
As you may know that Google Android has deprecated it support for Apache module i.e (HttpPost and HttpGet and HttpClient and many more class that has Apache module) since API level 22, Now the alternate way is to use JAVA’s HttpURLConnection Class.
This tutorial depicts the Android Registration form to deal with GET and POST data using HttpURLConnection class.
So then lets us start implementing a Registration form in android that stores data into MySQL phpmyadmin database using HttpURLConnection class.
Step 1: Creating a database in Phpmyadmin dashboard
if i say, I am making use of localhost to work with phpmyadmin MySQL service. you can use any of your hosting either webhosting which has phpmyadmin installed or your localhost that has WampServer installed.
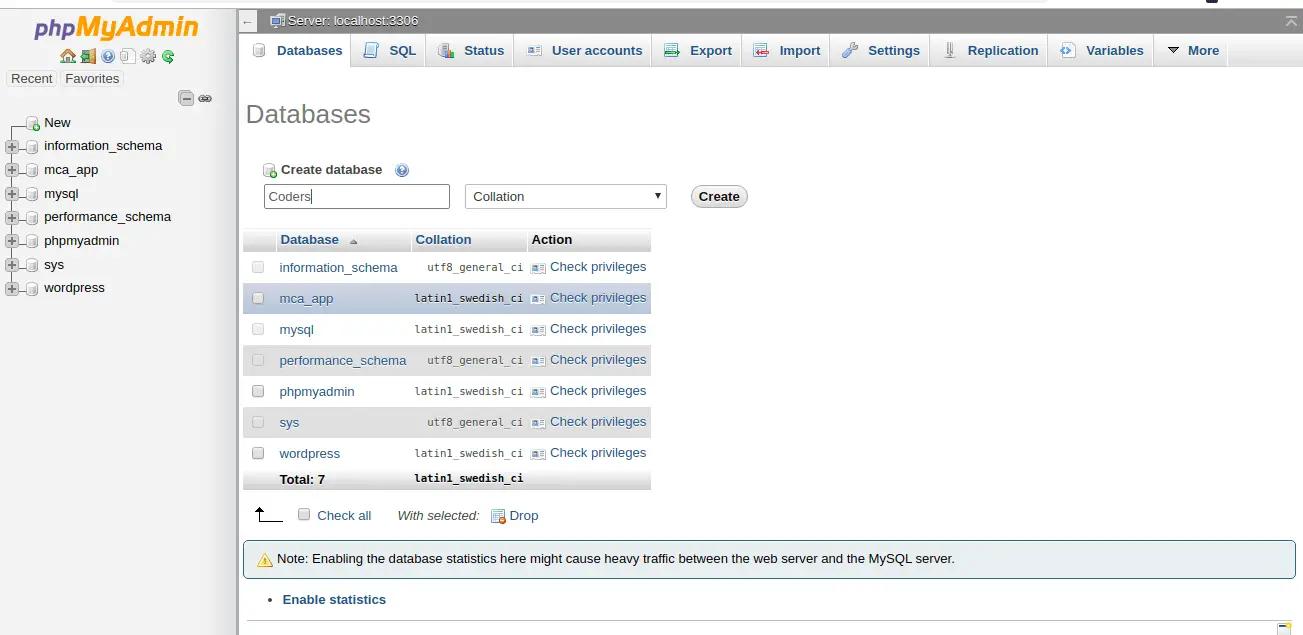
then, login into your phpmyadmin dashboard and and create a new Database,
I have created a database name Coders (just for this tutorial) you can specific any name for that database.
CREATE DATABASE databasename;
now, database is ready it time to create table names as register.
There are 2 ways for creating table in phpmyadmin
1st way
CREATE TABLE Coders (
    id int NOT NULL AUTO_INCREMENT,
    name varchar(20) NOT NULL,
    city varchar(20) NOT NULL,
    phone varchar(12) NOT NULL,
    CONSTRAINT Coders PRIMARY KEY (id)
);
2nd way
the second way for creating table is using phpmyadmin dashborad
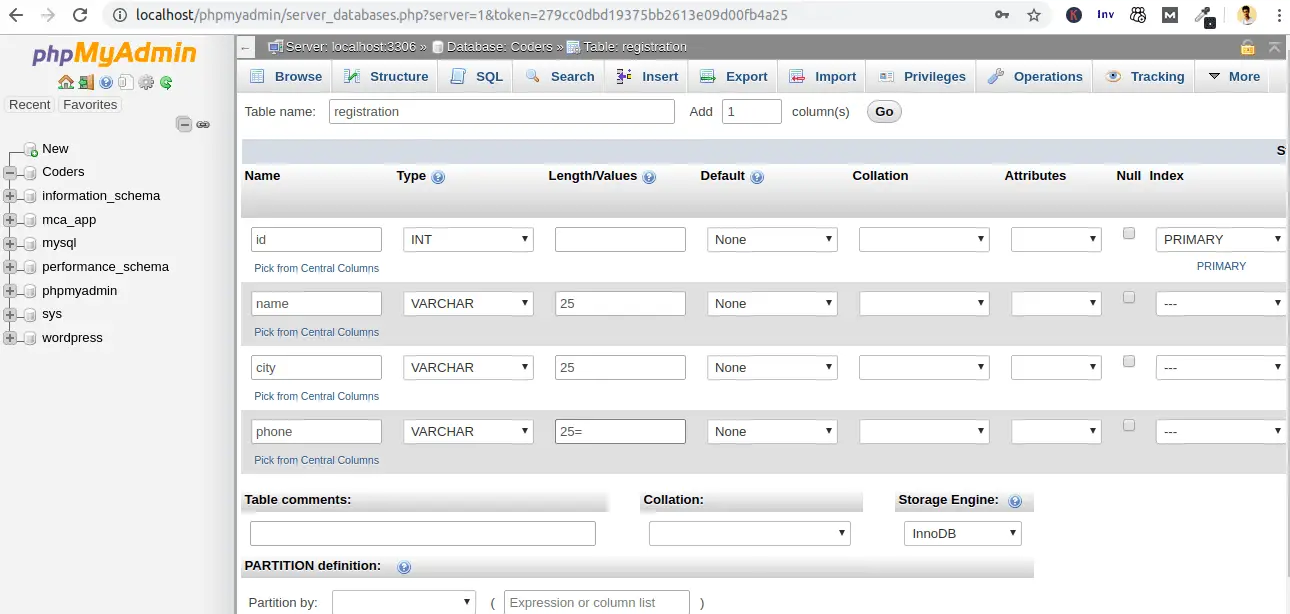
In Registration table i have for data entries where i can store data values
id: which is simple a integer value that simple store numbers that i have defined a auto increment and primary key value.
name: which stored name of the user.
city: holds place of the user.
phone: holds mobile number of the user.
All set on server side work.
Step 2 : Php code that handle storing data that if recieved from android app
conn.php
<?php
$db_name="Coders"; // database name
$mysql_username="replace with your login id";
$mysql_password="replace with your password";
$server_name="localhost";
$conn = mysqli_connect($server_name,$mysql_username,$mysql_password,$db_name);
if($conn)
{
  //echo "Connection Success";
}
else
{
  //echo "Connection Failed";

}
?>
Connection php page is user to get connected to phpmyadmin database
$db_name=”Coders”; // database name
$mysql_username=”replace with your login id”; username that you use to login in to phpmyadmin server
$mysql_password=”replace with your password”; password that you use to sign in.
$server_name=”localhost”; use localhost if you have phpmyadmin installed in you system or else use you doman name or IP address.
registration.php
<?php
    include('conn.php');
    if($_SERVER['REQUEST_METHOD'] == 'POST')
  {


  $fname=$_POST['name']; //data recieved from android app
  $city=$_POST['city'];
  $phone=$_POST['phone'];

  $query="select * from registration where phone='$phone'";

        $result=mysqli_query($conn,$query);
    if(mysqli_num_rows($result)>0)
    {
           while($row=mysqli_fetch_array($result))
          {
            echo trim("false");
          }
    }
        else
        {
          $query="insert into registration (name,city,phone) values ('$fname','$city','$phone');";
          mysqli_query($conn,$query);
          echo trim("true");
        }
  }
?>
registration php code page is use to get data from android code and send it to phpmyadmin to store that data recieved into database.
EG: $fname=$_POST[‘name’]; : data will be recieved from android application to php code
insert query : insertion query will be run to store the recieved data in database.
Step 3 : android studio implementing httpURLConnection class
This Android Php project contains two android activities, MainActivity.java and SuccessActivity.java.
MainActivity is actual Registration form where you can register himself using name,city and phone number and a submit button when clicked the user get registered
SuccessActivity is a plain activity form which simple show a success message of the user screen when the registration is been successfully done.
Designing app UI using XML code
activity_main.xml
<?xml version="1.0" encoding="utf-8"?>
<LinearLayout xmlns:android="http://schemas.android.com/apk/res/android"
    xmlns:app="http://schemas.android.com/apk/res-auto"
    xmlns:tools="http://schemas.android.com/tools"
    android:layout_width="match_parent"
    android:layout_height="match_parent"
    tools:context=".MainActivity"
    android:orientation="vertical"
    android:layout_gravity="center_horizontal"
    android:gravity="center_horizontal"
    android:layout_margin="10dp">

    <TextView
        android:layout_width="wrap_content"
        android:layout_height="wrap_content"
        android:text="Proto Coders Point"
        android:textSize="25sp"
        android:textColor="#0057FF"
        app:layout_constraintBottom_toBottomOf="parent"
        app:layout_constraintLeft_toLeftOf="parent"
        app:layout_constraintRight_toRightOf="parent"
        app:layout_constraintTop_toTopOf="parent" />

    <TextView
        android:layout_width="wrap_content"
        android:layout_height="wrap_content"
        android:text="Registration Form" />

    <EditText
        android:id="@+id/name"
        android:layout_width="match_parent"
        android:layout_height="wrap_content"
        android:ems="10"
        android:layout_marginTop="10dp"
        android:inputType="textPersonName"
        android:hint="NAME" />

    <EditText
        android:id="@+id/city"
        android:layout_width="match_parent"
        android:layout_height="wrap_content"
        android:ems="10"
        android:layout_marginTop="10dp"

        android:inputType="textPersonName"
        android:hint="CITY" />

    <EditText
        android:id="@+id/phone"
        android:layout_width="match_parent"
        android:layout_height="wrap_content"
        android:ems="10"
        android:layout_marginTop="10dp"
        android:inputType="textPersonName"
        android:hint="PHONE" />

    <Button
        android:id="@+id/submit"
        android:background="#6F9AF8"
        android:textColor="#FFF"
        android:layout_width="match_parent"
        android:layout_height="wrap_content"
        android:layout_marginTop="10dp"
        android:text="SUBMIT" />


</LinearLayout>
Java Code to Run the data transfer process
Snippet code of how to use HttpURLConnection class in andoid
try {
                // Setup HttpURLConnection class to send and receive data from php and mysql
                conn = (HttpURLConnection)url.openConnection();
                conn.setReadTimeout(READ_TIMEOUT);
                conn.setConnectTimeout(CONNECTION_TIMEOUT);
                conn.setRequestMethod("POST");

                // setDoInput and setDoOutput method depict handling of both send and receive
                conn.setDoInput(true);
                conn.setDoOutput(true);

                // Append parameters to URL
                Uri.Builder builder = new Uri.Builder()
                        .appendQueryParameter("username", params[0])
                        .appendQueryParameter("password", params[1]);
                String query = builder.build().getEncodedQuery();

                // Open connection for sending data
                OutputStream os = conn.getOutputStream();
                BufferedWriter writer = new BufferedWriter(
                        new OutputStreamWriter(os, "UTF-8"));
                writer.write(query);
                writer.flush();
                writer.close();
                os.close();
                conn.connect();

            } catch (IOException e1) {
                // TODO Auto-generated catch block
                e1.printStackTrace();
                return "exception";
            }
MainActivity.java
The complete java code is below
package protocoderspoint.com.localhostphpmyadmin;

import androidx.appcompat.app.AppCompatActivity;

import android.app.ProgressDialog;
import android.content.Intent;
import android.net.Uri;
import android.os.AsyncTask;
import android.os.Bundle;
import android.util.Log;
import android.view.View;
import android.widget.Button;
import android.widget.EditText;
import android.widget.Toast;

import org.apache.http.client.ClientProtocolException;

import java.io.BufferedReader;
import java.io.BufferedWriter;
import java.io.IOException;
import java.io.InputStream;
import java.io.InputStreamReader;
import java.io.OutputStream;
import java.io.OutputStreamWriter;
import java.net.HttpURLConnection;
import java.net.URL;

public class MainActivity extends AppCompatActivity {

    Button Submit;
    EditText name,city,phone;
    ProgressDialog pdDialog;
    String URL_REGISTER="http://192.168.0.10/protocoderspoint/register.php";
    String sname,scity,sphone;
    String URL_RESPONSE="";

    HttpURLConnection conn;
    URL url = null;
    @Override
    protected void onCreate(Bundle savedInstanceState) {
        super.onCreate(savedInstanceState);
        setContentView(R.layout.activity_main);

        name=(EditText)findViewById(R.id.name);
        city=(EditText)findViewById(R.id.city);
        phone=(EditText)findViewById(R.id.phone);

        Submit=(Button)findViewById(R.id.submit);

        Submit.setOnClickListener(new View.OnClickListener() {
            @Override
            public void onClick(View v) {
                 sname = name.getText().toString();
                 scity = city.getText().toString();
                 sphone=phone.getText().toString();

                Log.d("text",sname+scity+sphone);

               new user_register().execute();
            }
        });
    }

    public class user_register extends AsyncTask<Void, Void, String> {

        @Override
        protected  void onPreExecute() {

            super.onPreExecute();
            pdDialog = new ProgressDialog(MainActivity.this);
            pdDialog.setMessage("Registering user Please Wait..");
            pdDialog.setCancelable(false);
            pdDialog.show();

        }

        @Override
        protected String doInBackground(Void... arg0) {
           try {
                URL url = new URL(URL_REGISTER);

                conn = (HttpURLConnection)url.openConnection();
                conn.setReadTimeout(15000);
                conn.setConnectTimeout(10000);
                conn.setRequestMethod("POST");

                conn.setDoInput(true);
                conn.setDoOutput(true);


                System.out.println("name:"+sname);
                System.out.println("city:"+scity);
                System.out.println("phone:"+sphone);

                // Append parameters to URL
                Uri.Builder builder = new Uri.Builder()
                        .appendQueryParameter("name", sname)
                        .appendQueryParameter("city", scity)
                        .appendQueryParameter("phone",sphone);
                String query = builder.build().getEncodedQuery();

               // Open connection for sending data
                OutputStream os = conn.getOutputStream();
                BufferedWriter writer = new BufferedWriter(
                        new OutputStreamWriter(os, "UTF-8"));
                writer.write(query);
                writer.flush();
                writer.close();
                os.close();
                conn.connect();

                int response_code = conn.getResponseCode();

                // Check if successful connection made
                if (response_code == HttpURLConnection.HTTP_OK) {

                    // Read data sent from server
                    InputStream input = conn.getInputStream();
                    BufferedReader reader = new BufferedReader(new InputStreamReader(input));
                    StringBuilder result = new StringBuilder();
                    String line;

                    while ((line = reader.readLine()) != null) {
                        result.append(line);
                    }

                    // Pass data to onPostExecute method
                    return(result.toString());

                }else{

                    return("unsuccessful");
                }


            }
            catch (ClientProtocolException e)
            {

                Log.d("BLOOD","IOE response " + e.toString());
                // TODO Auto-generated catch block
                URL_RESPONSE="ERROR";
            }
            catch (IOException e)
            {

                Log.d("BLOOD","IOE response " + e.toString());
                // TODO Aut return 0
                URL_RESPONSE="ERROR";
            }

            return null;
        }

        @Override
        protected void onPostExecute(String result) {
            super.onPostExecute(result);
            if (pdDialog.isShowing())
                pdDialog.dismiss();

            String trim_result=result.trim();


            Toast.makeText(MainActivity.this, result.trim(), Toast.LENGTH_LONG).show();

            if(trim_result.equalsIgnoreCase("true"))
            {
                /* Here launching another activity when login successful. If you persist login state
                use sharedPreferences of Android. and logout button to clear sharedPreferences.
                 */

                Intent intent = new Intent(MainActivity.this,SuccessActivity.class);
                startActivity(intent);
                MainActivity.this.finish();

            }else if (result.equalsIgnoreCase("false")){

                // If username and password does not match display a error message
                Toast.makeText(MainActivity.this, "Invalid email or password", Toast.LENGTH_LONG).show();

            } else if (result.equalsIgnoreCase("exception") || result.equalsIgnoreCase("unsuccessful")) {

                Toast.makeText(MainActivity.this, "OOPs! Something went wrong. Connection Problem.", Toast.LENGTH_LONG).show();

            }
        }

        }

    }
- On Submit Button pressed user_register function trigged.
- user_register that extends AsyncTask, Asynctask is very useful when it comes to handing any process that runs of background.
- onPreExecute(): used to show progressDialog on the screen.
- doInBackground(): The sending and recieving data from android registration app and to php file using HttpURLConnection class.
- onPostExecute(): this will get execute as soon as doInBackground() task gets completed, here we just disable progressDialog box and and get response from server in teams of true or false, which means registration is successful or unsuccessful.
Then,now the App will successfully run on android 7 and below but when it comes to run on android 8 and above you may face error like:
Error 1 : D/NetworkSecurityConfig: No Network Security Config specified, using platform default
Error 2 : IOE response java.io.IOException: Cleartext HTTP traffic to 192.168.0.10 not permitted
Then to solve this problem you need to do this
Create file res/xml/network_security_config.xml –
<?xml version="1.0" encoding="utf-8"?>
<network-security-config>
    <domain-config cleartextTrafficPermitted="true">
        <domain includeSubdomains="true">192.168.0.10</domain>
    </domain-config>
</network-security-config>
if you are using localhost replace domain IP with your IP address or your domain name
AndroidManifest.xml –
<application
        ...
        android:networkSecurityConfig="@xml/network_security_config"
        ...>
        ...

</application>
Don’t forget Internet Permission in androidmanifest.xml file.
Then, all set your app is ready to execute
that Store data in to Phpmyadmin database server.
")


