Home Blog

Ways to Iterate through object JavaScript – Object Iteration

0
iterate through object javascript
iterate over object javascript

Objects in JavaScript are data stored in string type that are stored as key-value pair. One of the important concept working with objects is iterations, Iteration in other words is traversing through the properties of object. In this JS article let’s checkout different ways to iterate through object in javascript.

referral Object

const person = {
    firstName: "John",
    lastName: "Doe",
    age: 30,
    email: "john.doe@example.com",
    address: {
        street: "123 Main St",
        city: "Anytown",
        state: "CA",
        zipCode: "12345"
    },
    hobbies: ["reading", "traveling", "gardening"],
    isActive: true
};

JavaScript Methods to Iterate an Object

1. for…in Loop:

The for...in, javascript loop through object goes through all the enumerable elements/properties of an object, and also those that are inherited from its prototype chain.

for (let key in obj) {
    console.log(key, obj[key]);
}

result:

firstName: John
lastName: Doe
age: 30
email: john.doe@example.com
address: [object Object]
hobbies: reading,traveling,gardening
isActive: true

2. Object.keys() Method

The Object.keys() method returns all the keys items in an array.

const keys = Object.keys(person);
console.log(keys);

result

[
  'firstName',
  'lastName',
  'age',
  'email',
  'address',
  'hobbies',
  'isActive'
]

3. Object.values() Method

The Object.values() method returns all the values items in an array.

const values = Object.values(obj);
values.forEach(value => {
    console.log(value);
});

result

[
  'John',
  'Doe',
  30,
  'john.doe@example.com',
  {
    street: '123 Main St',
    city: 'Anytown',
    state: 'CA',
    zipCode: '12345'
  },
  [ 'reading', 'traveling', 'gardening' ],
  true
]

4. Object.entries() Method

The Object.entries() method returns a new array which contains all the value in key-value pairs in a form of array, example below.

const entries = Object.entries(person);
console.log(entries);

result:

[
  [ 'firstName', 'John' ],
  [ 'lastName', 'Doe' ],
  [ 'age', 30 ],
  [ 'email', 'john.doe@example.com' ],
  [
    'address',
    {
      street: '123 Main St',
      city: 'Anytown',
      state: 'CA',
      zipCode: '12345'
    }
  ],
  [ 'hobbies', [ 'reading', 'traveling', 'gardening' ] ],
  [ 'isActive', true ]
]

Note:

In JavaScript the order of iteration is not guaranteed in JS Object.

The loops methods like for...in can loop only enumerable properties but not non-enumerable properties in object. If you want to iterate object properties that are non-enumerable then you need to used methods like Object.getOwnPropertyName or Reflect.ownKeys().

Flutter Dart `then` vs `whenComplete` vs `catchError`

0
flutter dart then vs whenComplete vs catchError

Hi Guy’s, Welcome to Proto Coders Point, In this Flutter Article let’s then whenComplete and catchError in Flutter Dart.

In Flutter/Dart Programming language, We make use of then, whenComplete, and catchError methods are used with Futures to handle asynchronous task operation in flutter dart.

1. then : Used to handle the success completion of a Future and then access the result.
.then() only works if the Future task like fetching data from server is success (without any errors).

2. whenComplete : Used to execute a callback function whenever the Future completes, regardless of success or error. Means even if there is any error whenComplete will get executed. It’s similar to finally this is like default result.

3. catchError: Used to handles error caught while fetching Future result or Future logic has some error in it.

Code Example to demonstrate then,whenComplete and catchError with Future in Dart:

import 'dart:async';

void main() {

  // Example Future that resolves after 2 seconds
  Future<String> fetchData() {
    return Future.delayed(Duration(seconds: 2), () => "Data fetched successfully");
  }

  // Example Future that throws an error after 3 seconds
  Future<String> simulateError() {
    return Future.delayed(Duration(seconds: 3), () => throw Exception("Error occurred"));
  }

  // Using then to handle successful completion
  fetchData().then((data) {
    print("Data: $data");
  }).catchError((error) {
    print("Error fetching data: $error");
  });

  // Using whenComplete to execute code regardless of success or failure
  simulateError().then((data) {
    print("Data: $data");
  }).catchError((error) {
    print("Error fetching data: $error");
  }).whenComplete(() {
    print("Completed");
  });
}

OutPut

Data: Data fetched successfully
Error fetching data: Exception: Error occurred
Completed

Understanding JavaScript’s this Keyword with call() Method

0
This keyword in javascript, call() method example.

Hi Guy’s Welcome to Proto Coders Point, In this article let’s understand 'this' keyword in JavaScript and how it plays an important role in JavaScript.

The 'this' keyword is the context in which function it is defined. It is dynamically refers to object that is currently executing the function.

For better understanding let’s refer below code and learn how this keyword context works and how to make use of call() method in JavaScript that allows borrowing methods from one object to another.

Source Code

let obj1 = {
    firstName: "Rajat",
    lastName: "Palankar",
    fullName : function(){
        console.log(this.firstName + " " + this.lastName);
    }
}

let obj2 = {
    firstName: "Suraj",
    lastName: "Somanche",
}

obj1.fullName(); //"Rajat Palankar"

obj1.fullName.call(obj2); // "Suraj Somnache"

In Above JS Snippet Code, we have two objects, named obj1 and obj2, each of this object containing key/Value pair properties firstName and lastName. With this obj1 has an additional method called fullName which simply logs the full name by concatenating firstName and lastName.

Now, let’s check out how the this keyword operates in the context within this fullName method.

When fullName() is called on obj1 by doing something like: obj1.fullName(), here this context refers to the obj1 object itself. Thus, this.firstName will return us “Rajat” and this.lastName will return us “Palankar”, and concat it and print “Rajat Palankar” on screen.

But what if we want to reuse the fullName method that is defined in obj1 but this context should point to obj2 object? This is when we can make use of call() method in javascript.

The call() method allows us to invoke a function with a specific this context. Here’s how it works:

obj.fullName.call(obj2);

The line, obj.fullName refers to the fullName method of obj, and call(obj2) is used to invoke obj1 with obj2 as it’s this context. So, Now this context is refering to obj, In this way now, this.firstName inside the fullName function of obj1 is now refers to obj2.firstName and this.lastName refers to obj2.lastName. Consequently, “Suraj Somanche” is logged to the console.

Android Studio system requirements for laptop or PC (New)

0
Android Studio system requirements

Hi Guy’s Welcome to Proto Coders Point. In this Article let’s check System requirement to use Android Studio for building Mobile Applications.

As you know that Android Studio is most popular IDE developed by JetBrains & Google, Which was specially built for Developing Android Application but now is days is been used in all field like Mobile Application development, Desktop Application or Single Codebase application development using Flutter.

Android Studio is free to use in all the Operating System Like Windows, macOS, Linux and Chrome OS.

Below are System Requirements to run Android Studio Smoothly.

Windows System Requirement for Android Studio

Minimum system requirements:

  • OS: Windows 8/10/11 (64-bit)
  • CPU: 2nd generation Intel CPU (Sandy Bridge) or newer, AMD CPU with support for a Windows Hypervisor
  • Memory: 8 GB RAM
  • Free storage: 8 GB
  • Screen resolution: 1280 x 800

Recommended system requirements:

  • OS: Windows 10/11 64-bit
  • CPU: Intel Core i5-8400 3.0 GHz or better
  • Memory: 16 GB RAM
  • Free storage: 30 GB (SSD is strongly recommended)
  • Screen resolution: 1920 x 1080

MacOS System Requirement for Android Studio

Minimum system requirements:

  • OS: macOS 10.14 (Mojave) or newer
  • CPU: ARM-based chips, or 2nd generation Intel Core or newer with support for Hypervisor.Framework
  • Memory: 8 GB RAM
  • Free storage: 8 GB
  • Screen resolution: 1280 x 800

Recommended specifications:

  • OS: macOS 10.15 (Catalina)
  • CPU: Intel Core i5-8400 3.0 GHz or better
  • Memory: 8 GB RAM
  • Free storage: 30 GB (SSD is strongly recommended)
  • Screen resolution: 1920 x 1080

Linux System Requirement for Android Studio

Minimum system requirements:

  • OS: Any 64-bit Linux distribution that supports Gnome, KDE, or Unity DE
  • CPU: x86_64 CPU architecture; 2nd generation Intel Core or newer, or AMD processor with support for AMD Virtualization (AMD-V) and SSSE3
  • Memory: 8 GB RAM
  • Free storage: 8 GB
  • Screen resolution: 1280 x 800
  • GNU C Library (glibc) 2.19 or later

Recommend system requirements:

  • OS: Any 64-bit Linux distribution that supports Gnome, KDE, or Unity DE
  • CPU: Intel Core i5-8400 or better
  • Memory: 8 GB
  • Free storage: 20 GB SSD
  • Free resolution: 1920 x 1080
  • GNU C Library (glibc) 2.19 or later

Chrome OS System Requirement for Android Studio

Minimum system requirements:

  • CPU: Intel i5 or higher (U series or higher) recommended
  • Memory: 8 GB
  • Free storage: 8 GB
  • Screen resolution: 1280 x 800

Android Studio system requirements – Conclusion

When you start Android Studio the CPU power is used the max and if your CPU is less then i3 process it may get utilized fully and can get overloaded. Therefore, It is recommended to use at least Intel Core i5-8400 or Higher for smooth running of android studio and mobile device emulator. For better smooth experience I suggest you to install android studio in SSD.

Multiple Listview in Flutter

0
multiple listview in flutter

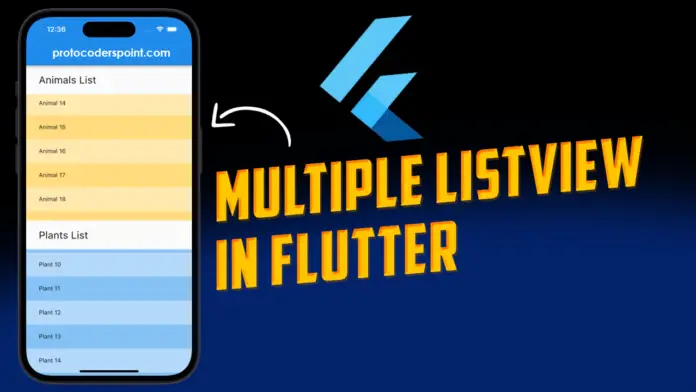
Hi Guy’s Welcome to Proto Coders Point. In this Flutter Tutorial will learn How to display Multiple ListViews in Flutter in a single screen where the user can interact with both the list at once.

Video Tutorial

Source Code

import 'package:flutter/cupertino.dart';
import 'package:flutter/material.dart';
import 'package:flutter/widgets.dart';

void main() {
  runApp(const MyApp());
}

class MyApp extends StatelessWidget {
  const MyApp({super.key});

  // This widget is the root of your application.
  @override
  Widget build(BuildContext context) {
    return MaterialApp(
      debugShowCheckedModeBanner: false,
      title: 'Flutter Demo',
      theme: ThemeData(
        colorScheme: ColorScheme.fromSeed(seedColor: Colors.deepPurple),
        useMaterial3: true,
      ),
      home: const MyHomePage(),
    );
  }
}

class MyHomePage extends StatefulWidget {
  const MyHomePage({super.key});

  @override
  State<MyHomePage> createState() => _MyHomePageState();
}

class _MyHomePageState extends State<MyHomePage> {
  final fruits = List.generate(100, (index) => "Fruit $index");
  final veg = List.generate(100, (index) => "Veg $index");

  @override
  Widget build(BuildContext context) {
    return Scaffold(
      body: Column(
        crossAxisAlignment: CrossAxisAlignment.start,
        children: [
          Container(
            width: MediaQuery.of(context).size.width,
            padding: EdgeInsets.symmetric(vertical: 10, horizontal: 20),
            child: Text(
              "Fruits",
              style: TextStyle(fontSize: 18),
            ),
            color: Colors.blueAccent,
          ),
          Expanded(
            child: ListView.builder(
                itemCount: fruits.length,
                itemBuilder: (context, index) {
                  return Container(
                    child: ListTile(
                      title: Text(fruits[index]),
                    ),
                  );
                }),
          ),
          Container(
            width: MediaQuery.of(context).size.width,
            padding: EdgeInsets.symmetric(vertical: 10, horizontal: 20),
            child: Text(
              "Veg",
              style: TextStyle(fontSize: 18, color: Colors.white),
            ),
            color: Colors.black,
          ),
          Expanded(
            child: ListView.builder(
                itemCount: veg.length,
                itemBuilder: (context, index) {
                  return ListTile(
                    title: Text(veg[index]),
                  );
                }),
          )
        ],
      ),
    );
  }
}

Code Explanation

I have generated a list of data that I want to display in listview.

final fruits = List.generate(100, (index) => "Fruit $index");
final veg = List.generate(100, (index) => "Veg $index");

In above snippet code, I have created 2 dummy list of data by using List.generator and I want to display both the list of data into once screen itself, so that user can easily interact with both of then on single screen.

Then, To display multiple widgets we make use of Column widget to arrange it’s children vertically. In Column widget we place 2 section: one to display fruits and another to display list of vegetables for this we make use of ListView.builder.

Each ListView.builder is configured with an itemCount property to determine the number of items in the list.

The itemBuilder property defines a callback function that returns a widget for each item in the list.

In the provided code, ListTile widgets are used as list items, displaying text based on the content of fruits and veg lists.

Event Loops in JavaScript with code example | NodeJS

0
What is Event Loop With Code Example

Hi Guy’s Welcome to Proto Coders Point. In this article let’s learn about Event Loop in JavaScript with code example.

What is Event Loop?

As you know that JavaScript works on a single threads, It can execute only one task at a time, But when building application using JS at backend, We can execute multiple tasks at a same time, like instance, Listening for events, and timeout etc.

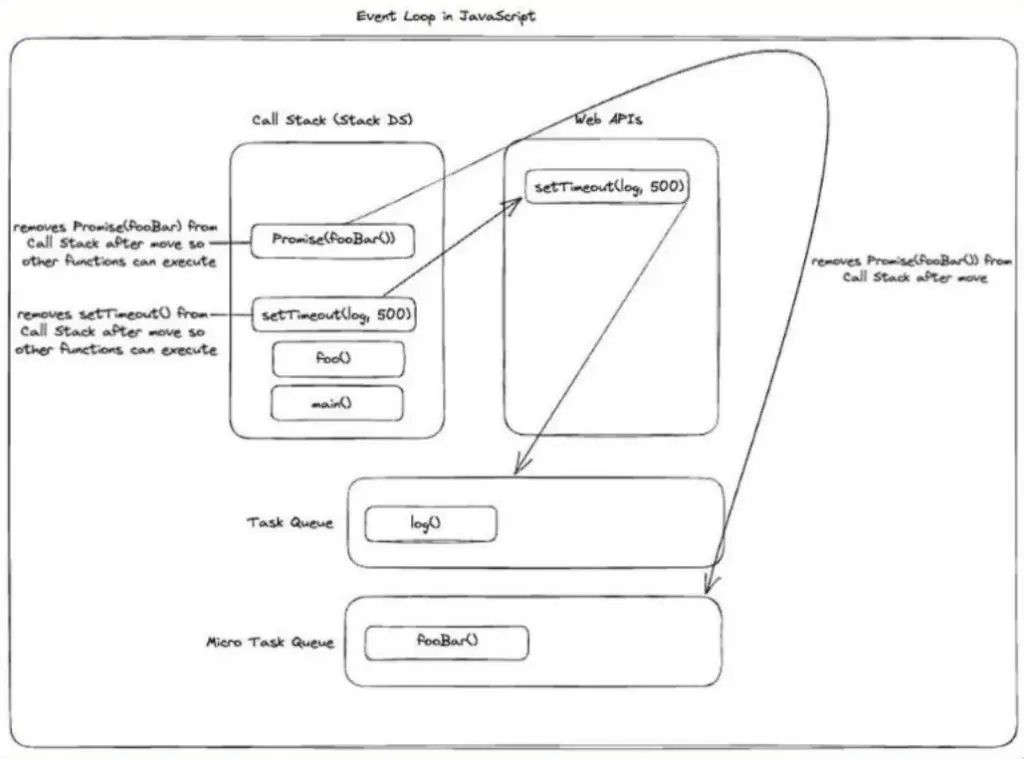
To handle multiple event or calculation JavaScript make use of event loop. It is a concurrency model that has four major component. i.e. Call Stack, Web API’s, Task Queue and Micro Task Queue.

javascript event loop

Component’s of JavaScript Event Loops

1. Call Stack: A Stack Data Structure (LIFO) Last In First Out Stack Model, that is used for keeping track of current execution function calls.

2. Web API’s: When any API event like setTimeout or DOM manipulation function gets into the call Stack, They are moved to separate bucket known as Web API’s. Once the API execution is completed is is poped from the Call Stack so that Call Stack can execute next.

3. Task Queue: When the setTimeout() delay finishes, The Web API moves the timeout to the Task Queue. Then the Task Queue will wait for the Call Stack to get empty. Once it gets empty, It will remove the first task from the queue & moves it on the Call Stack to execute that code.

4. Micro Task Queue: This is Another Queueing system, Micro Task Queue has Higher Priority than Task Queue but it holds promises instead of Web API’s. It Follow the same principle of pushing task into Call Stack when Call Stack is empty.

Event loop in javascript example or In NodeJS

Here is a example on event loop in JavaScript:

Code:

// Define a function that simulates an asynchronous task

function simulateAsyncTask(taskName, duration) {
  console.log(`${taskName} started`);
  setTimeout(() => {
    console.log(`${taskName} completed after ${duration} milliseconds`);
  }, duration);
}

// Simulate two asynchronous tasks

simulateAsyncTask("Task 1", 2000);
simulateAsyncTask("Task 2", 1000);

console.log("Main program continues executing...");

Event Loop Code Explanation:

We have created a function by name simulateAsyncTask which accepts two parameters: taskName (a string representing the name of the task) and duration (the duration of the task in milliseconds).

Then simulateAsyncTask, we firstly print/log that the task has started, then use setTimeout to simulate an asynchronous operation and then pass the timeout duration to complete it. Once the timeout elapses, we print/ log that the task has completed.

We simulate two asynchronous tasks: “Task 1” with a duration of 2000 milliseconds i.e. 2 seconds & “Task 2” with a duration of 1000 milliseconds i.e. 1 second.

After starting the asynchronous tasks, we have simply made use of console.log that print msg on the screen “Main program continues executing…”.

When you run this code, you’ll notice that “Main program continues executing…” is logged immediately, before the asynchronous tasks complete. This demonstrates the non-blocking nature of asynchronous JavaScript code and the event loop in action. The event loop manages the execution of asynchronous tasks, allowing the main program to continue executing while waiting for tasks to complete.