Home Blog Page 15

Integrate Facebook ads in Flutter

0
Facebook Ads In Flutter
How to add facebook ads in flutter app

This article will show you , how to quickly make money from your Flutter application using Facebook ads.

By incorporating Facebook ads into their Flutter apps developers can monetize their work by displaying Facebook ads inside of them. To ensure that the ads are appearing as intended.it is necessary to create a Facebook Ads account, configure the Facebook SDK, add the Facebook Audience Network plugin, initialise the Facebook Audience Network SDK, create an ad widget using the FacebookBannerAd widget and run the app. Developers can easily integrate Facebook ads into their Flutter apps using these steps to start making money. This article will show you how to quickly monetize your Flutter application using Facebook ads.

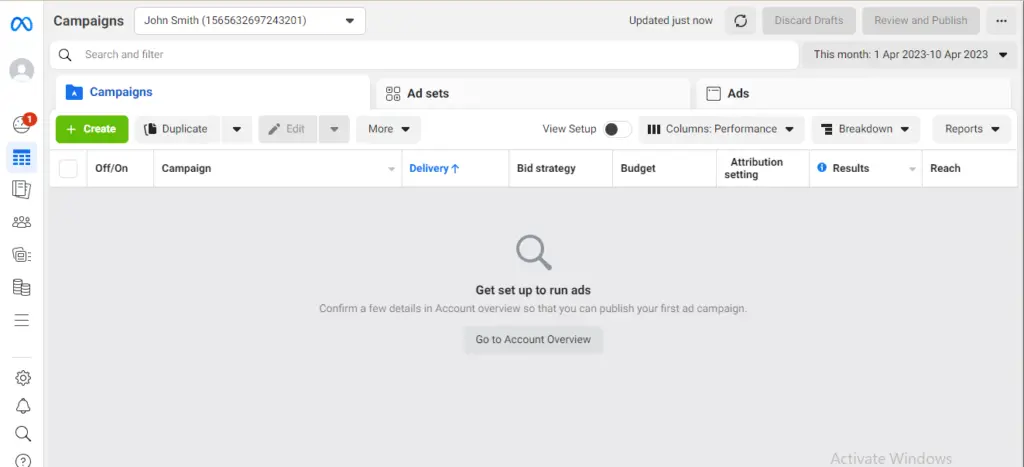
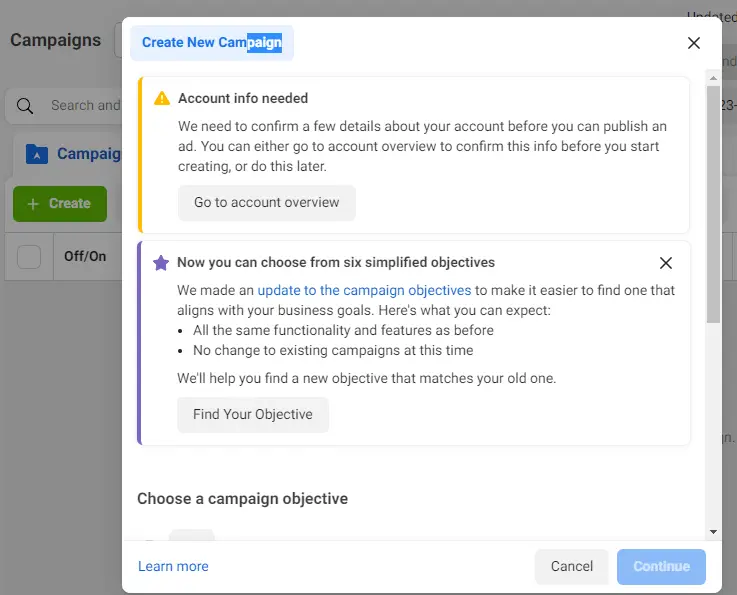
Create an App in facebook console

The app development flow gets the bare minimum of data required to create an exclusive ID for your app. After completing the flow, you will arrive at the App Dashboard where you can either continue designing and testing your app or add more details about it.

Starting…..

Your Facebook developer account must be active

Launch the app development process.

1) : Click the “Get Started” button in the upper right corner of the page while you are on the Facebook for Developers website.

2) : You’ll need to open a Facebook account if you don’t already have one. Use your login information to access your account if you have one.

Step 1) : Creating Facebook Application & get APP name & App ID

To create Facebook App Id & App name, you can follow these steps.

A) : Open https://developers.facebook.com and create your application and you have to show like this type page
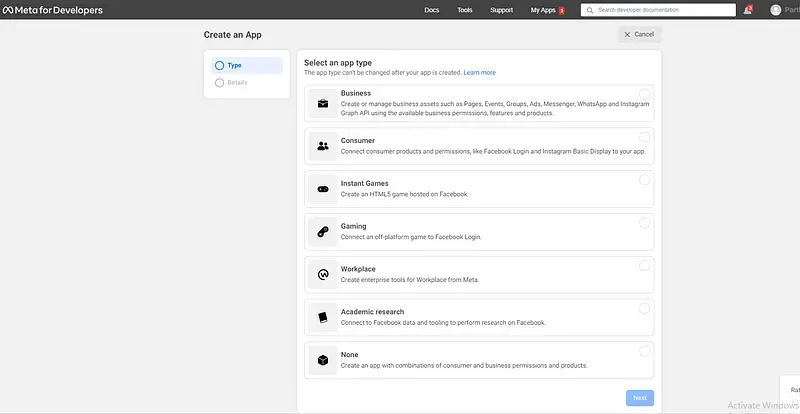
Create an app

Choose your app type , the recommended option here is Consumer. Then click on Next,.

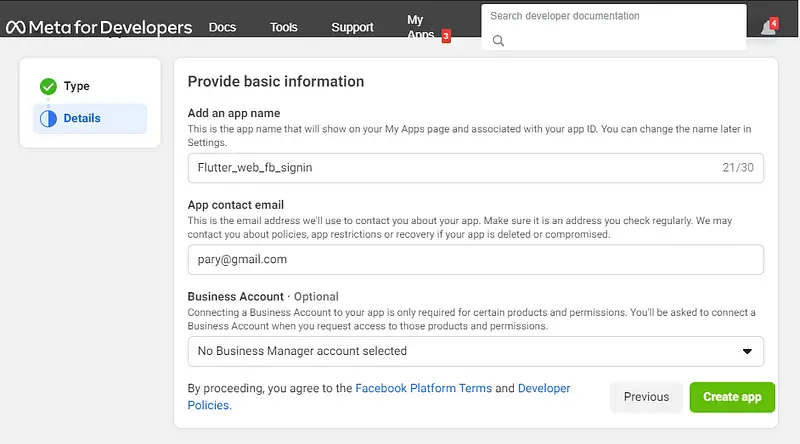
Fill in the appName and email address here then choose Create app.

B): After you’ve finished creating the application .begin adding the Facebook Login project.

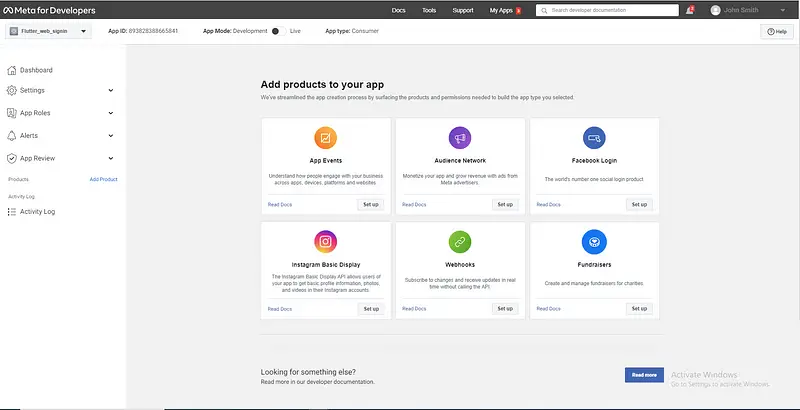
In this step select the Facebook login option and click on the Setup button. Your app ID which you can use in your Facebook ads, is located here. You’ll need this ID later so , make a note of it.

Step2 🙂 Once you have created your application click the “Set Up” button and choose “Audience Network” from  list of possibilities.

Your app ID which you can use in your Facebook ads is located here.

i)Visit Facebook Ads Manager at  https://www.facebook.com/adsmanager/ and log in to your account to get placement ID.

ii) first selecting platform then decide on the purpose of your advertisement. such as Audience Network, Facebook, Instagram etc….

iii) To create an advertisement

iv) When deciding on the platform you want to use decide what your advertisement will be used for.

v) You will be given a placement ID after choosing the placement. which you can use in your Facebook advertisements. You’ll need this ID later so make note of it.

You should able to register an app in the Facebook console and get an app ID and placement ID by following the instructions and visible screenshots provided here. Let me know if you have any other inquiries.

The steps below can be used to add Facebook Ads to a Flutter app:

You should be able to register an app in the Facebook console and get an app ID and placement ID by following the instructions and visible screenshots provided here. 

The steps below can be used to add Facebook Ads to a Flutter app:

Step 1) : Set up an app in the Facebook Developer Dashboard after creating a Facebook Developer account.

Step 2) : Your Flutter app should now include the Facebook Ads SDK. This is accomplished by including the following dependencies in your pubspec.yaml file:

dependencies:
  flutter_facebook_ads: ^any

Step 3) : Packages can be installed using the command line:

flutter pub get

Step 4) : Import file

import 'package:facebook_audience_network/facebook_audience_network.dart';

We will use testing project id and placement id to display different ads, such as banner ads and interstitial ads. To obtain a real project id, we must submit our application to Facebook for review. Once they approve, we receive project id, and we can then create placement id in accordance with our needs.

Step 5) :Install Facebook Ads SDK into your app . You can do by adding the following code your main method :

void main() {
  FacebookAds.instance.initialize(
    appId: 'your_app_id',
  );
  runApp(MyApp());
}

Types of Facebook Mobile Ads

Adding Banner Ad In Flutter App

In an app’s layout, banner ads take up space at the top or bottom of the device screen. They remain visible while users use the app and can automatically refresh after a set amount of time.

FacebookBannerAd(
       bannerSize: BannerSize.LARGE,
       keepAlive: true,
       placementId: "Your Placement ID",
     ),

Adding an Interstitial Ad

Interstitial advertisements are interactive, full-screen advertisements that hide the host app or website’s interface. These advertisements are placed at natural transition points or breaks, such as in between activities or game levels, because they appear between content.

We must first create a method to call the interstitial ad in order to add an interstitial ad to your Flutter project. If the advertisement loads successfully, the user will see it.

 FacebookInterstitialAd.loadInterstitialAd(
    placementId: "Your Placement Id",
    listener: (result, value) {
      if (result == InterstitialAdResult.LOADED)
        FacebookInterstitialAd.showInterstitialAd(delay: 2000);
    },
  );

Reward ad

Users who view Facebook reward ads receive virtual currency or other in-app rewards in exchange for watching a video ad. These advertisements are made to encourage user interaction with advertising in way that is advantageous to both the advertiser and the user.

Using the Facebook Ads SDK, you can incorporate Facebook reward ads into a Flutter application. The procedure involves loading a paid video ad, initializing the Facebook Ads SDK in your app, and presenting it to the user. The specified virtual currency or another in-app reward is given to the user after they watch the advertisement.

 _rewardedVideoAd = RewardedVideoAd(
      placementId: 'your_placement_id',
      listener: (result, value) {
        print('Rewarded Video Ad $result => $value');
        if (result == RewardedVideoAdResult.rewarded) {
          // reward user
        }
      },
    );
    _rewardedVideoAd.load();
onPressed: () {
            if (_rewardedVideoAd.isLoaded) {
              _rewardedVideoAd.show();
            }
          },

Your_placement_id should be replaced with the Placement ID you obtained from the Facebook Developer Dashboard.

The entire implementation is contained in this GitHub repository.

link here : 


Conclusion

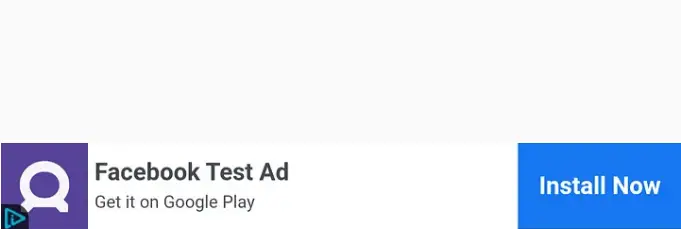
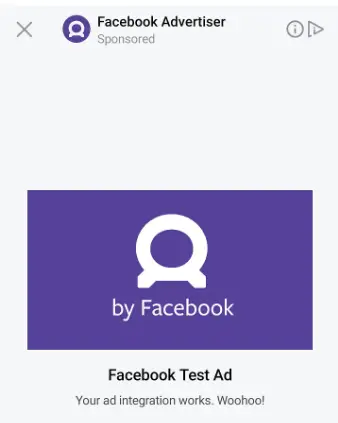
Try out your ads. To test your ads and make sure they are functioning properly, use Facebook’s Ad Manager or the Facebook Ads Helper tool.

I hope you found this Flutter facebook ads tutorial to be useful.

I’m done now! These instructions explain how to set up paid facebook ads in a Flutter app using the Facebook Ads SDK.

Thanks for reading this article…..

Have a good day…..

AR(Augmented Reality) in flutter

0
AR Core- Augmented Reliality in flutter
AR - Augmented Reliality in flutter

Augmented reality can be implemented in flutter applications using the stunning ARcore plugin. One of the recently introduced new technologies is this one With this plugin we’ll talk about the various features that the flutter plugin offers. so let’s get started.

In this tutorial, you’ll discover how to leverage augmented reality in Flutter to enhance the app’s user experience.

Augmented reality is used in mobile applications to enhance the user experience. Customers may see items in front of them thanks to the usage of several mobile apps for product display.

An augmented reality app is a piece of software that incorporates digital visual content—occasionally audio and other kinds as well—into the user’s physical environment.

This technology is mainly focused on this two tasks : 

1)detecting the position of the mobile device as it travels and creating 

2)real-world understanding,according to Google’s description on ARCore.

You must take the following actions in Android Studio in order to make 

Activate AR & set up


Activate AR & set up

You must take the following actions in Android Studio in order to make 

ARCore functionality available:-

Step 1):  Add entries to the manifest that are AR Required or AR Optional.

AR Required : 

<uses-permission android:name="android.permission.CAMERA" />
<uses-feature android:name="android.hardware.camera.ar" />
<application …>
   <meta-data android:name="com.google.ar.core" android:value="required" />
</application>

AR Optional :

<uses-permission android:name="android.permission.CAMERA" />
<uses-sdk android:minSdkVersion="14" />
<application>
    <meta-data android:name="com.google.ar.core" android:value="optional" />
</application>

Step 2): the following to build.gradle

allprojects {
   repositories {
       google()
}
}

dependencies {
 implementation 'com.google.ar:core:1.16.0'
}

Step 3): The following dependencies should be added to your app’s build.gradle file.

android {
    compileOptions {
        sourceCompatibility 1.8
        targetCompatibility 1.8 
}
dependencies {
    implementation 'com.google.ar.sceneform.ux:sceneform-ux:1.8.0'
    implementation 'com.google.ar.sceneform:core:1.8.0'
}

Following the steps listed below, we will integrate augmented reality into Flutter.

Step 1): Integrating the AR Core Plugin

Add the arcore_flutter_plugin package to your pubspec.yaml file:

arcore_flutter_plugin: ^any

For my project.. I am using this plugin.

Step 2):  Run the flutter packages and then package installed.

Step 3): In your Flutter application import the arcore_flutter_plugin package:

import 'package:arcore_flutter_plugin/arcore_flutter_plugin.dart';

ArCoreView

The ARview type is returned by this class, It contains two different types of views.

i)  AUGMENTEDFACE

ii) STANDARDVIEW


It contains 4 properties:

i) onArCoreViewCreated

ii) enableTapRecoginzer

iii) enableUpdateListener

iv) type

i) onArViewCreated

It accepts an ARObjectManageras a parameter. ARObjectManagerwill be covered in our later section.

ii) enableTapRecoginzer

Set to false at first. It is utilized by the MethodChannel as an argument.

iii) enableUpdateListener

Set to false at first. It is utilized by the MethodChannel as an argument.

iv) type

It is a view type; one of AUGMENTEDFACE, STANDARDVIEW is available. By default, it is set to STANDARDVIEW .


ArController

Using the addArNode, addArNodeWithAncher, and removeNode functions, this controller could add an ArNode, an ArNode with an anchor, and remove a node.

new augmented reality scene

You must include an ArView widget in your app in order to create a brand-new AR scene. The main interface for interacting with the ARCore platform is this widget. Here an illustration of how to make a fresh AR scene:

ArCoreController? arCoreController;

body : ArCoreView(
        onArCoreViewCreated: _onArCoreViewCreated,
      ),

 void _onArCoreViewCreated(ArCoreController controller) {
    arCoreController = controller;
  }


Step 5): Insert 3D models

Using the ArCoreReferenceNode widget, you can include 3D models in your AR scene. With the help of this widget, you can position and load 3D models into your scene. To add a 3D model to your scene, follow these steps:

ArCoreReferenceNode(
  name: "node name",
  objectUrl: "object value",
  position: Vector3(0, 0, -1),
  rotation: Vector3(0, 180, 0),
  scale: Vector3(0.2, 0.2, 0.2),
),

 Step 6): Control your AR experience.

ArCore can be used to manage an AR experience. With this controller, you can change the camera angle and add or remove nodes from the AR view, among other things. Below is an example of managing an AR experience.

void _onArCoreViewCreated(ArCoreController controller) {
  arCoreController = controller;

  // Move the camera to a new position
  arCoreController?.moveCamera(
    CameraUpdate.newPosition(
      Vector3(0, 0, -2),
    ),
  );
}

main.dart file

void main() async {
  WidgetsFlutterBinding.ensureInitialized();

  runApp(
    MyApp(),
  );
}

class MyApp extends StatelessWidget {
  const MyApp({super.key});

  @override
  Widget build(BuildContext context) {
    return MaterialApp(
      debugShowCheckedModeBanner: false,
      color: Colors.blue,
      title: "Ar implementation in flutter app",
      home: ArItemScreen(),
    );
  }
}

Create a dart file with name ar_item_screen and set this code

Scaffold(
        backgroundColor: Colors.white,
        appBar: AppBar(title: const Text("AR in flutter")),
        body: SafeArea(
          child: Padding(
            padding: const EdgeInsets.all(15),
            child: Container(
              height: 100,
              alignment: Alignment.center,
              padding: const EdgeInsets.only(left: 10, right: 10, top: 15),
              decoration: const BoxDecoration(
                color: Colors.blue,
                borderRadius: BorderRadius.only(
                    topRight: Radius.circular(30),
                    topLeft: Radius.circular(30)),
              ),
              child: GestureDetector(
                onTap: () {
                  Navigator.push(
                    context,
                    MaterialPageRoute(
                      builder: (context) => ARViewScreen(
                        itemImg: "assets/items/img_chair.jpg",
                        itemName: "Eula Modern Accent Dining Chair",
                      ),
                    ),
                  );
                },
                child: Row(
                  mainAxisAlignment: MainAxisAlignment.start,
                  children: <Widget>[
                    SizedBox(
                      width: 80,
                      height: 80,
                      child: Image.asset(
                        "assets/items/img_chair.jpg",
                        width: 60,
                      ),
                    ),
                    Padding(
                      padding: const EdgeInsets.only(left: 20.0),
                      child: Column(
                        crossAxisAlignment: CrossAxisAlignment.start,
                        children:  <Widget>[
                          Text(
                            "EDining Chair",
                            style: TextStyle(fontSize: 16, color: Colors.blue.shade900),
                          ),
                          Text(
                            "Eula Modern Accent Dining Chair",
                            style:
                                TextStyle(fontSize: 10, color: Colors.blue.shade900),
                          ),
                        ],
                      ),
                    ),
                     SizedBox(
                      width: 60,
                      child: Text(
                        "5,000",
                        style: TextStyle(fontSize: 14, color: Colors.blue.shade900),
                      ),
                    )
                  ],
                ),
              ),
            ),
          ),
        ));

Complete Source Code – AR Core – Augmented Reality in flutter

Click here to access this example app code……

https://github.com/kevalv001/ar_application.git

You can modify this code with your needs.


Conclusion..

Flutter offers a strong framework for creating augmented reality (AR) applications that work flawlessly on both Android and iOS devices. Developers can easily create immersive and interesting augmented reality (AR) experiences thanks to the combination of ARKit, ARCore, and Flutter.

Developers can quickly iterate and test their AR applications thanks to Flutter’s widget-based approach and hot-reload function. Flutter’s support for 2D and 3D graphics, animations, and interactivity also contributes to the development of rich and interesting AR experiences.

The development process is further streamlined by the availability of plugins and packages for incorporating AR functionality into Flutter applications. Developers can quickly access the AR capabilities of the underlying platform and incorporate them into their Flutter apps by using plugins like Apple’s ARKit Plugin and Google’s ARCore Plugin.

Thanks for reading this article 

Have such a wonderful day………..

Google maps integration in flutter

0
Google Maps In Flutter

This article walks you through the process of including a Google Map widget in your Flutter application step-by-step. Here is what you will construct today:

You can quickly and visually learn about the world by using a map. 

displaying their dimensions and distances between them. Locations around the world are shown. We can incorporate a map into our app using the Google Maps Flutter plugin. This add-on can connect to Google Maps servers display maps automatically and respond to user gestures. With its assistance we can also add markers to our map.

Why use Flutter with Google Maps?

Because Google Maps offers for both Android and iOS. It enables us to run code once gives them permission to do so for both device. The Google Map widget includes Google Maps Flutter plugin that supports initialCameraPosition, maptype, onMapCreated etc….. Anywhere on earth can be chosen as the location for the camera and marker. The marker can be made to our specifications. order to provide the zooming in Google Map view on the first page. it also includes zoom property in cameraposition.

Get started…..

Setup

1) : Visit console.cloud.google.com to access the Google Cloud Console.

Because you’ll need APIs to incorporate Google Maps in your app the first step is to create a project at Google Developers Console.

2) : Select “New Project” from the project dropdown menu in the top navigation bar.

3) : Give your project a name in the “New Project” dialogue box.

4) : You can optionally select a billing account to be linked to your project and enter an organization or folder to categorize it under. You must now set up a billing account if you don’t already have one.

5) : To begin creating your new project then click “Create” .

done  it!! Your new project utilize to be finished and accessible . Now that your project resources such as virtual -machines, databases  other services have been set up and configured. now  , you can start using them.


Activating the Maps API

The following steps must be taken in order to enable the Maps API in Google Cloud Platform:

1): Visit console.cloud.google.com to access the Google Cloud Console.

2): Select the project you want to enable the Maps API for by clicking on the project dropdown menu in the top navigation bar.

3): Click the hamburger menu in the top left corner of the Cloud Console, choose “APIs & Services” and then choose “Dashboard” from the dropdown menu.

4): Click the “+ ENABLE APIS AND SERVICES” button at the top of the page on the API & Services dashboard page.

5): In the search bar look for “Maps SDK for iOS” and ”Maps SDK for Android” click it to choose it.

6): Clicking on the ENABLE button , make the Maps SDK iOS and Maps SDK for Android APIs available on google platform .

google maps sdk for android

7): You will be taken to a page where you can create API credentials once the API has been enabled. To create an API key and set up the key’s settings, follow the on-screen instructions.

8): Finally, copy the API key and use it in your application to authenticate requests to the Maps t API.

Your application should now utilise the Maps API. Be aware that some APIs may require further configuration or billing setup before they can be used in flutter application .


API key creation and restriction

It’s important to remember that there is a cost associated with using the Google Map APIs. To lessen the likelihood of unauthorized use, you must therefore create a set of API keys for it and restrict its permissions. 
 Here I describe how to generate the keys.

1) : choose Credentials from menu on the left panel 

2): Select + CREATE CREDENTIALS option from menu .

3): select and use an API key in the flutter app for google map .

Generate API key 

I would strongly advise putting in place some restrictions after creating the API key . For instance if you only want to use an API key for a map only the Maps service should be able to use it.

Two categories of limitations exist:

1): You can specify which types of applications should have access to this key using application restrictions. (i.e., Android or iOS). To ensure that the key you created only works with that particular platform, choose the relevant option.

2): You can choose which services are accessible with this key thanks to API limitations. You would choose Maps API from the list if it were only for the map.


Google Maps is added to the Flutter app (Android)
Obtaining an API key for both iOS and Android is the following step. Once you have your API key enter it as follows in the AndroidManifest.xml file (android/app/src/main/AndroidManifest.xml) of your Flutter app:

<manifest ...
  <application ...
    <meta-data android:name="com.google.android.geo.API_KEY"
               android: value="YOUR ANDROID API KEY HERE"/>

After that add the location permission

 <uses-permission android:name="android.permission.ACCESS_FINE_LOCATION"/>
  <uses-permission android:name="android.permission.ACCESS_COARSE_LOCATION" />

Step 1): be added to the pubspec.yaml file as a dependency.

Google_maps_flutter: ^any

Step 2):  enter the below command on terminal and get the package

Flutter pub get

Step 3): The GoogleMap widget should now be added to your Dart file.

Google Map(
      initialCameraPosition: setInitialPosition,
    )

A setInitialPositionis given to GoogleMap containing the initial location that will be displayed on the map when it is loaded .

static final LatLng  setInitialPosition =
    LatLng(21.17386991096315, 72.8298368265714);
static final CameraPosition _kInitialPosition =
    CameraPosition(target: _kMapCenter, zoom: 11.0, tilt: 0, bearing: 0);

Show the map in the flutter app.

 Completer<GoogleMapController> _controller = Completer();
  void _onMapCreated(GoogleMapController controller) {
    _controller.complete(controller);
  }
  @override
  Widget build(BuildContext context) {
    return MaterialApp(
      home: Scaffold(
        appBar: AppBar(
          title: Text('Maps Sample App'),
          backgroundColor: Colors.green[700],
        ),
        body: GoogleMap(
          onMapCreated: _onMapCreated,
          initialCameraPosition: CameraPosition(
            target: setInitialPosition ,
            zoom: 11.0,
          ),
        ),
      ),
    );
  }
google map in flutter example

If the map does not display properly or if you get a message saying: “Cannot enable my location layer as location permissions are not granted,”

Solution : 

i) If the user rejects the request, create logic to ask again. Write the logic to alert them that the app won’t function without location permissions if they select the “don’t ask again” option on the permissions dialogue.

ii) Make sure you have asked for the correct permissions to access the device’s location. The manifest file needs to include the following permissions:

<uses-permission android:name="android.permission.ACCESS_FINE_LOCATION"/>
<uses-permission android:name="android.permission.ACCESS_COARSE_LOCATION" />

Flutter map styling

mapType: MapType.normal,
  myLocationEnabled: true,
  myLocationButtonEnabled: true,
  zoomControlsEnabled: true,
  buildingsEnabled: true,
  indoorViewEnabled: true,
  trafficEnabled: false,
  mapStyle: '''
    [
      {
        "elementType": "geometry",
        "stylers": [
          {
            "color": "#1d2c4d"
          }
        ]
      },
      {
        "elementType": "labels.text.fill",
        "stylers": [
          {
            "color": "#8ec3b9"
          }
        ]
      },
      {
        "elementType": "labels.text.stroke",
        "stylers": [
          {
            "color": "#1a3646"
          }
        ]
      },
      {
        "featureType": "administrative.country",
        "elementType": "geometry.stroke",
        "stylers": [
          {
            "color": "#4b6878"
          }
        ]
      }
    ]
  ''',

Map alterations using the GoogleMap widget

With the GoogleMap widget, you have a lot of freedom to change the map.


Change the different map type

There are many different kinds of maps, including hybrid, terrain, and satellite. You can easily do this by setting the desired type to the widget’s mapType property:

GoogleMap(
  initialCameraPosition: setInitialPosition ,
  onMapCreated: onMapCreated,
  mapType: MapType.satellite,
);

My Location button enabled

By default, the widget’s initialCameraPosition parameter’s specified location will be displayed on the map. (or any other location that you provide to the map programmatically). Set myLocationEnabled to true to enable the user to go back to their current location.

When the device is still, a tiny blue dot will show up on the screen; when it is moving, a chevron will.

MapType _currentMapType = MapType.normal;
GoogleMap(
  initialCameraPosition: setInitialPosition ,
myLocationEnabled: true,
  onMapCreated: onMapCreated,
  mapType:_currentMapType ,
);

How do I change my location on Google Maps in Flutter?.., is a common query .

In Flutter, you are unable to modify your location on Google Maps. GPS calculations are used to determine your location, and it cannot be changed unless your device is moved to a different location.

If you want to move the “my location” button around on the screen, you can make a FloatingActionButton (FAB) to replace the stock “my location” button and position it wherever you like. Only the logic necessary to center the map’s camera on your location when the button is pressed will need to be written.

Change that so that pressing the button toggles between the normal view and satellite view of the maps.

Create the variable _currentMapType to record the current map type in order to accomplish this. _currentMapType maptype should be added to the GoogleMap widget.

Now , Add a method that, when called inside a setState() call, modifies the value of _currentMapType. By doing this, the map will be updated to reflect the new value of _currentMapType.

_onMapTypeButtonPressed() {
  setState(() {
    _currentMapType = _currentMapType == MapType.normal
        ? MapType.satellite
        : MapType.normal;
  });
}
FloatingActionButton(
 onPressed: _onMapTypeButtonPressed,
)
flutter google maps

Mark the location of the marker on the map :

Now , we can move the camera around based on precise latitude and longitude . we will try to mark the set where we move the camera. In the event you decide to relocate to New York . you will notice a marker placed at the desired location. when the camera pans to New York.

We will use the GoogleMap widget markers property . which is accepts set of markers to accomplish this.

final Set<Marker> _markers = Set();
GoogleMap(
 markers: _markers,
…
)
google maps in flutter app

We created marker inside the _onAddMarkerButtonPressed function inside the setState() method . because we want to marker to be set as the user moves to the specified location in map.

_onAddMarkerButtonPressed() {
 setState(() {
   _markers.add(Marker(
     markerId: MarkerId(_lastMapPosition.toString()),
     position: _lastMapPosition,
     infoWindow: const InfoWindow(
       title: 'Best place',
       snippet: '',
     ),
     icon: BitmapDescriptor.defaultMarker,
   ));
 });
}

An area of the map is marked with a marker. the position property uses the location’s LatLng. The markerId is each marker’s individual unique identifier. 

Let’s.. now add some information to the marker . so that it can be tapped to display the information. In order to do this we’ll use the infoWindow property of the Marker widget . Which provides us with a title and snippet as well as a desc for the marker.

 Marker(
            markerId: MarkerId('India'),
            position: LatLng(lat, long),
            infoWindow: InfoWindow(title: 'India', snippet: 'India is the best')
        ),

Enabling the traffic mode

You can turn on traffic mode . simply setting the value of trafficEnabled properties to true.

GoogleMap(
  initialCameraPosition: setInitialPosition ,
  onMapCreated: onMapCreated,
  trafficEnabled: true,
);

Important details for maps : 

onMapCreated is a method that receives a MapController as a parameter and is called when a map is created.

initialCameraPosition:  necessary variable that specifies the starting position of the camera. Which region of the world you want the map to focus on is indicated by the camera position.

camera control is handled by mapController. This design is comparable to other Flutter controllers like the TextEditingController.

For app code click here 👍

https://github.com/Mitali8620/google_maps_app.git


Conclusion:

The GoogleMap widget is a widget, just like any other widget in Flutter, so you can place it inside any other widget, such as a Listview, Stack, Column, Row, Container, and so on. You can also transform it, clip it—although we’re not sure why anyone would want to do that—and do anything else with the map since it’s a widget. Be imaginative, do more exploring, and even share any discoveries you make with us.You can modify this code for your needs.

Please let us know what you thought of the article. We wish we could have covered every feature, but that would require writing a book, which is not what you or we want. We made an effort to cover everything, from how to install it to some fundamental functions that map users might need on a regular basis.

Thanks for reading…..

Have a beautiful day……

NodeJS List out all Files & Folders in a working Directory

0
nodejs fs list files & directory

Hi Guy’s Welcome to Proto Coders Point. In this NodeJS Article let’s learn How to list folders of a working directory using file system (fs) library.

Node list all files & folders in directory

I will assume you already have a node project opened or created.

As I said to work with File System like creating folder, reading files from a folder we require NodeJS fs library.

Install fs module using below command

node install fs

Read directory using fs module nodejs

In NodeJS, As I said we must make using of file system module to work with system files using nodejs. In fs library we have a function i.e. readdir() using which we can list out all the files & folders/directory of a working directory.

The fs.readdir() function take two arguments:- first: the path from where you want to read files & folders and second: is a callback function that will hold the contents of a directory.


Example 1 : List all the Files & Folders from a given directory path

below example will print the name of files & folders of a current directory

const fs = require('fs');

const directoryPath = './your-directory';

fs.readdir(directoryPath, function (err, files) {
  if (err) {
    return console.log('Unable to read directory: ' + err);
  } 
  console.log(files);
});

Note: you need to replace your-directory path with the path of a directory that you want read out and list files & directory.


Example 2 : List only Folders/Directory from a given directory path

In below code, I am using fs.readdir() to read all the files & directory in a given directory, and then to list out only Folders/Directory by iterating to each files or folder using filter, during filtering I am checking if the file is a directory or a file by using fs.statSync(path).isDirectory(); If the file is directory then adding it to the list.

//joining path of directory 
    const directoryPath = path.join('myRootFolder');
    
    //passsing directoryPath and callback function
    fs.readdir(directoryPath, (err, files) => {
        if (err) {
            console.error(err);
            return;
        }
         // Here, only directory will get filtered
        const directories = files.filter(file => {
            const filePath = path.join(directoryPath, file);
            return fs.statSync(filePath).isDirectory();
        });

        console.log(directories);
    });

Example 3 : List only files from a given directory path

In below code, I am using fs.readdir() to read all the files & directory in a given directory, and then to list out only files by iterating to each files or folder using filter, during filtering I am checking if the file is a files or a directory by using fs.statSync(path).isFile(); If the file is a file then adding it to the list.

//joining path of directory 
    const directoryPath = path.join('myRootFolder');
    
    //passsing directoryPath and callback function
    fs.readdir(directoryPath, (err, files) => {
        if (err) {
            console.error(err);
            return;
        }
         // Here, only files will get filtered
        const directories = files.filter(file => {
            const filePath = path.join(directoryPath, file);
            return fs.statSync(filePath).isFile();
        });

        console.log(directories);
    });

How to create Directory/Folder using NodeJS

0
How to Create DirectoryFolder using NodeJS

Hi Guy’s Welcome to Proto Coders Point. In this NodeJS Article let’s learn How to create a directory(folder) if it doesn’t exist in nodeJS using file system (fs) library.

Creating directory using NodeJS

I will assume you already have a node project opened or created.

As I said to work with File System like creating folder, reading files from a folder we require NodeJS fs library.

Install fs module using below command

node install fs

Check if the folder already exist in nodejs

Before creating a directory in any working directory, We must first check if the folder that we want to create already exist or no. If don’t exist we can create it. To check if folder exist we can make use of fs existSync(<folderName>) the return type is true or false.

fs.existsSync(rootFolder)

Creating directory in nodejs

Then to create directory/folder we can make use of fs mkdirSync(<folderPath>)

fs.mkdirSync(folderpath);

In below Code, I have a API Router “/createFolder” been created using ExpressJS, user can send a folderName that he want to create. So now assume I want to create a root folder with a subfolder in it, So first I need to check if rootFolder exist if yes then check if inside root folder subfolder exist or no if no then create the subfolder(The user is willing to create ). Now another scenario is the else part i.e. if rootFolder don’t exist we must create it and then create subFolder in it.

router.post("/createFolder", async (req, res) => {
    const folderName = req.body.folderName;
    if (!folderName) {
        return res.json({ status: false, message: "Folder Name is Mandatory" });
    }
    const rootFolder = "rootFolder";
    const folderpath = `${rootFolder}/${folderName}`;
    try {
        if (fs.existsSync(rootFolder)) {
            if (!fs.existsSync(folderpath)) {
                fs.mkdirSync(folderpath);
                return res.json({ status: true, success: "Directory created" });
            }
        } else {
            fs.mkdirSync(rootFolder);
            if (!fs.existsSync(folderpath)) {
                fs.mkdirSync(folderpath);
                return res.json({ status: true, success: "Directory/Folder created" });
            }
        }
        return res.json({ status: true, success: "Directory/Folder Already Exist" });
    } catch (error) {
        console.log(error);
    }
});

Embed Power BI reports dashboard in Jupyter notebooks

0
Embed Power Bi report in Jupyter Notebook

In this Tutorials, We are going to learn how to embed PowerBI Reports on Jupyter Notebook. So first of all we will start with Basic requirement for this Task.

Requirements

  1. Jupyter Notebook
  2. POWER BI Workspace
  3. Libraries :- powerbiclient, DeviceCodeLoginAuthentication, Report, models

So now will start with Jupyter Notebook

Jupyter Notebook is a web based Computing platform. It is also web applications for creating computational documentations

Installation of power BI client:-

pip install powerbiclient 

run the above installation cmd in your command prompt or Notebook to install power bi.


Authenticate to Power BI and acquire an access token

Acquire a token using Device Code flow

To authenticate users on devices or operating systems that don’t provide a web browser, device code flow let’s the user use another device such as a computer to sign in interactively.

By using the device code flow, The application follow  two-step process that for OS and designs

get_access_token() :- Get access token for OAuth2 access to MS PowerBI Shell

from powerbiclient.authentication import DeviceCodeLoginAuthentication
device_auth = DeviceCodeLoginAuthentication()
token_with_device_code = device_auth.get_access_token()

After Running Bunch of Code, we will get message to Sign in for Device Login

–        Click on the Given Link  https://microsoft.com/devicelogin & paste the code that showing on your Screen.

After Clicking on Next Button it will ask to select Microsoft Account and Click On Continue

After Signed in Microsoft Account It will display below message that means we have successfully access Power BI Shell. & make sure you don’t close the Window.

After getting the access from Microsoft We will get Device Authentication message.

After this we are ready embed Power BI Report.


Power BI report embedding widget

Arguments:

  • group_id string – Required. Id of Power BI Workspace
  • report_id string – Optional. Id of Power BI report. auth object – Optional. We have 3 authentication options to embed a Power BI report:
    • Access token (string)
    • Authentication object (object) – instance of Authentication Result (DeviceCodeLoginAuthentication)
    • If not provided, Power BI user will be authenticated using Device Flow authentication

Returns:

  • object – Report object

Steps:-

After Completing Authentication

  1. Go To Power BI Workspace
  2. Click on Report that you want to Share
  3. Copy the Report and Group from the file URL and paste into Respective Values.
group_id = '2c17405e-d2d8-4293-95eb-acac4009c508’
report_id = '57dda861-7ff0-4a04-b913-39fa4e49ede0’
report = Report(group_id=group_id,report_id=report_id, auth=device_auth)
report

After Running this Code, you Will get your Report On Jupyter

Now we had successfully Embedd a report into the PowerBI Workspace