Home Blog Page 32

14 Rules to follow to become a professional flutter developer

0
How to Become a Professional Flutter Developer

Hi Guys, Welcome to Proto Coders Point, In this Flutter Article let’s check how to become a professional flutter developer by just following this coding rules in flutter.

How to become a professional flutter developer

1. Always use a const keyword for static data.

When any widget using static data which will never change in runtime , it’s better to use const on those widget or dataType.

return Scaffold(
      body: Container(
         child: Column(
           children: const [
             Text("This is static Text"),
             Text("so use const keyword ")
             // Always use a const for static type data
           ],
         ),
      )
    );

2. Use right widget as right place.

Below Example is not the right way to give padding.

Container(
        padding: EdgeInsets.all(10),
         child: Text("This is static Text"),
)

Flutter app is app an widget, but using right widget matters. In Above Example, I am using Container widget just to give padding to a child does not make sense right, Flutter has padding widget use that instead.

Padding(
        padding: const EdgeInsets.all(10.0),
        child: Text("This is static Text"),
 )

3. Make use of setState() properly for rebuild update.

If you are not using any state management plugin like flutter bloc, provider, GetX. They you might be using setState to rebuild the widget tree to update the date update.

Basically setState() will revuild the whole widget treee, just to make a small change in textField.

Instead create a seperate widget and use StatefulBuilder so that on setState only the particular widget tree get rebuild instead of whole widget tree.

Example:

class MyHomePage extends StatefulWidget {
  const MyHomePage({Key? key}) : super(key: key);

  @override
  State<MyHomePage> createState() => _MyHomePageState();
}

class _MyHomePageState extends State<MyHomePage> {
  int _counter = 0;

  // Do
  @override
  Widget build(BuildContext context) {
    return Scaffold(
        body: Column(
      children: [
        Text('${_counter}'),
        ElevatedButton(
            onPressed: () => {
                  setState(() {
                    _counter++;   // this will rebuild whole widget tree
                  })
                },
            child: Text("Click")),
        NewWidget()
      ],
    ));
  }

  Widget NewWidget() {
    return StatefulBuilder(
      builder: (BuildContext context, StateSetter setState) {
        return Column(
          children: [
            Text('${_counter}'),
            ElevatedButton(
                onPressed: () => {
                      setState(() {
                        _counter++; // on button click only this widget will get updated
                      })
                    },
                child: Text("Click"))
          ],
        );
      },
    );
  }
}

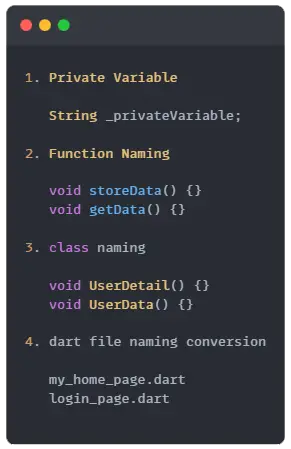
4. Use private variable/method.

Keep habit of using private variable. In flutter Dart doesn’t have the keywords like public, protected, and private. If an identifier starts with an underscore _, it’s private variable in dart.

This is not the right way

class Registration{
  String name,email,phone;
  
  Registration(
      {
        required this.name,
        required this.email, 
        required this.phone
      });
  
}

The Right way to use provide variable

class Registration{
  String _name;
  String _email;
  String _phone;

  Registration(
      {
        required String name,
        required String email,
        required String phone
      }) : _name = name, _email = email, _phone = phone;

}

5. Create seperate Method for event.

Avoid using implementing method or any event inside a widget itself, It’s not a good practice in flutter application development For Eg: Performing any event or action when user press a button, It Ok if event is a small task, if it a long code on event like calling a API to get data from server then it better create a seperate method outside a widget.

Example:

class _MyHomePageState extends State<MyHomePage> {
  int _counter = 0;

  void _doSomeThing(){
    print("perform your button press action here");
  }
  
  @override
  Widget build(BuildContext context) {
    return Scaffold(
        body: Column(
      children: [
        Text('${_counter}'),
        ElevatedButton(
            onPressed: ()=> _doSomeThing(),
            child: Text("Click")),
      ],
    ));
  }
}

6. Use Nullable the right way.

THe best feature of dart language is null safety I wrote a complete article on flutter null safety check it out to learn in detail

Don’t Do
Do

7. Internalization your flutter app.

Avoid using Hardcoded string in app. By implementing Internationalization in flutter app at the beginning of development is better, because one your app starts to grow, then to update small changed in-app then in one place you can easily search and update/replace the string easily.

Example:

Don’t do

Text("This is hard coded Text")
Text(
  AppLocalizations.of(context)!.AppName,     //
)

8. Don’t use var at all declaration.

use exact datatype, when you know it value type.

Exmaple: if a variable is of type number then it better to use int instead of var.

Eg:

String name = 'Rajat';
int age = 26;


9. Keep Flutter Theme & Page Routes in seperate file.

class MyApp extends StatelessWidget {

  var themeSetting = ThemeData(      // Always Create a select variable to device Theme
      primarySwatch: Colors.blue,
      textTheme: TextTheme(),
      primaryColor: Colors.green
  );

  @override
  Widget build(BuildContext context) {
    return MaterialApp(
      title: 'Flutter',
      theme: themeSetting,
      home: const MyHomePage(),
    );
  }
}

10. Use stateless widget the right way.

using StatefulWidget, unnecessarily all over the flutter app is not the right way to build flutter application, Use Stateless Widget where there are not rebuild or update required (widget data is fully static).


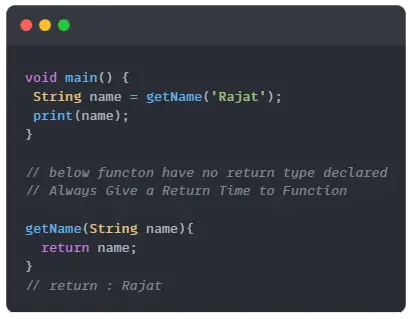
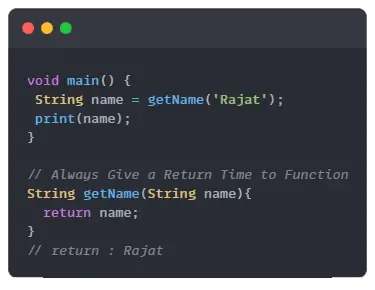
11. Don’t forget retrun type declaration in functions

Always give a return type to function

dart return type declaration function
Don’t Do – Function without return type declared
dart return type declaration function
Do – Always declare a return type to a function

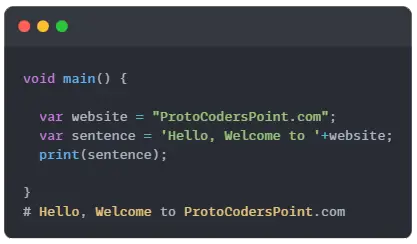
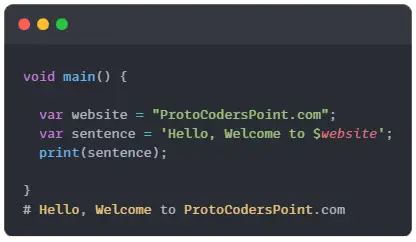
12. To Compose String use Interpolation

With string variable instead of using “+” to concate strings in variable, make use of interpolation in dart language.

dart interpolation
In this example + is been used to concate string into variable
dart interpolation
In this example interpolation ${var}, is used.

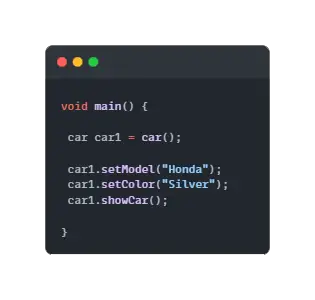
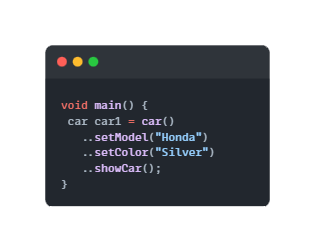
13. using cascade operator in dart

With one object when you run sequence of operation make use of cascade operation (..) double dot operators.

dart cascade operator
dart cascade operator example
Don’t Do
cascade operator in dart example
Do

14. Giving naming convention in dart the right way

Don’t
dart naming convention
Do

What is different between Packages & Plugins in Flutter

0
Different between Packages & Plugins Flutter

Hi Guys, Welcome to Proto Coders Point. In this flutter article let’s see the different between package & plugin in flutter.

Flutter Plugin

A Plugin will contain both a language + native code language, i.e Android (java, kotlin), iOS (Swift/Objective C) & Web, which together makes it called as plugin.

A specialized dart plugin that contain code written in dart combined with one or more platform specific (native) implementation, best example in flutter for plugin is url_launcher & flutter share plugin.

url launcher, it contain support for all platform (Android, iOS, Web & now even for desktop based application).

The code that are behind this plugin are native code, This native code are build by respective developers (android, iOS, web, desktop) & thus when this plugin are used in flutter application & run on any native platform, It will work perfectly smooth, Which makes app compactable on any platform and userfriendly.

Flutter Package:

A Package are fully written with one programming language, flutter package as example are written using dart prgramming language.
"If a Package uses any plugins in it, then it will still be called as package itself", because If I talk about development of package, you are not creating any plugin on your own, In fact you are just using plugins created by some other developer & creating yours own flutter package.

So your app need package, They’re helpful additions that make lots of things easier, some of those packages are pure dart code, those are called as package. In other hand other also includes some Java, Kotlin, Swift, JavaScript and those we call as Plugins.

Solution – unable to connect to server postgresql pgadmin

0
unable to connect to server postgresql using pgadmin

Hi Guys, Welcome to Proto Coders Point. This article is on the solution i.e “pgadmin unable to connect to server”, “could not connect to server: Connection refused”.

Here are 2 issue you may face while connecting to postgresql server using pgadmin.

1. Could not connect to server: Connection refused

pgadmin postgresql connection refused solution

2. Unable to connect to postgres server at IP port 5432 failed: timeout expired

pgadmin postgresql connection timeout expired

Solution

Solution 1 – Check if postgresql server is active

run below cmd to check postgresql status

sudo service postgresql status
postgresql check status

If it InActive, restart postgresql

sudo service postgresql restart

Solution 2: enable postgres to allow remote connections

By default postgresql remote connection is disabled for globally accessing db using server IP & can only by accessed locally on server itself.

ss -nlt | grep 5432

This should give response as running on global 5432, i.e. 0.0.0.0:5432. This means that psql is now enabled for remote access.

check postgresql listening post

Check out this article to enable postgres to allow remote connections.


Solution 3: All PostgreSQL port 5432 Inbound rules on cloud instance

Check if you have Added Inbound rules for allowing incoming traffic to port 5432, Add Inbound rules, as shown in below image.

add inbound rules on aws server for port 5432

After postgres configuring as soon in above steps, you will sure be able to connection postgresql server using pgadmin.

pgadmin postgresql connect

Enable postgreSQL Remote Connection – postgres remote access using pgadmin

0
Config Remote Connection to DATABASE using PgAdmin

Hi Guy’s Welcome to Proto Coders Point. In this article let’s enable postgresql remote connection & then by using pgadmin tools connect remote postgres database.

I have already wrte a complete step by step article on how to install postgresql on ubuntu server, check to out if you don’t have psql installed on your ubuntu server.

pgadmin connect to remote database – enable postgres to allow remote connections

I have psql been installed on my AWS ubuntu server, but by default postgresql remote connection is disabled for globally accessing db using server IP & can only by accessed locally on server itself.

Now, Suppose I want to use pgadmin 4 to connect to remote database & perform psql queries to perform CRUD operation on my server db. Then, I need to setup postgreSQL for globally accessable through IP & pgadmin 4 tools.

Video Tutorial

Video tutorial on configuring postgresql for remote access database

Let’s get started

Follow below Steps to configure postgresql remote access

Step 1: Setup password access to postgres user

Enter below command, to enter psql cli to interact with postgres database engine.

sudo -u postgres psql

set a password for postgres user

By Default, “postgres” admin user don’t have password been assigned, so we need to set a new password to postgres user by ourself.

enter \password <username>

\password postgres

Now, psql cli will prompt you to enter password twice.

set password to postgres

Step 2: Edit postgresql.conf file & change listen address

When postgresql is been installed, psql allows listening to localhost connections only, & thus block all the connection request from remote TCP/IP connection.

Open postgresql.conf file

sudo vim /etc/postgresql/14/main/postgresql.conf

Note: To enter Insert mode in ubuntu vim editor press “i”, & to save the file press “esc” > then enter “:wq”.

use down arrow to scroll, search for listen_addresses = “localhost”, which will commented, uncomment it and replace “localhost” with “*” as shown below:

listen_addresses = '*'
edit postgresql listen_addresses
edit postgresql listen_addresses = “*”

Step 3: Edit postgres pg_hba.conf for remote host access for all IP

By default, psql connection is only accepted for localhost & it refuses all the request from TCP/IP remote connection. Therefore, we need to allow a user to login from any IP address.

Open pg_hba.conf file & add this 2 lines at bottom of the file.

sudo vim /etc/postgresql/14/main/pg_hba.conf

#IPv4 Addresses
host all all 0.0.0.0/0 md5
#IPv6 Addresses
host all all ::0/0 md5

postgresql  allow remote conntection to database host all IPv4 & IPv6
postgresql allow remote conntection to database host all IPv4 & IPv6

Save the file.


Step 4: Restart postgreSQL

Now, To apply changed made in postgresql.cong & pg_hba.conf, we need to restart postgreSQL service.

sudo systemctl restart postgresql

Step 5: Check postgresql listening post number

ss -nlt | grep 5432

This should give response as running on global 5432, i.e. 0.0.0.0:5432. This means that psql is now enabled for remote access.

check postgresql listening port

Step 6: pgadmin 4 connect to remote connection

Important Note: Make sure you have defined InBound rules port range 5432 on your cloud service instance security for remote access postgress

add rules to remote access postgresql port 5432

Now let’s start pgadmin 4 tools & connect to postgresql remotely

On pgadmin dashboard click on add new server > In Connection Tab enter “HOST ID”, “port”, “Username” & “password”. reference below screenshot:

enter psql connection string for remote connection

Thus now, we are able to successfully access server postgresql remotely using pgadmin 4 tool.

how to connect to postgresql using pgadmin 4
connect to postgresql using pgadmin 4

Recommended Articles

Solution – pgadmin unable to connect to postgresql server

How to Install postgreSQL on ubuntu 20.04 | 22.04

0
cmd to Install PostgresQL on Ubuntu

Hi Guys, Welcome to Proto Coders Point. This article is on install postgresql ubuntu 20.04 | 22.04. Let’s get Started.

Introduction on PostgreSQL

PostgreSQL, In short also called as postgres, Is an advanced relational database management system using which you can implement SQL Query task.

In this article on how to quicky install postgreSQL on Ubuntu & run Postgres database server on ubuntu.

Requirement

To follow the steps along with this tutorial, you need a ubuntu server (aws/azure/google cloud) or a local ubuntu system any version 20.04 | 22.04

Video Tutorial

Video tutorial on installing postgresql on ubuntu server

Let’s Install it.

Just run below commands on ubuntu terminal, Thus it will install postgres.

Step 1: Updates the list of packages

To install PostgreSQL, firstly refresh ubuntu packages.

sudo apt update

Step 2: Add PostgreSQL 13 repository on Ubuntu

Install wget on ubuntu

sudo apt install wget ca-certificates

Download ca-certificates

wget --quiet -O - https://www.postgresql.org/media/keys/ACCC4CF8.asc | sudo apt-key add -
sudo sh -c 'echo "deb http://apt.postgresql.org/pub/repos/apt/ $(lsb_release -cs)-pgdg main" >> /etc/apt/sources.list.d/pgdg.list'
Download postgresql repository’s

Now, All the required files is been download using above wget command.

Again update packages using apt update.

sudo apt update

Step 3: Install PostgreSQL on ubuntu

sudo apt install postgresql postgresql-contrib
Install Postgresql on ubuntu 20.04

Step 4: Check postgresql status

sudo service postgresql status
check postgresql status

Step 5: Restart/Start postgresql

If postgres status is shown inActive, Then restart it by using below command.

sudo service postgresql restart

Step 6: Start using postgreSQL in Terminal

Enter postgre cli by changing user.

sudo -u postgres psql

How to check postgreSQL running port

by default, postgres will be running on port number 5432.

\conninfo

Check List of Roles & DB Access

\l   - Check List of user's
\du  - Check role(user) and Permission.

How to Install PHP on ubuntu with just 2 cmd’s

0
ubuntu php install

Hi Guys, Welcome to Proto Coders Point. php is a programming language mostly used in website application development, Most commonly used by website such as blogging, backend API or e-commerce websites. In the tech blog post let’s learn how to install php on ubuntu 20.04 or 22.04.

Time needed: 1 minute

Just run below commands to install php on ubuntu, it’s that easy.

  1. Update apt cache

    sudo apt update

  2. Install php & all it dependencies tools

    The below cmd will install php, php-cli, php-fpm, php-json, php-common, php-mysql, php-zip, php-gd,php-mdstring and other’s

    sudo apt install php php-cli php-fpm php-json php-common php-mysql php-zip php-gd php-mbstring php-curl php-xml php-pear php-bcmath

  3. Verify if php was successfully installed

    php --version