Home Blog Page 42

How to convert list to set in dart – flutter | vice versa

0
convert list to set in dart flutter

Hi Guys, Welcome to Proto Coders Point. In this dart article will learn about list & set in dart & how to convert list to set in dart or vice versa i.e convert set to list in dart.

What is list in dart

Basically dart list is an ordered collecion of data. A dart list look similar to array & the syntax is similar to javascript array literals.

How to declare list in dart

List lNum = [1, 2, 3, 4, 1, 3, 2];

In dart list, to store data in it we use bracket [] with data been separated by commas (,).


What is set in dart

A dart set is an unordered collection of data, that means the data stored in sets are unstructured. THe measure difference between list & set is, In sets duplicate values can’t be stored, data store in sets are always unique.

If we try to store duplicate value, set will simply discard the data if data already exist in sets.

syntax to declare set is similar to map in dart

Set<type> setname = {};

Example: Set<int> numbers = {1,5,7,9,6,3,4,2};


How to Convert list to set in dart

In dart we have a In-Built method i.e. toSet(). which will help us in converting list to set easily.

Note: As sets stores only unique value, if your list contain any duplicate value, then that duplicate value will not get stored in set for 2 times.

void main() {
   List lNumbers = [1, 2, 3, 4, 1, 3, 2];
   List lStrings = ['Rajat', 'Proto', 'Coders', 'Point', 'Flutter', 'Android', 'NodeJS'];

  
  print("\nBefore Converting \n _______________");
  print("\n ${lNumbers} "); 
  print("\n ${lStrings} "); 
  
  print("_____________________________________\n ");
  
  
  var set1Number = lNumbers.toSet();
  var set2String = lStrings.toSet();

  print("\n After converting list to set \n _______________");
  print("\n ${set1Number} "); 
  print("\n ${set2String} "); 
}

Output

dart list to set example

As you can see in above output, after converting list to set, the set has curly brackers instead of square bracket. And after converting as you see number of element in sets are less than the original element in lists, because the duplicate are discarded.


How to Convert set to list in dart

In dart, There is a in-built functin i.e. toList(), that helps us easily convert set to list in dart.

Example

void main() {
  Set<int> numbers = {1,5,7,9,6,3,4,2};
  
  print("set before converting:: ${numbers} \n");
  
  var list = numbers.toList();
  
  print("set to list converted:: ${list} \n  ");
  
 print("\n ________________________________\n ");
  
  Set<Map<String,dynamic>> person = {
    {"name":"Rajat","age": 26},
    {"name":"Suraj","age": 30},
    {"name":"Pavan","age": 22}
  };
  
  
  print("Set: ${person}");
  
  var personList = person.toList();
  
  print("\nSet to list (Mapped Data): ${personList}");
}

Output

dart set to list example

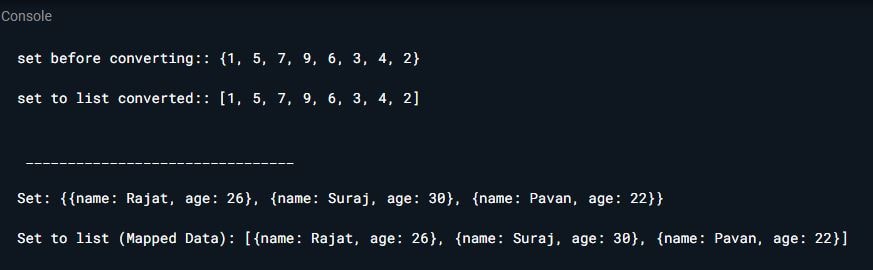
So here as you can see in above output converted collection has brackets [], it means set collection is converted in list.

Flutter Error – Project require a newer version of kotlin Gradle plugin

0
project requires a newer version of kotlin gradle plugin

Hi Guys, Welcome to Proto Coders Point. Today I encountered as issue/error message, when I build flutter project and tryed to run on my physical device.

Flutter Android Error

The error said "your project requires a newer version of kotlin gradle plugin".

Actually the project which I was trying to run was created 4 month age. You can read the full detail of error message:

BUILD FAILED in 1m 2s
Running Gradle task 'assembleDebug'...                             64.3s

Flutter Fix ───────────────────────────────────────────────────────────────────
[!] Your project requires a newer version of the Kotlin Gradle plugin.                              
Find the latest version on https://kotlinlang.org/docs/gradle.html#plugin-and-versions, then update
/Users/goodman/Desktop/Projects/kindacode/android/build.gradle:                   
ext.kotlin_version = '<latest-version>'                                                             
─────────────────────────────────────────────────────────────────── 

Exception: Gradle task assembleDebug failed with exit code 1

No need to panic if you encountered the same issue, because the solution is very easy to follow:


Solution – Update Flutter Kotlin version to latest

To solve “newer version of kotlin gradle plugin”, Simple you need to update kotlin version i.e ext.kotlin_version.

Navigate to Project > android > build.gradle

flutter update kotlin version

The current latest version at the time of this article is 1.6.10, It will change in future. So to get the updated latest version of kotlin gradle plugin kindly visit official site https://kotlinlang.org/docs/gradle.html.


Error Handling in flutter using Error Widget

0
flutter error widget builder
Error Handling in flutter, show custom UI for error instead of red exception screen

Hi Guys, Welcome to Proto Coders Point. In this Article will learn errors handling in flutter.

What is your code throws an error, suppose say initState method throws an error, this will simply return a red color screen with the error message printed in it, and no developer likes to see read color error screen in flutter development.

So here, In this flutter article, I have a solution for you, so that you learn how to handle errors in flutter by showing error with beautiful custom build design for error screen, so that we get rid of the red exception error page in flutter.

Error Widget in flutter

A ErrorWidget is an widget that is build specially for error handling, so this widget will render a separate custom build exception message screen when error occurs.

Flutter ErrorWidget is used when our app fails to build methods. and we can show error with custom UI, it will also help determine where the problem lies exactly.

How to show user friendly error page in flutter

It’s possible to show a custom UI error handling page by making use if ErrorWidget.builder (code example is below). Instead of Red error exception.

If your flutter app is published & is been used by lot’s of user, then at some point of time if error occurs then user might see red exception which is not good as user-experience & might leave a negative feedback about our app.

So it better to implement an custom global error handling in flutter by which we can show a user-freindly error page rather then red color error page with message.

How to use Flutter Error Widget

In void main(), before runApp(), add ErrorWidget.builder as shown below(UI Design in MaterialApp, customize as per your for error UI design).

void main() {
  // Set the ErrorWidget's builder before the app is started.
  ErrorWidget.builder = (FlutterErrorDetails details) {
    return MaterialApp(
       ....
    );
  };
  // Start the app.
  runApp(const MyApp());
}

Now, throws error, from where you think error might occur. Just for an example I am throwing error from initState() method as below:

@override
  void initState() {
    // TODO: implement initState
    super.initState();
    throw("Error thrown from initState(), This is Dummy Error Example");
}

How to use ErrorWidget Builder in Flutter

Here is a example, The error is throws then user clicks on “don’t click me” button.

Complete Code with custom UI design for Error Widget for Error handling in flutter below. main.dart

import 'package:flutter/material.dart';

void main() {
  // Set the ErrorWidget's builder before the app is started.
  ErrorWidget.builder = (FlutterErrorDetails details) {
    // In release builds, show a yellow-on-blue message instead:
    return MaterialApp(
      home: Scaffold(
        body: Center(
          child: Container(
          alignment: Alignment.center,
          width: 250,
          height: 200,
          decoration: BoxDecoration(
              borderRadius: BorderRadius.circular(10),
              color: Colors.amber[300],
              boxShadow: [
                BoxShadow(color: Colors.green, spreadRadius: 3),
              ],
            ),
          child: Text(
            ' Error!\n ${details.exception}',
            style: const TextStyle(color: Colors.red,fontSize: 20),
            textAlign: TextAlign.center,

            textDirection: TextDirection.ltr,
          ),
      ),
        ),),
    );
  };

  // Start the app.
  runApp(const MyApp());
}

class MyApp extends StatefulWidget {
  const MyApp({Key? key}) : super(key: key);

  static const String _title = 'ErrorWidget Sample';

  @override
  State<MyApp> createState() => _MyAppState();
}

class _MyAppState extends State<MyApp> {
  bool throwError = false;

  @override
  Widget build(BuildContext context) {
    if (throwError) {
      // Since the error widget is only used during a build, in this contrived example,
      // we purposely throw an exception in a build function.
      return Builder(
        builder: (BuildContext context) {
          throw Exception('oh no, You clicked on Button..! | Error Caught');
        },
      );
    } else {
      return MaterialApp(
        title: MyApp._title,
        home: Scaffold(
          appBar: AppBar(title: const Text(MyApp._title)),
          body: Center(
            child: TextButton(
                onPressed: () {
                  setState(() {
                    //by setting throwError to true, above if condition will execute.
                    throwError = true;
                  });
                },
                child: const Text('Do Not Click me')),
          ),
        ),
      );
    }
  }
}

Result of ErrorWidget for Error handling in flutter

Animated splash screen in flutter

0
Flutter animated splashscreen
animated startup screen in flutetr

Hi Guys, Welcome to Proto Coders Point. In this flutter tutorial article will learn how to implement Animated splashscreen in flutter.

To acheive simple & animation splash screen will make use of flutter animated_splash_screen package.

A library/package by which we can easily add a startup screen that too in animation effect in flutter.

Animated splash screen in flutter

How to use this package. Below are steps to add package in your flutter project.

1. Installation

Add dependencies using terminal command

flutter pub add animated_splash_screen

with above command, it will simply add the dependencies in pubspec.yaml, now run below cmd to successfully download package as external library.( make sure you are connected to internet).

flutter pub get

Alernative way to add external package in flutter project

Open pubspec.yaml, then under dependencies section add it:

dependencies:
  animated_splash_screen: ^1.2.0

Now, hit pub get button or run flutter pub get cmd .


2. Import it

Now, once package is been installed successfully, to use the package, we need to import it where required. Eg: main.dart.

import 'package:animated_splash_screen/animated_splash_screen.dart';


How to implement Animated splash screen in flutter

Startup screen in flutter.

@override
  Widget build(BuildContext context) {
    return AnimatedSplashScreen(
      splash: 'logo/splash.png',
      nextScreen: MainPageScreen(),
      splashTransition: SplashTransition.rotationTransition
    );
  }

Properties of AnimatedSplashScreen

  • splash: Here you can pass any widget, that you want to show in splash screen, Like: Container widget, Icon Widget, Image.asset, Image.network etc.
  • splashTransition: Animated Transition effect to above splash properties. Below are list of splashTransition effect for different anim.
  • backGroundColor: Set a backGroundColor to splash screen, by default: background Color is white.
  • duration: Set for how much time splash screen should show.
  • nextScreen: The screen that will appear after startup welcome screen.

Different Animation Transition

splashTransition

  splashTransition.slideTransition,
  splashTransition.scaleTransition,
  splashTransition.rotationTransition,
  splashTransition.sizeTransition,
  splashTransition.fadeTransition,
  splashTransition.decoratedBoxTransition

Snippet Example

How to use different Widget in splash properties to customize splash screen in flutter

container with Icon

AnimatedSplashScreen(
        splash: Container(
          color: Colors.amber,
          child: Icon(Icons.ac_unit_sharp,size: 50,),
        ),
        nextScreen: MyHomePage(),
        splashTransition: SplashTransition.rotationTransition,
        duration: 3000,
      )

Icon with fadeAnimation

AnimatedSplashScreen(
        splash: Icon(Icons.ac_unit_sharp,size: 50,),
        nextScreen: MyHomePage(),
        splashTransition: SplashTransition.fadeTransition,
        duration: 3000,
)

Image.asset

AnimatedSplashScreen(
        splash: Image.asset("assets/logo.png"),
        nextScreen: MyHomePage(),
        splashTransition: SplashTransition.decoratedBoxTransition,
        duration: 3000,
)

Image.network

AnimatedSplashScreen(
        splash: Image.network("Image url"),
        nextScreen: MyHomePage(),
        splashTransition: SplashTransition.sizeTransition,
        duration: 3000,
)

Complete Source Code – Flutter Animated Splash Screen

main.dart

import 'package:flutter/material.dart';
import 'package:animated_splash_screen/animated_splash_screen.dart';

void main() {
  runApp(const MyApp());
}

class MyApp extends StatelessWidget {
  const MyApp({Key? key}) : super(key: key);

  @override
  Widget build(BuildContext context) {
    return MaterialApp(
      title: 'Flutter Demo',
      theme: ThemeData(
        primarySwatch: Colors.blue,
      ),
      home: AnimatedSplashScreen(
        splash: 'assets/logo.png', // use any widget here
        nextScreen: MyHomePage(),
        splashTransition: SplashTransition.rotationTransition,
        duration: 3000,
      )
    );
  }
}

class MyHomePage extends StatefulWidget {
  const MyHomePage({Key? key}) : super(key: key);

  @override
  State<MyHomePage> createState() => _MyHomePageState();
}

class _MyHomePageState extends State<MyHomePage> {
  @override
  Widget build(BuildContext context) {
    return Scaffold(
      body: Center(
        child: Column(
          mainAxisAlignment: MainAxisAlignment.center,
          children: [
            Container(
              width: 150,
              height: 150,
              child: Image.asset('assets/logo.png'),
            ),
            Container(
              child: Text("Welcome to Proto Coders Point",style: TextStyle(fontSize: 20),),
            ),
          ],
        ),
      ),
    );
  }
}

How to check if Dark Mode is on in android programmatically

0
Android Check Dark Mode or Light Mode on programmatically

Hi Guys, Welcome to Proto Coders Point, In this article will learn how to check if the device is in night node theme or light mode theme in android programmatically.

As you all know that switching to dark theme is avaiable on Android 10 & above version.

Android check dark mode or light mode programmatically

Now, when a Android Developer develop an application then, If device dark theme is enabled i.e(night mode), then automatically, the dark theme is been applied to the app(because) in theme.xml we have 2 theme one for light node and night mode, due to which our app theme don’t look good as certain places in app.

You’re app may face some UI_Mode appearance issue, at certain view in app and should be colored programmically so you might be wondering how can i check if night or day mode is enabled on my device progammically depending on which you can easy set proper them from you androd app


Solution is Here

Check DARK MODE or LIGHT MODE in Android

In Below snippet code I am going to change the Theme depending on our mobile device UI_MODE Theme (Light or Dark).

Below is just an example, on How to chec which UI_Mode is active,

Snippet Code

  int nightModeFlags =  view.getContext().getResources().getConfiguration().uiMode & Configuration.UI_MODE_NIGHT_MASK;
     
    switch (nightModeFlags) {
     case Configuration.UI_MODE_NIGHT_YES:
           Log.e(TAG, "onClick: NIGHT YES ");
           AppCompatDelegate.setDefaultNightMode(AppCompatDelegate.MODE_NIGHT_NO);
           break;

     case Configuration.UI_MODE_NIGHT_NO:
            Log.e(TAG, "onClick: LIGHT");
            AppCompatDelegate.setDefaultNightMode(AppCompatDelegate.MODE_NIGHT_YES);
            break;

     case Configuration.UI_MODE_NIGHT_UNDEFINED:
             //   doStuff();
             break;
    }

Flutter MSIX Package – Create .msix installer for flutter windows

0
Flutter Windows Build - Create .MSIX Of Flutter Project

Hi Guys, Welcome to Proto Coders Point. In this tutorial will learn how to create installer of flutter app for flutter windows application.

I have already wrote an article on flutter windows installer, Create exe installer for windows application where i have made use of external software i.e. inno setup for creating exe install of flutter application.

This tutorial article is completely different, we are going to make use of flutter library i.e flutter msix, to create installer of flutter app.

About Flutter MSIX

The fluter MSIX is basically a command-line tool by which we can create MSIX installer of flutter windows build application, Therefore it make easy process to launch flutter windows app on Microsoft stores.

How to use flutter MSIX

To use MSIX flutter, We must add the package as dev dependencies in our flutter project as external library, so that we can access msix from command line terminal.

So lets do it step by step

Adding flutter MSIX

In flutter project, Open pubspec.yaml file, then under dev dependencies section add:-

dev_dependencies:
  msix: ^3.4.1
flutter msix
flutter msix

or else

Add dev dependencies using terminal command as below

flutter pub add --dev msix

How to create flutter MSIX installer

To create flutter msix installer, you need to just run below command in terminal of IDE.

flutter pub run msix:create

so this will create .msix installer of flutter windows build version under project folder at path:

Project > build > windows > runner > Release

flutter pub run msix create installer

but before creating flutter windows installer, we must config the installer. so let learn how to do it.

Configuring flutter msix

So as i said, before creatinf flutter msix installer, we must config the app by giving application title, icon, display name, publisher name, application verion, application logo & the capabilities of the application.

So to add all this msix config, by adding declaration in pubspec.yaml file as msix_config: as soon below.

under pubspec.yaml file

msix_config:
  display_name: Proto Coders Point
  publisher_display_name: Proto Coders Point
  identity_name: com.example.liquidswipetut
  msix_version: 1.0.0.0
  logo_path: F:\pic's\Proto Coders Point\logo150.png
  publisher: CN=BF212345-5644-46DF-8668-012044C1B138
  store: true
  capabilities: internetClient
configuring msix flutter .JPG

Aftering adding the above config parameter/details, Now run the above msix create command i.e flutter pub run msix:create

And here is the flutter windows installer file been created.


How to publish flutter app on microsoft store

For publishing flutter app n microsoft store, you need to use a flag i.e –store while creating msix installer.

flutter pub run msix:create --store

Read & learn after msix on official site


Video Tutorial