In JavaScript, Data can we stored in a form of object to store multiple values of complex data structure.
In JS, A Object can be created by {} curly braces, Here data are stored in key-value pair. Keys are always in String & value can be of any datatype.
JavaScript, Array & Object are the most frequently used to manage collection of data, it’s the easiest way to manage data while any event is been performed by users.
Convert array to collection(object) in JS
The best way to convert array to object in JavaScript
['a','b','c']
to
{ '0':'a', '1':'b', '2':'c' }
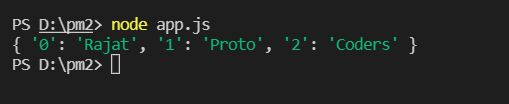
1. JavaScript Example 1 – Convert array to object
const namesArr = ["Rajat","Proto", "Coders"];

function toObject(arr){
    var ob = {};

    for(var i =0;i<arr.length;i++){
        ob[i] = arr[i];
    }

    return ob;
}
var obj = toObject(namesArr);
console.log(obj);
Output
2. Array to Object using reduce method & functions
In today’s, JS we have a js method .reduce to iterate to array and remove empty holes from an array, so in below example will use array.reduce to convert array to object collections.
At start of function we pass empty object, then augment the object by increment, and at the end of iteration of function, we get result as { '0': 'Rajat', '1': 'Proto', '2': 'Coders' }.
Object to Array
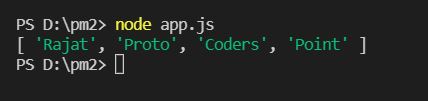
3. Example 3 – Object to array JavaScript
To convery object to array in js, you can make use on Object.key and map to acheive it.
Let check how
var obj = { '0': 'Rajat','1':'Proto', '2': 'Coders', '3': 'Point' };

var result = Object.keys(obj).map((keys) => obj[keys]);

console.log(result);
A flutter favicon is a graphic Image or you can say it as a website logo icon that is assoiciated with a webiste. A favicon appears on a address bar i.e. in tabs of a browser when a website loads, it like a identity of a website.
A logo that you want to show as favicon icon in flutter web app, you need to generate graphic image(icon) of different dimension size (eg: 192 X 192, 512 X 512).
We can make use of online free tools called favicon generator
Difference between Visibility, Opacity,OffStage Widget
Hi Guys, Welcome to Proto Coders Point. In this article let learn about how to hide widget in flutter, i.e. using Visibility, Opacity, OffStage & difference between them & which is the best widget to hide content in flutter.
Flutter Visibility Widget
Visibility widget is to show/hide widgets, it has a visible property, which helps us in showing or hiding child, when visible is set to false, the actual child is replaced with zero- sized box instead.
Snippet
// manage visibility
              Visibility(

                // showing the child widget
                visible: true, // true to show, false to hide
                child: Text(
                  "Visible/Hide Text Example",

                ),
              ),
Properties
visible: bool (true or false)
To hide or show the child widget
replacement: Widget
By default,zero – sizedBox is shown, when visible is set to false, you can use any widget as replacement
maintainSize: bool
Suppose you want a empty space when visible is false.
maintainInteractivity: bool
User can interact with widget, even when widget is invisible.
Flutter Opacity Widget
The opacity widget in flutter is used to make it’s child transparent, it can be done by using opacity property and set it 0, (range 0.0 - 1.0). The child is completely invisible when set to opacity 0, but will acquire the space & widget is also interactive.
Snippet
Opacity(
  opacity: _visible ? 1.0 : 0.0,
  child: const Text("Now you see me, now you don't!"),
)
Properties
child: Widget
A widget inside opacity
opacity: 0.0 to 1.0
Transparent level to apply to child widget
alwaysIncludeSemantic: bool
Semantic info about child is always included.
Flutter OffStage Widget
OffStage in flutter widget lays it child out, as if it in true but don’t draw/render the child widget view on screen, and all don’t take space of screen.
most of the time offstage is used to measure the dimension of widget without showing it on screen.
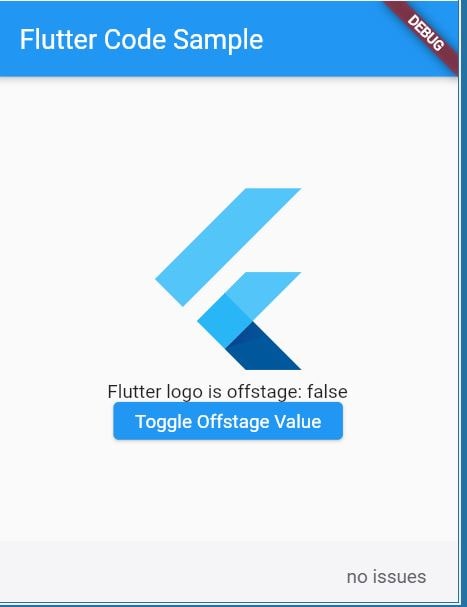
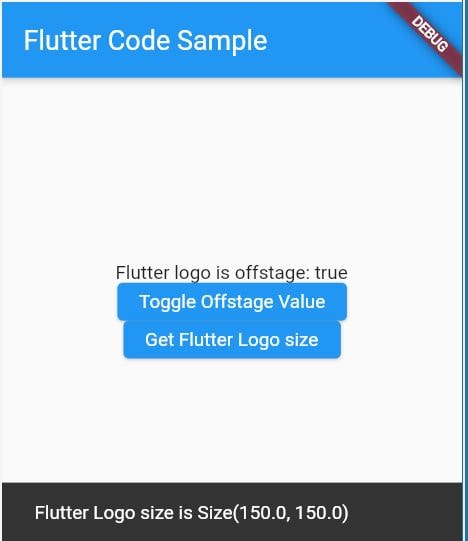
flutter offstage example
The below example, we have a offstage widget which has child as FlutterLogo widget, when offstage is true, the offstage will be hidden so when offstage is hidden i.e. true, we will display a button to get logo size, which will show size of FlutterLogo widget in snackbar.
Different between Visibility, Opacity, OffStage Widget
Which is the best flutter widget to hide content.
Opacity
Alpha opacity is set to any widget you want, setting it to 0.0 is like invisible then setting to 0.1 is lightly visible and increase the visibility when range set between 0.0 to 1.0, so i hope it easy to understand. Even after setting the opacity to 0.0 and making it invisible the widget will still occupy the space it require, because we have not actually removed the widget instead we just make is transparent, therefore user can touch and click it.
Offstage
The child widget is hidden with this one. It’s as if you put the widget “outside of the screen” so that users don’t notice it. The widget continues to progress through the flutter pipeline until it reaches the final “painting” stage, at which point it accomplishes nothing. This means that all state and animations will be preserved, but nothing will be rendered on the screen. It also won’t take up any space during layout, so there won’t be any gaps, and users won’t be able to click it.
Visibility
Visibility widget in flutter, is very user friendly and convenience, as we have discussed above when visible is set to false, the widget is completely removed and replaced with zero sizedBox, suppose if you want to keep the empty space, then make use of visibility properties like maintainAnimation , maintainSize, maintainState, maintainInteractivity etc.
when you use maintain state, it will wrap the child with Opacity or Offstage widget. When visible is false (i.e widget is hidden) but you have maintain size, so the empty space visible is wrapped with IgnorePointer so that user can’t click on it, unless you make use of maintainInteractivity : true
Removing Widget
For example, you can use if (condition) to determine whether or not a widget should be included in a list, or you can use condition? child: SizedBox() to directly replace it with a SizedBox. This method avoids unnecessary calculations and is the most efficient.
Hi Guys, Welcome to Proto Coders Point. In this article will learn about pm2 and learn how to install pm2 in your operating system.
What is PM2 – Why we use PM2
PM2 stands for process manager, so as the name itself says PM2 is used to manage your nodejs processing script, we use pm2 to keep our nodejs script application always running even after terminal is been closed.
Basically when we run node script in terminal using node app.js and close the terminal, then the process is no longer alive therefore to keep app process alive we start the scripts by using process manager 2.
$ pm2 start app.js
Required
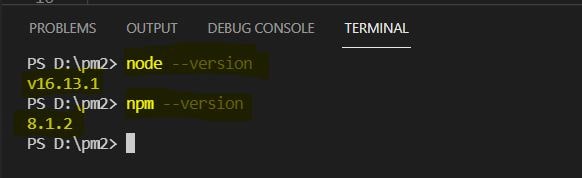
NodeJS & npm should be installed in your OS. check if node & npm are installed or not.
node --version
npm --version
Install pm2 ubuntu / windows / macOS
To install process management(pm2), make sure node & npm is installed.
Now let install pm2 on ubuntu, not only on ubuntu, below installation steps works on all OS. run below cmds.
npm install pm2 -g
Here -g means install it globally.
How to run script using pm2
By using pm2 we can start any scripting language process (nodejs, python, ruby etc) as shown below:-
pm2 start <app-name>
eg: pm2 start app.js
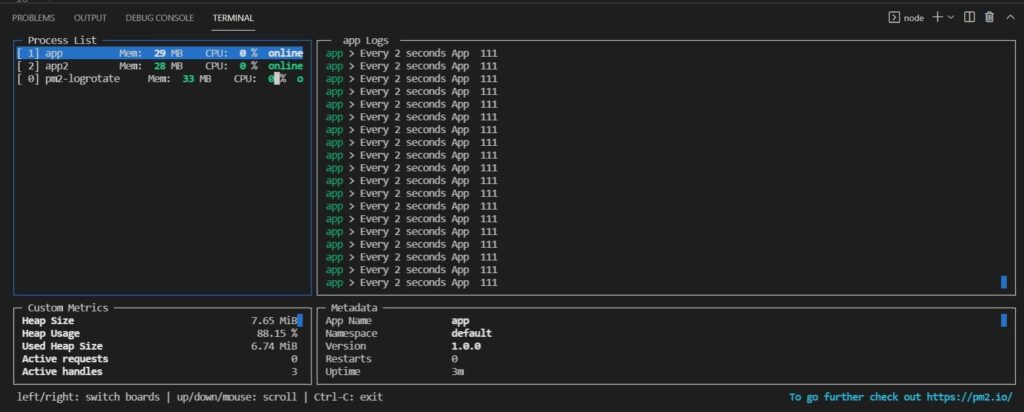
Manage Application process in pm2
As we start app process you can manage & view them easily using pm2:-
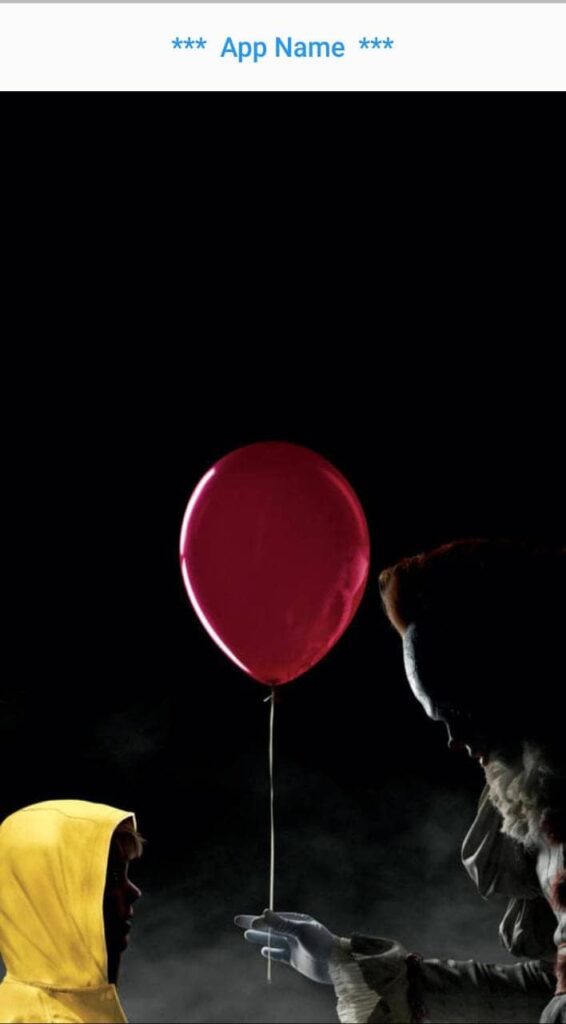
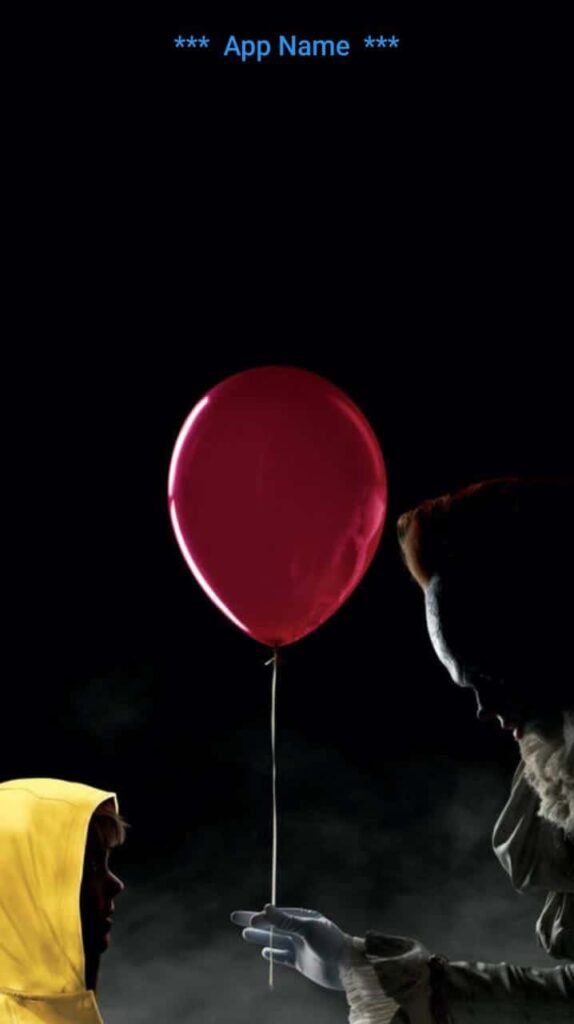
Hi Guys, Welcome to Proto Coders Point. In this article we will learn to make a appbar transparent in flutter.
What is Appbar in flutter
Appbar is a widget that appear on top of mobile application screen, so typically if consist of quick & most commonly used action like like back button or a three dot flutter popup menu button.
In flutter appbar is available in scaffold widget property. Learn more about AppBar, The main motto of this article is how to make flutter appbar transparent.
Scaffold(
extendBodyBehindAppBar: true,
appBar: AppBar(
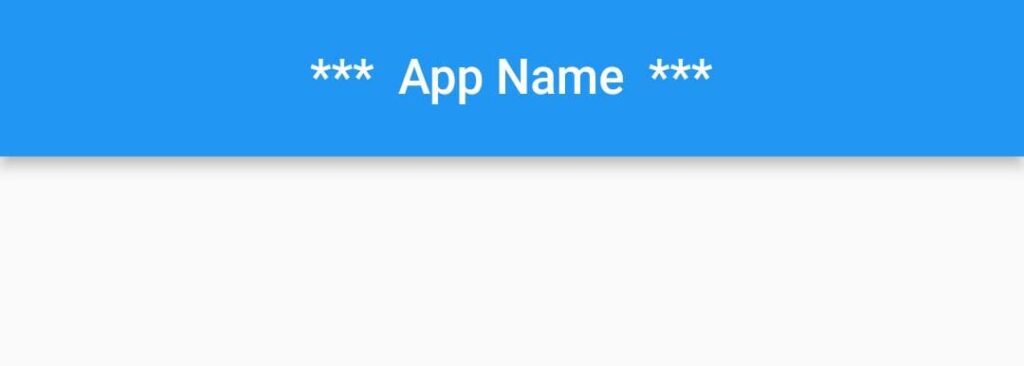
title: const Text("*** App Name ***",style: TextStyle(color: Colors.blue),),
centerTitle: true,
backgroundColor: Colors.transparent, // remove color from appbar
),
);
Now, you can see that appbar is transparent but there is a default shadow effect to it, we need to remove the elevation by setting it to 0
Appbar remove elevation shadow effect
Now let’s make the elevation to 0 to make appbar fully transparent.
AppBar(
          title: const Text("***  App Name  ***",style: TextStyle(color: Colors.blue),),
          centerTitle: true,
          backgroundColor: Colors.transparent,
          elevation: 0, // add this line
        ),
Make body to extend appbar
In below code I have added body tag in scaffold widget with Image.network as background, but as you can see, the body is below appbar, it’s not extending appbar, so the app bar is looking white in color.
let’s make Fullscreen page with transparent AppBar in Flutter. In scaffold widget there is a property called “extendBodyBehindAppBar” set it to true, to get body behind appbar.
Hi Guys, Welcome to Proto Coders Point, In this Article will learn about javascript date & time, How to gte current date time in javascript, get time in IST, EST, CST format & how to remove timezone T & Z from datatime string in js.
What is Javascript Time?
System Time can we fetched in js using Date object, javascript return date in milliseconds number (since JAN 01, 1970 UTC), so we can make use of js date methods to get day, hours, minutes, seconds.
Syntax
const date = new Date();
console.log("current Time", date); // 2022-01-01T11:39:52.989Z
Javascript date methods
Here are few pre-defined js date methods to get date-time information from date object.
The below snippet code will return time in IST format.
const date = new Date();

console.log("current Time", date);
var ISToffSet = 330; //IST is 5:30; i.e. 60*5+30 = 330 in minutes
offset= ISToffSet*60*1000;
var ISTTime = new Date(date.getTime()+offset);
console.log("IST Date",ISTTime);
JS get current time in EST
The below code will return you time in EST Time format
const date = new Date();
var offset = -300; //Timezone offset for EST in minutes.
var estDate = new Date(date.getTime() + offset*60*1000);
console.log(estDate); //Gives Mon Mar 21 2016 23:00:00 GMT+0530 (IST)
Get current time in CST javascript
The below code will return time in CST time now.
const date = new Date();
var CSToffSet = -360; //CST is -6:00 of UTC; i.e. 60*6 = -360 in minutes
offset= CSToffSet*60*1000;
var CSTTime = new Date(date.getTime()+offset);

console.log("CST Date",CSTTime);
Javascript remove timezone offset from date
const date = new Date();
console.log(date);
As you know, date has a fixed length of character, therefore you can simple slice, as per your date requirement, here is what you can do.
//remove time zone
let date_without_timezone = date.toISOString().slice(0,23);
console.log("Date, Time without time zone: ", date_without_timezone);
Remove T and Z from date javascript
if you want to maintain the data format in js & only remove T & Z from time string then you can make use of replace() method. check the example below
//remove T and Z from time
var timeTZremove = date.toISOString().replace('T',' ').replace('Z',' ');

console.log("dateTime removed T Z: ",timeTZremove);
How to get full month name in javascript
To get Month full name in js, you can do as below
Will create/declare a array variable that have list of month name. const monthsList = ["January", "February", "March", "April", "May", "June", "July", "August", "September", "October", "November", "December"];
Then by using, javascript date methods as listed above, will use getMonth() method that return current month in number i.e. from 0-11. let monthName = monthsList[date.getMonth()];
complete code – Get month name from Date
// get month full name in JS
const months = ["January", "February", "March", "April", "May", "June", "July", "August", "September", "October", "November", "December"];

let monthName = months[date.getMonth()];

console.log("Current Month: ", monthName);