Home Blog Page 60

How to generate random number in dart program

0
how to generate random number in dart
generate random number in dart

Hi Guys, Welcome to Proto Coders Point.

In this dart tutorial (article), we will learn how to generate random number in dart.

In Dart programming, A Random number are often used in flutter application where a user can generate a unique key number.

What is Random Number in dart program?

In dart, A Random Number is a randomly generated from a large set of numbers & select a number using some mathematical algorithm.

Generating random number are commonly implemented in many flutter application having a feature like OTP verification for user SignIn.

One of the best example where dart random number in range is implemented is dice game, whenever a dice is thrown we get a fixed range of random number ranging between 1 – 6.

Dart Random class – In math package

In dart, we have a class named “Random” which is used to generate random integer number, bool , random decimal number.

Note: To use Random class in dart, we must import ‘dart:math’ packagem because Random Class is defined in dart:math package.

It can generate random booleon, integer and double value by using its method provided.

Method on Math.random class

MethodDescription
nextBool() =>Generate either true or false randomly.
nextDouble() => Generate an positive floating point number ranging from 0.0 to 1.0.
nextInt(int max) => Generate a positive number range from 0 to max(as defined)
Eg: random.nextInt(6); // Here 6 is a range, number will generate from 0 – 6.

Dart Porgram to generate random number bool, int, double

1. Dart Program random number

import 'dart:math';

void main() {
  var random = new Random();

   print(random.nextBool()); //true or false

   print(random.nextInt(75)); // number between 0 - 75

   print(random.nextDouble());  // double value 0.0 to 1.0

}
dart random number output

2. How to generate fixed digit number

Eg: Generate a fixed 5 digit or 6 digit random number.

import 'dart:math';

void main() {
   Generate5digit();
}

Generate5digit(){
     var rng = new Random();
     var rand = rng.nextInt(90000) + 10000;
     print(rand.toInt());
}

So in above dart code, you can get a random number in range 00000 to 90000 and add 10000 to it. you always get a 5 digit random number generated.

5 digit random number dart

3. How to get dart random number between range. Eg : 50 – 100

import 'dart:math';

void main() {
  var random = new Random();
  print(''); //just for next line space in output

  print(' Random Number from 0 - 50 :  ${next(0, 50,random)}');

  print('');
}


int next(int min, int max,Random rand) => min + rand.nextInt(max - min);
dart random number between range


How to Generate OTP number in flutter

Flutter Multi-Line TextFormField

0
flutter texrfield with multi line

Hi Guys, Welcome to Proto Coders Point.

In this Flutter Tutorial we will learn how to implement a text field with multiline input supported.
Means a user can input more then one line in textfield.

By Default, a TextFormField widget is set to single line input, but some time a user might want to Enter lines of Text message in the textfield & the TextField size must got extending as the user enter the text.

Allow textFormField with multiple lines input

So to make a TextField accept multiple lines, simply make use of maxLines property in TextField or TextFormField widget.

And keyboardType property set it to TextInputType.multiline, so that user will get a button using which he/she can move the cursor to next line.

Eg:

TextField

TextField(
              minLines: 1,
              maxLines: 5,  // allow user to enter 5 line in textfield
              keyboardType: TextInputType.multiline,  // user keyboard will have a button to move cursor to next line
              controller: _Textcontroller,
            ),

TextFormField

TextFormField(
              minLines: 1,
              maxLines: 5,  // allow user to enter 5 line in textfield
              keyboardType: TextInputType.multiline,  // user keyboard will have a button to move cursor to next line
              controller: _Textcontroller,
            ),

Complete Source – Multiline input textfield flutter- TextEditingController

Here is Complete Source code, Flutter Multline TextField and TextEditingController to handle text that is been entered by user.

Video Tutorial


main.dart

import 'package:flutter/cupertino.dart';
import 'package:flutter/material.dart';
import 'package:read_json_file/MutltTextFieldline.dart';

void main() {
  runApp(MyApp());
}

class MyApp extends StatelessWidget {
  // This widget is the root of your application.
  @override
  Widget build(BuildContext context) {
    return MaterialApp(
      title: 'Flutter Demo',
      theme: ThemeData(
        primarySwatch: Colors.blue,
      ),
      home: MultiLineTextField(), // call page to display
    );
  }
}

MultiLineTextField.dart

import 'package:flutter/material.dart';

class MultiLineTextField extends StatefulWidget {
  @override
  _MultiLineTextFieldState createState() => _MultiLineTextFieldState();
}

class _MultiLineTextFieldState extends State<MultiLineTextField> {
  // text controller to handle user entered data in textfield
  final TextEditingController _Textcontroller = TextEditingController();
  
  @override
  Widget build(BuildContext context) {
    return Scaffold(
      body: Center(
        child: Column(
          mainAxisAlignment: MainAxisAlignment.center,
          children: [
           (_Textcontroller.value.text.isEmpty) ? Text("Please Enter Message") :Text('Sent Message: ${_Textcontroller.value.text}'),
            Padding(
              padding: const EdgeInsets.all(10.0),
              child: TextFormField(
                controller: _Textcontroller,
                minLines: 2,
                maxLines: 5,
                keyboardType: TextInputType.multiline,
                decoration: InputDecoration(
                  hintText: 'Enter A Message Here',
                  hintStyle: TextStyle(
                    color: Colors.grey
                  ),
                  border: OutlineInputBorder(
                    borderRadius: BorderRadius.all(Radius.circular(10)),
                  )
                ),
              ),
            ),
            TextFormField(
              minLines: 1,
              maxLines: 5,  // allow user to enter 5 line in textfield
              keyboardType: TextInputType.multiline,  // user keyboard will have a button to move cursor to next line
              controller: _Textcontroller,
            ),
            ElevatedButton(onPressed: (){
              setState(() {
                _Textcontroller.notifyListeners();
              });
            },child: Text("Send Message"),)
          ],
        ),
      ),
    );
  }
}

How to read json file in flutter & display in listview

0
Read json file in flutter and show the data in flutter listview.

Hi Guys, Welcome to Proto Coders Point.

In this Flutter tutorial(Article), We will learn how to read json file in flutter & parse local JSON file in flutter & the Display the JSON file data in flutter listview builder.

Final Output

read json file display listviewflutter

Video Tutorial – Example on reading json file, parse json data or fetch json data in flutter

You can watch the above video or continue reading…

So Let’s begin

Implementing flutter read local JSON file from assets folder.

1. Create a new flutter project

Firstly, need to create a new flutter project or simply only any existing flutter project where you want to implement read local JSON file in flutter.

In my case, I make use of android stdio to develop flutter application.

creating new flutter project:
File > New > New Flutter Project.

Give a good name & package name to project and finish.
Done your flutter project is ready.

2. How to add JSON file in flutter project

I have created a JSON file by name ProductItem.json which has a list of 10 shoes products (id, name, category, imageUrl, oldPrice & price of each item).

you can download the json file from below button or simply create you own json file.

Create a directory under flutter project & paste the ProductItem.json file in the directory.

3. Create a data model class file

ProductDataModel.dart is used to handle our data that is been used to read from JSON file.

This class has dataTypes & constructor & a method.

ProductDataModel.fromJson is used to assign the data to variable in MAP json format.

Check out this Post Flutter Auto Create Model from JSON File

ProductDataModel.dart

class ProductDataModel{
  //data Type
  int? id;
  String? name;
  String? category;
  String? imageURL;
  String? oldPrice;
  String? price;

// constructor
  ProductDataModel(
      {
       this.id,
      this.name,
      this.category,
      this.imageURL,
      this.oldPrice,
      this.price
      }
   );

  //method that assign values to respective datatype vairables
  ProductDataModel.fromJson(Map<String,dynamic> json)
  {
    id = json['id'];
    name =json['name'];
    category = json['category'];
    imageURL = json['imageUrl'];
    oldPrice = json['oldPrice'];
    price = json['price'];
  }
}

4. Reading JSON file & display the data in listview

Explanition of what is done in main.dart file.

1. Import services.dart as rootBundle

import 'package:flutter/services.dart' as rootBundle;

This will help us in reading json file.

2. Create Method to read json file in flutter

Future<List<ProductDataModel>> ReadJsonData() async {
    //read json file
    final jsondata = await rootBundle.rootBundle.loadString('jsonfile/productlist.json');
    //decode json data as list
    final list = json.decode(jsondata) as List<dynamic>;
    
    //map json and initialize using DataModel
    return list.map((e) => ProductDataModel.fromJson(e)).toList();
  }

3. FutureBuilder to parse & display data in listview

 FutureBuilder(
      future: ReadJsonData(),
      builder: (context, data) {
        if (data.hasError) {
         //in case if error found
          return Center(child: Text("${data.error}"));
        } else if (data.hasData) {
           //once data is ready this else block will execute
          // items will hold all the data of DataModel
           //items[index].name can be used to fetch name of product as done below
          var items = data.data as List<ProductDataModel>;
          return ListView.builder(
              itemCount: items == null ? 0 : items.length,
              itemBuilder: (context, index) {
                return Card(
                  elevation: 5,
                  margin: EdgeInsets.symmetric(horizontal: 10, vertical: 6),
                  child: Container(
                    padding: EdgeInsets.all(8),
                    child: Row(
                      mainAxisAlignment: MainAxisAlignment.center,
                      crossAxisAlignment: CrossAxisAlignment.center,
                      children: [
                        Container(
                          width: 50,
                          height: 50,
                          child: Image(
                            image:
                                NetworkImage(items[index].imageURL.toString()),
                            fit: BoxFit.fill,
                          ),
                        ),
                        Expanded(
                            child: Container(
                          padding: EdgeInsets.only(bottom: 8),
                          child: Column(
                            mainAxisAlignment: MainAxisAlignment.center,
                            crossAxisAlignment: CrossAxisAlignment.start,
                            children: [
                              Padding(
                                padding: EdgeInsets.only(left: 8, right: 8),
                                child: Text(
                                  items[index].name.toString(),
                                  style: TextStyle(
                                      fontSize: 16,
                                      fontWeight: FontWeight.bold),
                                ),
                              ),
                              Padding(
                                padding: EdgeInsets.only(left: 8, right: 8),
                                child: Text(items[index].price.toString()),
                              )
                            ],
                          ),
                        ))
                      ],
                    ),
                  ),
                );
              });
        } else {
              // show circular progress while data is getting fetched from json file
          return Center(
            child: CircularProgressIndicator(),
          );
        }
      },
    )

Complete Code – Read JSON file in flutter & display data on screen using ListView.Builder

main.dart

import 'dart:convert';
import 'package:flutter/cupertino.dart';
import 'package:flutter/material.dart';
import 'package:read_json_file/ProductDataModel.dart';
import 'package:flutter/services.dart' as rootBundle;

void main() {
  runApp(MyApp());
}

class MyApp extends StatelessWidget {
  // This widget is the root of your application.
  @override
  Widget build(BuildContext context) {
    return MaterialApp(
      title: 'Flutter Demo',
      theme: ThemeData(
        primarySwatch: Colors.blue,
      ),
      home: MyHomePage(),
    );
  }
}

class MyHomePage extends StatefulWidget {
  @override
  _MyHomePageState createState() => _MyHomePageState();
}

class _MyHomePageState extends State<MyHomePage> {
  @override
  Widget build(BuildContext context) {
    return Scaffold(
        body: FutureBuilder(
      future: ReadJsonData(),
      builder: (context, data) {
        if (data.hasError) {
          return Center(child: Text("${data.error}"));
        } else if (data.hasData) {
          var items = data.data as List<ProductDataModel>;
          return ListView.builder(
              itemCount: items == null ? 0 : items.length,
              itemBuilder: (context, index) {
                return Card(
                  elevation: 5,
                  margin: EdgeInsets.symmetric(horizontal: 10, vertical: 6),
                  child: Container(
                    padding: EdgeInsets.all(8),
                    child: Row(
                      mainAxisAlignment: MainAxisAlignment.center,
                      crossAxisAlignment: CrossAxisAlignment.center,
                      children: [
                        Container(
                          width: 50,
                          height: 50,
                          child: Image(
                            image:
                                NetworkImage(items[index].imageURL.toString()),
                            fit: BoxFit.fill,
                          ),
                        ),
                        Expanded(
                            child: Container(
                          padding: EdgeInsets.only(bottom: 8),
                          child: Column(
                            mainAxisAlignment: MainAxisAlignment.center,
                            crossAxisAlignment: CrossAxisAlignment.start,
                            children: [
                              Padding(
                                padding: EdgeInsets.only(left: 8, right: 8),
                                child: Text(
                                  items[index].name.toString(),
                                  style: TextStyle(
                                      fontSize: 16,
                                      fontWeight: FontWeight.bold),
                                ),
                              ),
                              Padding(
                                padding: EdgeInsets.only(left: 8, right: 8),
                                child: Text(items[index].price.toString()),
                              )
                            ],
                          ),
                        ))
                      ],
                    ),
                  ),
                );
              });
        } else {
          return Center(
            child: CircularProgressIndicator(),
          );
        }
      },
    )
    );
  }

  Future<List<ProductDataModel>> ReadJsonData() async {
    final jsondata = await rootBundle.rootBundle.loadString('jsonfile/productlist.json');
    final list = json.decode(jsondata) as List<dynamic>;
    return list.map((e) => ProductDataModel.fromJson(e)).toList();
  }
}

Output

Windows 11 features | Check windows 11 compatibility for currect system

0
windows 11 features - windows 11 compatibility

Hi Guys, In this article, we will check out new feature added into windows 11 and system requirements check if your pc/laptop support windows 11.

Before we check out windows 11 system requirement, let’s have a look towords windows 11 features.

Introduction to windows 11 awesome feature

Microsoft saying for features in windows 11:

“A new windows experience, bringing you closer to the people and things you love”

Maximize productivity:

Access more then one app by spliting windows layout screen work space, multi tasking made super ease with tools in windows like snap layout & redocking experiences.

New Ways to connect for free:

Windows 11 comes with build-in applicatioon called ‘Microsoft teams’, that helps you instantly connect to the people you love & care & it completely free to call & chat, just sign-in with microsoft.

Attact widget: that you usually use:

You can quickly setup a widget stickly in front of you like news, information & entertainment that will keep you upto date with news, info & other staff that matters to you.

Anytime – playtime:

Gaming in windows 11 made super smooth, bring gaming to a complete new level, easily search your next favourite game with xbox game, with gives you access to over 100 high quality games.

gaming in windows 11

Windows 11 minimum system requirements

Processor: 1GHz or faster with atleast 2 core on compatiable 64-bit processor. Check out the list of compatiable 64-bit processor for windows 11.

Memory RAM: 4 GB minimum.

Storage: 64 GB or larger, Works best & smooth with SSD drive.

System fireware: UEFI, secure boot.

Graphic card: Direct X 12 compatiable graphic / WDDM2X.

Display: >9″ with HD (720p).

Check weather windows 11 support your PC/Laptop

To check if your system support windows 11, microsoft have developed a app named “PC Health check app” that scans your system specification and compair with windows 11 requirements.

this pc can't run windows 11

Pattern program in dart – print patterns : star, numbers, character

0
pattern program
pattern program

Hi Guys, Welcome to Proto Coders Point, In this dart tutorial(article) we will learn how to print different design pattern in dart programming language.

Dart pattern program, improve your coding skillm the logic used in dart program & build logical technique used in looping concept. With my experience, pattern program are always asked in most of interview technique round.

By using loops we can print pattern in dart with different design patterns. To easily understand pattern programs in dart, we must have deep knowledge on how dart loop works such as for loop, do-while loop.

In this tutorial we will learn how to print star pattern, number pattern, character pattern in dart programming language.

Learn basic of how to print pattern in dart loop works

Before we go to dart program to print pattern design, let’s learn basic of pattern printing.

Suppose you want ot draw a pattern using dart program, directly don’t start writng program.

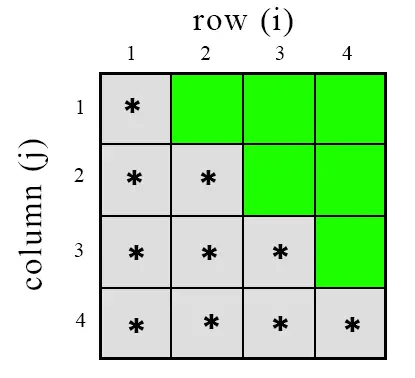
First draw the pattern in a table block using row & column, so that you can understand the logic flow, which block to fill and which block to keep empty.

As we have shown in below star pattern image.

To build/draw a pattern in console a program must use atleast two loop, if the program is complex to print pattern we must use more looping techniques.

then, if you observed above pattern image, the first row print only 1 star, the second row print 2 stars & the third row prints 3 stars and so on.

Understanding the logic behind printing pattern in dart

Let’s understand the logic behind how the loop will iterate through loop to print stars patterns as shown in above pattern image.

Snippet code

 for(int i = 0 ; i< 5; i++)
    {
        for(int j = 0; j<=i;j++)
        {
            stdout.write('*');
        }
        stdout.writeln();
    }

Here the first for loop is for row (i) & second for loop is column (j).

let’s go, execution of code step by step in iteration wise.

iteration 1:

for i = 0 ; i < 4 (true)
for k = 0;  j <= i (true)

In first iteration only 1 star get printed because J loop runs for 1 time & then comes out of loop & jumps out of j loop & goes to next line.

*

now, the value of i is incremented by +1 & j is rest to 0.


iteration 2:

for i = 1 ; i < 4 (true)
for k = 0;  j <= i (true)

In second iteration, j loop runs for 2 times, so two stars get prined & jump out of loop & goes to next line.

*
* *

now, the value of i is incremented by +1 & j is rest to 0.


iteration 3:

for i = 2 ; i < 4 (true)
for k = 0;  j <= i (true)

In third iteration, j loop runs for 3 times, i.e. j = 0 to j = 2 (0 – 1 -2). so stars get printed 3 times.

*
* *
* * *

now, the value of i is incremented by +1 & j is rest to 0.


iteration 4:

for i = 3 ; i < 4 (true)
for k = 0;  j <= i (true)

In fourth iteration, j loop runs for 4 times, i.e. j = 0 to j = 3 (0 – 1 -2 – 3). so stars get printed 4 times.

*
* *
* * *
* * * * 

now, the value of i is incremented by +1 & j is rest to 0.


iteration 5 will not work

for i = 4 ; i < 4 (false)

Here, the execution of loop stops, as i < 4. i.e. 4 < 4 which is false. therefore the loop stops.


Star pattern in dart

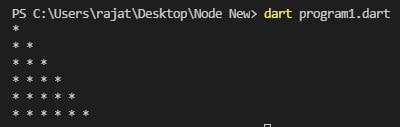
1. Right triangle star pattern

import 'dart:io';
void main(){
    int rows = 6;
    for(int i = 0 ; i< rows; i++)
    {
        for(int j = 0; j<=i;j++)
        {
            stdout.write('* ');
        }
        stdout.writeln();
    }
}
right triangle star pattern in dart

2. Left triangle star pattern

import 'dart:io';
void main(){
    int rows = 6;
    for(int i = 0 ; i< rows; i++)
    {
        for(int j=2*(rows-i);j>=0;j--){
            stdout.write(" ");
        }
        for(int j = 0;j<=i;j++)
        {
            stdout.write("* ");
        }
        stdout.writeln();
    }
}
left triangle star pattern in dart

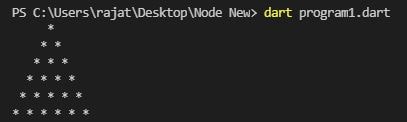
3. Pyramid star pattern

import 'dart:io';
void main(){
    int rows = 6;
    for(int i = 0 ; i< rows; i++)
    {
        for(int j=(rows-i);j>1;j--){
            stdout.write(" ");
        }
        for(int j = 0;j<=i;j++)
        {
            stdout.write("* ");
        }
        stdout.writeln();
    }
}

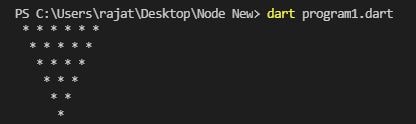
4. Reverse Pyramid star pattern

import 'dart:io';
void main(){
    int rows = 6;
    for(int i = 0 ; i< rows; i++)
    {
        for(int j = 0;j<=i;j++)
        {
             stdout.write(" ");
        }

        for(int k=0;k<=rows-1-i;k++){
           stdout.write("* ");
        }
        
        stdout.writeln();
    }
}

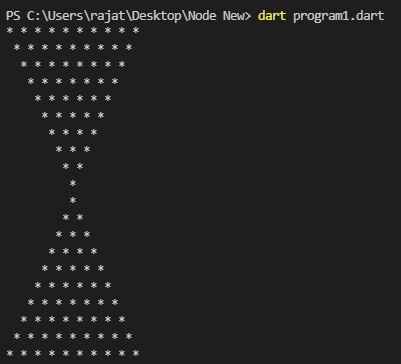
5. Sandglass star pattern

import 'dart:io';

void main() {
  int i, j, k, n = 10;

  for (i = 0; i <= n - 1; i++) {
    for (j = 0; j < i; j++) {
      stdout.write(" ");
    }
    for (k = i; k <= n - 1; k++) {
      stdout.write("*" + " ");
    }
    stdout.writeln("");
  }
  for (i = n - 1; i >= 0; i--) {
    for (j = 0; j < i; j++) {
      stdout.write(" ");
    }
    for (k = i; k <= n - 1; k++) {
      stdout.write("*" + " ");
    }
    stdout.writeln("");
  }
}
sandglass star pattern design in dart

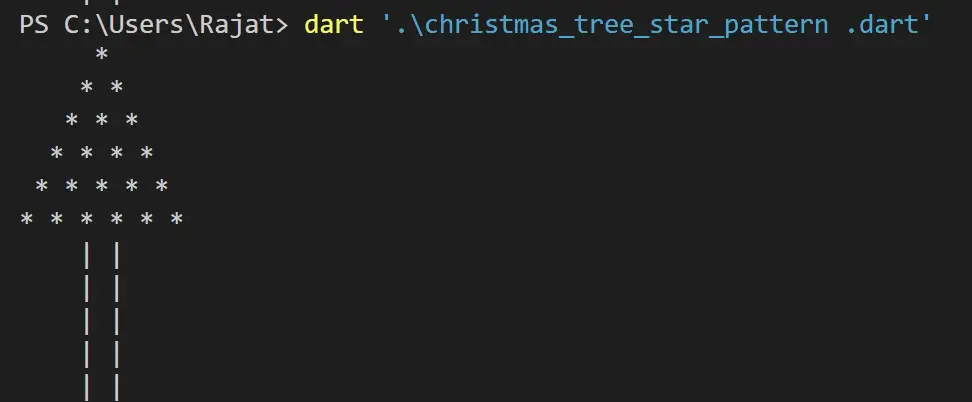
6. Christmas Tree Star Pattern

import 'dart:io';
void main() {
  
  //beginning of upper part
  for (int i = 1; i <= 6; i++) {
    for (int j =6 - i; j > 0; j--) {
      stdout.write(" ");
    }
    for (int k = 1; k <= i; k++) {
      stdout.write("* ");
    }
    stdout.writeln();
  }


//end of upper part
//beginning of lower part
  for (int i = 1; i <= 6 - 1; i++) {
    stdout.write(" ");
    for (int j = 6 - 3; j > 0; j--) {
      stdout.write(" ");
    }
    for (int k = 2; k > 0; k--) {
      stdout.write("| ");
    }
    stdout.writeln();
  } // end of lower part
}
christmas tree star pattern program in dart


Number Pattern in dart

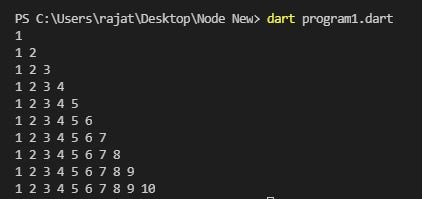
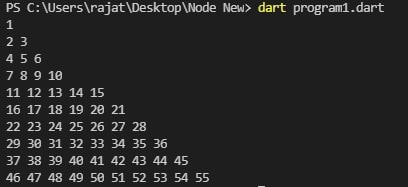
1. Right triangle Number patterns

import 'dart:io';

void main() {
  int i, j, numbers, n = 10;

  for(i=0;i<n;i++){
    numbers = 1;
    for(j = 0; j<=i;j++)
    {
      stdout.write('$numbers ');
      numbers++;
    }
    stdout.writeln();
  }

}
numbers patterns in dart

2. Number Increment pattern

import 'dart:io';

void main() {
  int i, j, numbers=1, n = 10;

  for(i=1;i<=n;i++){
    
    for(j = 1; j<i+1;j++)
    {
      stdout.write('${numbers++} ');
     
    }
    stdout.writeln();
  }

}
number increment pattern in dart

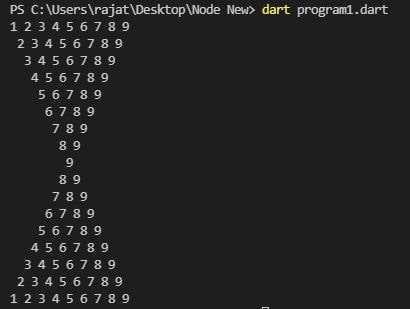
3. Sandglass Number patterns

import 'dart:io';

void main() {
  int n = 9, i, j;

  for (int i = 1; i <= n; i++) {
    for (int j = 1; j < i; j++) {
       stdout.write(" ");
    }
    for (int k = i; k <= n; k++) {
      stdout.write("$k ");
    }
    stdout.writeln();
  }
  for (int i = n - 1; i >= 1; i--) {
    for (int j = 1; j < i; j++) {
      stdout.write(" ");
    }
    for (int k = i; k <= n; k++) {
      stdout.write("$k ");
    }
    stdout.writeln();
  }
}
sand glass number patterns

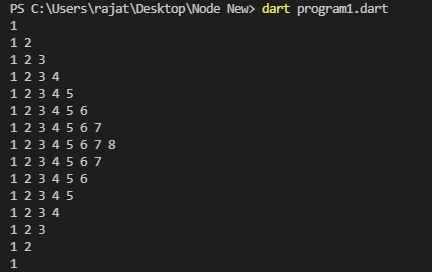
4. Rotated pyramid number pattern

import 'dart:io';

void main() {
  int rows = 8;
//Prints upper half pattern
  for (int i = 1; i <= rows; i++) {
    for (int j = 1; j <= i; j++) {
      stdout.write("$j ");
    }
    stdout.writeln();
  }
//prints lower half pattern
  for (int i = rows - 1; i >= 1; i--) {
    for (int j = 1; j <= i; j++) {
      stdout.write("$j ");
    }
    stdout.writeln();
  }
}
pyramid number pattern in dart


Character Pattern in dart

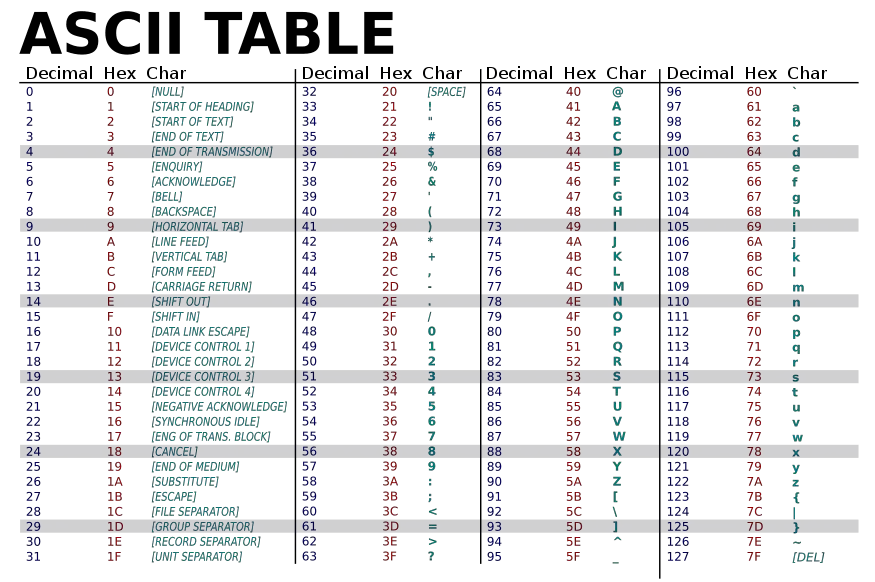
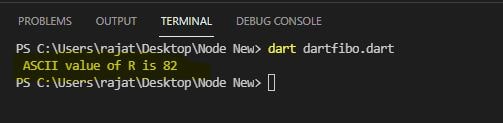
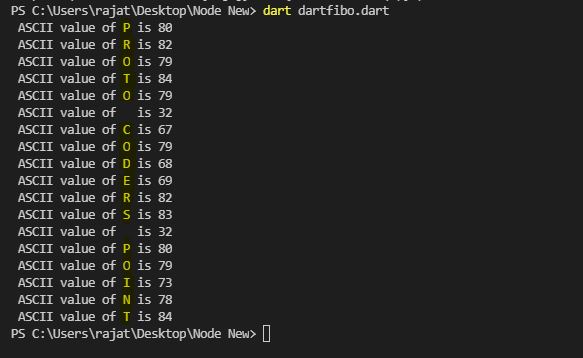
Converting string in ascii code in dart

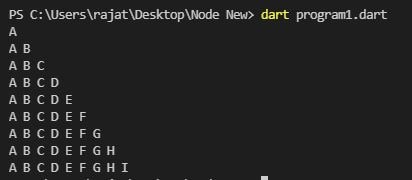
1. Right Triangle Alphabetic Pattern in dart

import 'dart:io';

void main() {
  int alphabet = 65;

  for (int i = 0; i <= 8; i++) {
    for(int j = 0;j<=i;j++)
    {
       stdout.write('${String.fromCharCode(alphabet+j)} ');
    }
    stdout.writeln();
  }
}
character alphabet printing pattern in dart

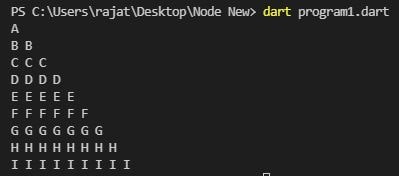
2. Repeating Alphabet Pattern

import 'dart:io';

void main() {
  int alphabet = 65;

  for (int i = 0; i <= 8; i++) {
    for(int j = 0;j<=i;j++)
    {
       stdout.write('${String.fromCharCode(alphabet)} ');
    }
    alphabet++;
    stdout.writeln();
  }
}
Repeating Alphabet Pattern

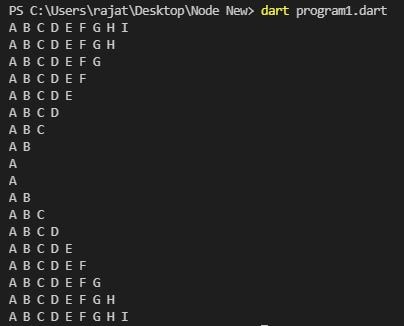
 3. K-shape Alphabet Pattern

import 'dart:io';

void main() {
  

  for (int i = 8; i >= 0; i--) {
    int alphabet = 65;
    for(int j = 0;j<=i;j++)
    {
       stdout.write('${String.fromCharCode(alphabet+j)} ');
    }
    stdout.writeln();
  }
  for (int i = 0; i <= 8; i++) {
    int alphabet = 65;
    for(int j = 0;j<=i;j++)
    {
       stdout.write('${String.fromCharCode(alphabet+j)} ');
    }
    stdout.writeln();
  }
}
k shape alphabet pattern dart

Dart program to convert string to ASCII value (Code Units)

0
dart program to convert striing to ascii value

Hi Guys, Welcome to Proto Coders Point.

In the Dart tutorial (Article), We will learn a basic program every beginner programmer should know, i.e. How to convert string character to ASCII value in dart programming language(code unit).

Introducation:

What is ASCII value?

ASCII stands for “American Standart code for informaton exchange”. Is used for character encoding standard for electronic communication.

In simple words ASCII is a technique used to get ASCII number of a character.

Here is a ASCII value chart for you for reference.

Eg: Suppose you want ascii value of character capital ‘R’, you can check above ascii chart we have R = 82, like wise for small letter ‘r’ = 114.

Ascii in dart – code unit in dart

In dart language, ascii is also know as code unit. In dart, each character is in UTF-16 form.

dart String class we have 2 methods to get code unit of a given character or also loop to string character to get all code units by each index of string value.


Dart codeUnitAt(index) & codeUnits methods

As i said above, String class in dart has 2 main method that can be used to convert string to ASCII in dart.

1. string.codeUnitAt(index)

The codeUnitAt method is used to get ascii/code unit of character in string using it’s index value.

int codeUnitAt(int index)

It accepts a integer parameter (i.e. index) and return a integer value of ASCII code.

As you all know that index value starts from ‘0’. i.e. 0 index is the first character of a string, 1 is second character of a string and so on. Have a look to example.

String name = "PROTO CODERS POINT";
dart string memory allocation

so if you want to convert index 0 position from string, then you can simple do it by:-

name.codeUnitAt(0);  // here 0 is index value.

1. Dart code for converting character to ascii value

import 'dart:io';

void main() {
 
 String ch = 'R';
 print(' ASCII value of ${ch[0]} is ${ch.codeUnitAt(0)}');
 
}

output

character to ascii in dart

2. Looping through all character in string.

import 'dart:io';

void main() {
 
 String name = 'PROTO CODERS POINT';

 //loop to each character in string 
 for(int i = 0; i <name.length; i++){

   print(' ASCII value of ${name[i]} is ${name.codeUnitAt(i)}');

 }

}

Output

ascii dart example

2. string.codeUnits

The string.codeUnits is used to get all the ascii value / code units of a given string & it returns code unit(ascii value) in list.

defined as:

List codeUnits

To get list of code unit(ascii value) of a given string simply pass the string to this method.

Eg: String name =''RAJAT";
print("ASCII list of given string ${name.codeUnits}.
import 'dart:io';

void main() {
 
 String name = 'PROTO CODERS POINT';
 
 //returns list of code unit value.
 print('Code Unit list: ${name.codeUnits}');
 
}

output