
Hi, Guys Welcome to Proto Coders Point, In this android studio tutorial article we will build a material component i.e custom bottom navigation bar android.
Bottom Navigation bar is a material component that help user to switch between screen or pages.
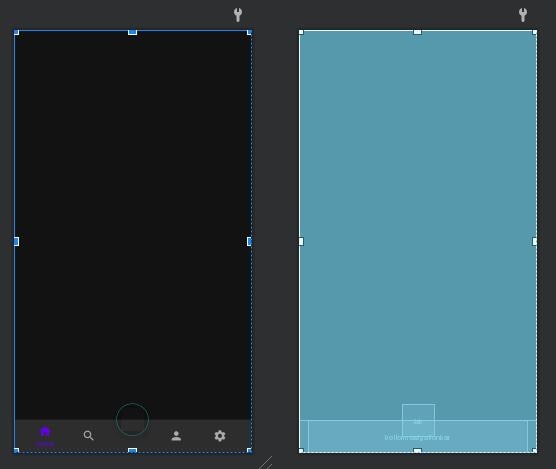
Here is how our final BottomNavigationView looks

Video Tutorial on Custom Navigation Bar android
So now let’s begin Implementing the same.
Custom Bottom Navigation Bar android with Fab Button at center
Step 1: Create a new Android Project
Ofcourse you need to create a new Android Project or Open your existing Android Project where you want to add Bottom Navigation View.
In your Android Studio IDE go to, File > New > New Project ( a window will open select Empty Activity Next) > Give a name & package to your Android application & Finish (Android project will get created).
Step 2: Add Required Dependencies (build.gradle app level)
In your Android IDE Project section look for Gradle Script> build.gradle (app level) open it and add below 3 dependencies under the dependencies section if they don’t exist.
dependencies {
    implementation 'com.google.android.material:material:1.3.0'
    implementation 'androidx.constraintlayout:constraintlayout:2.0.4'
    implementation 'androidx.coordinatorlayout:coordinatorlayout:1.1.0'
    implementation 'com.google.android.material:material:1.3.0-alpha03'
}
Step 3: Add google maven repository and sync project
Then, you need to add android google maven url in your project repositories in build.gradle(project level) under allprojects section.
allprojects {
    repositories {
        google()
        jcenter()
        maven {
            url "https://maven.google.com"
        }
    }
}
Step 4: Create 5 Vector Assets Icon in Drawable Folder
Then, you need 5 Vector Assets to show in each menu item of Bottom Navigation Bar. So to create it:
right click on drawable > New > Vector Assets ( a window will open select your clip Art as per your need Next ) > finish
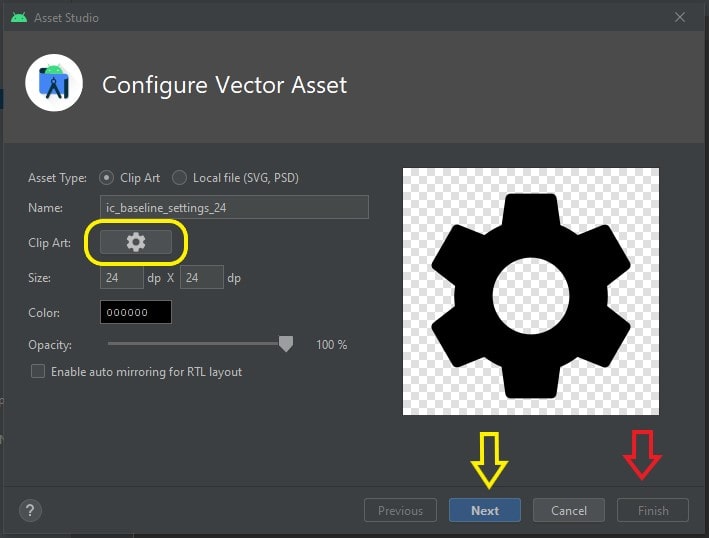
Like this create 5 vector icon assets.
Step 5: Create menu in android studio
Then, you need to create a menu in android studio under
res > menu > (right click, create a new menu resource file) bottom_nav_menu.xml
and copy paste below xml code in it
bottom_nav_menu.xml
<?xml version="1.0" encoding="utf-8"?>
<menu xmlns:android="http://schemas.android.com/apk/res/android">

    <item android:id="@+id/mHome"
        android:title="Home"
        android:icon="@drawable/ic_home_24"/>

    <item android:id="@+id/mSearch"
        android:title="Search"
        android:icon="@drawable/ic_search_24"/>
    <item android:id="@+id/mplaceholder"
        android:title=""
        />

    <item android:id="@+id/mPerson"
        android:title="Profile"
        android:icon="@drawable/ic_person_24"/>

    <item android:id="@+id/mSetting"
        android:title="Setting"
        android:icon="@drawable/ic_settings_24"/>


</menu>
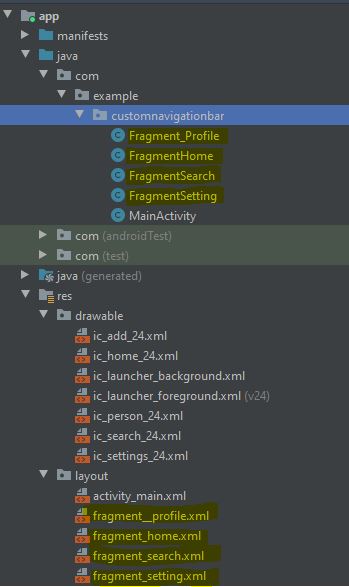
Step 6: create 4 fragment files
then, to create frangment files under java folder right click on package name > New > Fragment > Fragment (Blank)
This will automatically create fragment xml file for you.
Have a look at my project structure, i have created 4 fragment class and 4 fragment xml.
Step 7: activity_main.xml custom bottom navigation bar android
activity_main.xml
<?xml version="1.0" encoding="utf-8"?>
<RelativeLayout xmlns:android="http://schemas.android.com/apk/res/android"
    xmlns:app="http://schemas.android.com/apk/res-auto"
    xmlns:tools="http://schemas.android.com/tools"
    android:layout_width="match_parent"
    android:layout_height="match_parent"
    tools:context=".MainActivity">
    <FrameLayout
        android:layout_width="match_parent"
        android:layout_height="match_parent"
        android:id="@+id/framecontainer"
        >

        <androidx.coordinatorlayout.widget.CoordinatorLayout
            android:id="@+id/coordinator"
            android:layout_width="match_parent"
            android:layout_height="match_parent">

            <com.google.android.material.bottomappbar.BottomAppBar
                android:id="@+id/bottomappbar"
                android:layout_width="match_parent"
                android:layout_height="wrap_content"
                android:layout_gravity="bottom">

                <com.google.android.material.bottomnavigation.BottomNavigationView
                    android:id="@+id/bottomnavigationbar"
                    android:layout_width="match_parent"
                    android:layout_height="match_parent"
                    android:layout_marginRight="16dp"
                    android:background="@android:color/transparent"
                    app:menu="@menu/bottom_nav_menu" />

            </com.google.android.material.bottomappbar.BottomAppBar>

            <com.google.android.material.floatingactionbutton.FloatingActionButton
                android:id="@+id/fab"
                android:layout_width="wrap_content"
                android:layout_height="wrap_content"
                android:src="@drawable/ic_add_24"
                app:layout_anchor="@id/bottomappbar" />
        </androidx.coordinatorlayout.widget.CoordinatorLayout>
    </FrameLayout>


</RelativeLayout>
Step 8: Giving functionality to navigation menu bar
MainActivity.java
package com.example.customnavigationbar;

import androidx.annotation.NonNull;
import androidx.appcompat.app.AppCompatActivity;
import androidx.fragment.app.Fragment;

import android.os.Bundle;
import android.view.MenuItem;

import com.google.android.material.bottomnavigation.BottomNavigationView;

public class MainActivity extends AppCompatActivity {

    BottomNavigationView bottomNavigationView;

    @Override
    protected void onCreate(Bundle savedInstanceState) {
        super.onCreate(savedInstanceState);
        setContentView(R.layout.activity_main);

        bottomNavigationView = (BottomNavigationView) findViewById(R.id.bottomnavigationbar);

        bottomNavigationView.setBackground(null);

        bottomNavigationView.getMenu().getItem(2).setEnabled(false);

        getSupportFragmentManager().beginTransaction().replace(R.id.framecontainer,new FragmentHome()).commit();

        bottomNavigationView.setOnNavigationItemSelectedListener(new BottomNavigationView.OnNavigationItemSelectedListener() {
            @Override
            public boolean onNavigationItemSelected(@NonNull MenuItem item) {
                Fragment temp = null;

                switch (item.getItemId())
                {
                    case R.id.mHome : temp = new FragmentHome();
                                     break;
                    case R.id.mSearch : temp = new FragmentSearch();
                        break;

                    case R.id.mPerson : temp = new Fragment_Profile();
                    break;

                    case R.id.mSetting : temp = new FragmentSetting();


                }

                getSupportFragmentManager().beginTransaction().replace(R.id.framecontainer,temp).commit();
                return true;
            }
        });
    }
}
")


