
Working Demo
An AlertDialog is a Simplest way to get response from a user by providing them a option to select .This post will show you how can we add a list of choices to our AlertDialog box in android.
If you check official documentation that have describe that, their are total three kinds of lists that can be used with an AlertDialog in android :
- Traditional single-choice list
- Persistent single-choice list (radio buttons)
- Persistent multiple-choice list (checkboxes)
In this Tutorial i will give demo on all 3 kinds of alert dialog choice list
Basic to build a Alert Dialog Box
// setup the alert builder

 AlertDialog.Builder builder = new AlertDialog.Builder(MainActivity.this);
        builder.setTitle("Choose an Option");
Manually Create a Array list to display on a alert dialog
// add a list
        String[] options = {"Option1", "Option2", "Option3", "Option4", "Option3"};
Create a dialog box and show to user on action
// create and show the alert dialog
        AlertDialog dialog = builder.create();
        dialog.show();
Traditional single-choice Android alert Dialog list.
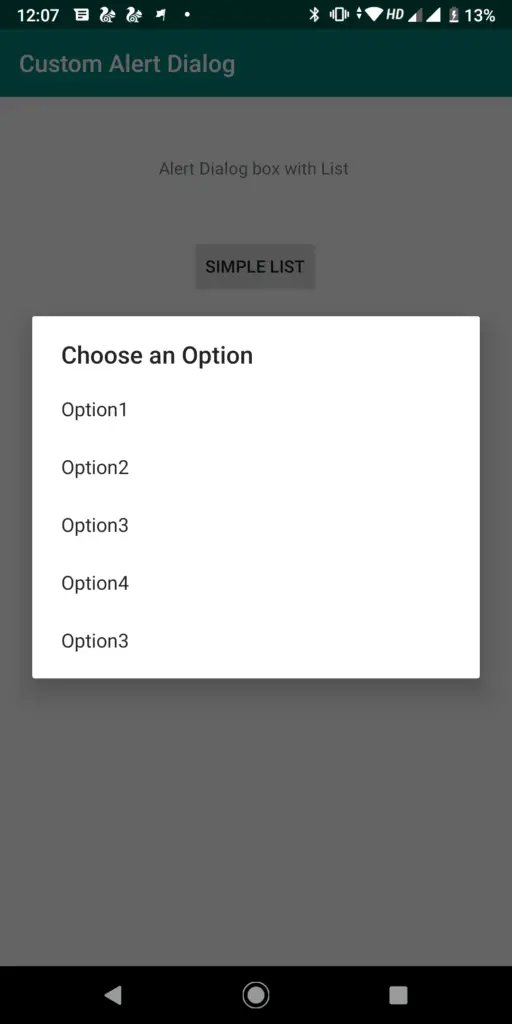
The way to make use of a traditional single-choice list is to use setItems method.
Call the Below Function on button Click
 public void TraditionallistDialog()
    {
        // setup the alert builder

        AlertDialog.Builder builder = new AlertDialog.Builder(MainActivity.this);
        builder.setTitle("Choose an Option");

        // add a list

        String[] options = {"Option1", "Option2", "Option3", "Option4", "Option3"};

        //Pass the array list in Alert dialog
        builder.setItems(options, new DialogInterface.OnClickListener() {
            @Override
            public void onClick(DialogInterface dialog, int which) {
                switch (which) {
                    case 0: // Select option task
                    case 1: // Config it as you need here
                    case 2:
                    case 3:
                    case 4:
                }
            }
        });
// create and show the alert dialog
        AlertDialog dialog = builder.create();
        dialog.show();
    }
In Traditional list their is no need to set any positive button, as user select any list from alert dialog list the item will automatically gets selected and alert dialog get closed.
Radio button single-choice Android alert Dialog list.
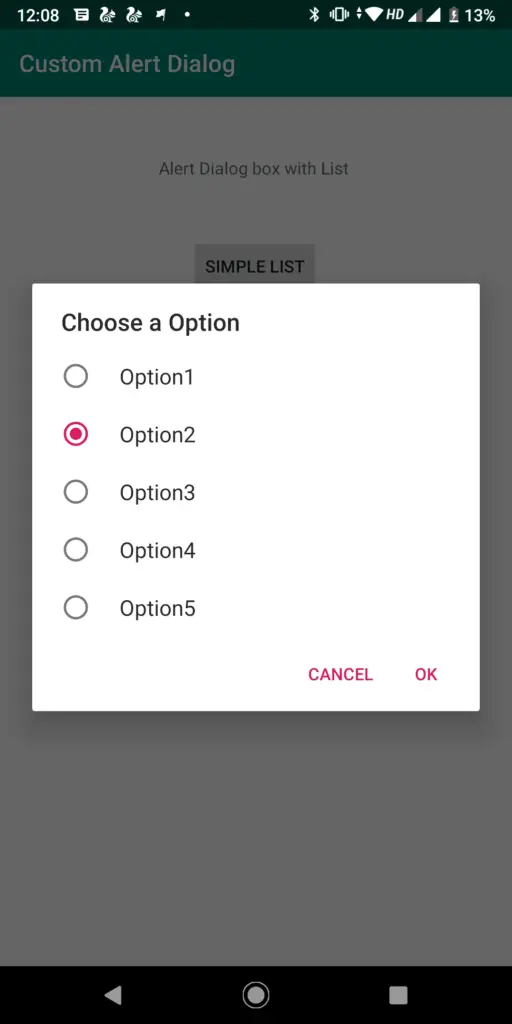
The Best advantage of the radio button list over a Simple traditional list is that the user will be able to check which is the default selected option in the list where as in Traditional list their is no default option.
The way to make a radio button list is to use setSingleChoiceItems.
Call the below code on button Click.
public  void radiolistDialog()
    {
        // setup the alert builder
        AlertDialog.Builder builder = new AlertDialog.Builder(MainActivity.this);
        builder.setTitle("Choose a Option");
// add a radio button list
        final String[] selectedoption = {"Option1", "Option2", "Option3", "Option4", "Option5"};
        int checkedItem = 1; // cow
        builder.setSingleChoiceItems(selectedoption, checkedItem, new DialogInterface.OnClickListener() {
            @Override
            public void onClick(DialogInterface dialog, int which) {
                // user checked an item
                Toast.makeText(MainActivity.this,"selected option: "+selectedoption[which],Toast.LENGTH_LONG).show();
                //here 'which' is the position selected
            }
        });
// add OK and Cancel buttons
        builder.setPositiveButton("OK", new DialogInterface.OnClickListener() {
            @Override
            public void onClick(DialogInterface dialog, int which) {
                // user clicked OK
            }
        });
        builder.setNegativeButton("Cancel", null);
// create and show the alert dialog
        AlertDialog dialog = builder.create();
        dialog.show();
    }
In Radiobutton list we can implement 2 kinds of buttons in alert dialog box i.e setPositiveButton() and setNegativeButton() with different actions.
Checkbox list choice Android alert Dialog list.
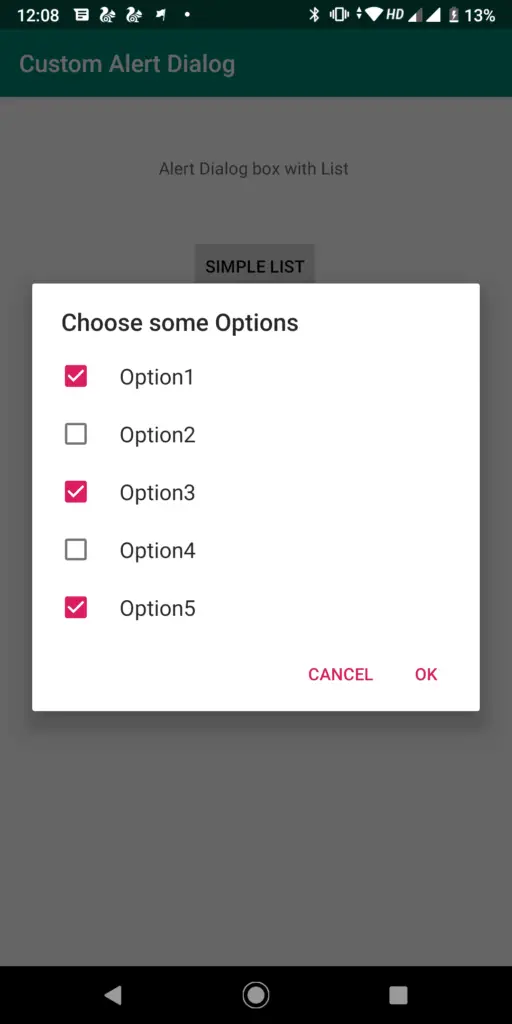
Here in Checkbox list alert dialog list user can select multiple option from the given options.
The way to make a checkbox list is to use setMultiChoiceItems.
public void checkboxlistDialog()
    {
        // setup the alert builder
        AlertDialog.Builder builder = new AlertDialog.Builder(MainActivity.this);
        builder.setTitle("Choose some Options ");
        // add a checkbox list
        String[] selectedoption = {"Option1", "Option2", "Option3", "Option4", "Option5"};
        final boolean[] checkedItems = {true, false, false, false, false};
        builder.setMultiChoiceItems(selectedoption, checkedItems, new DialogInterface.OnMultiChoiceClickListener() {
            @Override
            public void onClick(DialogInterface dialog, int which, boolean isChecked) {
                // user checked or unchecked a box


            }
        });
// add OK and Cancel buttons
        builder.setPositiveButton("OK", new DialogInterface.OnClickListener() {
            @Override
            public void onClick(DialogInterface dialog, int which) {
                // user clicked OK
            }
        });
        builder.setNegativeButton("Cancel", null);
// create and show the alert dialog
        AlertDialog dialog = builder.create();
        dialog.show();
    }
Complete Source Code android Alert Dialog with list of options
activitymain.xml for UI Design
<?xml version="1.0" encoding="utf-8"?>
<androidx.constraintlayout.widget.ConstraintLayout xmlns:android="http://schemas.android.com/apk/res/android"
    xmlns:app="http://schemas.android.com/apk/res-auto"
    xmlns:tools="http://schemas.android.com/tools"
    android:layout_width="match_parent"
    android:layout_height="match_parent"
    tools:context=".MainActivity">

    <TextView
        android:id="@+id/textView"
        android:layout_width="wrap_content"
        android:layout_height="wrap_content"
        android:text="Alert Dialog box with List "
        app:layout_constraintBottom_toBottomOf="parent"
        app:layout_constraintEnd_toEndOf="parent"
        app:layout_constraintLeft_toLeftOf="parent"
        app:layout_constraintRight_toRightOf="parent"
        app:layout_constraintStart_toStartOf="parent"
        app:layout_constraintTop_toTopOf="parent"
        app:layout_constraintVertical_bias="0.07" />

    <Button
        android:id="@+id/listdialog1"
        android:layout_width="wrap_content"
        android:layout_height="wrap_content"
        android:layout_marginTop="48dp"
        android:text="Simple list"
        app:layout_constraintEnd_toEndOf="parent"
        app:layout_constraintHorizontal_bias="0.498"
        app:layout_constraintStart_toStartOf="parent"
        app:layout_constraintTop_toBottomOf="@+id/textView" />

    <Button
        android:id="@+id/radiolist"
        android:layout_width="wrap_content"
        android:layout_height="wrap_content"
        android:layout_marginTop="28dp"
        android:text="Radio button list"
        app:layout_constraintEnd_toEndOf="parent"
        app:layout_constraintHorizontal_bias="0.498"
        app:layout_constraintStart_toStartOf="parent"
        app:layout_constraintTop_toBottomOf="@+id/listdialog1" />

    <Button
        android:id="@+id/checkboxlist"
        android:layout_width="wrap_content"
        android:layout_height="wrap_content"
        android:layout_marginTop="40dp"
        android:text="Checkbox list"
        app:layout_constraintEnd_toEndOf="parent"
        app:layout_constraintHorizontal_bias="0.498"
        app:layout_constraintStart_toStartOf="parent"
        app:layout_constraintTop_toBottomOf="@+id/radiolist" />

</androidx.constraintlayout.widget.ConstraintLayout>
MainActivity.java
package protocoderspoint.com.customalertdialog;

import androidx.appcompat.app.AlertDialog;
import androidx.appcompat.app.AppCompatActivity;

import android.content.DialogInterface;
import android.os.Bundle;
import android.view.View;
import android.widget.Button;
import android.widget.Toast;

public class MainActivity extends AppCompatActivity {

    Button simplelist,radiolist,checkboxlist;
    @Override
    protected void onCreate(Bundle savedInstanceState) {
        super.onCreate(savedInstanceState);
        setContentView(R.layout.activity_main);
        simplelist=(Button)findViewById(R.id.listdialog1);
        radiolist=(Button)findViewById(R.id.radiolist);
        checkboxlist=(Button)findViewById(R.id.checkboxlist);
     simplelist.setOnClickListener(new View.OnClickListener() {
            @Override
            public void onClick(View view) {
                simplelistDialog();
            }
        });

     radiolist.setOnClickListener(new View.OnClickListener() {
         @Override
         public void onClick(View view) {
             radiolistDialog();
         }
     });

     checkboxlist.setOnClickListener(new View.OnClickListener() {
         @Override
         public void onClick(View view) {
             checkboxlistDialog();
         }
     });
    }

    public void simplelistDialog()
    {
        // setup the alert builder

        AlertDialog.Builder builder = new AlertDialog.Builder(MainActivity.this);
        builder.setTitle("Choose an Option");

        // add a list

        String[] options = {"Option1", "Option2", "Option3", "Option4", "Option3"};

        //Pass the array list in Alert dialog
        builder.setItems(options, new DialogInterface.OnClickListener() {
            @Override
            public void onClick(DialogInterface dialog, int which) {
                switch (which) {
                    case 0: // Select option task
                    case 1: // Config it as you need here
                    case 2:
                    case 3:
                    case 4:
                }
            }
        });
// create and show the alert dialog
        AlertDialog dialog = builder.create();
        dialog.show();
    }

    public  void radiolistDialog()
    {
        // setup the alert builder
        AlertDialog.Builder builder = new AlertDialog.Builder(MainActivity.this);
        builder.setTitle("Choose a Option");
// add a radio button list
        final String[] selectedoption = {"Option1", "Option2", "Option3", "Option4", "Option5"};
        int checkedItem = 1; // cow
        builder.setSingleChoiceItems(selectedoption, checkedItem, new DialogInterface.OnClickListener() {
            @Override
            public void onClick(DialogInterface dialog, int which) {
                // user checked an item
                Toast.makeText(MainActivity.this,"selected option: "+selectedoption[which],Toast.LENGTH_LONG).show();
                //here 'which' is the position selected
            }
        });
// add OK and Cancel buttons
        builder.setPositiveButton("OK", new DialogInterface.OnClickListener() {
            @Override
            public void onClick(DialogInterface dialog, int which) {
                // user clicked OK
            }
        });
        builder.setNegativeButton("Cancel", null);
// create and show the alert dialog
        AlertDialog dialog = builder.create();
        dialog.show();
    }

   public void checkboxlistDialog()
    {
        // setup the alert builder
        AlertDialog.Builder builder = new AlertDialog.Builder(MainActivity.this);
        builder.setTitle("Choose some Options ");
        // add a checkbox list
        String[] selectedoption = {"Option1", "Option2", "Option3", "Option4", "Option5"};
        final boolean[] checkedItems = {true, false, false, false, false};
        builder.setMultiChoiceItems(selectedoption, checkedItems, new DialogInterface.OnMultiChoiceClickListener() {
            @Override
            public void onClick(DialogInterface dialog, int which, boolean isChecked) {
                // user checked or unchecked a box


            }
        });
// add OK and Cancel buttons
        builder.setPositiveButton("OK", new DialogInterface.OnClickListener() {
            @Override
            public void onClick(DialogInterface dialog, int which) {
                // user clicked OK
            }
        });
        builder.setNegativeButton("Cancel", null);
// create and show the alert dialog
        AlertDialog dialog = builder.create();
        dialog.show();
    }
}
Recommended Android post


