Home Blog Page 71

Flutter Wake Lock – Keep Screen Awake using WakeLock in Android, IOS

0
walklock flutter - how to keep app screen on while using app

Hi Guys, Welcome to Proto Coders Point, In this Flutter tutorial we will make use of flutter wakelock plugin/package using which we can keep the device screen awake. when your app is been used by users.
This wake lock keep the screen awake, This flutter library is very useful when you are building an app where user is watching videos in your flutter application.

Wakelock Flutter package library

Official link of this library : https://pub.dev/packages/wakelock

Video Tutorial 

1. Installation – Adding Dependencies in your flutter project

Open pubspec.yaml file and then in dependencies section all the wakelock plugin

dependencies:
  wakelock: ^0.2.1   #add this line

2. User the wakelock class where required by just Importing the class

import 'package:wakelock/wakelock.dart';

Then you need to just import flutter wakelock class wherever required. For Exmaple : main.dart

Implementation

This Flutter package is very easy to use and implement into your flutter project, Everything in this plugin is been controlled in the Wakelock call itself.

If you want to keep device screen awake then, you need to simply call a function called ” Wakelock.enable” and to disable just call “Wakelock.disable“.

For example:
Snippet code

The below code on button press will keep android wakelock and ios wakelock, Means screen display will be awake until user disable it.

RaisedButton(onPressed: (){
       setState(() {
                  Wakelock.enable();
                 });
},
color: Colors.blue,
child: Text("ENABLE"),
)


Then, to disable it

RaisedButton(onPressed: (){
              setState(() {
                Wakelock.disable();
              });

  },
 color: Colors.blue,
 child: Text("DISABLE"),
 ),

advance feature

Use Wakelock.toggle(enable: true); 
by using this toggle feature of the library we can simply turn on awake lock and turn off

setState(() {
                Wakelock.toggle(enable: isWakeEnable);
                if(isWakeEnable)
                 {
                      isWakeEnable = false;
                    
                 }
                 else
                 {
                      isWakeEnable = true;
                     
                 }
    });

Here in above code what is happening is:
we have a boolean type variable isWakeEnable set to true and this vairable is been used to turn on/Enable Wakelock in Android & IOS.

and then when toggle button is been pressed, it will check  in IF – ELSE statement,

if(true) then set isWakeEnable to false, else set isWakeEnable to true.

Complete Code – Example on WakeLock Android, IOS

main.dart

import 'package:flutter/material.dart';
import 'package:wakelock/wakelock.dart';

void main() {
  runApp(MyApp());
}

class MyApp extends StatelessWidget {
  // This widget is the root of your application.
  @override
  Widget build(BuildContext context) {
    return MaterialApp(
      title: 'Flutter Demo',
      debugShowCheckedModeBanner: false,
      theme: ThemeData(
        primarySwatch: Colors.blue,
        visualDensity: VisualDensity.adaptivePlatformDensity,
      ),
      home: MyHomePage(),
    );
  }
}

class MyHomePage extends StatefulWidget {
  @override
  _MyHomePageState createState() => _MyHomePageState();
}

class _MyHomePageState extends State<MyHomePage> {

  bool isWakeEnable = true;
  String toggleText = "ON";

  List<bool> _selection = List.generate(1, (_) => false);

  @override
  Widget build(BuildContext context) {
    return Scaffold(
      appBar: AppBar(
        title: Text("Wake Lock Example"),
      ),
      body: Center(
        child: Column(
          mainAxisAlignment: MainAxisAlignment.center,
          children: [
            FutureBuilder(
                future: Wakelock.enabled,
                builder: (context,data){
                 return Text("Wake Lock is ${data.data} ");
            }),
            RaisedButton(onPressed: (){
                setState(() {
                  Wakelock.enable();
                });
            },
            color: Colors.blue,child: Text("ENABLE"),),
            RaisedButton(onPressed: (){
              setState(() {
                Wakelock.disable();
              });

            },
              color: Colors.blue,
              child: Text("DISABLE"),
            ),

            ToggleButtons(
                children: <Widget>[
                  Text(toggleText),
                ]
                ,
              isSelected: _selection,
             onPressed: (int index){
                  setState(() {
                    Wakelock.toggle(enable: isWakeEnable);
                    if(isWakeEnable)
                    {
                      isWakeEnable = false;
                      toggleText ="OFF";
                    }else{
                      isWakeEnable = true;
                      toggleText ="ON";
                    }
                  });

             },
            )

          ],
        ),
      ),
    );
  }
}

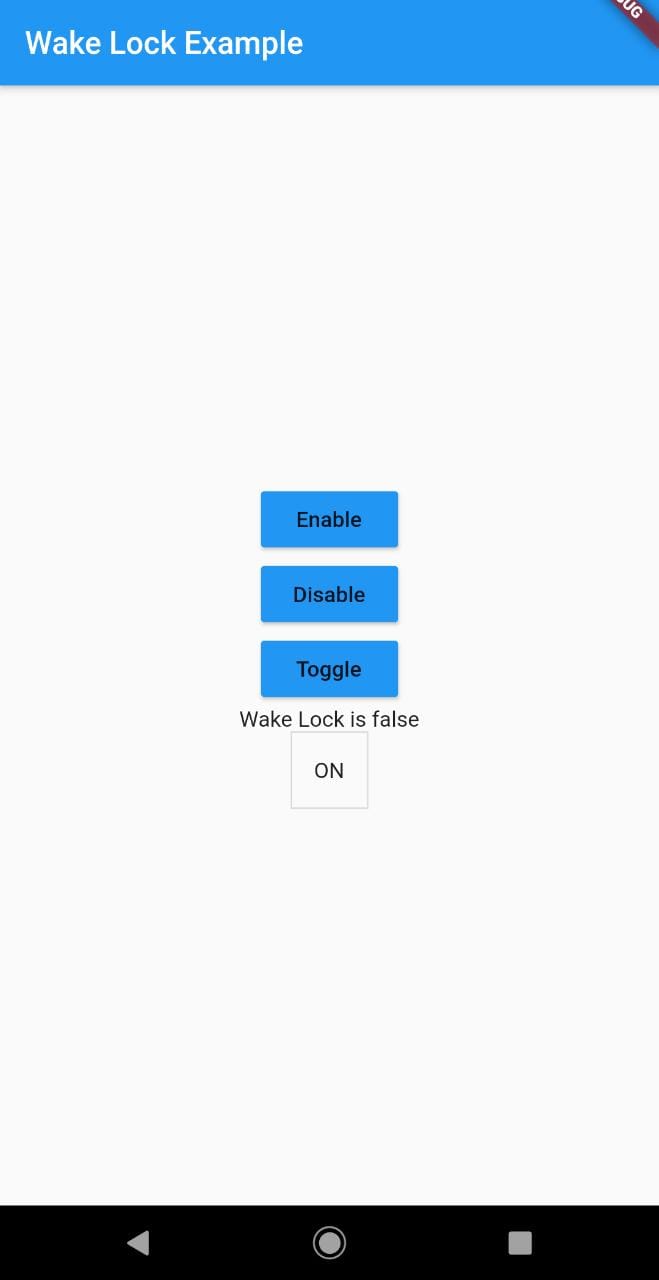
Here, In Above code We have 3 buttons
1st button is to enable wake lock
2nd button is to disbale wake lock
3rd is toggle button which will enable and disable the wake lock


How to become a full stack web developer in 2021-2022

0
How to become a full stack web developer in 2020-2021

Hi Guys, Welcome to Proto Coders Point, In this article we will discuss on how to become a full stack developer (Web) 2021-2022.

So, you have considered to learn web development, you’ve also heard that for better career you need to build your full stack developer skills in web.

It is known that a full stack developers will have both Front End & Back End development skill sets.

If you have a good full stack web developer portfolio in 2021-2022 then you’ll be able to apply for both kind of job i.e front end as well as back end developer.

Are you Ready? This article will be very useful for you to plan the journey to be a full stack developer.


How to become a full stack developer in 2021-2022

1. KNOW – WHAT IS FULL STACK MEANS

A Full stack web developer is a engineer who has knowledge in developing both client side and server side coding and scripting.
Here I mean He/She can develop, Creative Web pages, by using HTML5 & CSS3 and He/She can also program browser coding using JAVASCRIPT, JQuery, Angular & More.
and also he will be able to handle all the server scripting like fetching data from database using PHP, NodeJS, Deno, Python etc. This all web development task will be under one person who has good quality full stack developer skill set.


2. IS FULL STACK GOOD FOR YOUR CAREER GOALS

Here is a quick break down of Full Stack

Pros & Cons of Full stack Development

Pros

Developer will know how to handle both front & back end development.
Help remove lot’s of confussion by dividing work with the full stack team.

Lower Cost: As one full stack developer can handle full project development their is no need to hire 3 seperate specialist developers.

Learn more in Computer Technology: As a single person handle both back end & front end developement task & thus he will learn more then other developers.
An Aptitude to debuy error and use any code he want.

Cons

Time Management is Difficuit : As you know that all the task will be handled and developed & maintain by a single or small group of full stack people, it will be difficult to manage or complete project on given time.
A person will have heavy load  of responsibility.


Proto Coders Point point of View
I would recommend you to be a full stack developer, because you will get lot’s of things to learn quickly.


3. FRONT END & BACK END YOU SHOULD KNOW TO BE FULL STACK DEVELOPER

If you are NewBies in Software development or Web development or don’t have any knowledge of full stack then I would recommend you to go first with Front End Development.

Front End Programming language you should learn in 2020 – 2021

  1. HTML 5.
                HTML Stand for Hyper Text Markup Language . HTML is a standard markup language for developing the basic structure of web page. It indicates the browser about how the website needs to be displayed. The latest version of html is the HTML5.
  2. CSS 3.
              CSS stands for Cascading Style Sheets. CSS is used for styling of the Website to give a more attractive look to a webpage.It tells the browser the way in which the HTML elements need to be displayed, There are 3 ways of using CSS namely the inline css, internal css and the external css. The latest version of css used is the CSS3
  3. JAVASCRIPT & Its Libraries & Framework.
    Javascript is a programming language used for both client side as well as the server side. As we know HTML and CSS provide the structure and style to the webpage,Javascript makes the web page interactive and responsive.

Back End Programming language you should learn in 2020 – 2021

  1. SQL
            SQL stands for Structured Query Language. SQL is a language used for communicating with the databases.It helps us in accessing and manipulating the data from the databases.
    SQL can Retrieve, insert, update, delete the data  and  also create new database.
  2. PHP
                PHP stands for Hypertext Preprocessor .It is a server side scripting language,it helps to manage the dynamic content and making  the  web page more interactive and responsive. The latest version php is the PHP 7.4.
  3. PYTHON
              Python is a programming language  created by Guido van Rossum which was released in 1991.It is  used for server side scripting in web development, which also helps in handling big data. Python 3.8.0 is the latest version release.
  4. NODEJS
                 The main work of Server side script is to open a file on the server, fetch all requested data from database and return the data content to the client.
    This can be easily achieved using NODEJS which is developed by Ryan Dahl
  5. RUBY
               Ruby is  a high level programming language which was developed by Yukihiro Matz Matsumoto. It has a framework known as Ruby on Rails which helps the developers to build websites and applications.

4. LEARN, WEB FRONT END DEVELOPER SKILLS & EVEN BACK END

So, As you now know which skill you should learn & build. It time to start learning them,
you can learn web development skills in very little time. If you have basic idea of what web development is.

The Best Cources of full stack development in Udemy and Udacity

Udacity.com
Udemy.com

In the mean time, during the learning process, front end developer skills, ui developer skills and back end developer skills,
You can also start appling for Intership on web development and also start finding client for web development projects.


5. BUILD YOUR PORTFOLIO – HOW TO BUILD WEB DEVELOPER PORTFOLIO

For any kind of job, let it be technology related or any business, to get a good package salary job – A Person need to create his/her own PORTFOLIO.

As i said in Point 4, during the process of learning full stack web development skills a front end ui developer or back end, Just try to find a good client, weather it small project or big project just take it and complete the web projects.

Like this keep on adding project into you web developer portfolio.


6. SEARCH FOR FULL STACK DEVELOPER JOBS

So, Now you have good knowledge & skill as full stack web developer, it’s time to search for a good job in reputed companies as a full stack developer.

Best Job Boards sites for full stack

7. WHAT WILL BE FULL STACK WEB DEVELOPER SALARY

Average salary of a full stack developer will be around $10000 ( INR 7,30,000 ) to $20000 ( INR 14,00,000 ) in INDIA.

Other Country Full Stack development company can pay you $50000  to $90000 depending on your web development skill sets.

ALL THE BEST 

site I refered for this article

https://skillcrush.com/blog/how-to-become-a-full-stack-developer/

Flutter Form Validation- Email validate, confirm Password validation

0
flutter form validation email and password confirm

Hi Guys, Welcome to Proto Coders Point, In this Flutter Tutorial we will check how to create forms in flutter with validation such as empty TextField, Email Validation, and password and confirm password validation in flutter

So let’s begin

Steps for form validation

  1. Create Form with a GlobalKey<FormState>.
  2. Add some TextFormField with validation that required.
  3. Create a button where you check for flutter form validation and submit it.

Step 1: Form Creation and assigning it a GlobalKey with FormState

First make use of Form Widget, This will work as a group & help you in managing validating multiple flutter forms textfield easily.
Then, after creating a form in flutter, provide it with GlobalKey<FormState>, It will help you  in allowing validation to form in proper order & very easily.

As show in below Snippet flutter code

final _formKey = GlobalKey<FormState>();

@override
  Widget build(BuildContext context) {
    // Build a Form widget using the _formKey created above.
    return Form(
      key: _formKey,    
      child: Column(
        children: <Widget>[
              // Add TextFormFields and RaisedButton here.
        ]
     )
    );
  }

Here i have created a globalkey as formState then in widget Tree, I have made use of Form Widget and assigned key: as _formKey, and form has child as Column so that we can create TextFormField for Flutter Form Validation.

Step 2: Adding TextFormField with Validation email, password confirm

TextFormField widget comes from Material design & it can also display validation error, whenever any user do not fullfill TextFormField Requirement,
This we can do by applying Validation Rules to particular flutter Textfield by providing validation properties rules to it.

If user enter any invalid input, then Validator function in flutter will detect it & return a appropriate error message at the bottom of TextField.

TextFormField(
  // The validator receives the text that the user has entered.
  validator: (value) {
    if (value.isEmpty) {
      return 'Please enter some text';
    }
    return null;
  },
);

If user submit the form without any data then validator will take care by showing proper text message to user, as shown in below screenshot.

flutter form validation using global formstate

Step 3: OnButton Pressed Check for Form Validation

So, Now as you have designed flutter form with TextFormField with validation, now simple create a button(should be inside the Form Widget tag), using which the user can submit the form filled with information in it.

When a user attempt to submit the form onPressed, we will check if flutetr form field by user is as per required validation, Then if the form is valid then send all the data info to database server to be saved, else if the form is invalidthen show a proper error message to the user under the flutter textfield where validation is not authorized.

RaisedButton(
  onPressed: () {
    // Validate returns true if the form is valid, otherwise false.
    if (_formKey.currentState.validate()) {
      // If the form is valid, display a snackbar. In the real world,
      // you'd often call a server or save the information in a database.

      Scaffold
          .of(context)
          .showSnackBar(SnackBar(content: Text('Processing Data')));
    }
  },
  child: Text('Submit'),
);

We are using GlobalKey formState under Form so, Form Validation will automatically detect where uses validation has failed.

Video Tutorial

Complete Source Code of Form Validation in Flutter

UI Design

flutter form validation email confirm password

Project Structure

Here InputDeco_design.dart file is an decoration of TextFormField, As you can see in UI design TextField has border and radius.

Source Codes


main.dart

import 'package:flutter/cupertino.dart';
import 'package:flutter/material.dart';
import 'package:flutter_form_validator/FormPage.dart';
import 'package:flutter_form_validator/InputDeco_design.dart';
void main() {
  runApp(MyApp());
}

class MyApp extends StatelessWidget {
  // This widget is the root of your application.
  @override
  Widget build(BuildContext context) {
    return MaterialApp(
      title: 'Flutter Demo',
      debugShowCheckedModeBanner: false,
      theme: ThemeData(
        visualDensity: VisualDensity.adaptivePlatformDensity,
      ),
      home: FormPage(),
    );
  }
}


InputDeco_design.dart

import 'package:flutter/material.dart';

  InputDecoration buildInputDecoration(IconData icons,String hinttext) {
  return InputDecoration(
    hintText: hinttext,
    prefixIcon: Icon(icons),
    focusedBorder: OutlineInputBorder(
      borderRadius: BorderRadius.circular(25.0),
      borderSide: BorderSide(
          color: Colors.green,
          width: 1.5
      ),
    ),
    border: OutlineInputBorder(
      borderRadius: BorderRadius.circular(25.0),
      borderSide: BorderSide(
        color: Colors.blue,
        width: 1.5,
      ),
    ),
    enabledBorder:OutlineInputBorder(
      borderRadius: BorderRadius.circular(25.0),
      borderSide: BorderSide(
        color: Colors.blue,
        width: 1.5,
      ),
    ),
  );
}

FormPage.dart

import 'package:flutter/material.dart';
import 'InputDeco_design.dart';

class FormPage extends StatefulWidget {
  @override
  _FormPageState createState() => _FormPageState();
}

class _FormPageState extends State<FormPage> {

  String name,email,phone;

  //TextController to read text entered in text field
  TextEditingController password = TextEditingController();
  TextEditingController confirmpassword = TextEditingController();

  final GlobalKey<FormState> _formkey = GlobalKey<FormState>();

  @override
  Widget build(BuildContext context) {
    return Scaffold(
      body: Center(
        child: SingleChildScrollView(
          child: Form(
            key: _formkey,
            child: Column(
              mainAxisAlignment: MainAxisAlignment.center,
              children: [
                CircleAvatar(
                  radius: 70,
                  child: Image.network("https://protocoderspoint.com/wp-content/uploads/2020/10/PROTO-CODERS-POINT-LOGO-water-mark-.png"),
                ),
                SizedBox(
                  height: 15,
                ),
                Padding(
                  padding: const EdgeInsets.only(bottom:15,left: 10,right: 10),
                  child: TextFormField(
                    keyboardType: TextInputType.text,
                    decoration: buildInputDecoration(Icons.person,"Full Name"),
                    validator: (String value){
                      if(value.isEmpty)
                      {
                        return 'Please Enter Name';
                      }
                      return null;
                    },
                    onSaved: (String value){
                      name = value;
                    },
                  ),
                ),
                Padding(
                  padding: const EdgeInsets.only(bottom: 15,left: 10,right: 10),
                  child: TextFormField(
                    keyboardType: TextInputType.text,
                    decoration:buildInputDecoration(Icons.email,"Email"),
                    validator: (String value){
                      if(value.isEmpty)
                      {
                        return 'Please a Enter';
                      }
                      if(!RegExp("^[a-zA-Z0-9+_.-]+@[a-zA-Z0-9.-]+.[a-z]").hasMatch(value)){
                        return 'Please a valid Email';
                      }
                      return null;
                    },
                    onSaved: (String value){
                      email = value;
                    },
                  ),
                ),
                Padding(
                  padding: const EdgeInsets.only(bottom: 15,left: 10,right: 10),
                  child: TextFormField(
                    keyboardType: TextInputType.number,
                    decoration:buildInputDecoration(Icons.phone,"Phone No"),
                    validator: (String value){
                      if(value.isEmpty)
                      {
                        return 'Please enter phone no ';
                      }
                      return null;
                    },
                    onSaved: (String value){
                      phone = value;
                    },
                  ),
                ),
                Padding(
                  padding: const EdgeInsets.only(bottom: 15,left: 10,right: 10),
                  child: TextFormField(
                    controller: password,
                    keyboardType: TextInputType.text,
                    decoration:buildInputDecoration(Icons.lock,"Password"),
                    validator: (String value){
                      if(value.isEmpty)
                      {
                        return 'Please a Enter Password';
                      }
                      return null;
                    },

                  ),
                ),
                Padding(
                  padding: const EdgeInsets.only(bottom: 15,left: 10,right: 10),
                  child: TextFormField(
                    controller: confirmpassword,
                    obscureText: true,
                    keyboardType: TextInputType.text,
                    decoration:buildInputDecoration(Icons.lock,"Confirm Password"),
                    validator: (String value){
                      if(value.isEmpty)
                      {
                        return 'Please re-enter password';
                      }
                      print(password.text);

                      print(confirmpassword.text);

                      if(password.text!=confirmpassword.text){
                        return "Password does not match";
                      }

                      return null;
                    },

                  ),
                ),

                SizedBox(
                  width: 200,
                  height: 50,
                  child: RaisedButton(
                    color: Colors.redAccent,
                    onPressed: (){

                      if(_formkey.currentState.validate())
                      {
                        print("successful");

                        return;
                      }else{
                        print("UnSuccessfull");
                      }
                    },
                    shape: RoundedRectangleBorder(
                        borderRadius: BorderRadius.circular(50.0),
                        side: BorderSide(color: Colors.blue,width: 2)
                    ),
                    textColor:Colors.white,child: Text("Submit"),

                  ),
                )
              ],
            ),
          ),
        ),
      ),
    );
  }
}

Output

Flutter Form Email Validation

flutter validation email

Flutter form confirm password –
password and confirm password validation must match

flutter password validation and confirm password validation must match

Download Source Code from GitHub  Link: https://github.com/RajatPalankar8/flutter_form_validation.git 

Recommended Articles

flutter email validation

password validation regex – Android

Flutter GetX Route Management – Getx Navigation in Flutter

3
Flutter getx routes management example

Hi Guys, Welcome to Proto Coders Point, In this Flutter tutorial we will discuss Flutter Getx Route Management, getx routing Made easy with this awesome library.

What is Flutter GetX?

The GetX library in flutter is a very extra lightweight plugin & a powerful package that will help flutter developers to build apps much faster.

Using GetX we can easily switch between screens, show snack bar, show dialog, and bottom sheet that too without passing any context.

Then, it combines high-performance state management, intelligent dependency injection & route management that too quickly.

learn more:  Introduction to getx library

Learn more in detail about this library from the official site

https://pub.dev/packages/get

Video Tutorial


Installation of GetX plugin

Create a new Flutter Project and under your project, you will see pubspec.yaml file open it: add this package under the dependencies section

dependencies:
  get: ^3.13.2   #check official site of latest version

import it and use it wherever required

import 'package:get/get.dart';

Ok, So now we are done with the basic requirement,

In this tutorial, we will check only GetX Route Management, So let’s begin

Flutter Getx Routes Management

If you want to create a snack bar, dialogs, bottom sheet, and a complete routers of your flutter then, GETX is excellent to make use of:

Note: To use getx  you need to wrap the root of your flutter project with GetMaterialApp instead of using simply MaterialApp

snippet code

GetMaterialApp(
      title: 'Flutter Demo',
      debugShowCheckedModeBanner: false,
      home: HomePage(),
      theme: ThemeData(

        primarySwatch: Colors.blue,

        visualDensity: VisualDensity.adaptivePlatformDensity,
      ),
    );

As you can see in the above snippet code I have just wrapped the root node with GetMaterialApp so that I can use getx properties anywhere in the application.

Properties of Getx Routes

Navigate to a new screen

Get.to(nextScreen());

To go to the next Screen & no option  to go back to the previous screen ( you can use this in SplashScreen, Registration Screen or Login Screen )

Get.off(nextScreen());

Then, to go to the next screen but you want to forget all the previous routes that you traveled then use this:

Get.offAll(NextScreen());

Using Flutter Routes name

Snippet Code

class MyApp extends StatelessWidget {
  // This widget is the root of your application.
  @override
  Widget build(BuildContext context) {
    return GetMaterialApp(
      title: 'Flutter Demo',
      debugShowCheckedModeBanner: false,

      // starting point from where app should begin
      initialRoute: '/',

      //when initial Route is given no need to add home widget for initial start point of app
      //full app route structure

      routes: {
        '/':(context)=> MyHomePage(),
        '/login':(context)=>LoginPage(),
        '/reg':(context)=>Registration(),
        '/dashboard':(context)=>Dashboard()
      },

      theme: ThemeData(
        primarySwatch: Colors.blue,
        visualDensity: VisualDensity.adaptivePlatformDensity,
      ),
    );
  }
}

As you can see in the above code,
I have created some routes to other pages in your app,
So now will be check Getx properties that can help you in Navigation using Routes Names.

Navigation to named routes

Get.toNamed('/login');   // this will take you to login page

Navigation to named Routes but forget/removing all previously traveled routes

Get.offAllNamed('/dashboard');

Goes to the next page, and then removes the previous one.

Get.offAndToNamed('/dashboard');

Demo Project- just to Demonstrate Route Management using GetX

This is the project structure
Project Structure getx flutter
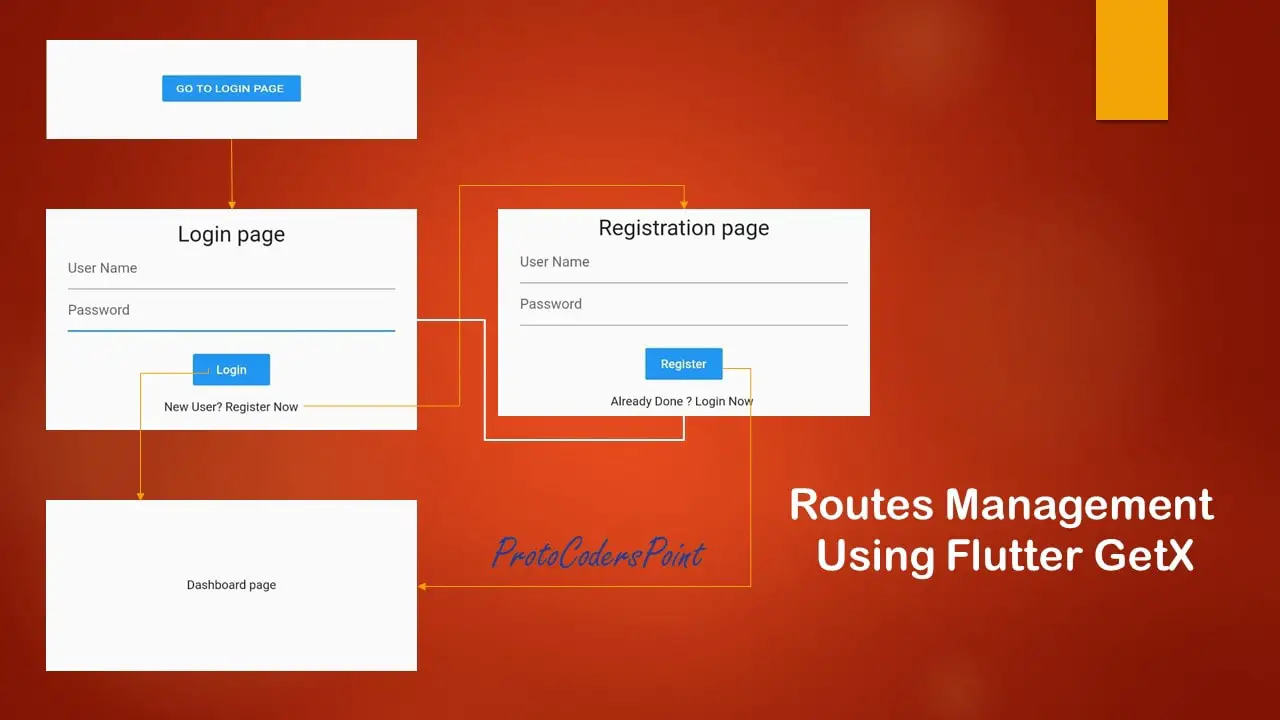
Note: This is just a dummy project with a simple login registration screen(without any actual functionality) just to show Route management in flutter using GetX.

Here are the Codes

main.dart

import 'package:flutter/material.dart';
import 'package:flutter_getx_routes/Dashboard.dart';
import 'package:flutter_getx_routes/LoginPage.dart';
import 'package:flutter_getx_routes/MyHomePage.dart';
import 'package:flutter_getx_routes/Registration.dart';
import 'package:get/get.dart';

void main() {
  runApp(MyApp());
}

class MyApp extends StatelessWidget {
  // This widget is the root of your application.
  @override
  Widget build(BuildContext context) {
    return GetMaterialApp(
      title: 'Flutter Demo',
      debugShowCheckedModeBanner: false,
      // starting point from where app should begin
      initialRoute: '/',
      //when initial Route is given no need to add home widget for initial start point of app
      //full app route structure

      routes: {
        '/':(context)=> MyHomePage(),
        '/login':(context)=>LoginPage(),
        '/reg':(context)=>Registration(),
        '/dashboard':(context)=>Dashboard()
      },

      theme: ThemeData(
        primarySwatch: Colors.blue,
        visualDensity: VisualDensity.adaptivePlatformDensity,
      ),
    );
  }
}


MyHomePage.dart

import 'package:flutter/material.dart';
import 'package:get/get.dart';

class MyHomePage extends StatefulWidget {
  @override
  _MyHomePageState createState() => _MyHomePageState();
}

class _MyHomePageState extends State<MyHomePage> {
  @override
  Widget build(BuildContext context) {
    return Scaffold(
      body: Center(
        child: Column(
          mainAxisAlignment: MainAxisAlignment.center,
          children: [
            FlatButton(onPressed: (){
                  Get.toNamed('/login');
            }, child: Text("GO TO LOGIN PAGE ",style: TextStyle(color: Colors.white),),color: Colors.blue,)
          ],
        ),
      ),
    );
  }
}


Registration.dart

import 'package:flutter/material.dart';
import 'package:get/get.dart';

class Registration extends StatelessWidget {
  @override
  Widget build(BuildContext context) {
    return Scaffold(
      body: Container(
        child: Center(
          child: Column(
            mainAxisAlignment: MainAxisAlignment.center,
            children: [
              Text("Registration page",style: TextStyle(fontSize: 25),),
              //// textField only for Simple UI, there is not event happening in it
              Padding(
                padding: const EdgeInsets.only(left: 25,right: 25),
                child: TextField(
                    decoration:  InputDecoration(
                      hintText: "User Name",
                    )
                ),
              ),Padding(
                padding: const EdgeInsets.only(left: 25,right: 25),
                child: TextField(
                    decoration:  InputDecoration(
                      hintText: "Password",
                    )
                ),
              ),
              SizedBox(height: 20,),
              FlatButton(onPressed: () {

                // after registration successful remove all the previous screen visited and goto dashboard page
                Get.offAllNamed('/dashboard');

              } ,
             child: Text("Register",style: TextStyle(color: Colors.white),),color: Colors.blue,),
              SizedBox(height: 10,),

              //// Go to Login page from registration if already registered  using getx toNamed properties

              GestureDetector(onTap: ()=> Get.offAllNamed('/login'),child: Text("Already Done ? Login Now ")),
            ],
          ),
        ),
      ),
    );
  }
}

LoginPage.dart 

import 'package:flutter/material.dart';
import 'package:get/get.dart';

class LoginPage extends StatelessWidget {
  @override
  Widget build(BuildContext context) {
    return Scaffold(
      body: Container(
        child: Center(
          child: Column(
            mainAxisAlignment: MainAxisAlignment.center,
            children: [
              Text("Login page",style: TextStyle(fontSize: 25),),
              //// textField only for Simple UI, there is not event happening in it
              Padding(
                padding: const EdgeInsets.only(left: 25,right: 25),
                child: TextField(
                    decoration:  InputDecoration(
                      hintText: "User Name",
                    )
                ),
              ),Padding(
                padding: const EdgeInsets.only(left: 25,right: 25),
                child: TextField(
                    decoration:  InputDecoration(
                      hintText: "Password",
                    )
                ),
              ),
              SizedBox(height: 20,),
              FlatButton(onPressed: () {

                // after Login successful remove all the previous screen visited and goto dashboard page
                Get.offAllNamed('/dashboard');

              } , child: Text("Login",style: TextStyle(color: Colors.white),),color: Colors.blue,),
              SizedBox(height: 10,),

              //// Go to Registration page is new user using getx toNamed properties
              GestureDetector(onTap: ()=> Get.toNamed('/reg'),child: Text("New User? Register Now")),
            ],
          ),
        ),
      ),
    );
  }
}

Dashboard.dart

import 'package:flutter/material.dart';

class Dashboard extends StatelessWidget {
  @override
  Widget build(BuildContext context) {
    return Scaffold(
      body: Container(
        child: Center(
          child: Text("Dashboard page"),
        ),
      ),
    );
  }
}

Output

flutter getx route management example output

Recommended Articles on Flutter Getx

Introduction to getX Flutter example

Flutter State management using GetX

Flutter State Management using GetX – Firebase Firestore Cloud Example

1
Flutter getx state management with firebase firestore example

Hi Guys, Welcome to Proto Coders Point, In this Flutter Tutorial we gonna implement Flutter State Management using the GetX plugin (Flutter Made Easy) & also an example to reflect the firebase firestore data change using GetX & StreamBuilder.

What is Flutter GetX?

The GetX library in flutter is a very extra lightweight plugin & a powerful package that will help flutter developers to build apps much faster.

Using GetX we can easily switch between screens, show snack bar, show dialog and bottom sheet that too without passing any context.

Then, it combines high-performance state management, intelligent dependency injection & route management that to quickly.

learn more:  Introduction to getx library


Video Tutorial

Let’s begin

Required Flutter Dependencies for the tutorial

under your project open pubspec.yaml file and under dependencies section add them.

dependencies:
  get:   # getx plugin

  #firebase
  cloud_firestore: ^0.14.1+3 #to make use of firebase classes and methods

Here I have made use of 2 dependencies

  1. get:  to add getx package to our flutter project, Using getx, flutter app development become much faster, you can easily achieve task such as showing snack bar, dialog and many more like state management and route management. learn more: https://pub.dev/packages/get
  2. cloud_firestore: To play with Firebase cloud firestore data, Cloud Firestore is a flexible, NoSQL cloud database to store data.  learn more: https://pub.dev/packages/cloud_firestore

Flutter State Management using GetX – Example 1

This Example 1 – will be on Normal/Static data to demonstrate State Management using GetX.

1st Step: Create a new Flutter Project

2nd Step: Add Get dependencies

dependencies:
  get:

Add the dependencies and hit the pub get button.


3rd Step: Create a new Dart file in the lib

In your lib directory create a new dart file and name it as “CounterState.dart”

Then the below code has

A variable count with an initial value of 0 which is kept in observable
observable means any changes in this variable will be reflected to its consumer.

Then, I have an increment() function, when called will increase count by +1.

import 'dart:async';
import 'package:get/get.dart';

class CounterState extends GetxController{

  var count = 0.obs;

  increment()=> count++;
}

4th Step: Under main.dart file

main.dart

In the below code I have added a comment refer it

As you can see below code
First of all, I have created an instance of a class CounterState, then I am using Instance Object to get data of the class variable (count) and to call increment to increment the count value by +1.

import 'package:cloud_firestore/cloud_firestore.dart';
import 'package:firebase_core/firebase_core.dart';
import 'package:flutter/material.dart';
import 'package:flutter_getx_demo/CounterState.dart';
import 'package:get/get.dart';
import 'Page2.dart';
void main(){
  runApp(MyApp());
}

class MyApp extends StatelessWidget {
  // This widget is the root of your application.
  @override
  Widget build(BuildContext context) {
    return GetMaterialApp(
      title: 'Flutter Demo',
      debugShowCheckedModeBanner: false,
      theme: ThemeData(

        primarySwatch: Colors.blue,

        visualDensity: VisualDensity.adaptivePlatformDensity,
      ),
      home: MyHomePage(),
    );
  }
}

class MyHomePage extends StatefulWidget {
  @override
  _MyHomePageState createState() => _MyHomePageState();
}

class _MyHomePageState extends State<MyHomePage> {

  final CounterState counterState = Get.put(CounterState());  // create instance of a class.

  @override
  Widget build(BuildContext context) {
    return Scaffold(
      body: Column(
        mainAxisAlignment: MainAxisAlignment.center,
        children: [
          Center(
            child: Obx(()=>Text("Counter Value is : ${counterState.count} ") ), //get count variable value
          ),
          FlatButton(onPressed: (){

            Get.to(Page2());  //getx to navigate

          }, child: Text("GO TO PAGE 2"),color: Colors.blue,),  
        ],
      ),
      floatingActionButton: FloatingActionButton(
        onPressed: () {
               counterState.increment();  //on button press call increment function
        },
        child: Icon(Icons.add),
      ),
    );
  }
}


5th Step: Create a new dart Page

Create a new Dart file by the name “Page2.dart”.

Here first create an Instance of a class and using Get we can find the updated value of the data present in that CounterState class.

I mean to say the incremented value on both the page will be same.

import 'package:flutter/material.dart';
import 'package:flutter_getx_demo/CounterInstance.dart';
import 'package:get/get.dart';

class Page2 extends StatelessWidget {

  final CounterInstance counterInstance = Get.find();
  @override
  Widget build(BuildContext context) {
    return Scaffold(
      body: Center(
        child: Text("${counterInstance.count}",
                 style: TextStyle(fontSize: 25),
                 ),
      ),
    );
  }
}

Watch this video tutorial for the basic of Flutter GetX 


Flutter State Management using GetX – Firebase firestore Example 2

This is Example 2 – Will be dynamic state management using GetX controller and StreamBuilder.

First of all, you need to connect your flutter project with the firebase console

1st Step: Create a new project in the firebase console

adding flutter project to firebase console

Then, add the app
Select Android
(Sorry, I don’t have iPhone or MAC BOOK to show to iOS steps)

firebase android package name add project

Find Android package name under AndroidManifest.xml file
Flutter Project > android > app > AndroidManifest.xml

Then Firebase will give you a googleservices.json file that you need to add under
Flutter Project > android > app 

adding google services

then, you need to add some firebase dependencies and classpath

Project-level build.gradle (<project>/build.gradle):

buildscript {
  repositories {
    // Check that you have the following line (if not, add it):
    google()  // Google's Maven repository
  }
  dependencies {
    ...
    // Add this line
    classpath 'com.google.gms:google-services:4.3.4'
  }
}

allprojects {
  ...
  repositories {
    // Check that you have the following line (if not, add it):
    google()  // Google's Maven repository
    ...
  }
}

App-level build.gradle (<project>/<app-module>/build.gradle):

apply plugin: 'com.android.application'
// Add this line
apply plugin: 'com.google.gms.google-services'    //add this line

dependencies {
  // Import the Firebase BoM
  implementation platform('com.google.firebase:firebase-bom:25.12.0')   //add this line

  implementation 'com.google.firebase:firebase-analytics'    //add this line


}

then, you are done, now just run your app on your physical device to check if your app is connected to the firebase server.
Firebase Console will show you a message, saying you are successfully connected.


2nd Step: Add Required Dependencies

dependencies:
  get:     #for GETX plugin
  cloud_firestore: ^0.14.1+3    #to get data from Firestore cloud

add this to both dependencies and hit the pub get button.


3rd Step: Let’s Create firestore database collection

Go to Firebase Console, and open the recent project you are work on and then go to Cloud Firestore > here create a new Database,
and Enter the path/data collection as shown in the below screenshot

cloud firestore collection data

this will be the path where we will store the count variable data.

4th Step: Coding – using GetX and StreamBuilder

CounterState.dart

Here Stream is used to keeping a look at data snapshot changes, Whenever any data is been changed in the server, automatically the consumer of that data will get updated Stream to listen, StreamController and StreamBuilder.


import 'dart:async';
import 'package:cloud_firestore/cloud_firestore.dart';
import 'package:get/get.dart';

class CounterState extends GetxController{
  
  StreamController<int> streamController   = StreamController<int>();

  // the path from where our data will be fetched and displayed to used 
  Stream<DocumentSnapshot> doc =      Firestore.instance.collection("data").document("counterState").snapshots();
  
  void StartStream(){
      doc.listen((event) {
         // here count is a field name in firestore database 
        streamController.sink.add(event.data()['count']);
      });
  }
  
  @override
  FutureOr onClose() {
    streamController.close();
  }
}

main.dart

import 'package:cloud_firestore/cloud_firestore.dart';
import 'package:firebase_core/firebase_core.dart';
import 'package:flutter/material.dart';
import 'package:flutter_getx_demo/CounterState.dart';
import 'package:get/get.dart';
import 'Page2.dart';
void main() async{
  WidgetsFlutterBinding.ensureInitialized();
  await Firebase.initializeApp();    // initializedApp with Firebase
  runApp(MyApp());
}

class MyApp extends StatelessWidget {
  // This widget is the root of your application.
  @override
  Widget build(BuildContext context) {
   // wrap full app with GetMaterialApp so that GetX properties can be used
    return GetMaterialApp(
      title: 'Flutter Demo',
      debugShowCheckedModeBanner: false,
      theme: ThemeData(

        primarySwatch: Colors.blue,

        visualDensity: VisualDensity.adaptivePlatformDensity,
      ),
      home: MyHomePage(),
    );
  }
}

class MyHomePage extends StatefulWidget {
  @override
  _MyHomePageState createState() => _MyHomePageState();
}

class _MyHomePageState extends State<MyHomePage> {

  int count ; // a variable that store data value available in server

  // create instance of a class using getX put properties
  final CounterState counterState = Get.put(CounterState());

  @override
  void initState() {
    super.initState();
    //start fetching data from firebase server
    counterState.StartStream();
  }

  @override
  Widget build(BuildContext context) {
    return Scaffold(
      body: Center(
        child: Column(
          mainAxisAlignment: MainAxisAlignment.center,
          children: [
             // StreamBuilder that keep UI up to date 
             // in the sense when data is been changed is refected to app UI
            StreamBuilder(
                stream:  counterState.streamController.stream,
                builder: (BuildContext context,AsyncSnapshot<dynamic> snapshot){
                  count = snapshot.data;
                  return Text("Stream : $count ");
                }
            ),

            FlatButton(
              onPressed: (){
               // call function to add +1
              _Add_data();

              },color: Colors.blue,

              child: Text("Add +1 ",style: TextStyle(color: Colors.white),),
            ),
          ],
        ),
      ),
     
    );
  }

  void _Add_data() {
    // collection field where data should be updated
    Map<String,int> demodata = {
      "count":(count+1).toInt(),
    };

    //the document path where data much be updated
    DocumentReference  documentReference = Firestore.instance.collection("data").document("counterState");
    //
    documentReference.update(demodata);
  }

}


The explanation is been done in the above code in //comment  read them

Output

View post on imgur.com

Recommended post on Flutter GetX Library

Introduction to Flutter GetX

Flutter GetX Route Management

Firebase Authentication using Flutter GetX libraryVelocityX

Flutter Firebase Google Sign In method

Introduction to Flutter GetX | Development made easy with GetX Plugin

6
flutter getx

Hi Guys, Welcome to Proto Coders Point, In this Flutter Tutorial we gonna introduce you with best development plugin that makes flutter software development easy and fast i.e Flutter GetX.

This Tutorial Article will be just an Introducton to Flutter GetX Plugin & How to you can install it in your flutter project and basic of how to us getX.

Learn more about the Plugin from Offical Site in details https://pub.dev/packages/get

Video Tutorial 

What is Flutter GetX?

The GetX library in flutter is very extra light weight plugin & a powerful package that will help flutter developer to build apps much faster.

Using GetX we can easily switch between screens, show snackbar, show dialog and bottomsheet that too without passing any context.

Then, it combimes high performance state management, intelligent dependency injection & route management that to quickly.

Feature provided in Flutter GetX library

  1. State Management
  2. Route Management
  3. Dependency Management
  4. Validation & much more.

This are 3 very useful feature of GetX package that makes developer to build Android, iOS apps faster.

Note: Seperate Tutorial on the above feature of this plugin will be made very soon in upcoming Articles.

Installation of GetX Plugin

Add Get to your pubspec.yaml file of your flutter project:

dependencies:
  get: ^version

Import get where it is need:

import 'package:get/get.dart';

Then, to use getX you just you need to Change Root Widget MaterialApp with GetMaterialApp for Example See below Snippet Code

class MyApp extends StatelessWidget {
  // This widget is the root of your application.
  @override
  Widget build(BuildContext context) {
    return GetMaterialApp(                  //LIKE THIS 
      title: 'Flutter Demo',
      theme: ThemeData(

        primarySwatch: Colors.blue,

        visualDensity: VisualDensity.adaptivePlatformDensity,
      ),
      home: MyHomePage(),
    );
  }
}

After Wraping as shown above you can easily use GetX method in child widgets.

Basic Snippet code of GetX library/ How to use GetX

Before we had to write long long code to make simple events in app for Example to more from one page to other page

Old Flutter Route Management code

Navigator.push(context, 
                MaterialPageRoute(
                              builder: (context)=>MyHomePage()
                              )
               );

In above code as you can see you need to write such a long code just to go to other screen. this can we done easily in 1 line using Getx syntax that too without passing context.

Using GetX to Navigate to Pages

//Easy Navigation
Get.to(Page2());

Route Management/Navigation using GetX is made easy using this Get X library, Just you need to do is on Button Press or any event occur call the above code.

Showing Snackbar & Dialog Box

Get.snackbar("Hi", "message");


snackbar using getx

Dialog box using GetX

Get.defaultDialog(title: "THIS IS DIALOG BOX USING FLUTTER GET X ",middleText: "GET x made Easy");

Dialog using GetX

Here is Simple Full Code with 3 Button to Perform above Operation using GetX

import 'package:flutter/material.dart';
import 'package:flutter_getx_demo/Page2.dart';
import 'package:get/get.dart';
void main() {
  runApp(MyApp());
}

class MyApp extends StatelessWidget {
  // This widget is the root of your application.
  @override
  Widget build(BuildContext context) {
    return GetMaterialApp(
      title: 'Flutter Demo',
      debugShowCheckedModeBanner: false,
      theme: ThemeData(

        primarySwatch: Colors.blue,

        visualDensity: VisualDensity.adaptivePlatformDensity,
      ),
      home: MyHomePage(),
    );
  }
}

class MyHomePage extends StatefulWidget {
  @override
  _MyHomePageState createState() => _MyHomePageState();
}

class _MyHomePageState extends State<MyHomePage> {

  @override
  Widget build(BuildContext context) {
    return Scaffold(
      body: Center(
        child: Column(
          mainAxisAlignment: MainAxisAlignment.center,
          children: [
            Text("SHOW SNACKBAR"),

            FlatButton(onPressed: (){
              Get.snackbar("HI", "This is Snackbar using Flutter GetX");
            },   child: Text("Snackbar"),color: Colors.lightBlue,),

            SizedBox(
              height: 20,
            ),
            Text("SHOW  Dialog"),

            FlatButton(onPressed: (){
              Get.defaultDialog(title: "This is dialog using GetX Flutter");
            },   child: Text("Dialog"),color: Colors.lightBlue,),
            SizedBox(
              height: 20,
            ),
            Text("Go to Next Page"),

            FlatButton(onPressed: (){
              Get.to(Page2());
            },   child: Text("GO TO PAGE 2"),color: Colors.lightBlue,),


          ],
        ),
      ),
    );
  }
}


Output:

FLUTTER GETX DIALOG EXAMPLE FLUTTER GETX EXAMPLE SNACKBAR