So Now we have done with learning basic information about this widget.
Now it’s time to implement the Cupertino Action sheet Widget.
As usual you need to create a new Flutter project, or implement it in your existing flutter project it your choice.
So I am using Android-studio to create a new flutter Project.
File> New > New Flutter Project
Fill are the required staff.
Create a RaisedButton that can activate CupertinoActionSheet
As you Flutter Project is ready you need to remove all the existing flutter code that is been by-default added into your project by Google flutter team.
I Assume that you have removed all the default flutter code. Ok
Then, you need to create a RaiseButton inside body tag as displayed in below snippet Flutter code.
body: Center(
        child: RaisedButton(
          onPressed: () {
           //Cupertino Action sheet will come over here
          },
          child: Text("Click me "),
        ),
      ),
Here, i have a center widget that will bring all the widget at the center of the screen, Here there is a child widget RaisedButton that simply create a button widget at the center of the body tag.
RaisedButton have a Function method onPressed that triggers when the user click on Raised Button.
CupertinoActionSheet Snippet Code
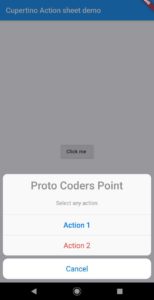
Then here, i have a CupertinoActionSheet with a title that simply display a text, and Message that display the description of the popup menu.
Then, i Have actions widget that is simply a array list of Cupertino Option Menus
In the Below Snippet code i have created 2 actions button that can perform different actions.
isDefaultAction: is set to true because the action button text will be displayed with blue color.
isDestructiveAction: is set to true that display action button text in red color.
CupertinoActionSheet(
              title: Text("Cupertino Action Sheet"),
              message: Text("Select any action "),
              actions: <Widget>[
                CupertinoActionSheetAction(
                  child: Text("Action 1"),
                  isDefaultAction: true,
                  onPressed: () {
                    print("Action 1 is been clicked");
                  },
                ),
                CupertinoActionSheetAction(
                  child: Text("Action 2"),
                  isDestructiveAction: true,
                  onPressed: () {
                    print("Action 2 is been clicked");
                  },
                )
              ],
);
import 'package:flutter/cupertino.dart';
import 'package:flutter/material.dart';
void main() => runApp(MyApp());
class MyApp extends StatelessWidget {
// This widget is the root of your application.
@override
Widget build(BuildContext context) {
return MaterialApp(
title: 'Flutter Demo',
theme: ThemeData(
// This is the theme of your application.
//
// Try running your application with "flutter run". You'll see the
// application has a blue toolbar. Then, without quitting the app, try
// changing the primarySwatch below to Colors.green and then invoke
// "hot reload" (press "r" in the console where you ran "flutter run",
// or simply save your changes to "hot reload" in a Flutter IDE).
// Notice that the counter didn't reset back to zero; the application
// is not restarted.
primarySwatch: Colors.blue,
),
home: MainPage(),
);
}
}
class MainPage extends StatefulWidget {
@override
_MainPageState createState() => _MainPageState();
}
class _MainPageState extends State<MainPage> {
@override
Widget build(BuildContext context) {
return Scaffold(
appBar: AppBar(
title: Text("Cupertino Action sheet demo"),
),
body: Center(
child: RaisedButton(
onPressed: () {
final action = CupertinoActionSheet(
title: Text(
"Proto Coders Point",
style: TextStyle(fontSize: 30),
),
message: Text(
"Select any action ",
style: TextStyle(fontSize: 15.0),
),
actions: <Widget>[
CupertinoActionSheetAction(
               child: Text("Action 1"),
               isDefaultAction: true,
               onPressed: () {
                 print("Action 1 is been clicked");
               },
             ),
             CupertinoActionSheetAction(
               child: Text("Action 2"),
               isDestructiveAction: true,
               onPressed: () {
                 print("Action 2 is been clicked");
               },
             )
           ],
           cancelButton: CupertinoActionSheetAction(
             child: Text("Cancel"),
             onPressed: () {
               Navigator.pop(context);
             },
           ),
         );
showCupertinoModalPopup(
context: context, builder: (context) => action);
},
child: Text("Click me "),
),
),
);
}
}

")


