
Hi Guys, Welcome to Proto Coders Point, In this flutter tutorial we gonna build Instagram UI Clone using Flutter.
The many focus of this tutorial is to create a Instagram UI Clone and interactions with New feed in home page (post), For the project i have dummy data model to show it in insta UI
take a look at what instagram ui design look, below
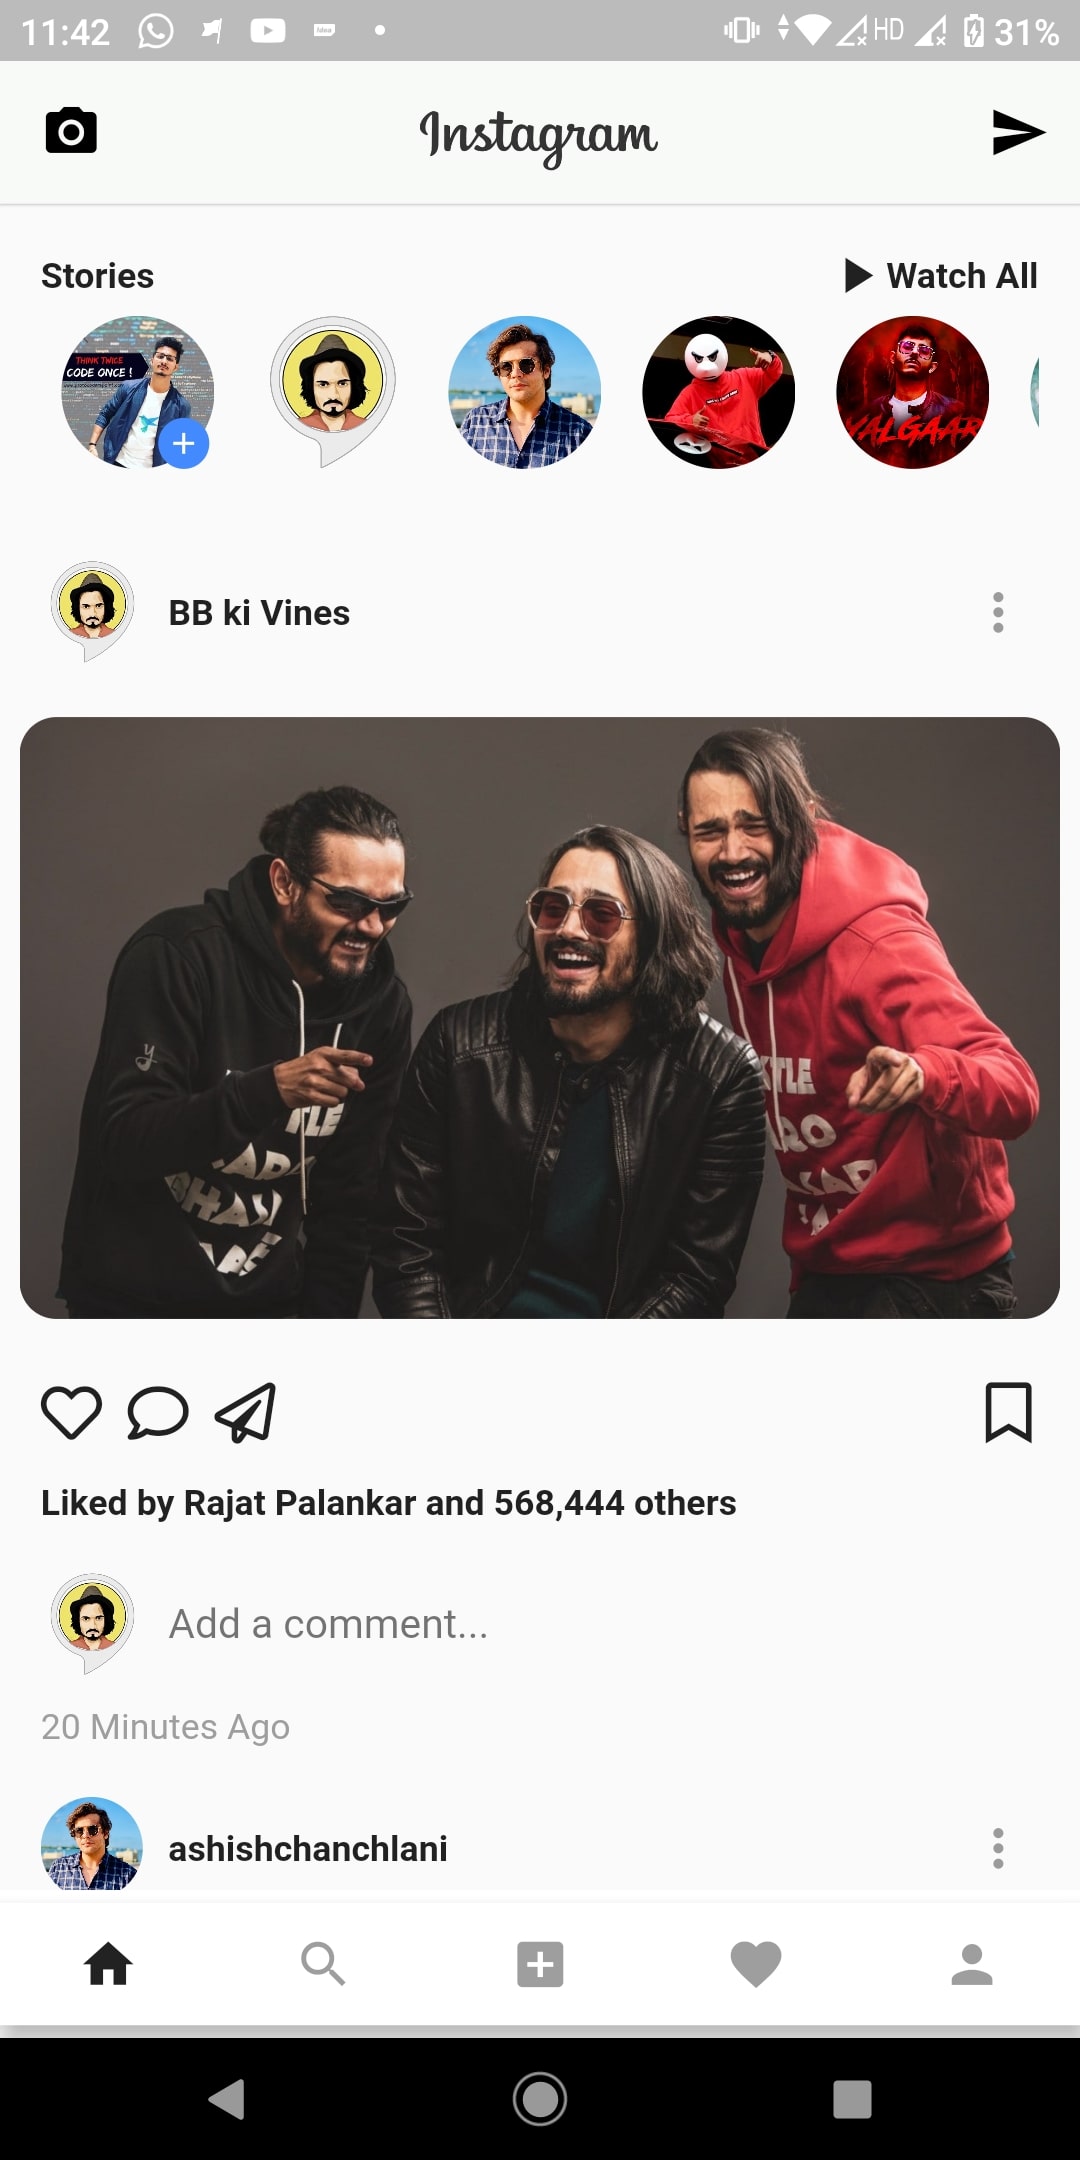
So let’s begin creating instagram app ui in flutter development
Flutter Instagram UI Clone – Stories and New Feeds
OffCourse 🤣🤣 you need to create a new Flutter project in your IDE, In my case i am making use of android studio as my IDE to develop Flutter application.
Create a new Flutter project > Give a good name for you project (Flutter Instagram IU Clone) and next to finish the creating of flutter project.
#1. Adding instagram logo and font_awesome_flutter dependencies
add instagram logo image in assets folder
first of all create a new assets/images folder under your flutter project and copy/paste a instagram text logo under that project and after adding the image path to that image in pubspec.yaml file
instagram text logo

Here is my project structure after adding image and giving path to the image directory.

Even you need font_awesome_flutter: dependencies to be added into your flutter project so that you can use it to show icons, as you can see i have added in above image.
Now we are done with all the requirement, Then now let’s start writing the flutter code to build instagram IU clone.
#2. Insta Data model
Create a new Dart file in lib directory of you project and name it as:
Data_Model_Story.dart
class Data_Model_Story {
  final String name;
  final String profilepic;
  final String postphoto;

  Data_Model_Story({this.name, this.profilepic,this.postphoto});

}
// dummy data to show Profile post and story image and Name of the account user.
List<Data_Model_Story> dummyStoryData = [

  new Data_Model_Story(
      name: "Rajat Palankar",
      postphoto: "https://d1kkg0o175tdyf.cloudfront.net/large/m_d2c4766b1ede-2019-01-27-14-00-16-000106.jpg",
      profilepic:
"https://pbs.twimg.com/profile_images/1243950916362895361/Z__-CJxz_400x400.jpg"),

  new Data_Model_Story(
      name: "BB ki Vines",
      postphoto: "https://i.gadgets360cdn.com/large/bb_ki_vines_body_1579760395127.jpg",
      profilepic:
      "https://images-na.ssl-images-amazon.com/images/I/711q+ma1FQL.png"),

  new Data_Model_Story(
      name: "ashishchanchlani",
      postphoto: "https://assets.entrepreneur.com/content/3x2/2000/20200217104953-Ashish1.jpeg",
      profilepic:
      "https://yt3.ggpht.com/a/AATXAJwZGPuuePGI6Mr887w6f6ZxsnoDl-Xf10gKPKIOeg=s900-c-k-c0xffffffff-no-rj-mo"),

  new Data_Model_Story(
      name: "  Angry Prash",
      postphoto: "https://pbs.twimg.com/media/D1tL281XcAAAAd1.jpg",
      profilepic:
      "https://pbs.twimg.com/profile_images/1143239373489463296/Zv3BvjsA.jpg"),

  new Data_Model_Story(
      name: "carryminati",
      postphoto: "https://i.ytimg.com/vi/zzwRbKI2pn4/maxresdefault.jpg",
      profilepic:
      "https://m.media-amazon.com/images/M/MV5BM2NlNzUyODUtZDgyNS00ZjU3LWI5NGUtOWFkYmQwMGVlNGRmXkEyXkFqcGdeQXVyMTE2MTc3MzU1._V1_.jpg"),

  new Data_Model_Story(
      name: "Leo",
      postphoto: "https://images.unsplash.com/photo-1511367461989-f85a21fda167?ixlib=rb-1.2.1&ixid=eyJhcHBfaWQiOjEyMDd9&w=1000&q=80",
      profilepic:
      "https://cdn.pixabay.com/photo/2016/11/29/02/28/attractive-1866858__340.jpg"),

  new Data_Model_Story(
      name: "Jack",
      postphoto: "https://images.unsplash.com/photo-1511367461989-f85a21fda167?ixlib=rb-1.2.1&ixid=eyJhcHBfaWQiOjEyMDd9&w=1000&q=80",
      profilepic:
      "https://cdn.pixabay.com/photo/2017/06/26/02/47/people-2442565__340.jpg"),

  new Data_Model_Story(
      name: "Amelia",
      postphoto: "https://images.unsplash.com/photo-1511367461989-f85a21fda167?ixlib=rb-1.2.1&ixid=eyJhcHBfaWQiOjEyMDd9&w=1000&q=80",
      profilepic:
      "https://cdn.pixabay.com/photo/2018/01/24/19/49/people-3104635__340.jpg"),

  new Data_Model_Story(
      name: "Sophia",
      postphoto: "https://images.unsplash.com/photo-1511367461989-f85a21fda167?ixlib=rb-1.2.1&ixid=eyJhcHBfaWQiOjEyMDd9&w=1000&q=80",
      profilepic:
      "https://cdn.pixabay.com/photo/2017/11/23/07/47/babe-2972221__340.jpg"),

  new Data_Model_Story(
      name: "Harry",
      postphoto: "https://images.unsplash.com/photo-1511367461989-f85a21fda167?ixlib=rb-1.2.1&ixid=eyJhcHBfaWQiOjEyMDd9&w=1000&q=80",
      profilepic:
      "https://cdn.pixabay.com/photo/2018/02/21/15/06/woman-3170568__340.jpg"),

  new Data_Model_Story(
      name: "Isla",
      postphoto: "https://images.unsplash.com/photo-1511367461989-f85a21fda167?ixlib=rb-1.2.1&ixid=eyJhcHBfaWQiOjEyMDd9&w=1000&q=80",
      profilepic:
      "https://cdn.pixabay.com/photo/2016/01/19/18/04/man-1150058__340.jpg"),

  new Data_Model_Story(
      name: "Emily",
      postphoto: "https://images.unsplash.com/photo-1511367461989-f85a21fda167?ixlib=rb-1.2.1&ixid=eyJhcHBfaWQiOjEyMDd9&w=1000&q=80",
      profilepic:
      "https://cdn.pixabay.com/photo/2015/07/31/15/01/man-869215__340.jpg"),

];
This Dummy data contain only name of Instagram Profile, His ProfilePic and postpic urls.
We can use this data to show in our Insta UI Clone app.
#3. main.dart file
import 'package:flutter/material.dart';
import 'package:flutter_instagram_ui/HomePage.dart';

void main() {
  runApp(MyApp());
}

class MyApp extends StatelessWidget {
  // This widget is the root of your application.
  @override
  Widget build(BuildContext context) {
    return MaterialApp(
      title: 'Flutter Demo',
      debugShowCheckedModeBanner: false,
      theme: ThemeData(
        primaryColor: Colors.black,
        primaryIconTheme: IconThemeData(color: Colors.black),
        primaryTextTheme: TextTheme(title: TextStyle(color: Colors.black))
      ),
      home: HomePage(),
    );
  }
}
#4. Create 4 dart file for different Instagram UI View
- HomePage.dart
- InstaBody.dart
- InstaStories.dart
- InstaList.dart
#1. HomePage.dart
This Home Page simply has a appbar, body and bottom navigation bar

import 'package:flutter/material.dart';
import 'package:flutter_instagram_ui/InstaBody.dart';

class HomePage extends StatelessWidget {

  final AppTopBar = new AppBar(
    backgroundColor: Color(0XFFF8faf8),
    elevation: 1.0,
    centerTitle: true,
    leading: Icon(Icons.camera_alt),
    title: SizedBox(height: 35.0,child: Image.asset("assets/images/instatexticon.png")),
    actions: <Widget>[
      Padding(
        padding: EdgeInsets.only(right: 12.0),
        child: Icon(Icons.send),
      )
    ],
  );
  @override
  Widget build(BuildContext context) {
    return Scaffold(
appBar: AppTopBar,
      body: InstaBody(),
      bottomNavigationBar: Container(
        color: Colors.white,
          height: 58.0,
         alignment: Alignment.center,
        child: BottomAppBar(
          child: Row(
            mainAxisAlignment: MainAxisAlignment.spaceAround,
            children: [
               IconButton(
                icon: Icon(Icons.home),
                onPressed: (){

                },
              ), IconButton(
                icon: Icon(Icons.search),
                onPressed: null
              ),
              IconButton(
                icon: Icon(Icons.add_box),
                onPressed: null
              ),
              IconButton(
                icon: Icon(Icons.favorite),
                onPressed:null
              ),
              IconButton(
                icon: Icon(Icons.person),
                onPressed: null
              ),
            ],
          ),
        ),
      ),
    );
  }
}
#2. InstaBody.dart
This widget page simple return a Column widget which has a children widget i.e Flexiable which in turn have child as InstaList.dart page
import 'package:flutter/material.dart';

import 'InstaList.dart';
class InstaBody extends StatelessWidget {
  @override
  Widget build(BuildContext context) {
    return Column(
      mainAxisAlignment: MainAxisAlignment.start,
      children: [
        Flexible(
          child: InstaList(),
        )
      ],
    );
  }
}
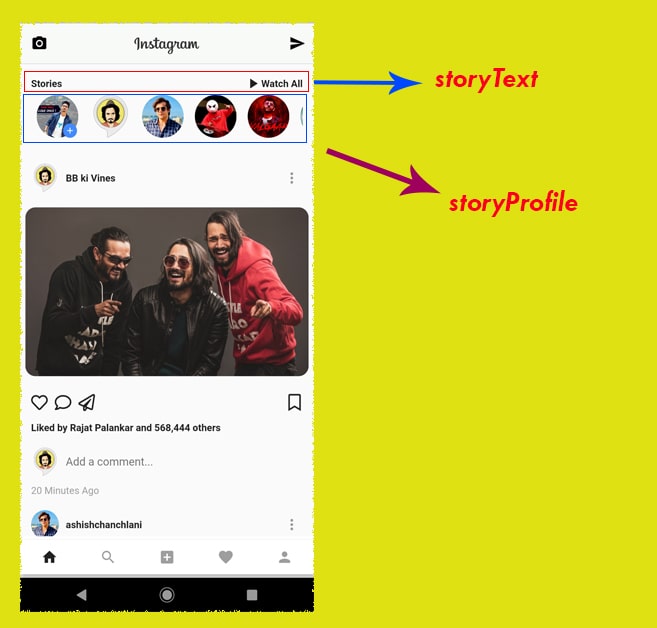
#3. InstaStories.dart
import 'package:flutter/material.dart';
import 'Data_Model_Story.dart';

class InstaStories extends StatelessWidget {

  final storyText = Row(
    mainAxisAlignment: MainAxisAlignment.spaceBetween,
    children: [
      Text("Stories",style: TextStyle(fontWeight: FontWeight.bold ),),
      Row(
        children: [
          Icon(Icons.play_arrow),
          Text("Watch All",style: TextStyle(fontWeight: FontWeight.bold),)
        ],
      )
    ],
  );

  final storyProfile = Expanded(
    child: ListView.builder(
      scrollDirection: Axis.horizontal,
      itemCount: dummyStoryData.length,
      itemBuilder: (context,index)=>Stack(
        alignment: Alignment.bottomRight,
        children: [
          Container(
            width: 60.0,
            height: 60.0,
            decoration: BoxDecoration(
                shape: BoxShape.circle,
                image: DecorationImage(
                  fit: BoxFit.fill,
                  image:NetworkImage(dummyStoryData[index].profilepic),

                )
            ),
            margin: const EdgeInsets.symmetric(horizontal: 8.0),
          ),
          index == 0 ? Positioned(
            right: 10.0,
            child: CircleAvatar(
              backgroundColor: Colors.blueAccent,
              radius: 10.0,
              child: Icon(Icons.add,size: 14.0,
                color: Colors.white,),
            ),
          ): Container()
        ],
      ),
    ),
  );
  @override
  Widget build(BuildContext context) {
    return Container(
      margin: const EdgeInsets.all(16.0),
      child: Column(
        crossAxisAlignment: CrossAxisAlignment.stretch,
        mainAxisAlignment: MainAxisAlignment.start,
        mainAxisSize: MainAxisSize.min,
        children: [
          storyText,  //check above image for understanding
          storyProfile
        ],
      ),
    );
  }
}
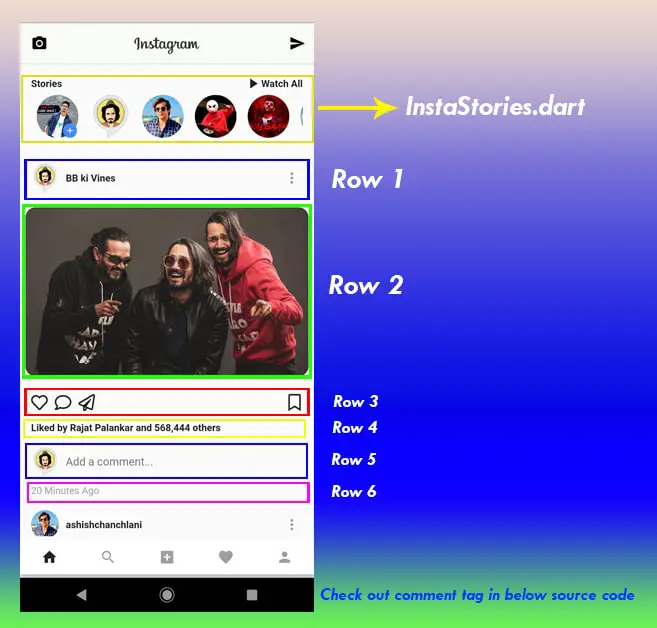
#4. InstaList.dart
import 'package:flutter/cupertino.dart';
import 'package:flutter/material.dart';
import 'package:flutter_instagram_ui/InstaStories.dart';
import 'package:font_awesome_flutter/font_awesome_flutter.dart';
import 'Data_Model_Story.dart';

class InstaList extends StatelessWidget {

  @override
  Widget build(BuildContext context) {

    var deviceSize = MediaQuery.of(context).size;
    return ListView.builder(itemCount:dummyStoryData.length,itemBuilder: (context,index)=> index == 0 ? SizedBox(
      child: InstaStories(),
      height: deviceSize.height *0.15,
    ):Column(
      mainAxisAlignment: MainAxisAlignment.start,
      mainAxisSize: MainAxisSize.min,
      crossAxisAlignment: CrossAxisAlignment.stretch,
      children: [

        //1st row

        Padding(
          padding: const EdgeInsets.fromLTRB(16.0,16.0,8.0, 16.0),
          child: Row(
            mainAxisAlignment: MainAxisAlignment.spaceBetween,
             children: [
              Row(
                children: [
                  Container(
                    height: 40.0,width: 40.0,
                    decoration: BoxDecoration(
                      shape: BoxShape.circle,
                      image: DecorationImage(
                          fit: BoxFit.fill,
                          image: NetworkImage(dummyStoryData[index].profilepic)
                      ),
                    ),
                  ),
                  SizedBox(
                    width: 10.0,
                  ),
                  Text(dummyStoryData[index].name,style: TextStyle(fontWeight: FontWeight.bold),),
                ],
              ),

               IconButton(
                 icon: Icon(Icons.more_vert),
                 onPressed: null,
               )

             ],
          ),
        ),

        //2nd row


        InteractiveViewer(
          boundaryMargin: EdgeInsets.all(8.0),
          minScale: 0.1,
          maxScale: 1.6,
          onInteractionUpdate: (_)=>print("Interaction Updated"),
          child: ClipRRect(borderRadius: BorderRadius.circular(15),
              child: Flexible(
                fit: FlexFit.loose,
                child: Image.network(dummyStoryData[index].postphoto,fit: BoxFit.cover,),
              ),
          ),
        ),

        //3rd row

        Padding(
          padding: const EdgeInsets.all(16.0),
          child: Row(
            mainAxisAlignment: MainAxisAlignment.spaceBetween,
            children: [
              Row(
                mainAxisAlignment: MainAxisAlignment.spaceBetween,
                children: [
                  Icon(
                    FontAwesomeIcons.heart
                  ),
                  SizedBox(width: 10,),
                  Icon(
                    FontAwesomeIcons.comment
                  ),
                  SizedBox(width: 10,),
                  Icon(
                    FontAwesomeIcons.paperPlane
                  )
                ],
              ),
              Icon(
                FontAwesomeIcons.bookmark
              )
            ],
          ),
        ),

        //4th Row

        Padding(
          padding: const EdgeInsets.symmetric(horizontal: 16.0),
          child: Text(
            "Liked by Rajat Palankar and 568,444 others ",
            style: TextStyle(fontWeight: FontWeight.bold),
          ),
        ),

        //5th Row

        Padding(
          padding: const EdgeInsets.fromLTRB(16.0, 16.0, 8.0, 8.0),
          child: Row(
            mainAxisAlignment: MainAxisAlignment.start,
            children: [
              Container(
                height: 40.0,
                  width: 40.0,
                decoration: BoxDecoration(
                  shape: BoxShape.circle,
                  image: DecorationImage(
                      fit: BoxFit.fill,
                      image: NetworkImage(dummyStoryData[index].profilepic)
                  ),
                ),
              ),
              SizedBox(width: 10.0,),
              Expanded(
                child: TextField(
                  decoration: InputDecoration(
                    border: InputBorder.none,
                    hintText: "Add a comment..."
                  ),
                ),
              )
            ],
          ),
        ),

// 6th row
      Padding(
        padding: const EdgeInsets.symmetric(horizontal: 16.0),
        child: Text("20 Minutes Ago",style: TextStyle(color: Colors.grey),) ,
      )
      ],
    ),);
  }
}
In the above source code i have added comment for example : //1st row //2nd row
just compare it with the above image.
Thus your Flutter Application is ready to show UI Design of Instagram Home page using Flutter dart.
")


