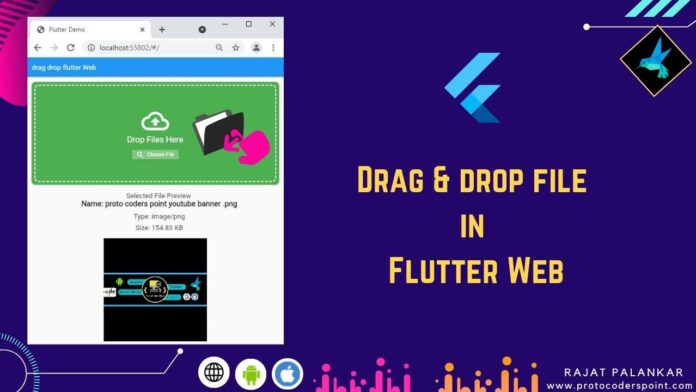
Hi Guys, Welcome to Proto Coder Point. In this flutter tutorial article, we will learn a simplest way to implement drag & drop feature in flutter web, By using which, a user can easily drop to upload a file such as images, video, document etc in to flutter dropzone.
Note: To add drop & dropzone in our flutter web app we will make use of ‘flutter_dropzone‘ package.
Video Tutorial
Complete Code is Below & Output 👇👇👇👇
Introduction to flutter dropzone package
A dropzone in flutter is a plugin, flutter for web only, by using which a developer can easily add drag & drop zone feature in flutter app.
A user can easily make use of this feature to drop a file or pickFile from brower file picker window.
Important Note: This package is only for flutter web app. As you all know that drop drop can’t be done in mobile devices.
So let’s quickly start adding this package in our flutter project.
Implementing Flutter drag and drop in flutter web app
1. Create or Open a flutter project
Onen your favorite IDE, My favorite IDE is Android-Studio to build flutter application.
goto > File > New > New Flutter Project ( Give good name to project > Next & Done)
your project will get created.
To open existing flutter project
goto > File > open ( select the project and open )
2. Add flutter_dropzone dependenies
Now, open pubspec.yaml file & under dependencies section add dropzone package.
dependencies:
  flutter_dropzone: ^2.0.1
3. Import flutter_dropzone.dart
Then, once you have added the dependencies in your project as a external libraries, to use it you need to import wherever you want to add dropzone.
import 'package:flutter_dropzone/flutter_dropzone.dart';
4. Syntax & properties of DropzoneView Widget
DropzoneView(
                onCreated: (controller) => this.controller = controller,
                onDrop: UploadedFile,
                onHover:() => setState(()=> highlight = true),
                onLeave: ()=> setState(()=>highlight = false),
                onLoaded: ()=> print('Zone Loaded'),
                onError: (err)=> print('run when error found : $err'),
            ),
properties of dropzoneview
| Method | used for |
| onCreated:(controller) | Attach a DropzoneController so that you ca control it & get data/information from event the user perform. |
| onDrop: (event) | Whe user drop a file this function will hold all the data of file such as name, size, mime, URL path of file. |
| OnHover: () | (Not Mouse Hover) This Function will work when user hover a file on dropping zone in flutter web app. |
| OnLeave: () | Load when user is hover on dropzon and drop the file and leave it. |
| OnError: (error) | Handle error such a error in file reading by browser |
| OnLoaded: () | Load as soon as widget is build in UI. |
How to make full UI Screen as Drag n drop
To make complete UI screen of flutter web app as dropzone, so that user can simply drag n drop anywhere into your UI, then make use of Stack widget.
Use a Stack Widget to put it into the background of other widget.
Stack(children: [DropzoneView(...),Center(child: Text('Drop files here')),],)
DropzoneViewController
This library has a file picking functionality, controller should be used to pick a file from browser, when a choose file button is clicked.
late DropzoneViewController controller;
pickFiles() method simply load & open, choose file dialog window in your browser that lets users to pick file.
final events = await controller.pickFiles();
snippet of button event that loads pickFile() method.
ElevatedButton.icon(
    onPressed: () async {
              // this will open a diglog in browser to pick a file..
               final events = await controller.pickFiles();
               if(events.isEmpty) return;
             // the user selected file detail is stored in event dynamic datatype and passed through method.
               UploadedFile(events.first);
    },
    icon: Icon(Icons.search),
    label: Text(
               'Choose File',
               style: TextStyle(color: Colors.white, fontSize: 15),
    ),
style: ElevatedButton.styleFrom(
          padding: EdgeInsets.symmetric(
          horizontal: 20
  ),
  primary: highlight? Colors.blue: Colors.green.shade300,
  shape: RoundedRectangleBorder()
),
)
Now all the data detail of pickedFile is stored in ‘events’ object, so to extract picked File information dropzoneViewController object is used, as shown below.
final name = event.name;
final mime = await controller.getFileMIME(event);
final byte = await controller.getFileSize(event);
final url = await controller.createFileUrl(event);
Complete source code of flutter drag and drop Github
Clone the Flutter Web Drag and Drop Example from Github now
you can simple clone the project or else refer below step by step process to implement drag drop area in flutter web.
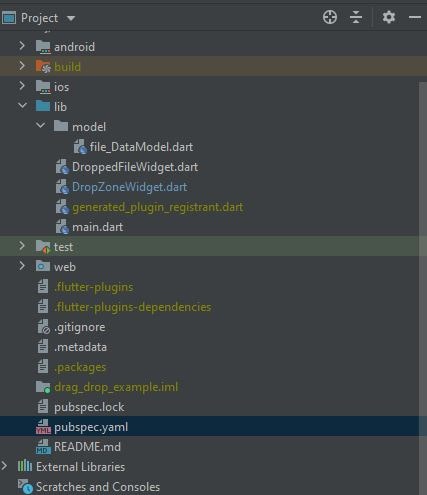
Check out my flutter project files structure for easy understanding.

In your Project > lib folder
create a new dart class file for handling Data by name file data model.
1. File_Data_Model.dart
class File_Data_Model{
  final String name;
  final String mime;
  final int bytes;
  final String url;

  File_Data_Model({required this.name,required this.mime,required this.bytes, required this.url});

  String get size{
    final kb = bytes / 1024;
    final mb = kb / 1024;

    return mb > 1 ? '${mb.toStringAsFixed(2)} MB' : '${kb.toStringAsFixed(2)} KB';
  }

}
This data model class is used to hold the data of the file dropped or picked by the user.
This file holds 4 datatype value such as name of file, mime type of file, int byte size of file and the URL path of the selected file.
It also has a getter method that convert bytes to MB or KB & return the size of file to user UI.
main.dart
import 'package:drag_drop_example/DropZoneWidget.dart';
import 'package:drag_drop_example/DroppedFileWidget.dart';
import 'package:drag_drop_example/model/file_DataModel.dart';
import 'package:flutter/material.dart';
import 'package:flutter_dropzone/flutter_dropzone.dart';

void main() {
  runApp(MyApp());
}

class MyApp extends StatelessWidget {
  // This widget is the root of your application.
  @override
  Widget build(BuildContext context) {
    return MaterialApp(
      debugShowCheckedModeBanner: false,
      title: 'Flutter Demo',
      theme: ThemeData(

        primarySwatch: Colors.blue,
      ),
      home: MyHomePage()
    );
  }
}

class MyHomePage extends StatefulWidget {


  @override
  _MyHomePageState createState() => _MyHomePageState();
}

class _MyHomePageState extends State<MyHomePage> {
  //object of datamodel class
  File_Data_Model? file;
  @override
  Widget build(BuildContext context) {
    return Scaffold(
      appBar: AppBar(
        title: Text("drag drop flutter Web"),
      ),
      body: SingleChildScrollView(
        child: Container(
            alignment: Alignment.center,
            padding: EdgeInsets.all(15),
            child: Column(
              children: [
                // here DropZoneWidget is statefull widget file
                Container(
                  height: 300,
                  child: DropZoneWidget(
                    onDroppedFile: (file) => setState(()=> this.file = file) ,
                  ),
                ),
                SizedBox(height: 20,),
                // DroppedFileWidget is self designed stateless widget to displayed user dropped image file as preview with detail info
                DroppedFileWidget(file:file ),

              ],
            )),
      ),
    );
  }
}
In above code, we have a Column widget which has 3 children widget.
DropZoneWidget.dart
Now Create a new dart file by name DropZoneWidget.dart in lib directory as shown in above project structure.
import 'package:drag_drop_example/model/file_DataModel.dart';
import 'package:flutter/cupertino.dart';
import 'package:flutter/material.dart';
import 'package:flutter_dropzone/flutter_dropzone.dart';
import 'package:dotted_border/dotted_border.dart';

class DropZoneWidget extends StatefulWidget {

  final ValueChanged<File_Data_Model> onDroppedFile;

  const DropZoneWidget({Key? key,required this.onDroppedFile}):super(key: key);
  @override
  _DropZoneWidgetState createState() => _DropZoneWidgetState();
}

class _DropZoneWidgetState extends State<DropZoneWidget> {
  //controller to hold data of file dropped by user
  late DropzoneViewController controller;
  // a variable just to update UI color when user hover or leave the drop zone
  bool highlight = false;

  @override
  Widget build(BuildContext context) {

    return buildDecoration(

        child: Stack(
          children: [
            // dropzone area
            DropzoneView(
                // attach an configure the controller
                onCreated: (controller) => this.controller = controller,
                // call UploadedFile method when user drop the file
                onDrop: UploadedFile,
                // change UI when user hover file on dropzone
                onHover:() => setState(()=> highlight = true),
                onLeave: ()=> setState(()=>highlight = false),
                onLoaded: ()=> print('Zone Loaded'),
                onError: (err)=> print('run when error found : $err'),
            ),

            Center(
              child: Column(
                mainAxisAlignment: MainAxisAlignment.center,
                children: [
                  Icon(
                    Icons.cloud_upload_outlined,
                    size: 80,
                    color: Colors.white,
                  ),
                  Text(
                    'Drop Files Here',
                    style: TextStyle(color: Colors.white, fontSize: 24),
                  ),
                  const SizedBox(
                    height: 16,
                  ),
                  // a button to pickfile from computer
                  ElevatedButton.icon(
                      onPressed: () async {
                        final events = await controller.pickFiles();
                        if(events.isEmpty) return;
                        UploadedFile(events.first);
                      },
                      icon: Icon(Icons.search),
                      label: Text(
                        'Choose File',
                        style: TextStyle(color: Colors.white, fontSize: 15),
                      ),
                  style: ElevatedButton.styleFrom(
                    padding: EdgeInsets.symmetric(
                      horizontal: 20
                    ),
                    primary: highlight? Colors.blue: Colors.green.shade300,
                    shape: RoundedRectangleBorder()
                  ),
                  )
                ],
              ),
            ),
          ],
        ));
  }

  Future UploadedFile(dynamic event) async {
    // this method is called when user drop the file in drop area in flutter

    final name = event.name;
    final mime = await controller.getFileMIME(event);
    final byte = await controller.getFileSize(event);
    final url = await controller.createFileUrl(event);

    print('Name : $name');
    print('Mime: $mime');

    print('Size : ${byte / (1024 * 1024)}');
    print('URL: $url');

     // update the data model with recent file uploaded
    final droppedFile = File_Data_Model
      (name: name, mime: mime, bytes: byte, url: url);

    //Update the UI
    widget.onDroppedFile(droppedFile);
    setState(() {
      highlight = false;
    });
  }

  Widget buildDecoration({required Widget child}){
    final colorBackground =  highlight? Colors.blue: Colors.green;
    return ClipRRect(
      borderRadius: BorderRadius.circular(12),
      child: Container(
        padding: EdgeInsets.all(10),
        child: DottedBorder(
          borderType: BorderType.RRect,
            color: Colors.white,
            strokeWidth: 3,
            dashPattern: [8,4],
            radius: Radius.circular(10),
            padding: EdgeInsets.zero,
            child: child
        ),
        color: colorBackground,
      ),
    );
  }
}
DroppedFileWidget.dart
import 'package:flutter/cupertino.dart';
import 'package:flutter/material.dart';
import 'package:drag_drop_example/model/file_DataModel.dart';

class DroppedFileWidget extends StatelessWidget {

  // here we get the uploaded file data
  final File_Data_Model? file;
  const DroppedFileWidget({Key? key, required this.file}) : super(key: key);

  @override
  Widget build(BuildContext context) {

  return Row(
    mainAxisAlignment: MainAxisAlignment.center,
    children: [
      Expanded(child: buildImage(context)),
    ],
  );
  }

  // a custom widget to show image
  Widget buildImage(BuildContext context){
    // will show no file selected when app is open for first time.
    if (file == null) return buildEmptyFile('No Selected File');

    return Column(
      children: [
        if(file != null) buildFileDetail(file),
        // if file dropped is Image then display image from data model URL variable
        Image.network(file!.url,
          width: MediaQuery.of(context).size.width ,
          height: MediaQuery.of(context).size.height,
          fit: BoxFit.cover,
          // if displaying image failed, that means there is not preview so display no preview
          errorBuilder:(context,error,_)=>buildEmptyFile('No Preview'),
        ),
      ],
    );
  }

  //custom widget to show no file selected yet
  Widget buildEmptyFile(String text){
     return Container(
       width: 120,
       height: 120,
       color: Colors.blue.shade300,
       child: Center(child: Text(text)),
     );
  }


  //a custom widget to show uploaded file details to user

  Widget buildFileDetail(File_Data_Model? file) {
    final style = TextStyle( fontSize: 20);
    return Container(
       margin: EdgeInsets.only(left: 24),
       child: Column(
         mainAxisAlignment: MainAxisAlignment.start,
         children: [
           Text('Selected File Preview ',style: TextStyle(fontWeight: FontWeight.w500,fontSize: 20),),
           Text('Name: ${file?.name}',style: TextStyle(fontWeight: FontWeight.w800,fontSize: 22),),
           const SizedBox(height: 10,),
           Text('Type: ${file?.mime}',style: style),
           const SizedBox(height: 10,),
           Text('Size: ${file?.size}',style: style),
           SizedBox(height: 20,)
         ],
       ),
    );
  }
}
Output


