Hi Guys, Welcome to Proto Coders Point, In this Flutter bloc Tutorial we gonna learn about what is BLoC patterns in Flutter, and how to Implement the Flutter Business Logic Component Flutter bloc example.
What is Flutter BLoC?
In order to learn or understand anything about BLoC, you need to have some basic knowledge about these 4 terms in Flutter Development.
- State
- Event
- Stream
- Sink.
State: A State in the flutter app is nothing but the data your application is currently been showing. As you guys know that Flutter is a reactive framework as data changed, Application UI also gets change.
Event: An Event is an action that is detected by the application, Typically, it’s a user action like clicking on a button and some action is be performed.
Stream: A Stream can be considered as a medium through which data is transferred. Easily understanding of Stream can be assumed like a pipeline from where the water is been supplied to other ends, How water travel through pipeline like the same way data is transferred through the stream.

There comes a point where we consume or receive data that is been flowing through the stream, This is where we can call Sink
Sink: A Sink can e considered as the point where you receive or consume data from a stream.
So now you know basics of these 4 terms, now you can easily understand what is flutter BLoC.
Flutter Bloc Pattern
3 different component of Flutter BLoC Pattern
- UI
- BLoC
- Data Provider

Here UI can interact with bloc & bloc can also do the same.
The Bloc provider can interact with the data provider for data.
What is BLoC Stands For?
A BLoC stands for Business Logical Component, A Flutter BLoC contents all the Business logic of a Application.
What is Data Provider in BLoC Pattern?
A Data Provider can be considered as your back-end i.e your database where all the users data is been stared.
How Flutter BLoC Works?
When an application is built using the Flutter BLoc pattern, whenever any data change is found in the data provider, BLoC (Business Logic Component) applies business logic to the current state & it re-creates the new state to the UI & when UI receive the new state it re-render itself to show the latest version of UI with new data that is been received from the data provider.
Let’s Understand Flutter Bloc with an Application Example
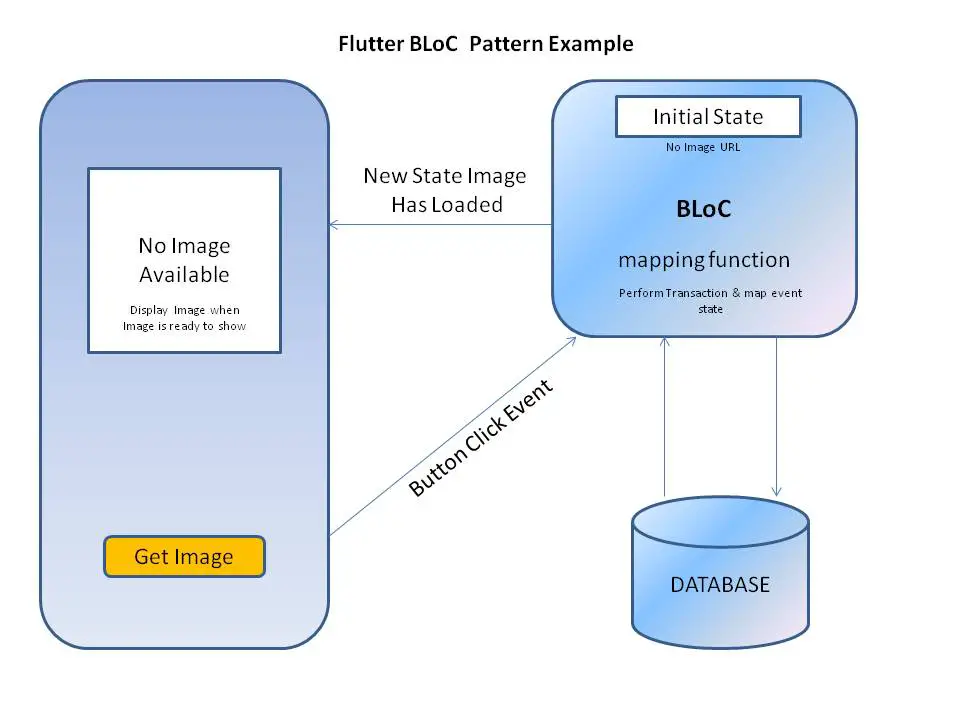
Flutter BLoC Pattern Tutorial Example
Step 1: Create a new Flutter project
In my case, I am making use of the android studio as my IDE to develop the Flutter project
Create new Project File > New > New Flutter Project
Give a name to your project as “Flutter Bloc Load image Example” or anything as per your choice.
Step 2: Add Required Dependencies
Then, Open pubspec.yaml file and add below 2 dependencies
dependencies:
  flutter:
    sdk: flutter
  flutter_bloc: ^6.0.1  #this
  bloc: ^6.0.1          #this
after adding this 2 dependencies now click on pub get text, What this will do is download all the required packages into your flutter project external library.
Step 3: Create a new dart file
Then, once you have added bloc dependencies, now create a new dart file under the lib directory and name it as “BlocImage.dart”
and then Copy below lines of BlocImage Code that will simply return the URL of an image.
import 'package:bloc/bloc.dart';

enum ImageEvent{getImage}

class BlocImage extends Bloc<ImageEvent,String>
{
  BlocImage(String initialState) : super('https://upload.wikimedia.org/wikipedia/commons/thumb/a/ac/No_image_available.svg/1024px-No_image_available.svg.png');

  @override
  Stream<String> mapEventToState(ImageEvent event)  async*{
    // TODO: implement mapEventToState
    yield 'https://protocoderspoint.com/wp-content/uploads/2019/10/protocoderspoint-rectangle-round-.png';
  }

}
Note: return, returns the values and also terminates the function, where a yield, returns the value but does not terminate the function.
In the above Bloc code I have set initialState to an image URL that has Not to Image Message, and when the user clicks on Button event mapEventToState gets trigged and original image will get displayed on the screen.
Step 4: main.dart file
Copy-paste the below code in main.dart file
import 'package:flutter/cupertino.dart';
import 'package:flutter/material.dart';
import 'package:flutter_bloc/flutter_bloc.dart';
import 'package:flutter_bloc_example/BlocImage.dart';

void main() {
  runApp(MyApp());
}

class MyApp extends StatelessWidget {
  // This widget is the root of your application.
  @override
  Widget build(BuildContext context) {
    return MaterialApp(
      title: 'Flutter Demo',
      debugShowCheckedModeBanner: false,
      theme: ThemeData(
        primarySwatch: Colors.blue,

        visualDensity: VisualDensity.adaptivePlatformDensity,
      ),
      home: Scaffold(
        body: BlocProvider(
          create: (BuildContext context)=> BlocImage("0"),
          child: MyHomePage(),
        ),
      ),
    );
  }
}
class MyHomePage extends StatelessWidget {

  @override
  Widget build(BuildContext context) {

    final _blocimage = BlocProvider.of<BlocImage>(context);
    return Center(
      child: Column(
        mainAxisAlignment: MainAxisAlignment.center,
        children: <Widget>[
          Image.network("https://raw.githubusercontent.com/felangel/bloc/master/docs/assets/flutter_bloc_logo_full.png",width: 250,height: 200,),
          Text("Flutter Bloc Example", style: TextStyle(fontStyle: FontStyle.italic,fontSize: 30),),

          BlocBuilder<BlocImage,String>(
            builder: (BuildContext context,String urlstate){
              return Image.network(urlstate,width: 200,height: 200,);
            },
          ),
          ButtonBar(
            alignment: MainAxisAlignment.center,
            children: <Widget>[
              RaisedButton(
                child: Text("Get  Image"),
                color: Colors.blue[700],
                onPressed: (){
                  _blocimage.add(ImageEvent.getImage);
                },
              ),
            ],
          )
        ],
      ),
    );
  }
}
So In Above lines of code i have wrapped MyHomePage widget class in BloCprovider, what the BLocProvider will do is, it will pass the BlocImage instance to its child MyHomePage.
So to refer BlocImage in your MyHomePage i have created a final variable as you may see in above complete or below snippet code.
final _blocimage = BlocProvider.of<BlocImage>(context);
on Button Click Event new data will be fetched from the Flutter BLoC pattern
RaisedButton( child: Text("Get Image"), color: Colors.blue[700], onPressed: (){ _blocimage.add(ImageEvent.getImage); }, ),
Which widget should get re-rendered on data change can be done as below
BlocBuilder<BlocImage,String>( builder: (BuildContext context,String urlstate){ return Image.network(urlstate,width: 200,height: 200,); }, ),
FINAL FLUTTER BLOC EXAMPLE OUTPUT TO LOAD IMAGE AFTER BUTTON CLICK EVENT
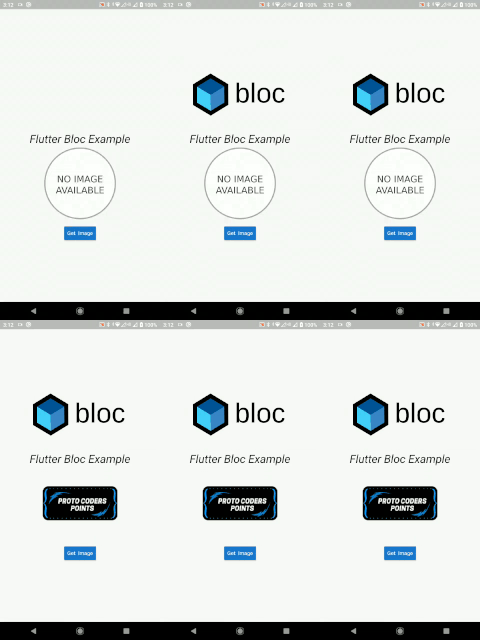
Sorry, Here Click is not visible, So when I click on the Get Image button the Image is getting loaded from the URL I have provided.





[…] Guys, Welcome to Proto Coders Point, In this Flutter Tutorial we gonna Learn basic of Flutter BLoC Pattern, Basically we will build a simple app that can perform Increment & Decrement […]