Hi Guys , Welcome to proto coders point, In this python tutorial we will implement invisible cloak from harry potter using python opencv library.
what are python libraries to use invisible cloak?
What is numpy?
This is python libraries where we are using for arrays perpose in our project.
what is opencv?
In this library we are using opencv to capture the video.
What is Time?
so we are using time to capture the video in that time.
Step 1 :Create new python project
First we have to create a new python project to work on this invisible cloak.
File > New Project
Step 2 :Create a new python file to handle invisible cloak harry poter.
You need to create a new python file where you can write python code.
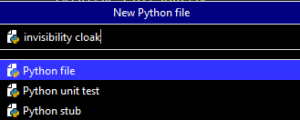
Right click on Project > New > Python File
i have created a new python file with name as ” invisibility cloak” using pycharm IDE.

Step 3 : Add library in your python project.
How to install the numpy , opencv-python , time module ?

File > Setting > Project Interpretor > Click on ” + ” > Search for “numpy,python-opencv” then select the package and then click on install package button.
step 4 : Open the python file “invisible”
import cv2
import numpy as np
import time
out_name = "output_shri.avi"
cap = cv2.VideoCapture(0)
fourcc = cv2.VideoWriter_fourcc(*'XVID')
out = cv2.VideoWriter('shri.mp4' , fourcc, 20.0, (640,480))
time.sleep(2)
background = 0#capturing background
for i in range(30):
    ret, background = cap.read()#capturing image
while(cap.isOpened()):
    ret, img = cap.read()

    if not ret:
        break

    hsv=cv2.cvtColor(img, cv2.COLOR_BGR2HSV)
    lower_red = np.array([0,120,70])
    upper_red = np.array([10,255,255])
    mask1 = cv2.inRange(hsv , lower_red , upper_red)

    lower_red = np.array([170,120,70])
    upper_red = np.array([180,255,255])
    mask2 = cv2.inRange(hsv , lower_red , upper_red)

    mask1 = mask1 + mask2 #OR
    mask1=cv2.morphologyEx(mask1, cv2.MORPH_OPEN ,np.ones((3,3) , np.uint8) , iterations=2)

    mask2=cv2.morphologyEx(mask1, cv2.MORPH_DILATE ,np.ones((3,3) , np.uint8) , iterations=1)

    mask2 = cv2.bitwise_not(mask1)

    res1 = cv2.bitwise_and(background, background, mask=mask1)
    res2 = cv2.bitwise_and(img, img, mask=mask2)

    final_output = cv2.addWeighted(res1 , 1, res2 , 1, 0)

    cv2.imshow('Harry' , final_output)
    k=cv2.waitKey(10)
    if k==27:
        break

cap.release()
cv2.destroyAllWindows()
As we have installed the numpy ,opencv-python model in our project now you can just import the which ever library we have installed then we write the farther code.then we have to capturing the video.after capturing video we have to give the camera to warm up.
Capturing the background in range of 60 .you should have video that have some seconds to dedicated to background farm so that it cloud easily save the background image.
Then we are reading from video.so we are convert the image -BGR to HSV as we focused on detection of red color. and then converting BGR to HSV for better detection or you can convert it to gray.
we have ranges should be carefully chosen the setting the lower and upper range for mask1.some setting the lower and upper range for mask2.then it replaced with some other code depending upon the color of your cloth.then refining the mask corresponding to the detected red color.then we are generating the final output


