
Communication between UI widgets and Flutter life cycle methods.
The Flutter App’s lifecycle displays how the application will modify its State. It aids in comprehending the principle underlying the easy development of our apps. Since everything in Flutter is a widget, we should consider Flutter’s widget before considering its lifecycle.
The Lifecycle of an Flutter App
The Lifecycle of a Flutter App shows how the app will alter its State. It aids in comprehending the idea underlying the fluid movement of our applications. I want to impart everything I’ve learned about creating widgets in Flutter. Let’s start…
Widgets refer to all of the user interface elements that are visible on the screen. Based on the widget’s capacity to be reloaded during runtime, widgets may be roughly classified into two classes.
Flutter has majorly two types of widgets :
- Stateless
- Stateful Widget.
We must comprehend the differences between the two widgets before learning about the Lifecycle.
1. Stateless Widget :
Stateless In Flutter, a widget is a component whose state, once generated, cannot be altered; examples include variables, buttons, icons, and other components whose states cannot be altered in order to access data. replaces the build method and then returns a widget. When the UI depends on data contained within the object itself, we utilize it. In short , Stateless widgets are ones that do not alter dynamically during execution and do not need managing the state.
import 'package:flutter/material.dart';

void main() => runApp(MyApp());

class MyApp extends StatelessWidget {
  const MyApp({Key? key}) : super(key: key);

  @override
  Widget build(BuildContext context) {
    return const Container();
  }
}
2. Stateful Widget :
A stateful widget keeps track of data and reacts to everything the data does while being used by the application. It is rendered several times over its lifespan since it is a changeable widget.
When a user dynamically changes the application screen, we use this. The fact that this widget features a status widget, which lets everyone know when anything has changed on our screen, makes it the most significant of all the widgets. In short , Stateful widgets are ones that keep track of the current state and allow for dynamic runtime changes to the user interface.
import 'package:flutter/material.dart';

void main() => runApp(MyApp());

class MyApp extends StatefulWidget {
  const MyApp({Key? key}) : super(key: key);

  @override
  State<MyApp> createState() => _MyAppState();
}

class _MyAppState extends State<MyApp> {
  @override
  Widget build(BuildContext context) {
    return Container();
  }
}
Thus, as “Stateful Widgets” are those that handle the State, we will focus on them when we talk about the LifeCycle of Flutter.
Lifecycle Flow Chart For Flutter App.
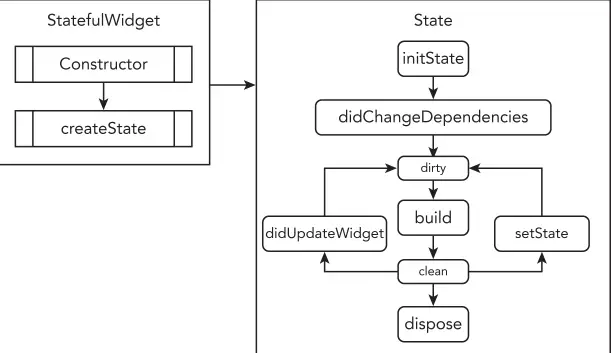
Stages of Flutter App Lifecycle:
The state and how it changes affect the life cycle. We may describe the flutter life cycle based on a stateful widget’s state. The life cycle stage:
- createState()
- initState()
- didChangeDependencies()
- build()
- didUpdateWidget()
- setState()
- deactivate()
- dispose()
Due to the creation and re-construction of the Widgets and their State, you’ll see a lot more “states” for the making than the destruction.Let’s explore more into life cycle stages:
1) createState()
The Flutter framework will give instructions to construct a method called createState() in override when we create a stateful widget. An instance of the state that this method is linked with will be returned.
I used the stateful class name “MyHomepage” in this life cycle example. When the ‘buildContext’ is assigned and located on a tree, all widgets’ bool mounted values change to true. Until dispose is called, the value will be retained.
class MyApp extends StatefulWidget {
  const MyApp({Key? key}) : super(key: key);

  @override
  State<MyApp> createState() => _MyAppState();
}
2) initState()
This tactic is taken into account when the Widget is created in an engaging manner and is called precisely once for each State object. The initState() function will execute any characterised or added code first, even before the widgets are constructed.
This function must call super.initState(), which executes the parent widget’s initState (Stateful widget). Your variables, objects, streams, AnimationController, and other items may all be initialised here.
@override
  void initState() {
    // TODO: implement initState
    super.initState();
  }
3) didChangeDependencies()
When the widget is created for the first time, this function is invoked immediately after initState(). If a modification is required and your StatefulWidgets depend on an InheritedWidget, they will call again.There aren’t many functions you can include, such as variable re-initializations and API requests reliant on parent data changes.
@override
void didChangeDependencies() {
  super.didChangeDependencies()
}
4) build()
This approach serves as the primary technique since it is essential to the presentation of all widgets. Every time we need to display UI Widgets on the screen, it is called.
The Flutter framework changes the build() method whenever you need to update your UI or, alternatively, on the off chance that you hit hot-reload!. You may use setState(), which instructs the framework to once again run the form function, if you need to specifically redesign the UI whenever any information is changed.
@override
Widget build(BuildContext context) {
  return Container()
}
5) didUpdateWidget()
When the parent Widget makes a modification and the UI has to be redrew, it will be invoked. It basically runs every time we hot reload the programme to check for widget changes.
When a parent widget has to edit a child widget with a comparable Runtime Type because the parent’s properties or designs have changed, didUpdateWidget is triggered. This turns away from the new widget and accepts the arrangement modifications made by it.
@protected
void didUpdateWidget(MyApp oldWidget) {
 super.didUpdateWidget(oldWidget);
}
6) setState()
The framework schedules a build for this State of object after being informed by the setState() function that the internal state of the object has changed in a way that might affect the UI.
Calling this function after the framework calls dispose is incorrect.
void function(){
 setState(() {});
}
7) deactivate()
This approach is taken into account when the State is eliminated from the tree, but it may also be re-inserted into the tree at a different location.
This approach is taken into account when the widget is not yet connected to the Widget Tree but may very likely be added at a later time. The part when you utilise Navigator is the finest example of this. Deactivate is used when a client wants to return to the previous screen after pushing to the next one, in which case the widget will once more be added to the tree.
@override
void deactivate(){
 super.deactivate();
}
8) dispose()
This approach, which is crucial, basically runs counter to the initState() function. It is taken into account when the item and its State ought to be permanently removed from the Widget Tree and won’t ever reassemble.
You may dismiss documents, cancel timers, dispose of animation controls, unsubscribe from streams, and more here. You can ultimately provide each and every asset in this plan. Currently, if the widget is later added to the widget tree again, the entire lifespan will be repeated.
When removing something permanently, such as when releasing a resource produced by an item or stopping animation, we employ this technique.
@override
  void dispose() {
    // TODO: implement dispose
    super.dispose();
  }
Flutter App LifeCycle – Code Example
Create a new dart file called widget_lifecycle_demo.dart inside the lib folder. And paste below code into this.
import 'package:flutter/material.dart';
class LifeCycleDemoScreen extends StatefulWidget {
 @override
 _LifeCycleDemoScreen State createState() => _LifeCycleDemoScreen State();
}

class _LifeCycleDemoScreen State extends State<LifeCycLifeCycleDemoScreen leExm> with WidgetsBindingObserver {

 @override
 void initState() {
   super.initState();
   WidgetsBinding.instance!.addObserver(this);
   print("initState");
 }

 @override
 void didChangeAppLifecycleState(AppLifecycleState state) {
   super.didChangeAppLifecycleState(state);
   print('AppLifecycleState: $state');
 }

 @override
 void dispose() {
   WidgetsBinding.instance!.removeObserver(this);
   super.dispose();
 }

 @override
 void deactivate() {
   // TODO: implement deactivate
   print("deactivate");
   super.deactivate();
 }

 int _counter = 0;

 void _incrementCounter() {
   setState(() {
     _counter++;
   });
 }

 @override
 Widget build(BuildContext context) {
   print("build");
   return Scaffold(
     appBar: AppBar(title: Text("Flutter Widget Lifecycle")),
     body: Center(
       child: Column(
         mainAxisAlignment: MainAxisAlignment.center,
         children: <Widget>[
           Text(
             'You have pushed the button this many times:',
           ),

           Text(
             '$_counter',
             style: Theme.of(context).textTheme.headline4,
           ),
           SizedBox(height: 8.0,),
         ],
       ),
     ),
     floatingActionButton: FloatingActionButton(
       onPressed: _incrementCounter,
       tooltip: 'Increment',
       child: Icon(Icons.add),
     ),
   );
 }
}
Conclusion
I’ve described the fundamentals of the App Lifecycle in a flutter in the post; you may change the code to suit your preferences. This was a brief introduction from my end to the app life cycle on user interaction, and it functions using Flutter.
I’m hoping that this post will provide you enough knowledge to set up the App Lifecycle in your Flutter applications. We’ll demonstrate the Flutter app’s lifecycle for you. This blog post looked at the flutter app’s lifetime. I’m hoping that this blog will better your understanding of the life cycle. Please give it a try.
Thank you for reading this post.
Clap 👏 If you find this post useful. Have a nice day………….
")


