")
Introduction
In the world of web application development, building a URL shortener server is best for beginners who wants to learn for scratch and also best for collage student who want to submit a project. A URL shortener project takes long URLs and provides a shortened link, making links more manageable and shareable in short form links. In this article, we will help you in developing a nodejs application in building a URL shortener using Node.js, Express, and MongoDB.
Video Playlist on building URL Shortener in Flutter + NodeJS with MongoDB Database
Project Structure
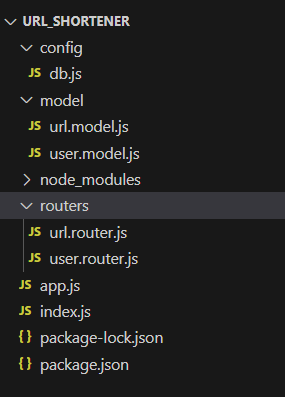
The NodeJS project will be organized into folders such as config, model, and routers for better code structure.
- config: In config folder we have a file
db.jsthat is responsible for mongodb database connectivity. - model: In model folder we have files that define mongodb database schema, Here we have 2 file namely
url.model.jsanduser.model.js. - routers: In router folder we have RESTAPI for url and user apis.
- app.js and index.js: This main root / starting point of our nodejs express URL shortener application in nodejs.
Node Module / Libraries required for building URL shortener Application
body-parser:used for parse incoming request bodies from client or front-end.cors:Enables secure cross-origin resource sharing.express:used to simplify the creation of nodejs express server and creating API and routers.mongoose:used to connect or interact with MongoDB database, creating mongodb collection schema.shortid:used for generating unique random identifier, that we can used as shortURL.
Enter below command to install this nodeJS Modules or Libraries
npm install body-parser cors express mongoose shortid
URL Shortener in NodeJS using ExpressJS and MongoDB
Refer above project structure and create respective files under the folders.
config > db.js
This file is responsible to get connected to mongodb database using nodejs mongoose library.
This connection is exported so that the connection can we used in model file as below.
const mongoose = require('mongoose');

const connection = mongoose.createConnection('mongodb://127.0.0.1:27017/url_shortener')

connection.on('connected',()=>{
    console.log("DB Connected");
})


module.exports = connection;
modul > url.model.js
This is a MongoDB schema for url collection, where we are going to store user submitted URL’s data like userId, longUrl and shorturl.
const mongoose = require('mongoose');
const db = require('../config/db');
const userModel = require('./user.model')

const { Schema } = mongoose;

const urlSubmitionSchema = new Schema({
    userId:{
        type: Schema.Types.ObjectId,
        ref: userModel.modelName
    },
    longUrl:{
        type : String
    },
    shorturl:{
        type : String
    }
});

const urlSubmitionModel = db.model('urlSubmittion',urlSubmitionSchema);
module.exports = urlSubmitionModel;
modul > user.model.js
This is a MongoDB schema for user collection, where we are going to store users data like name, email and password.
const mongoose = require('mongoose');
const db = require('../config/db');

const { Schema } = mongoose;

const userSchema = new Schema({
    name:{
        type:String
    },
    email:{
        type:String
    },
    password:{
        type:String
    },
})

const userModel = db.model('users',userSchema);
module.exports = userModel;
routers > url.router.js
This use url routers has 3 API:
- urlSubmit: Using this we can convert long URL into shorturl, Basically this API is used for LongURL submition and get shortURL of it.
This API accept 2 parameters: userId & longUrl then generate a shortId i.e a random id which we can use as shortURL. This whole data will be stored into Mongodb database. - /:url: this api is a parameterized API, for example support a longURL is submitted and uses get the shortURL it, Now the user can us url like this
http://localhost:3000/xya12idto redirect himself to longURL. - getUserURLList: This API will return all the URL’s been submitted by the user, This is been used to show or display the list of URL in Frontend (URL Shortener Flutter App).
const router = require('express').Router();
const shortId = require('shortid');
const urlSubmitModel = require("../model/url.model");

router.post('/urlSubmit', async (req, res) => {
    const { userId, longUrl } = req.body;
    try {
        const randonurl = shortId.generate();
        const urlSubmit = new urlSubmitModel({ userId, longUrl, shorturl: randonurl });
        await urlSubmit.save();

        res.json({ status: true, shortUrl: `http://localhost:3000/${randonurl}` })
    } catch (error) {
        res.json({ status: false, message: "Something went wrong" })
    }
});

router.get('/:url',async(req,res)=>{
   const {url} = req.params;

   const urldata = await urlSubmitModel.findOne({shorturl:url})

   console.log(urldata);

   if(urldata){
            res.redirect(urldata.longUrl);
   }else{
    res.json({status:false,message:"invalid url"})
   }

});

router.post('/getUserURLList',async(req,res)=>{
    const {userId} = req.body;
    const allUserUrl = await urlSubmitModel.find({userId});
    if(allUserUrl){
        res.json({status:true,success:allUserUrl})
    }else{
        res.json({status:false,message:"no data found"});
    }
})


module.exports = router;
routers > user.routers.js
In user API routers we will have 2 API for users
- userRegistration: using this we can register user to our system.
- userLogin: Using this the user can use his credential or login detail to Login into our URL Shortener Flutter Application.
const router = require('express').Router();
const userModel = require('../model/user.model');


router.post('/userRegistration', async (req,res)=>{
    try {
        const {name,email,password} = req.body;

        const user = await userModel.findOne({email});
        if(!user){
            const createuser = new userModel({name,email,password});
            await createuser.save();


            res.json({status:true,success : "User Created Successfully"});
        }else{
            res.json({status:false,success : "User Exist"});
        }

    } catch (error) {
        console.log(error);
    }


});


router.post('/userLogin', async (req,res)=>{
    try {
        const {email,password} = req.body;

        const user = await userModel.findOne({email,password});
        if(user){

            res.json({status:true,success : user});
        }else{
            res.json({status:false,success : "User Invalid Please Try Again"});
        }

    } catch (error) {
        console.log(error);
    }
});

module.exports = router;
app.js
The app.js file is where we will define our middleware like cors, routers using express, and is exported using module.exports and imported in index.js
const express = require('express');
const cors = require('cors');
const bodyParser = require('body-parser');
const userRouter = require('./routers/user.router');
const urlRouter = require('./routers/url.router');
const app = express();

app.use(cors());

app.use(bodyParser.json({limit:'50Mb'}));
app.use(bodyParser.urlencoded({limit:'50Mb',extended:true}))

app.use('/',userRouter);
app.use('/',urlRouter);

module.exports = app;
index.js
This file is where our NodeJS Express Server start.
const app = require("./app")


app.get('/',(req,res)=>{
    const { data } = req.body;
   res.send(` Hello ${data}`)
})

app.listen(3000,()=>{
    console.log("Localhost Express running at 3000");
})
How to run url shortener backend nodejs server
node index.js


")
