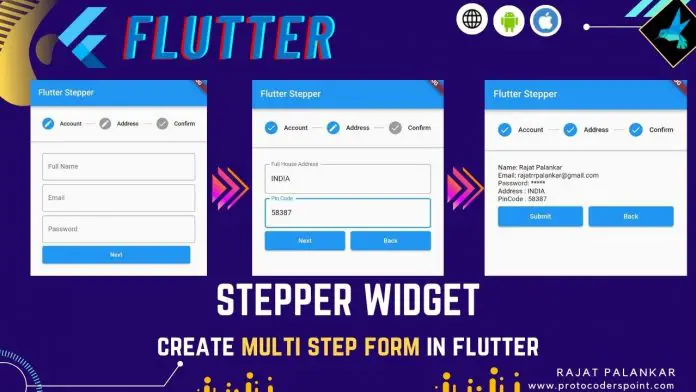
Hi Guys, Welcome to Proto Coders Point, In this flutter tutorial we will learn how to use flutter Stepper Widget in flutter app to build multi step form, where a user can fill out the information like a progress steppers( step by step form fill ) using Material Stepper in flutter.
Introducation to Flutter Stepper Class
A Stepper Class in flutter is a Material stepper widget that is used to display progress bar a sequence of steps.
Flutter Stepper widget is mostly used where multi step form is needed to be filled & completed in order to reach the final step of submitting the whole form at once to server(Database).
Video Tutorial
Stepper form progress example
Stepper Widget – Snippet Code Implementation
Stepper(
        type: StepperType.horizontal, // or StepperType.vertical
        currentStep: _activeStepIndex,
        steps: stepList(), // pass array list of Step widgets
        onStepContinue: () {
          // goto next step, simply increment currentStep value by +1
        },
        onStepCancel: () {
        // goto previous step, simply decrement currentStep value by -1

        },
        onStepTapped: (int index) {
          setState(() {
             // directly jump to particular step in stepper
            _activeStepIndex = index;
          });
        },
        controlsBuilder: (context, {onStepContinue, onStepCancel}) {
           // Change UI of
           // next and back button of stepper
        },
      ),
Properties of Stepper Widget Flutter
| Properties | Value | Description |
| type: | StepperType.horizontal StepperType.vertical | Stepper progress in horizontal or vertical by default: its Vertical |
| currectStep: | Index value of Step: 0,1,2.. | Defines the current active step in the form. |
| onStepContinue() | — | Callback when continue button, to move to next step. |
| onStepCancel() | — | Callback when cancel button, to move to previous step. |
| onStepTapped(int index) | (int index) | Callback when tapped on steps, to move to selected step in progress. |
| steps | List<Step> | The steps of Stepper whose, Title, Content are shown when respective step is Active. |
| controlsBuilder | (context, {onStepContinue, onStepCancel}) | To change to custom continue(next) & cancel(back) button. |
How to use Stepper Widget in flutter to build a multi step form.
Let’s get Started.
Now, let’s create a Integer value for current Step.
int _activeStepIndex = 0;
We can use this integer value into steps of currentstep whose content is to be displayed.
Now, onStepContinue() is a callback method, called when continue button is pressed.
Here we are checking if _activeStepIndex is less then the number of stepper list if true then increment _activeStepIndex by +1 & apply setState to move to next step.
onStepContinue: () {
          if (_activeStepIndex < (stepList().length - 1)) {
            setState(() {
              _activeStepIndex += 1;
            });
          } else {
            print('Submited');
          }
        }
Therefore when continue button is pressed, will close the current step & move to next step.
Now, onStepCancel() is a callback method, called when user press on ‘cancel’ button.
Here, we will decrement _activeStepIndex by -1,
onStepCancel: () {
          if (_activeStepIndex == 0) {
            return;
          }

          setState(() {
            _activeStepIndex -= 1;
          });
        }
Then when ‘cancel’ button is pressed, will go back to previous step.
Now, onStepTapped(int index), user can press on the step to directly jump to particular step in the form.
onStepTapped: (int index) {
          setState(() {
            _activeStepIndex = index;
          });
        },
Define a list of Step Widgets
Now, Let’s define a List<Step> = [Step(),….] to by shown in stepper widget in flutter.
Will create 3 Steps.
Snippet
List<Step> stepList() => [
    Step(...), //Step 1
    Step(...), //Step 2
    Step(...), //Step 3
  ];
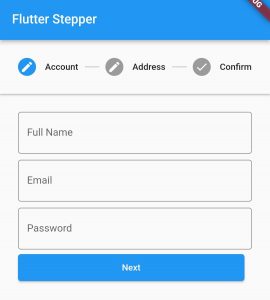
In Step 1: We will ask user about account details, such as Name, Email, Password.
Here, In Step Widget content properties we have defined 3 TextField where a user can enter his account Name, Email, Password.
Step(
          state: _activeStepIndex <= 0 ? StepState.editing : StepState.complete,
          isActive: _activeStepIndex >= 0,
          title: const Text('Account'),
          content: Container(
            child: Column(
              children: [
                TextField(
                  controller: name,
                  decoration: const InputDecoration(
                    border: OutlineInputBorder(),
                    labelText: 'Full Name',
                  ),
                ),
                const SizedBox(
                  height: 8,
                ),
                TextField(
                  controller: email,
                  decoration: const InputDecoration(
                    border: OutlineInputBorder(),
                    labelText: 'Email',
                  ),
                ),
                const SizedBox(
                  height: 8,
                ),
                TextField(
                  controller: pass,
                  obscureText: true,
                  decoration: const InputDecoration(
                    border: OutlineInputBorder(),
                    labelText: 'Password',
                  ),
                ),
              ],
            ),
          ),
        ),
Step 1 – Screenshot

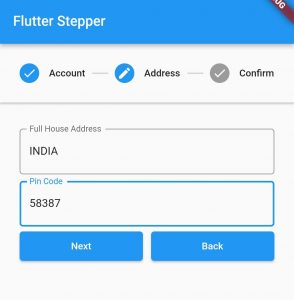
In Step 2: We will ask home address of the user.
Here, In Step Widget content properties we have defined 2 TextField to enter address & pincode.
 Step(
            state:
                _activeStepIndex <= 1 ? StepState.editing : StepState.complete,
            isActive: _activeStepIndex >= 1,
            title: const Text('Address'),
            content: Container(
              child: Column(
                children: [
                  const SizedBox(
                    height: 8,
                  ),
                  TextField(
                    controller: address,
                    decoration: const InputDecoration(
                      border: OutlineInputBorder(),
                      labelText: 'Full House Address',
                    ),
                  ),
                  const SizedBox(
                    height: 8,
                  ),
                  TextField(
                    controller: pincode,
                    decoration: const InputDecoration(
                      border: OutlineInputBorder(),
                      labelText: 'Pin Code',
                    ),
                  ),
                ],
              ),
            )),
Step 2 – Screenshot

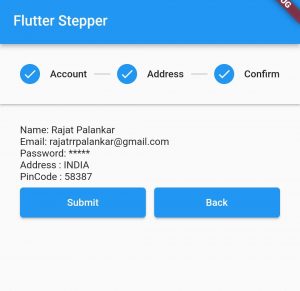
In Step 3: Will be a conformation step, where user can check the information he/she has entered before multi step form is final submission.
Step(
            state: StepState.complete,
            isActive: _activeStepIndex >= 2,
            title: const Text('Confirm'),
            content: Container(
                child: Column(
              crossAxisAlignment: CrossAxisAlignment.start,
              mainAxisAlignment: MainAxisAlignment.start,
              children: [
                Text('Name: ${name.text}'),
                Text('Email: ${email.text}'),
                const Text('Password: *****'),
                Text('Address : ${address.text}'),
                Text('PinCode : ${pincode.text}'),
              ],
            )))
Step 3 – Screenshot

How to customize Stepper Widget Button in flutter
To customize Continue(next) & Cancel(back) button in stepper widget, we have a property called as controlsBuilder.
By Default: We have Continue button and Cancel button to go to next step or go to previous step, you can change it as per your need by using controlsBuilder and add any widget in place of continue & cancel button.
controlsBuilder: (context, {onStepContinue, onStepCancel}) {
          return Container(
            child: Row(
              children: [
                Expanded(
                  child: ElevatedButton(
                    onPressed: onStepContinue,
                    child: const Text('Next'),
                  ),
                ),
                const SizedBox(
                  width: 10,
                ),
                if (_activeStepIndex > 0)
                  Expanded(
                    child: ElevatedButton(
                      onPressed: onStepCancel,
                      child: const Text('Back'),
                    ),
                  )
              ],
            ),
          );
        },
Complete Source Code
How to use Stepper widget to build Multi Step Form in flutter
main.dart
import 'package:flutter/material.dart';

void main() {
  runApp(const MyApp());
}

class MyApp extends StatelessWidget {
  const MyApp({Key? key}) : super(key: key);

  // This widget is the root of your application.
  @override
  Widget build(BuildContext context) {
    return MaterialApp(
      title: 'Flutter Demo',
      theme: ThemeData(
        primarySwatch: Colors.blue,
      ),
      home: const MyHomePage(),
    );
  }
}

class MyHomePage extends StatefulWidget {
  const MyHomePage({Key? key}) : super(key: key);

  @override
  _MyHomePageState createState() => _MyHomePageState();
}

class _MyHomePageState extends State<MyHomePage> {
  int _activeStepIndex = 0;

  TextEditingController name = TextEditingController();
  TextEditingController email = TextEditingController();
  TextEditingController pass = TextEditingController();
  TextEditingController address = TextEditingController();
  TextEditingController pincode = TextEditingController();

  List<Step> stepList() => [
        Step(
          state: _activeStepIndex <= 0 ? StepState.editing : StepState.complete,
          isActive: _activeStepIndex >= 0,
          title: const Text('Account'),
          content: Container(
            child: Column(
              children: [
                TextField(
                  controller: name,
                  decoration: const InputDecoration(
                    border: OutlineInputBorder(),
                    labelText: 'Full Name',
                  ),
                ),
                const SizedBox(
                  height: 8,
                ),
                TextField(
                  controller: email,
                  decoration: const InputDecoration(
                    border: OutlineInputBorder(),
                    labelText: 'Email',
                  ),
                ),
                const SizedBox(
                  height: 8,
                ),
                TextField(
                  controller: pass,
                  obscureText: true,
                  decoration: const InputDecoration(
                    border: OutlineInputBorder(),
                    labelText: 'Password',
                  ),
                ),
              ],
            ),
          ),
        ),
        Step(
            state:
                _activeStepIndex <= 1 ? StepState.editing : StepState.complete,
            isActive: _activeStepIndex >= 1,
            title: const Text('Address'),
            content: Container(
              child: Column(
                children: [
                  const SizedBox(
                    height: 8,
                  ),
                  TextField(
                    controller: address,
                    decoration: const InputDecoration(
                      border: OutlineInputBorder(),
                      labelText: 'Full House Address',
                    ),
                  ),
                  const SizedBox(
                    height: 8,
                  ),
                  TextField(
                    controller: pincode,
                    decoration: const InputDecoration(
                      border: OutlineInputBorder(),
                      labelText: 'Pin Code',
                    ),
                  ),
                ],
              ),
            )),
        Step(
            state: StepState.complete,
            isActive: _activeStepIndex >= 2,
            title: const Text('Confirm'),
            content: Container(
                child: Column(
              crossAxisAlignment: CrossAxisAlignment.start,
              mainAxisAlignment: MainAxisAlignment.start,
              children: [
                Text('Name: ${name.text}'),
                Text('Email: ${email.text}'),
                const Text('Password: *****'),
                Text('Address : ${address.text}'),
                Text('PinCode : ${pincode.text}'),
              ],
            )))
      ];

  @override
  Widget build(BuildContext context) {
    return Scaffold(
      appBar: AppBar(
        title: const Text('Flutter Stepper'),
      ),
      body: Stepper(
        type: StepperType.vertical,
        currentStep: _activeStepIndex,
        steps: stepList(),
        onStepContinue: () {
          if (_activeStepIndex < (stepList().length - 1)) {
            setState(() {
              _activeStepIndex += 1;
            });
          } else {
            print('Submited');
          }
        },
        onStepCancel: () {
          if (_activeStepIndex == 0) {
            return;
          }

          setState(() {
            _activeStepIndex -= 1;
          });
        },
        onStepTapped: (int index) {
          setState(() {
            _activeStepIndex = index;
          });
        },
        controlsBuilder: (context, {onStepContinue, onStepCancel}) {
          final isLastStep = _activeStepIndex == stepList().length - 1;
          return Container(
            child: Row(
              children: [
                Expanded(
                  child: ElevatedButton(
                    onPressed: onStepContinue,
                    child: (isLastStep)
                        ? const Text('Submit')
                        : const Text('Next'),
                  ),
                ),
                const SizedBox(
                  width: 10,
                ),
                if (_activeStepIndex > 0)
                  Expanded(
                    child: ElevatedButton(
                      onPressed: onStepCancel,
                      child: const Text('Back'),
                    ),
                  )
              ],
            ),
          );
        },
      ),
    );
  }
}
Conclusion
Thanks for reading the flutter tutorial article, Here i have explained the basic about flutter stepper widget.
I hope in this flutter programming article, you gained Information on how to use stepper widget.
We learnt, how to change direction of progress stepper (Horizontal/Vertical), & learnt how add multi step form using stepper widget.


