Hi Guys, Welcome to Proto Coders Point , In this Tutorial we will implement Flutter Animation with example.
As usual you need to create new Flutter project or work with existing project
Introduction to Flutter from official site
So let’s begin implementation of Animation in Flutter
Flutter – Custom Animation Effect with Example
AnimationController Class
A Animationcontroller as the name itself says that it is used for an animation effects in Flutter Development.
This class lets you perform tasks such as:
- Play an animation forward or in reverse, or stop an animation.
- Set the animation to a specific value.
- Define the upperBound and lowerBound values of an animation.
- Create a fling animation effect using a physics simulation.
Code Snippet
AnimationController controller;

controller = AnimationController(
      duration: Duration(seconds: 3),
      vsync: this,
      upperBound: 100.0,
    );
    controller.forward();

    controller.addListener(() {
      setState(() {
        print(controller
            .value); //used to just print controller value to see changes
      });
    });
Duration : The length of time this animation should last.
If [reverseDuration] is specified, then [duration] is only used when going [forward]. Otherwise, it specifies the duration going in both directions.
vsync : this
package:flutter/src/widgets/ticker_provider.dart mixin SingleTickerProviderStateMixin<T extends StatefulWidget> on State<T> implements TickerProvider
Provides a single [Ticker] that is configured to only tick while the current tree is enabled, as defined by [TickerMode].
To create the [AnimationController] in a [State] that only uses a single [AnimationController], mix in this class, then pass vsync: this to the animation controller constructor.
This mixin only supports vending a single ticker. If you might have multiple [AnimationController] objects over the lifetime of the [State], use a full [TickerProviderStateMixin] instead.
Center(
       child: Container(
       child: Image.asset('images/splash.png'),
       height: controller.value,
      ),
),
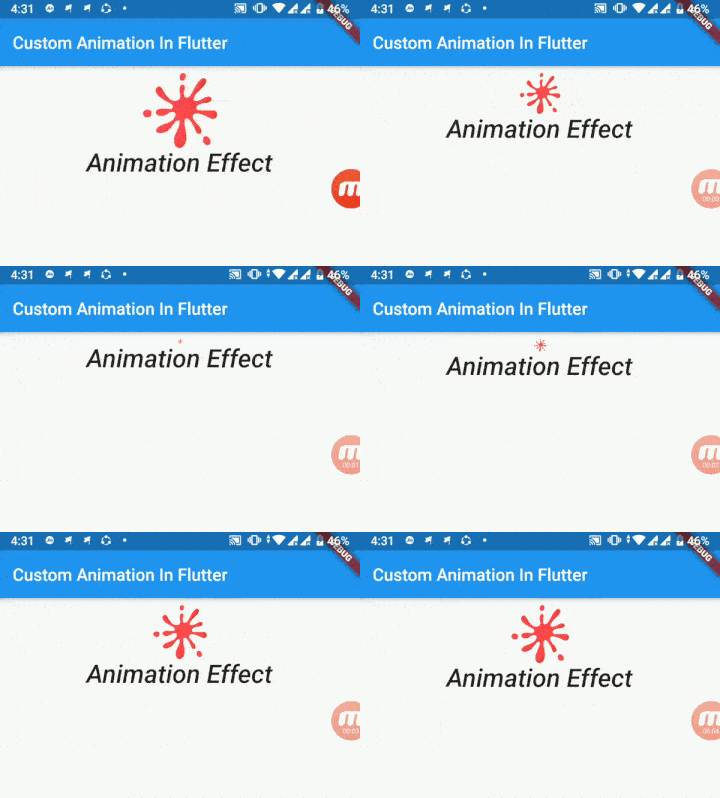
In the above flutter animation i have simply gave an anim effect to an image where an image size gets increase within 3 seconds from Container height 0 to 100.
Here i am setting the container height from 0 – 100 in 3 seconds.
1. Flutter Animation Effect Example 1
Copy paste the Below lines of code in main.dart file of you animation project
main.dart
import 'package:flutter/material.dart';

void main() => runApp(MyApp());

class MyApp extends StatelessWidget {
  // This widget is the root of your application.
  @override
  Widget build(BuildContext context) {
    return MaterialApp(
      title: 'Flutter Demo',
      theme: ThemeData(
        primarySwatch: Colors.blue,
      ),
      home: MyHomePage(),
    );
  }
}

class MyHomePage extends StatefulWidget {
  @override
  _MyHomePageState createState() => _MyHomePageState();
}

class _MyHomePageState extends State<MyHomePage>
    with SingleTickerProviderStateMixin {
  AnimationController controller;

  @override
  void initState() {
    // TODO: implement initState
    super.initState();

    controller = AnimationController(
      duration: Duration(seconds: 3),
      vsync: this,
      upperBound: 100.0,
    );
    controller.forward();

    controller.addListener(() {
      setState(() {
        print(controller
            .value); //used to just print controller value to see changes
      });
    });
  }

  @override
  Widget build(BuildContext context) {
    return Scaffold(
      appBar: AppBar(
        title: Text("Custom Animation In Flutter"),
      ),
      body: Padding(
        padding: const EdgeInsets.all(8.0),
        child: Column(
          children: <Widget>[
            Center(
              child: Container(
                child: Image.asset('images/splash.png'),
                height: controller.value,
              ),
            ),
            Container(
              child: Text(
                "Animation Effect",
                style: TextStyle(
                    fontSize: 30.0,
                    fontWeight: FontWeight.w500,
                    fontStyle: FontStyle.italic),
              ),
            )
          ],
        ),
      ),
    );
  }
}
Output of above code flutter animation

The Above code will show the animation effect just once when the app is launched.
2. Flutter Animation Effect for continues Animation.
so if you want to show any continous Animation that you can make user of Animation Class of flutter.
CurvedAnimation Class check official site here
CurvedAnimation Class
A CurvedAnimation defines the animation’s progress as a non-linear curve.
animation = CurvedAnimation(parent: controller, curve: Curves.easeIn);
Controlling the animation
animation.addStatusListener((status) {
      if (status == AnimationStatus.completed) {
        controller.reverse(from: 1.0);
      } else if (status == AnimationStatus.dismissed) {
        controller.forward();
      }
    });
in the above snippet i am making use of 2 feature of AnimationController i.e reverse and forword.
that basically work something like this
controller.forword(); will work from small to high
controller.reverse(from:1.0); this will work from high to small.
Complete Code the get Continous animation effect
import 'package:flutter/material.dart';

void main() => runApp(MyApp());

class MyApp extends StatelessWidget {
  // This widget is the root of your application.
  @override
  Widget build(BuildContext context) {
    return MaterialApp(
      title: 'Flutter Demo',
      theme: ThemeData(
        primarySwatch: Colors.blue,
      ),
      home: MyHomePage(),
    );
  }
}

class MyHomePage extends StatefulWidget {
  @override
  _MyHomePageState createState() => _MyHomePageState();
}

class _MyHomePageState extends State<MyHomePage>
    with SingleTickerProviderStateMixin {
  AnimationController controller;
  Animation animation;
  @override
  void initState() {
    // TODO: implement initState
    super.initState();

    controller = AnimationController(
      duration: Duration(seconds: 3),
      vsync: this,
      upperBound: 1.0,
    );
    controller.forward();

    animation = CurvedAnimation(parent: controller, curve: Curves.easeIn);

    controller.addListener(() {
      setState(() {
        print(animation
            .value); //used to just print controller value to see changes
      });
    });

    animation.addStatusListener((status) {
      if (status == AnimationStatus.completed) {
        controller.reverse(from: 1.0);
      } else if (status == AnimationStatus.dismissed) {
        controller.forward();
      }
    });
  }

  @override
  void dispose() {
    // TODO: implement dispose
    super.dispose();
    controller.dispose();
  }

  @override
  Widget build(BuildContext context) {
    return Scaffold(
      appBar: AppBar(
        title: Text("Custom Animation In Flutter"),
      ),
      body: Padding(
        padding: const EdgeInsets.all(8.0),
        child: Column(
          children: <Widget>[
            Center(
              child: Container(
                child: Image.asset('images/splash.png'),
                height: animation.value * 100,
              ),
            ),
            Container(
              child: Text(
                "Animation Effect",
                style: TextStyle(
                    fontSize: 30.0,
                    fontWeight: FontWeight.w500,
                    fontStyle: FontStyle.italic),
              ),
            )
          ],
        ),
      ),
    );
  }
}
But this animation will continue forever unless we trash the controller.
Even if this screen is dismissed that Controller will still be running and will make user of mobile memory or resources. So whenever you’re using animation controller in you project it’s really important that you tap it into dispose method.
@override
  void dispose() {
    // TODO: implement dispose
    super.dispose();
    controller.dispose(); // stop the animation
  }
This dispose method will stop the controller animation effect when the screen if been changed.
Output

3. Change Background Color with Flutter Animation example 3
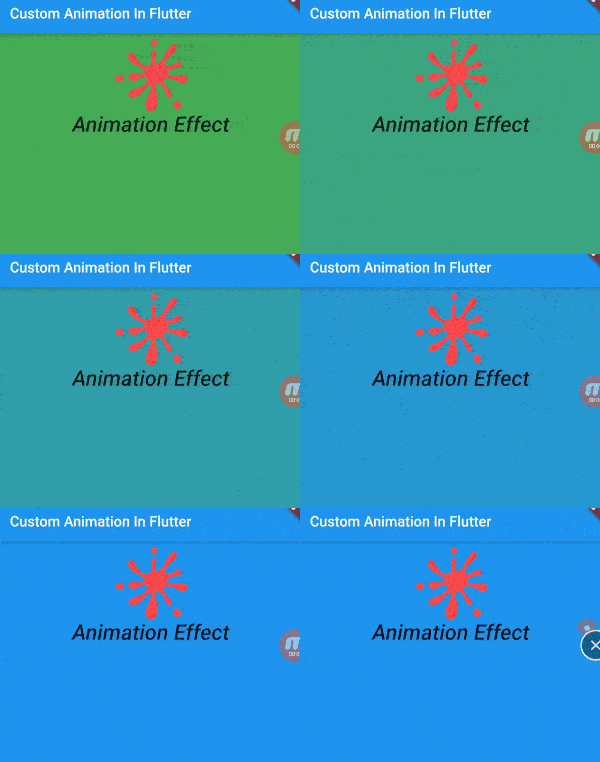
In this Flutter Animation example we are making user of ColorTween Class to change the backgroudColor as an amination effect.
ColorTween Class has 2 properties begin and end where you need to specific the begin color and end color
The value this variable has at the beginning of the animation.
- The value this variable has at the end of the animation.
Complete Code to change the backGround Color with Flutter Animation
import 'package:flutter/material.dart';

void main() => runApp(MyApp());

class MyApp extends StatelessWidget {
  // This widget is the root of your application.
  @override
  Widget build(BuildContext context) {
    return MaterialApp(
      title: 'Flutter Demo',
      theme: ThemeData(
        primarySwatch: Colors.blue,
      ),
      home: MyHomePage(),
    );
  }
}

class MyHomePage extends StatefulWidget {
  @override
  _MyHomePageState createState() => _MyHomePageState();
}

class _MyHomePageState extends State<MyHomePage>
    with SingleTickerProviderStateMixin {
  AnimationController controller;
  Animation animation;
  @override
  void initState() {
    // TODO: implement initState
    super.initState();

    controller = AnimationController(
      duration: Duration(seconds: 5),
      vsync: this,
      upperBound: 1.0,
    );
    controller.forward();

    animation =
        ColorTween(begin: Colors.green, end: Colors.blue).animate(controller);

    controller.addListener(() {
      setState(() {
        print(animation
            .value); //used to just print controller value to see changes
      });
    });

//    animation.addStatusListener((status) {
//      if (status == AnimationStatus.completed) {
//        controller.reverse(from: 1.0);
//      } else if (status == AnimationStatus.dismissed) {
//        controller.forward();
//      }
//    });
  }

  @override
  void dispose() {
    // TODO: implement dispose
    super.dispose();
    controller.dispose();
  }

  @override
  Widget build(BuildContext context) {
    return Scaffold(
      backgroundColor: animation.value, // animation effect to background
      appBar: AppBar(
        title: Text("Custom Animation In Flutter"),
      ),
      body: Padding(
        padding: const EdgeInsets.all(8.0),
        child: Column(
          children: <Widget>[
            Center(
              child: Container(
                child: Image.asset('images/splash.png'),
                height: 100.0,
              ),
            ),
            Container(
              child: Text(
                "Animation Effect",
                style: TextStyle(
                    fontSize: 30.0,
                    fontWeight: FontWeight.w500,
                    fontStyle: FontStyle.italic),
              ),
            )
          ],
        ),
      ),
    );
  }
}
Then, The above code will give you Output like this

Then,As you can observe in above Gif image that the background color of the app is been changing.


[…] of Flutter Hero Animation Widget to show Transition […]
[…] Flutter Animation – Custom Animation effect […]