
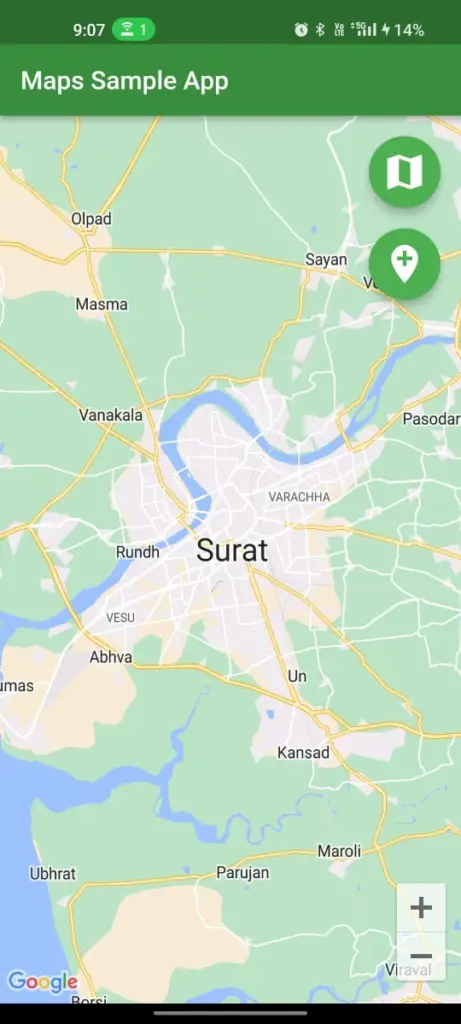
This article walks you through the process of including a Google Map widget in your Flutter application step-by-step. Here is what you will construct today:
You can quickly and visually learn about the world by using a map.
displaying their dimensions and distances between them. Locations around the world are shown. We can incorporate a map into our app using the Google Maps Flutter plugin. This add-on can connect to Google Maps servers display maps automatically and respond to user gestures. With its assistance we can also add markers to our map.
Why use Flutter with Google Maps?
Because Google Maps offers for both Android and iOS. It enables us to run code once gives them permission to do so for both device. The Google Map widget includes Google Maps Flutter plugin that supports initialCameraPosition, maptype, onMapCreated etc….. Anywhere on earth can be chosen as the location for the camera and marker. The marker can be made to our specifications. order to provide the zooming in Google Map view on the first page. it also includes zoom property in cameraposition.
Get started…..
Setup
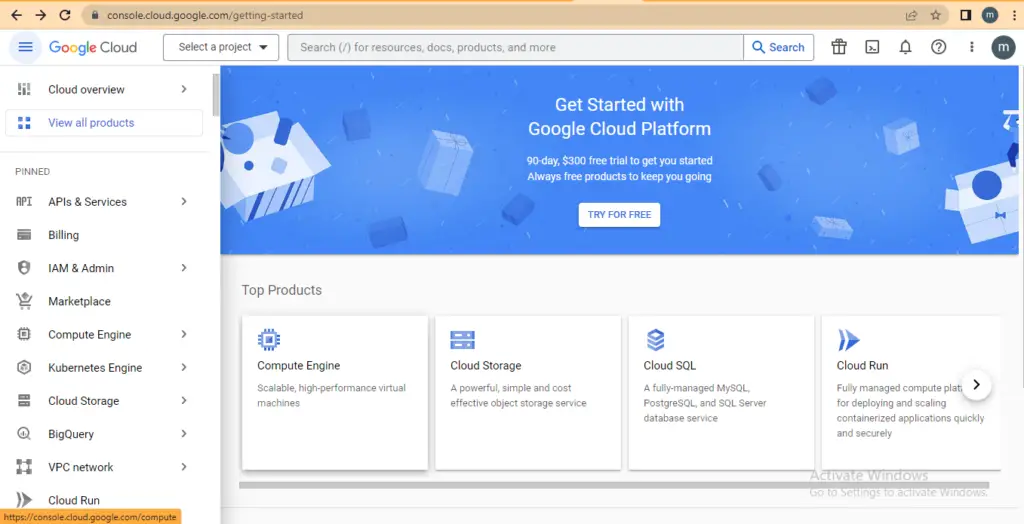
1) : Visit console.cloud.google.com to access the Google Cloud Console.
Because you’ll need APIs to incorporate Google Maps in your app the first step is to create a project at Google Developers Console.
2) : Select “New Project” from the project dropdown menu in the top navigation bar.
3) : Give your project a name in the “New Project” dialogue box.
4) : You can optionally select a billing account to be linked to your project and enter an organization or folder to categorize it under. You must now set up a billing account if you don’t already have one.
5) : To begin creating your new project then click “Create” .
done it!! Your new project utilize to be finished and accessible . Now that your project resources such as virtual -machines, databases other services have been set up and configured. now , you can start using them.
Activating the Maps API
The following steps must be taken in order to enable the Maps API in Google Cloud Platform:
1): Visit console.cloud.google.com to access the Google Cloud Console.
2): Select the project you want to enable the Maps API for by clicking on the project dropdown menu in the top navigation bar.
3): Click the hamburger menu in the top left corner of the Cloud Console, choose “APIs & Services” and then choose “Dashboard” from the dropdown menu.
4): Click the “+ ENABLE APIS AND SERVICES” button at the top of the page on the API & Services dashboard page.
5): In the search bar look for “Maps SDK for iOS” and ”Maps SDK for Android” click it to choose it.
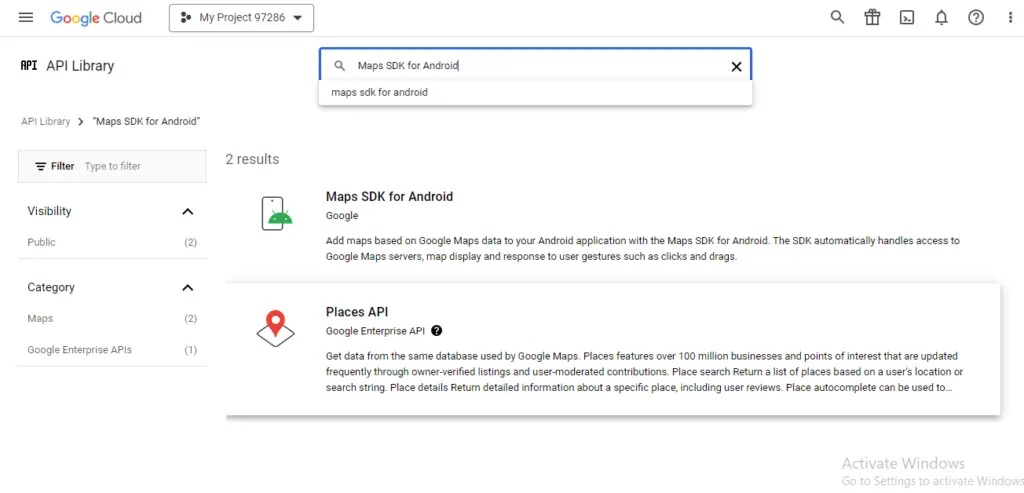
6): Clicking on the ENABLE button , make the Maps SDK iOS and Maps SDK for Android APIs available on google platform .
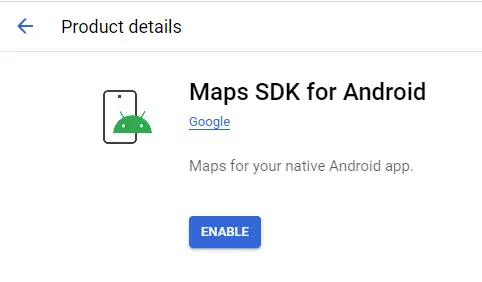
7): You will be taken to a page where you can create API credentials once the API has been enabled. To create an API key and set up the key’s settings, follow the on-screen instructions.
8): Finally, copy the API key and use it in your application to authenticate requests to the Maps t API.
Your application should now utilise the Maps API. Be aware that some APIs may require further configuration or billing setup before they can be used in flutter application .
API key creation and restriction
It’s important to remember that there is a cost associated with using the Google Map APIs. To lessen the likelihood of unauthorized use, you must therefore create a set of API keys for it and restrict its permissions.
Here I describe how to generate the keys.
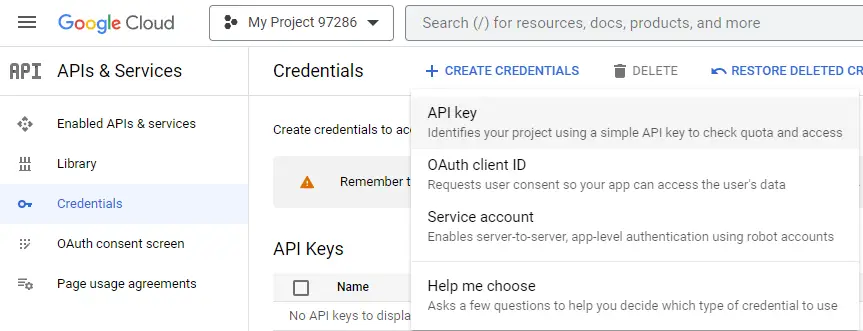
1) : choose Credentials from menu on the left panel
2): Select + CREATE CREDENTIALS option from menu .
3): select and use an API key in the flutter app for google map .
Generate API key
I would strongly advise putting in place some restrictions after creating the API key . For instance if you only want to use an API key for a map only the Maps service should be able to use it.
Two categories of limitations exist:
1): You can specify which types of applications should have access to this key using application restrictions. (i.e., Android or iOS). To ensure that the key you created only works with that particular platform, choose the relevant option.
2): You can choose which services are accessible with this key thanks to API limitations. You would choose Maps API from the list if it were only for the map.
Google Maps is added to the Flutter app (Android)
Obtaining an API key for both iOS and Android is the following step. Once you have your API key enter it as follows in the AndroidManifest.xml file (android/app/src/main/AndroidManifest.xml) of your Flutter app:
<manifest ...
  <application ...
    <meta-data android:name="com.google.android.geo.API_KEY"
               android: value="YOUR ANDROID API KEY HERE"/>
After that add the location permission
 <uses-permission android:name="android.permission.ACCESS_FINE_LOCATION"/>
  <uses-permission android:name="android.permission.ACCESS_COARSE_LOCATION" />
Step 1): be added to the pubspec.yaml file as a dependency.
Google_maps_flutter: ^any
Step 2): enter the below command on terminal and get the package
Flutter pub get
Step 3): The GoogleMap widget should now be added to your Dart file.
Google Map(
      initialCameraPosition: setInitialPosition,
    )
A setInitialPositionis given to GoogleMap containing the initial location that will be displayed on the map when it is loaded .
static final LatLng  setInitialPosition =
    LatLng(21.17386991096315, 72.8298368265714);
static final CameraPosition _kInitialPosition =
    CameraPosition(target: _kMapCenter, zoom: 11.0, tilt: 0, bearing: 0);
Show the map in the flutter app.
 Completer<GoogleMapController> _controller = Completer();
  void _onMapCreated(GoogleMapController controller) {
    _controller.complete(controller);
  }
  @override
  Widget build(BuildContext context) {
    return MaterialApp(
      home: Scaffold(
        appBar: AppBar(
          title: Text('Maps Sample App'),
          backgroundColor: Colors.green[700],
        ),
        body: GoogleMap(
          onMapCreated: _onMapCreated,
          initialCameraPosition: CameraPosition(
            target: setInitialPosition ,
            zoom: 11.0,
          ),
        ),
      ),
    );
  }
If the map does not display properly or if you get a message saying: “Cannot enable my location layer as location permissions are not granted,”
Solution :
i) If the user rejects the request, create logic to ask again. Write the logic to alert them that the app won’t function without location permissions if they select the “don’t ask again” option on the permissions dialogue.
ii) Make sure you have asked for the correct permissions to access the device’s location. The manifest file needs to include the following permissions:
<uses-permission android:name="android.permission.ACCESS_FINE_LOCATION"/>
<uses-permission android:name="android.permission.ACCESS_COARSE_LOCATION" />
Flutter map styling
mapType: MapType.normal,
  myLocationEnabled: true,
  myLocationButtonEnabled: true,
  zoomControlsEnabled: true,
  buildingsEnabled: true,
  indoorViewEnabled: true,
  trafficEnabled: false,
  mapStyle: '''
    [
      {
        "elementType": "geometry",
        "stylers": [
          {
            "color": "#1d2c4d"
          }
        ]
      },
      {
        "elementType": "labels.text.fill",
        "stylers": [
          {
            "color": "#8ec3b9"
          }
        ]
      },
      {
        "elementType": "labels.text.stroke",
        "stylers": [
          {
            "color": "#1a3646"
          }
        ]
      },
      {
        "featureType": "administrative.country",
        "elementType": "geometry.stroke",
        "stylers": [
          {
            "color": "#4b6878"
          }
        ]
      }
    ]
  ''',
Map alterations using the GoogleMap widget
With the GoogleMap widget, you have a lot of freedom to change the map.
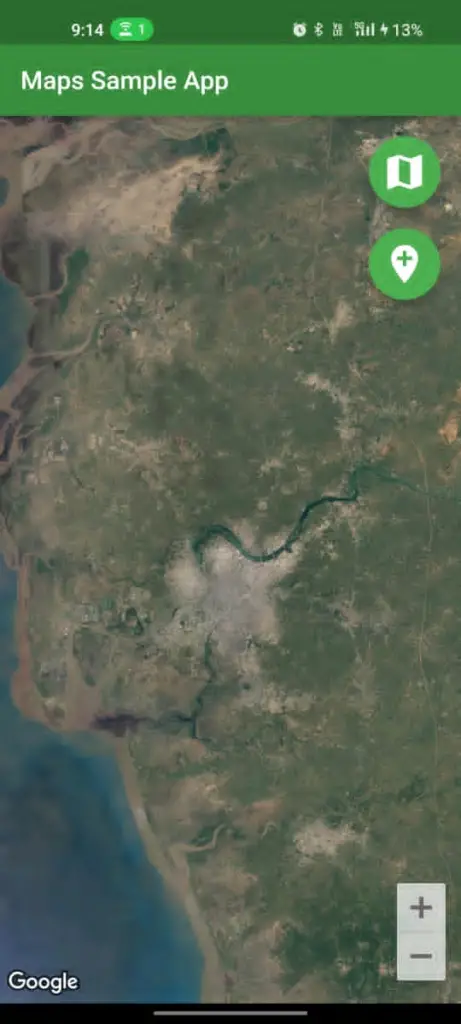
Change the different map type
There are many different kinds of maps, including hybrid, terrain, and satellite. You can easily do this by setting the desired type to the widget’s mapType property:
GoogleMap(
  initialCameraPosition: setInitialPosition ,
  onMapCreated: onMapCreated,
  mapType: MapType.satellite,
);
My Location button enabled
By default, the widget’s initialCameraPosition parameter’s specified location will be displayed on the map. (or any other location that you provide to the map programmatically). Set myLocationEnabled to true to enable the user to go back to their current location.
When the device is still, a tiny blue dot will show up on the screen; when it is moving, a chevron will.
MapType _currentMapType = MapType.normal;
GoogleMap(
  initialCameraPosition: setInitialPosition ,
myLocationEnabled: true,
  onMapCreated: onMapCreated,
  mapType:_currentMapType ,
);
How do I change my location on Google Maps in Flutter?.., is a common query .
In Flutter, you are unable to modify your location on Google Maps. GPS calculations are used to determine your location, and it cannot be changed unless your device is moved to a different location.
If you want to move the “my location” button around on the screen, you can make a FloatingActionButton (FAB) to replace the stock “my location” button and position it wherever you like. Only the logic necessary to center the map’s camera on your location when the button is pressed will need to be written.
Change that so that pressing the button toggles between the normal view and satellite view of the maps.
Create the variable _currentMapType to record the current map type in order to accomplish this. _currentMapType maptype should be added to the GoogleMap widget.
Now , Add a method that, when called inside a setState() call, modifies the value of _currentMapType. By doing this, the map will be updated to reflect the new value of _currentMapType.
_onMapTypeButtonPressed() {
  setState(() {
    _currentMapType = _currentMapType == MapType.normal
        ? MapType.satellite
        : MapType.normal;
  });
}
FloatingActionButton(
 onPressed: _onMapTypeButtonPressed,
)
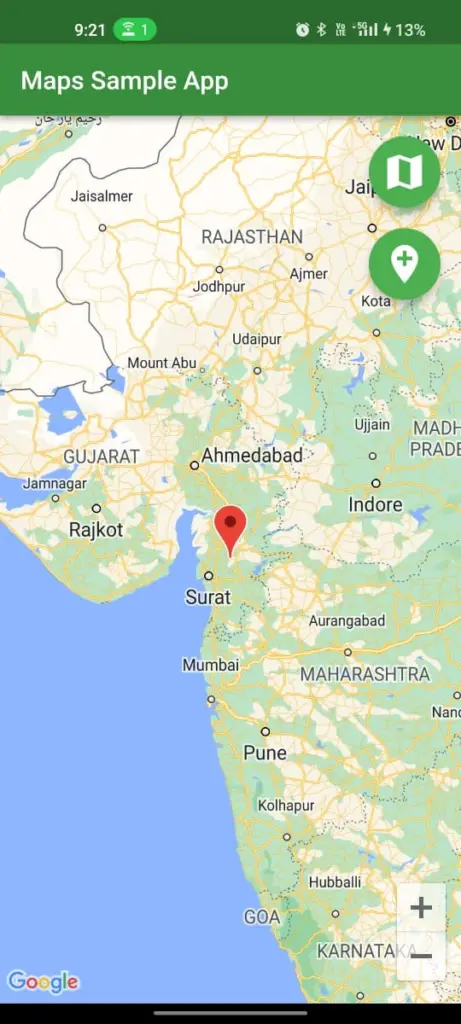
Mark the location of the marker on the map :
Now , we can move the camera around based on precise latitude and longitude . we will try to mark the set where we move the camera. In the event you decide to relocate to New York . you will notice a marker placed at the desired location. when the camera pans to New York.
We will use the GoogleMap widget markers property . which is accepts set of markers to accomplish this.
final Set<Marker> _markers = Set();
GoogleMap(
 markers: _markers,
…
)
We created marker inside the _onAddMarkerButtonPressed function inside the setState() method . because we want to marker to be set as the user moves to the specified location in map.
_onAddMarkerButtonPressed() {
 setState(() {
   _markers.add(Marker(
     markerId: MarkerId(_lastMapPosition.toString()),
     position: _lastMapPosition,
     infoWindow: const InfoWindow(
       title: 'Best place',
       snippet: '',
     ),
     icon: BitmapDescriptor.defaultMarker,
   ));
 });
}
An area of the map is marked with a marker. the position property uses the location’s LatLng. The markerId is each marker’s individual unique identifier.
Let’s.. now add some information to the marker . so that it can be tapped to display the information. In order to do this we’ll use the infoWindow property of the Marker widget . Which provides us with a title and snippet as well as a desc for the marker.
 Marker(
            markerId: MarkerId('India'),
            position: LatLng(lat, long),
            infoWindow: InfoWindow(title: 'India', snippet: 'India is the best')
        ),
Enabling the traffic mode
You can turn on traffic mode . simply setting the value of trafficEnabled properties to true.
GoogleMap(
  initialCameraPosition: setInitialPosition ,
  onMapCreated: onMapCreated,
  trafficEnabled: true,
);
Important details for maps :
onMapCreated is a method that receives a MapController as a parameter and is called when a map is created.
initialCameraPosition: necessary variable that specifies the starting position of the camera. Which region of the world you want the map to focus on is indicated by the camera position.
camera control is handled by mapController. This design is comparable to other Flutter controllers like the TextEditingController.
For app code click here 👍
https://github.com/Mitali8620/google_maps_app.git
Conclusion:
The GoogleMap widget is a widget, just like any other widget in Flutter, so you can place it inside any other widget, such as a Listview, Stack, Column, Row, Container, and so on. You can also transform it, clip it—although we’re not sure why anyone would want to do that—and do anything else with the map since it’s a widget. Be imaginative, do more exploring, and even share any discoveries you make with us.You can modify this code for your needs.
Please let us know what you thought of the article. We wish we could have covered every feature, but that would require writing a book, which is not what you or we want. We made an effort to cover everything, from how to install it to some fundamental functions that map users might need on a regular basis.
Thanks for reading…..
Have a beautiful day……
")


