
Hi Guys, Welcome to Proto Coders Point. In this Flutter tutorial Article will learn how to create tabBar in flutter.
What is the TabBar Flutter
The tabs in flutter are used for page navigation, by using which user can easily switch between pages by simple tapping on the flutter tabs, so it will generate TabView pages with respective pages & display it at body TabBarView.
Note: The styling of TabBar may defer depending on the Operating System your flutter app is running on, looking into an example. Android devices will place TabBar at the top of the screen below appbar, while when you run flutter app in iOS then the TabBar get created at bottom of iOS devices.
Therefore if you want TabBars at bottom of screen then simply, then it better to make use of flutter bottom navigation bar instead of tabBar.
How to create TabBar in flutter
Video Tutorial
In flutter we can easily create a TabBar for Navigation between Pages content, In one main page you can load multiple page content using tabBarView.
To add tabs in flutter app, we need to Wrap Scaffold Widget with DefaultTabController & provide a length (the number of tabs you want to create), then in flutter appbar create tabBar with tabs, then in body use TabBarView & define some widget or pages that you want to show when tabs from flutter tabbar are selected.

Let’s get Started in step-by-step to create tabBar in flutter app.
1st Step: Open Existing Flutter Project or create new Project.
I use android Studio to build flutter apps.
so in your project in main.dart copy paste below code as a starting code.
import 'package:flutter/cupertino.dart';
import 'package:flutter/material.dart';

void main() async {
  runApp(const MyApp());
}

class MyApp extends StatelessWidget {
  const MyApp({Key? key}) : super(key: key);

  @override
  Widget build(BuildContext context) {
    return MaterialApp(
      title: 'Flutter Demo',
      theme: ThemeData(
        primarySwatch: Colors.blue,
      ),
      home: MyHomePage(),
      debugShowCheckedModeBanner: false,
    );
  }
}

class MyHomePage extends StatefulWidget {
  const MyHomePage({Key? key}) : super(key: key);

  @override
  _MyHomePageState createState() => _MyHomePageState();
}

class _MyHomePageState extends State<MyHomePage> {

  @override
  Widget build(BuildContext context) {
    return Scaffold(
        appBar: AppBar(
          title: const Text(
            "Flutter TabBar Example",
          ),
        ),
        body: const  Center(
          child: Text("Here will show tab view seleted pages"),
        )
    );
  }
}
Here, we have Scaffold widget with appbar and body property.
2nd Step: Wrap Scaffold widget with DefaultTabController
To add TabBar in flutter you need to wrap scaffold widget with flutter DefaultTabController and define length ( The number of tabs you want to create in tab bar).
return DefaultTabController(
      length: 3,
      child: Scaffold(
          appBar: AppBar(
            title: const Text(
              "Flutter TabBar Example",
            ),

          ),
          body: const  Center(
            child: Text("Here will show tab view seleted pages"),
          ) ),
    );
3rd Step: Add Tabs in Appbar
As we have defined TabController length = 4, therefore we need to add 4 tab within TabBar, as I have done above.
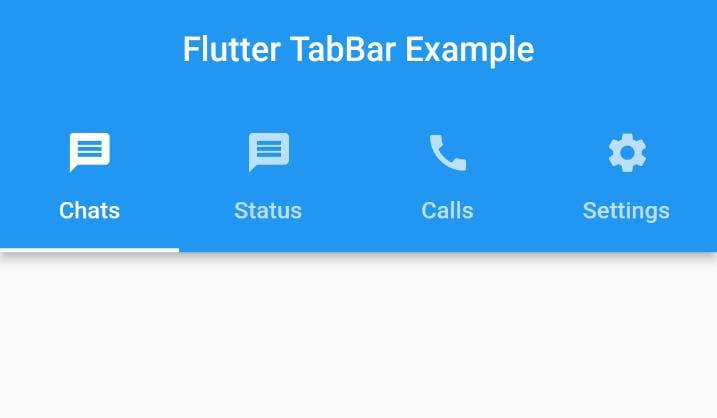
Our here i have created 4 tabs ” Chats, Status, Calls, Settings tabs”. you can create as per your app UI needed.
DefaultTabController(
      length: 4 ,
      child: Scaffold(
          appBar: AppBar(
            title: Text("Flutter TabBar Example"),
            bottom: TabBar(
              tabs: [
                Tab(text: 'Chats',),
                Tab(text: 'Status',),
                Tab(text: 'Calls',),
                Tab(text: 'Settings',)
              ],
            ),
          ),
          body: const  Center(
            child: Text("Hello"),
          ) ),
    );
4th Step: Add TabBarView Pages in body property of Scaffold Widget
Now, We have successfully added tabBar in Appbar and Also wrapped Scaffold widget with DefaultTabBarController, now when user want’s to switch between Tabs in flutter app, we need show selected tab page, therefore in body property of scaffold widget we must use TabBarView with 4 childrens widget/pages.
body: TabBarView(
            children: [
              Center(child: Text('Chats Page'),),
              Center(child: Text('Status Page'),),
              Center(child: Text('Calls Page'),),
              Center(child: Text('Settings Page'),)
            ],
          ),
Complete Source Code – Flutter create TabBar using DefaultTabController
main.dart
import 'package:flutter/cupertino.dart';
import 'package:flutter/material.dart';

void main() async {
  runApp(const MyApp());
}

class MyApp extends StatelessWidget {
  const MyApp({Key? key}) : super(key: key);

  @override
  Widget build(BuildContext context) {
    return MaterialApp(
      title: 'Flutter Demo',
      theme: ThemeData(
        primarySwatch: Colors.blue,
      ),
      home: MyHomePage(),
      debugShowCheckedModeBanner: false,
    );
  }
}

class MyHomePage extends StatefulWidget {
  const MyHomePage({Key? key}) : super(key: key);

  @override
  _MyHomePageState createState() => _MyHomePageState();
}

class _MyHomePageState extends State<MyHomePage> {

  @override
  Widget build(BuildContext context) {
    return DefaultTabController(
      length: 4 ,
      child: Scaffold(
          appBar: AppBar(
            title: const Text(
              "Flutter TabBar Example",

            ),
            centerTitle: true,
            bottom: TabBar(
              tabs: [
                Tab(text: 'Chats',),
                Tab(text: 'Status',),
                Tab(text: 'Calls',),
                Tab(text: 'Settings',)
              ],
            ),
          ),
          body: TabBarView(
            children: [
              Center(child: Text('Chats Page'),),
              Center(child: Text('Status Page'),),
              Center(child: Text('Calls Page'),),
              Center(child: Text('Settings Page'),)
            ],
          ),
      ),
    );
  }
}
")


