
Hi Guys, Welcome to Proto Coders Point, In this Android Tutorial we gonna make use of a Android Library called Expandable Cardview Github Library, Developed by AleSpero. Using this Android UI Library we will build a simple Login-Registration UI Screen.
Our App will have 2 Expandable cardview:
- One for Login UI
- another for Registration UI
What is Android Expandable CardView?
This Library is very useful, it lets you to create a simple,fastest way for creating a CardView where you can just insert any custom xml layout which will be poped/expanded.
Eg: Whenever user click on the cardview, a drop down will be animated with the custom XML layout.
Let’s start adding this library in our android project
How to integrate Expandable CardView in android with example?
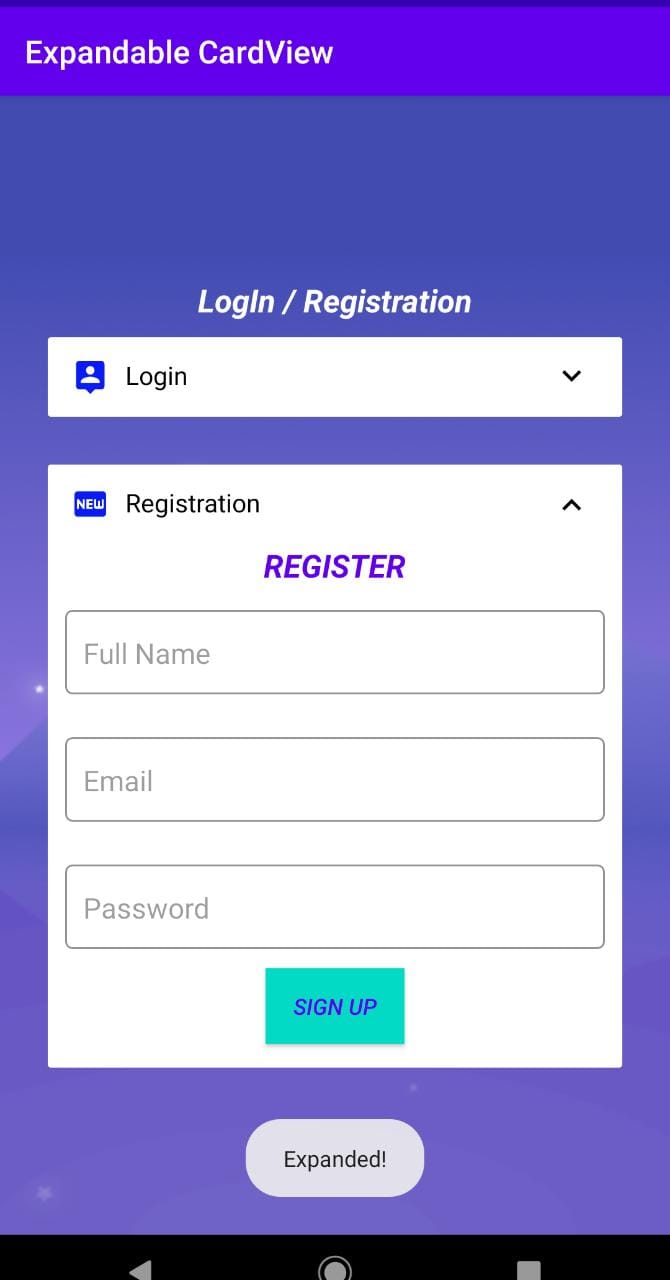
DEMO OF FINAL RESULT
Step 1: Create a new android Project
ofCourse you need android studio to create a new android project
Open android studio and create a new android project or open any existing project and name it as “expandable cardview android tutorial”
Step 2: Add Required Dependencies / Library
Open your build.gradle(app level) file and in-between dependencies{} add 2 of this library
Expandable CardView dependencies
implementation 'com.alespero:expandable-cardview:0.8' // expandable cardview library
Material Design
I have used TextInputLayout and TextInputEditText for custom EditText Field whose class resides in Material Design Library.
implementation 'com.google.android.material:material:1.0.0' //material design
Add both the dependencies as shown in below screenshot.
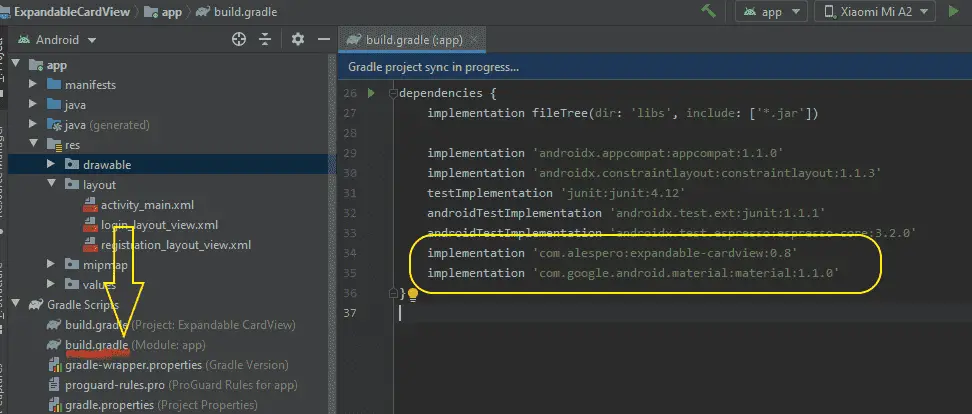
Now it’s done with adding the required dependencies for this android project.
Step 3: Create 2 XML layout
As we are creating 2 forms for login and registration we need to create 2 xml layout design with have EditText field and a button in it.
How to create a new layout in android studio?
Project > app > res > layout (right click) > New > Layout Resource File
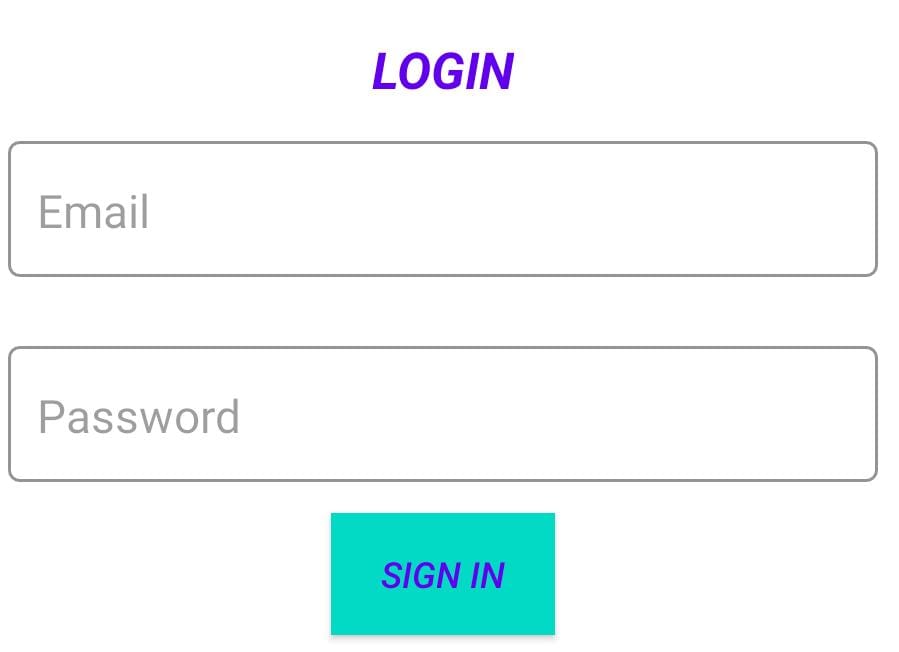
1.) login_layout_view.xml
<?xml version="1.0" encoding="utf-8"?>
<LinearLayout xmlns:android="http://schemas.android.com/apk/res/android"
    android:orientation="vertical" android:layout_width="match_parent"
    android:layout_height="match_parent"
    android:layout_margin="10dp">

    <TextView
        android:layout_width="wrap_content"
        android:layout_height="wrap_content"
        android:layout_gravity="center"
        android:textSize="20sp"
        android:textColor="@color/colorPrimary"
        android:textStyle="italic|bold"
        android:text="LOGIN"/>

    <com.google.android.material.textfield.TextInputLayout

        android:layout_width="match_parent"
        android:layout_height="60dp"
        android:layout_gravity="center"
        android:layout_marginTop="10dp"
        android:layout_marginEnd="10dp"
        android:layout_marginStart="10dp"
        android:layout_marginBottom="10dp"
        style="@style/Widget.MaterialComponents.TextInputLayout.OutlinedBox"
        android:gravity="center"
        android:hint="Email"
        android:textColor="@android:color/black">

        <com.google.android.material.textfield.TextInputEditText
            android:id="@+id/email"
            android:layout_width="match_parent"
            android:layout_height="match_parent"
            android:maxLines="1"
            android:inputType="textEmailAddress"/>

    </com.google.android.material.textfield.TextInputLayout>

    <com.google.android.material.textfield.TextInputLayout

        android:layout_width="match_parent"
        android:layout_height="60dp"
        android:layout_gravity="center"
        android:layout_marginTop="10dp"
        android:layout_marginEnd="10dp"
        android:layout_marginStart="10dp"
        android:layout_marginBottom="10dp"
        style="@style/Widget.MaterialComponents.TextInputLayout.OutlinedBox"
        android:gravity="center"
        android:hint="Password"
        android:textColor="@android:color/black">

        <com.google.android.material.textfield.TextInputEditText
            android:id="@+id/password"
            android:layout_width="match_parent"
            android:layout_height="match_parent"
            android:maxLines="1"
            android:inputType="number"/>

    </com.google.android.material.textfield.TextInputLayout>

    <Button
        android:id="@+id/login_ButtonID"
        android:layout_width="wrap_content"
        android:layout_height="wrap_content"
        android:layout_gravity="center"
        android:textStyle="italic"
        android:layout_marginBottom="15sp"
        android:background="@color/colorAccent"
        android:textColor="@color/colorPrimary"
        android:text="Sign In"/>
</LinearLayout>
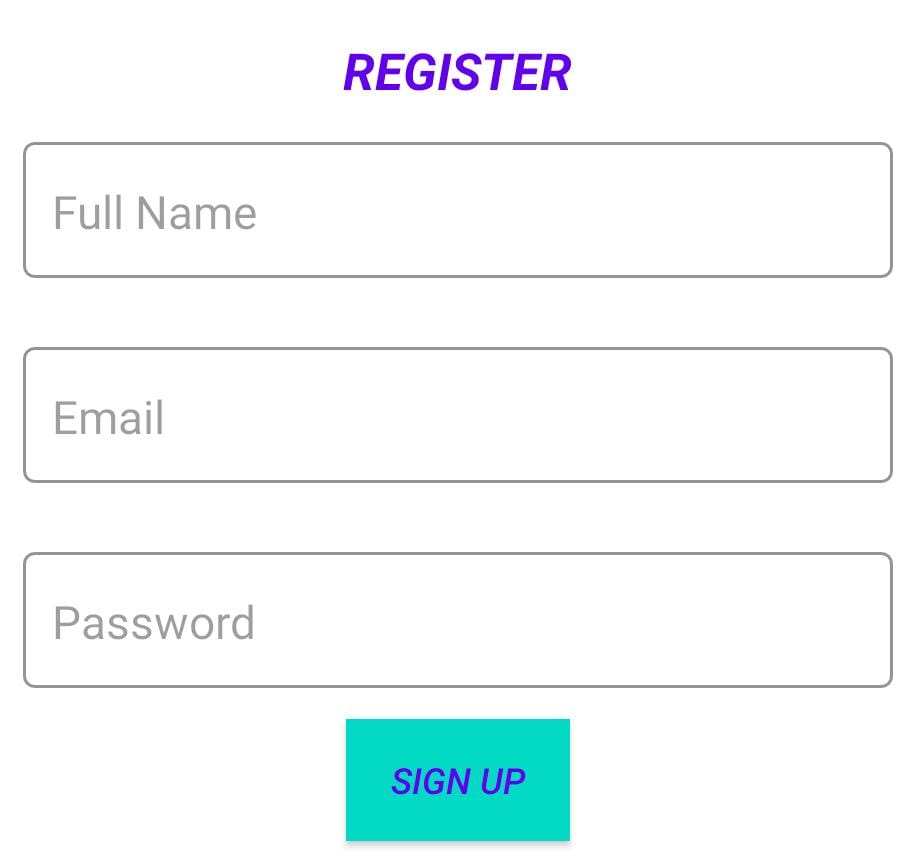
2.) registration_layout_view.xml
<?xml version="1.0" encoding="utf-8"?>
<LinearLayout xmlns:android="http://schemas.android.com/apk/res/android"
    android:orientation="vertical" android:layout_width="match_parent"
    android:layout_height="match_parent"
    android:layout_margin="10dp">

    <TextView
        android:layout_width="wrap_content"
        android:layout_height="wrap_content"
        android:layout_gravity="center"
        android:textSize="20sp"
        android:textColor="@color/colorPrimary"
        android:textStyle="italic|bold"
        android:text="REGISTER"/>

    <com.google.android.material.textfield.TextInputLayout

        android:layout_width="match_parent"
        android:layout_height="60dp"
        android:layout_gravity="center"
        android:layout_marginTop="10dp"
        android:layout_marginEnd="10dp"
        android:layout_marginStart="10dp"
        android:layout_marginBottom="10dp"
        style="@style/Widget.MaterialComponents.TextInputLayout.OutlinedBox"
        android:gravity="center"
        android:hint="Full Name"
        android:textColor="@android:color/black">

        <com.google.android.material.textfield.TextInputEditText
            android:id="@+id/fname"
            android:layout_width="match_parent"
            android:layout_height="match_parent"
            android:maxLines="1"
            android:inputType="textPersonName"/>

    </com.google.android.material.textfield.TextInputLayout>


    <com.google.android.material.textfield.TextInputLayout

        android:layout_width="match_parent"
        android:layout_height="60dp"
        android:layout_gravity="center"
        android:layout_marginTop="10dp"
        android:layout_marginEnd="10dp"
        android:layout_marginStart="10dp"
        android:layout_marginBottom="10dp"
        style="@style/Widget.MaterialComponents.TextInputLayout.OutlinedBox"
        android:gravity="center"
        android:hint="Email"
        android:textColor="@android:color/black">

        <com.google.android.material.textfield.TextInputEditText
            android:id="@+id/email"
            android:layout_width="match_parent"
            android:layout_height="match_parent"
            android:maxLines="1"
            android:inputType="textWebEmailAddress"/>

    </com.google.android.material.textfield.TextInputLayout>

    <com.google.android.material.textfield.TextInputLayout

        android:layout_width="match_parent"
        android:layout_height="60dp"
        android:layout_gravity="center"
        android:layout_marginTop="10dp"
        android:layout_marginEnd="10dp"
        android:layout_marginStart="10dp"
        android:layout_marginBottom="10dp"
        style="@style/Widget.MaterialComponents.TextInputLayout.OutlinedBox"
        android:gravity="center"
        android:hint="Password"
        android:textColor="@android:color/black">

        <com.google.android.material.textfield.TextInputEditText
            android:id="@+id/password"
            android:layout_width="match_parent"
            android:layout_height="match_parent"
            android:maxLines="1"
            android:inputType="textPassword"/>

    </com.google.android.material.textfield.TextInputLayout>

    <Button
        android:id="@+id/Reg_ButtonID"
        android:layout_width="wrap_content"
        android:layout_height="wrap_content"
        android:layout_gravity="center"
        android:textStyle="italic"
        android:layout_marginBottom="15sp"
        android:background="@color/colorAccent"
        android:textColor="@color/colorPrimary"
        android:text="Sign Up"/>
</LinearLayout>
Step 4: Declaring Expandable CardView in activity_main.xml
Snippet XML Code
<com.alespero.expandablecardview.ExpandableCardView
    android:id="@+id/profile"
    android:layout_width="wrap_content"
    android:layout_height="wrap_content"
    app:title="Login"
    app:icon="@drawable/ic_person"
    app:inner_view="@layout/mycustomlayoutview"
    app:expandOnClick="true"
    app:animationDuration="300"
    app:startExpanded="false"/>
Here only mandatory/required attributes are inner_view and title. The other attributes are optional.
inner_view : In inner_view you need to just pass the xml layout resources you have just created above.
expandOnClick: Expandable onClick must be set to true is you want the CardView Expandable
app:title : This is optional but if you want then you can specify it by giving title to your cardview.
icon: a small icon will be shown at the starting of the Extendable cardview
startExpanded: this works something like, if you want to set the cardview expanded or closed when the app is been open for first time.
activity_main.xml
<?xml version="1.0" encoding="utf-8"?>
<LinearLayout xmlns:android="http://schemas.android.com/apk/res/android"
    xmlns:app="http://schemas.android.com/apk/res-auto"
    xmlns:tools="http://schemas.android.com/tools"
    android:layout_width="match_parent"
    android:layout_height="match_parent"
    android:layout_gravity="center"
    android:background="@drawable/bacgroundimage"
    android:orientation="vertical"
    tools:context=".MainActivity">
    <LinearLayout
        android:layout_width="match_parent"
        android:layout_height="match_parent"
        android:orientation="vertical"
        android:layout_gravity="center"
        android:gravity="center">

    <TextView
        android:layout_width="wrap_content"
        android:layout_height="wrap_content"
        android:text="LogIn / Registration"
        android:layout_marginTop="10dp"
        android:layout_marginBottom="10dp"
        android:textColor="@android:color/white"
        android:textStyle="italic|bold"
        android:layout_gravity="center"
        android:textSize="20sp"
      />

    <com.alespero.expandablecardview.ExpandableCardView
        android:id="@+id/expend_Login"
        android:layout_width="wrap_content"
        android:layout_height="wrap_content"
        app:title="Login"
        android:layout_marginStart="30sp"
        android:layout_marginEnd="30sp"
        android:layout_marginBottom="30dp"
        app:icon="@drawable/ic_profile"
        app:inner_view="@layout/login_layout_view"
        app:expandOnClick="true"
        app:animationDuration="300"
        android:elevation="5dp"
        app:startExpanded="false"/> <!-- start Expanded we can set to true if you want this card to expanded on start -->
 <!-- Here inner view is link to the view or xml design you want to show, when expanded -->

    <com.alespero.expandablecardview.ExpandableCardView
        android:id="@+id/expend_Reg"
        android:layout_width="wrap_content"
        android:layout_height="wrap_content"
        app:title="Registration"
        android:layout_marginStart="30sp"
        android:layout_marginEnd="30sp"
        app:icon="@drawable/ic_fiber_new_black_24dp"
        app:inner_view="@layout/registration_layout_view"
        app:expandOnClick="true"
        app:animationDuration="300"
        android:elevation="5dp"
        app:startExpanded="false"/>
    </LinearLayout>
</LinearLayout>
Step 5: Snippet code of using this Expandable CardView
ExpandableCardView ExpandLogin; // create an object if it
OnCreate()
In OnCreate method, initiate the object by using findViewById and point to the view.
//find the view from activity_main
        ExpandLogin = (ExpandableCardView)findViewById(R.id.expend_Login);
setOnExpandedListener(……….)
//Listen to Expandable Cardview when card is been expanded or closed
       ExpandLogin.setOnExpandedListener(new ExpandableCardView.OnExpandedListener() {
           @Override
           public void onExpandChanged(View v, boolean isExpanded) {


               Toast.makeText(MainActivity.this, isExpanded ? "Expanded!" : "Collapsed!", Toast.LENGTH_SHORT).show();
               // do something here

           }
       });
Step 6 : Complete Code tutorial on Android Expandable CardView
MainActivity.java
Open MainActivity.java and paste the below lines of java codes
package com.protocoderspoint.expandablecardview;

import androidx.appcompat.app.AppCompatActivity;

import android.os.Bundle;
import android.view.View;
import android.widget.Button;
import android.widget.Toast;

import com.alespero.expandablecardview.ExpandableCardView;
import com.google.android.material.textfield.TextInputEditText;

public class MainActivity extends AppCompatActivity {

    ExpandableCardView ExpandLogin;
    ExpandableCardView ExpandRegister;
    Button SignIn,SignUp;

    TextInputEditText Loginemail;

    @Override
    protected void onCreate(Bundle savedInstanceState) {
        super.onCreate(savedInstanceState);
        setContentView(R.layout.activity_main);

        //find the view from activity_main
        ExpandLogin = (ExpandableCardView)findViewById(R.id.expend_Login);
        ExpandRegister = (ExpandableCardView)findViewById(R.id.expend_Reg);

        //Listen to Expandable Cardview when card is been expanded or closed
        ExpandLogin.setOnExpandedListener(new ExpandableCardView.OnExpandedListener() {
            @Override
            public void onExpandChanged(View v, boolean isExpanded) {


                Toast.makeText(MainActivity.this, isExpanded ? "Expanded!" : "Collapsed!", Toast.LENGTH_SHORT).show();
                Loginemail = (TextInputEditText)v.findViewById(R.id.email);

                SignIn = (Button)v.findViewById(R.id.login_ButtonID);

                SignIn.setOnClickListener(new View.OnClickListener() {
                    @Override
                    public void onClick(View v) {

                        //do you staff here onbutton click
                        Toast.makeText(MainActivity.this, Loginemail.getText().toString(), Toast.LENGTH_SHORT).show();
                    }
                });

            }
        });

        ExpandRegister.setOnExpandedListener(new ExpandableCardView.OnExpandedListener() {
            @Override
            public void onExpandChanged(View v, boolean isExpanded) {

                if(ExpandLogin.isExpanded()) //check is top login expandable card view is expanded
                {
                     ExpandLogin.collapse();  //if yes then close the Expension
                }

                Toast.makeText(MainActivity.this, isExpanded ? "Expanded!" : "Collapsed!", Toast.LENGTH_SHORT).show();

                //initializing the view of inner_view of Expandable cardview android
                SignUp = (Button)v.findViewById(R.id.Reg_ButtonID);

                //do you staff here onbutton click
            }
        });


    }
}
All set you android app is ready with login UI and Registration UI using the above specified awesome android library.
")


[…] is Similar to Expandable CardView in android,Using this Expansion Tile Widget one can Tap on the card to Expands or just collapses the view of […]