Hi Guys, Welcome to Proto Coders Point. In this flutter tutorial article, will learn how to implement remember me feature in flutter app to save login details by using HIVE local database.
So the feature is very useful, if a user don’t want to enter his login credential in login form everytime he visits the app.
How to implement login remember me in flutter app
The Idea that works behind this is, When a user put his login credential for first time for login purpose in the login textField & check the checkbox ‘Remember me’, We will store/save his/her details in local data store in mobile device itself i.e by using Hive NoSQL database, and when user re-visit the flutter app, we will retrive the data from HIVE database(local database) & put it into TextField, so that their is no need for a user to enter the login credential again & again.
In flutter there are many ways to store data locally. In our case, we are going to make use of HIVE database to save user login details in app itself.
Video Tutorial
Let’s get started
1. Implement Login registration UI
I have wrote a complete article of flutter login-registration, you can just check the below article to learn login UI or else simply download/clone the flutter login registration UI from my github repo.
In the above login UI project, You will get 2 pages UI
- Login Page UI
- Registration Page UI
The main motive of this tutorial article is how to save login details in flutter i.e. remember me login.
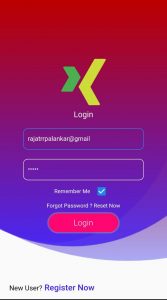
As you can see In login page we have:-

- 2 TextField: In TextField we have added TextEditingController to easily get the text entered in TextField.
- CheckBox: Remember me Checkbox, user can use it to choose weather to save his login credential or no.
- Login Button: To login to app.
2. Create new flutter project / clone UI from step 1
Implement remember me in flutter, create your own login form or else use my login UI from my github repository.
3. Adding Hive Package
Once your project is ready, go to pubspec.yaml file & under dependencies section add this 2 dependencies package.
dependencies:
  hive:
  hive_flutter:
then hit pub get text button or run ‘flutter pub get’ in your IDE terminal.
Therefore HIVE NoSQL database package will get installed in your flutter project as external library.
4. Importing HIVE & Hive_flutter package
To use hive you need to import it wherever required.
import 'package:hive/hive.dart';
import 'package:hive_flutter/hive_flutter.dart';
5. Initialize HIVE Database
Now, to make use of Hive db, you need to initialize Hive, to make use of local storage, therefore the best place to do it is in main() method, before loading your app.
void main()  async{
  await Hive.initFlutter();  // init flutter hive
  runApp(const MyApp());
}
6. Creating Hive Box
After initializing HIVE, We need to create/open a HIVE BOX.
In short, Hive box is a box where we will store our data in flutter NOSQL database form.
The best place to create Boxes is immediate after Hive.InitFlutter(). Therefore we can create/open HIVE box in initState().
let’s create flutter hive box
late Box box1;

 @override
  void initState() {
    // TODO: implement initState
    super.initState();
    createOpenBox();

  }

  void createOpenBox()async{

    box1 = await Hive.openBox('logindata');


    //getdata();  // when user re-visit app, we will get data saved in local database
    //how to get data from hive db check it in below steps
  }
7. Save login detail in HIVE BOX
To save data in hive db box we will use put() method.
syntax:
box.put('key',value);
In Hive, data are stored in key-value pair.
In our case, we need to save login detial if remember me checkbox is checked.
Therefore, when login button is pressed we will call a method(login()), In that method we will check if remember me login checkbox is checked, if yes then save login details in HIVE DB.
void login(){

   // perform your login authentication
  // is login success then save the credential if remember me is on
    if(isChecked){
      box1.put('email', email.value.text);
      box1.put('pass', pass.value.text);
    }
 }
8. Get data saved in HIVE database
To get data from hive database, we can make use of get() method and pass the key.
syntax:
box1.get('email')
The above syntex will return the data stored in the database using key, if data don’t exist it simply return null.
code: to get login remember me data in login form.
we will call getData() method immediatly after opening hive box, so if data is saved in database will set the data to Login TextField, if data is null then will do nothing.
 void getdata()async{
    if(box1.get('email')!=null){
      email.text = box1.get('email');
      isChecked = true;
      setState(() {

      });
    }
    if(box1.get('pass')!=null){
      pass.text = box1.get('pass');
      isChecked = true;
      setState(() {

      });
    }
  }
Complete Source code – Save Login Credential locally in flutter
main.dart
import 'package:flutter/material.dart';
import 'login_page.dart';
import 'package:hive/hive.dart';
import 'package:hive_flutter/hive_flutter.dart';

void main()  async{
  await Hive.initFlutter();  //init hive
  runApp(const MyApp());
}

class MyApp extends StatelessWidget {
  const MyApp({Key? key}) : super(key: key);
  @override
  Widget build(BuildContext context) {
    return MaterialApp(
      title: 'Flutter Demo',
      debugShowCheckedModeBanner: false,
      theme: ThemeData(
        primarySwatch: Colors.blue,
      ),
      home: Login_Page()  // load login page
    );
  }
}
Login_page.dart
import 'package:flutter/material.dart';
import 'package:flutter_svg/flutter_svg.dart';
import 'package:login_ui/registrationpage.dart';
import 'package:velocity_x/velocity_x.dart';
import 'package:hive/hive.dart';
import 'package:hive_flutter/hive_flutter.dart';

class Login_Page extends StatefulWidget {
  const Login_Page({Key? key}) : super(key: key);

  @override
  _Login_PageState createState() => _Login_PageState();
}

class _Login_PageState extends State<Login_Page> {
  bool isChecked = false;
  TextEditingController email = TextEditingController();
  TextEditingController pass = TextEditingController();

  late Box box1;

  @override
  void initState() {
    // TODO: implement initState
    super.initState();
    createOpenBox();

  }

  void createOpenBox()async{
    box1 = await Hive.openBox('logindata');
    getdata();
  }
  void getdata()async{
    if(box1.get('email')!=null){
      email.text = box1.get('email');
      isChecked = true;
      setState(() {

      });
    }
    if(box1.get('pass')!=null){
      pass.text = box1.get('pass');
      isChecked = true;
      setState(() {

      });
    }
  }


  @override
  Widget build(BuildContext context) {
    return Scaffold(
        resizeToAvoidBottomInset: false,
        body: SafeArea(
          child: Stack(
            children: [
              Container(
                decoration: const BoxDecoration(
                    image: DecorationImage(
                        image: AssetImage("images/assets/backgroundUI.png"),
                        fit: BoxFit.cover)),
              ),
              Padding(
                padding: const EdgeInsets.fromLTRB(20, 40, 20, 0),
                child: Column(
                  crossAxisAlignment: CrossAxisAlignment.center,
                  mainAxisAlignment: MainAxisAlignment.center,
                  children: [
                    Container(
                        height: 100,
                        width: 100,
                        child: SvgPicture.asset("images/assets/xing.svg")),
                    const HeightBox(10),
                    "Login".text.color(Colors.white).size(20).make(),
                    const HeightBox(20),
                    Padding(
                      padding: const EdgeInsets.fromLTRB(30, 0, 30, 0),
                      child: TextField(
                        controller: email,
                        decoration: InputDecoration(
                          hintText: 'Email',
                          hintStyle: const TextStyle(color: Colors.white),
                          enabledBorder: OutlineInputBorder(
                            borderRadius: BorderRadius.circular(10.0),
                            borderSide: const BorderSide(color: Colors.white),
                          ),
                          focusedBorder: OutlineInputBorder(
                              borderRadius: BorderRadius.circular(10.0),
                              borderSide: const BorderSide(color: Colors.blue)),
                          isDense: true,
                          // Added this
                          contentPadding:
                              const EdgeInsets.fromLTRB(10, 20, 10, 10),
                        ),
                        cursorColor: Colors.white,
                        style: const TextStyle(color: Colors.white),
                      ),
                    ),
                    const HeightBox(20),
                    Padding(
                      padding: const EdgeInsets.fromLTRB(30, 0, 30, 0),
                      child: TextField(
                        controller: pass,
                        obscureText:true,
                        decoration: InputDecoration(
                          hintText: 'Password',
                          hintStyle: const TextStyle(color: Colors.white),
                          enabledBorder: OutlineInputBorder(
                            borderRadius: BorderRadius.circular(10.0),
                            borderSide: const BorderSide(color: Colors.white),
                          ),
                          focusedBorder: OutlineInputBorder(
                              borderRadius: new BorderRadius.circular(10.0),
                              borderSide: const BorderSide(color: Colors.blue)),
                          isDense: true,
                          // Added this
                          contentPadding:
                              const EdgeInsets.fromLTRB(10, 20, 10, 10),
                        ),
                        cursorColor: Colors.white,
                        style: const TextStyle(color: Colors.white),
                      ),
                    ),
                    Row(
                      mainAxisAlignment: MainAxisAlignment.center,
                      children: [
                        Text("Remember Me",style: TextStyle(color: Colors.white),),
                        Checkbox(
                          value: isChecked,
                          onChanged: (value){
                            isChecked = !isChecked;
                            setState(() {

                            });
                          },
                        ),
                      ],
                    ),
                    GestureDetector(
                      onTap: () {},
                      child: const Text(
                        "Forgot Password ? Reset Now",
                        style: TextStyle(color: Colors.white),
                      ),
                    ),
                    HeightBox(10),
                    GestureDetector(
                        onTap: () {
                          print("Login Clicked Event");
                          login();
                        },
                        child: "Login".text.white.light.xl.makeCentered().box.white.shadowOutline(outlineColor: Colors.grey).color(Color(0XFFFF0772)).roundedLg.make().w(150).h(40)),
                    const HeightBox(20),
                  ],
                ),
              )
            ],
          ),
        ),
        bottomNavigationBar: GestureDetector(
          onTap: () {
            Navigator.pushReplacement(context,
                MaterialPageRoute(builder: (context) => registrationpage()));
          },
          child: RichText(
              text: const TextSpan(
            text: 'New User?',
            style: TextStyle(fontSize: 15.0, color: Colors.black),
            children: <TextSpan>[
              TextSpan(
                text: ' Register Now',
                style: TextStyle(
                    fontWeight: FontWeight.w600,
                    fontSize: 18,
                    color: Color(0XFF4321F5)),
              ),
            ],
          )).pLTRB(20, 0, 0, 15),
        ));
  }

  void login(){
    if(isChecked){
      box1.put('email', email.value.text);
      box1.put('pass', pass.value.text);
    }
  }
}


