
In this Tutorial, we will implement recyclerview with cardview in android studio.
As it is usually recommended now to make use of simple ListView to show a large set of data sets. If you have a huge set of data sets that you want to show to UI, then you should use RecyclerView, Because RecyclerView is much more customizable than ListView and in terms of performance it is also very far ahead.
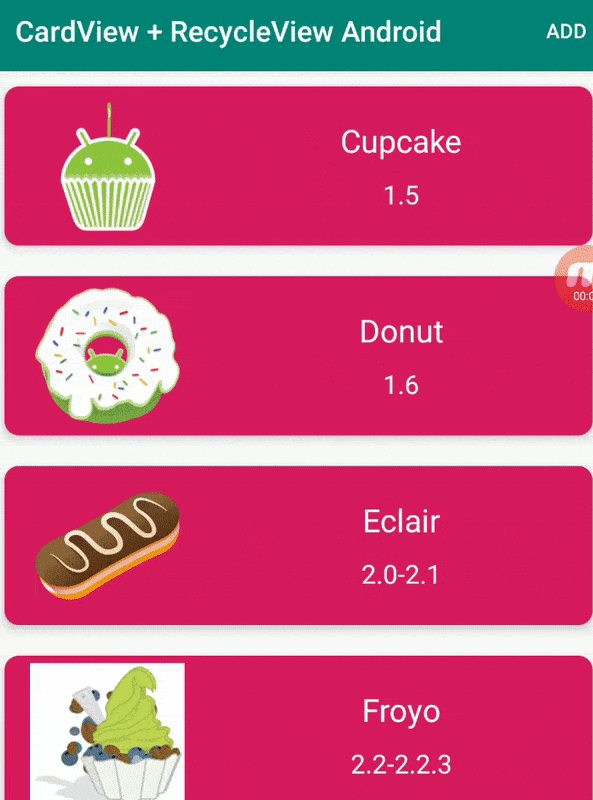
Here is a demo of how the Final Recyclerview with cardview UI looks like.
Android RecyclerView and Android CardView got introduced in Android Lollipop with Material Design.
Before We start Implementing Recyclerview with CardView android we will know the basics.
Android RecyclerView
Android RecyclerView is one of the more advanced, powerful, and flexible versions of the ListView Android.
RecyclerView is very useful to set the Layout Managers dynamically at runtime, unlike the ListView That was able to show the list in only one format is the vertical list. RecyclerView allows us to set the following types of Layouts at runtime.
- LinearLayoutManager: This helps users to set views in both vertical wells as horizontal listviews.
- StaggeredLayoutManager: it supports staggered lists
- GridLayoutManager: This layout helps us in viewing List in Grid UI as in GalleryView earlier. recyclerview gridlayout android example
recycler view Dependencies
dependencies {
    implementation 'com.android.support:recyclerview-v7:28.0.0'
}
RecycleView Dependencies for androidx
implementation 'androidx.recyclerview:recyclerview:1.0.0'
Android CardView
Apps often need to display data in similarly styled containers. These containers are often used in lists to hold each item’s information. The system provides the CardView API is an easy way for you to show information inside cards that have a consistent look across the platform. CardView is mostly used for good-looking UI with RecyclerView.
CardView is usually an XML UI Design to show data within the list using the recycler view. Android CardView UI component shows information inside cards. This component is generally used to show contact information.
dependencies {
    implementation 'com.android.support:cardview-v7:28.0.0'
}
CardView Dependencies for androidX
implementation 'androidx.cardview:cardview:1.0.0'
How we use RecyclerView with Cardview android x Example Project
So let us begin with the implementation of Recyclerview with card view android Application example.
Create a new project in android studio with Empty Activity.
This RecyclerView with Cardview android project consists of a MainActivity that basically displays the RecyclerView in XML.
The CardView is added to the RecyclerView from the CustomAdapter class.
The DataModel class is used to retrieve the data for each CardView through getters.
The MyData class holds the arrays of text views and drawables along with their ids.
Android RecyclerView with cardview android example code
The activity_main.xml holds the RecyclerView inside a RelativeLayout as shown below.
activity_main.xml code:
<?xml version="1.0" encoding="utf-8"?>
<RelativeLayout xmlns:android="http://schemas.android.com/apk/res/android"
    xmlns:tools="http://schemas.android.com/tools"
    android:layout_width="match_parent"
    android:layout_height="match_parent"
    tools:context=".MainActivity"

    >

    <androidx.recyclerview.widget.RecyclerView
        android:id="@+id/my_recycler_view"
        android:layout_width="match_parent"
        android:layout_height="match_parent"
        android:scrollbars="vertical"
        />

</RelativeLayout>
Android CardView layout is defined below:
cards_layout.xml code:
<?xml version="1.0" encoding="utf-8"?>
<LinearLayout xmlns:android="http://schemas.android.com/apk/res/android"
    android:layout_width="match_parent"
    android:layout_height="wrap_content"
    android:orientation="vertical"
    android:tag="cards main container">

    <androidx.cardview.widget.CardView
        android:id="@+id/card_view"
        xmlns:card_view="http://schemas.android.com/apk/res-auto"
        android:layout_width="match_parent"
        android:layout_height="wrap_content"
        card_view:cardBackgroundColor="@color/colorAccent"
        card_view:cardCornerRadius="10dp"
        card_view:cardElevation="5dp"
        card_view:cardUseCompatPadding="true">

        <LinearLayout
            android:layout_width="match_parent"
            android:layout_height="wrap_content"
            android:orientation="horizontal"
            >

            <ImageView
                android:id="@+id/imageView"
                android:tag="image_tag"
                android:layout_width="0dp"
                android:layout_height="100dp"
                android:layout_margin="5dp"
                android:layout_weight="1"
                android:src="@drawable/ic_launcher_background"/>

            <LinearLayout
                android:layout_width="0dp"
                android:layout_height="wrap_content"
                android:layout_marginTop="12dp"
                android:layout_weight="2"
                android:orientation="vertical"
                >

                <TextView
                    android:id="@+id/textViewName"
                    android:layout_width="wrap_content"
                    android:layout_height="wrap_content"
                    android:layout_gravity="center_horizontal"
                    android:layout_marginTop="10dp"
                    android:text="Android Name"
                    android:textColor="#FFFFFF"
                    android:textAppearance="?android:attr/textAppearanceLarge"/>

                <TextView
                    android:id="@+id/textViewVersion"
                    android:layout_width="wrap_content"
                    android:layout_height="wrap_content"
                    android:layout_gravity="center_horizontal"
                    android:layout_marginTop="10dp"
                    android:text="Android Version"
                    android:textColor="#FFFFFF"
                    android:textAppearance="?android:attr/textAppearanceMedium"/>

            </LinearLayout>
        </LinearLayout>

    </androidx.cardview.widget.CardView>

</LinearLayout>
In above Android CardView cards_layout.xml code it holds a ImageView that displayed drawable resources along with two TextViews in a Nested Linear Layout.
The menu_main.xml contains a single item to add back the cards removed.
how to create a new menu
File > New >Menu Resource File
and Add the below line of menu coders
<?xml version="1.0" encoding="utf-8"?>
<menu xmlns:android="http://schemas.android.com/apk/res/android"
    xmlns:app="http://schemas.android.com/apk/res-auto"
    xmlns:tools="http://schemas.android.com/tools"
    tools:context=".MainActivity">
    <item android:id="@+id/add_item"
        android:title="Add"
        android:orderInCategory="100"
        app:showAsAction="always"/>
</menu>
MainActivity.java class is defined below.
MainActivity.java
package protocoderspoint.com.cardviewrecycleviewandroid;

import android.content.Context;
import android.os.Bundle;
import android.view.Menu;
import android.view.MenuItem;
import android.view.View;
import android.widget.TextView;
import android.widget.Toast;

import androidx.appcompat.app.AppCompatActivity;
import androidx.recyclerview.widget.DefaultItemAnimator;
import androidx.recyclerview.widget.LinearLayoutManager;
import androidx.recyclerview.widget.RecyclerView;

import java.util.ArrayList;

public class MainActivity extends AppCompatActivity {

    private static RecyclerView.Adapter adapter;
    private RecyclerView.LayoutManager layoutManager;
    private static RecyclerView recyclerView;
    private static ArrayList<DataModel> data;
    static View.OnClickListener myOnClickListener;
    private static ArrayList<Integer> removedItems;

    @Override
    protected void onCreate(Bundle savedInstanceState) {
        super.onCreate(savedInstanceState);
        setContentView(R.layout.activity_main);

        myOnClickListener = new MyOnClickListener(this);

        recyclerView = (RecyclerView) findViewById(R.id.my_recycler_view);
        recyclerView.setHasFixedSize(true);

        layoutManager = new LinearLayoutManager(this);
        recyclerView.setLayoutManager(layoutManager);
        recyclerView.setItemAnimator(new DefaultItemAnimator());

        data = new ArrayList<DataModel>();
        for (int i = 0; i < MyData.nameArray.length; i++) {
            data.add(new DataModel(
                    MyData.nameArray[i],
                    MyData.versionArray[i],
                    MyData.id_[i],
                    MyData.drawableArray[i]
            ));
        }

        removedItems = new ArrayList<Integer>();

        adapter = new CustomAdapter(data);
        recyclerView.setAdapter(adapter);
    }


    private static class MyOnClickListener implements View.OnClickListener {

        private final Context context;

        private MyOnClickListener(Context context) {
            this.context = context;
        }

        @Override
        public void onClick(View v) {
            removeItem(v);
        }

        private void removeItem(View v) {
            int selectedItemPosition = recyclerView.getChildPosition(v);
            RecyclerView.ViewHolder viewHolder
                    = recyclerView.findViewHolderForPosition(selectedItemPosition);
            TextView textViewName
                    = (TextView) viewHolder.itemView.findViewById(R.id.textViewName);
            String selectedName = (String) textViewName.getText();
            int selectedItemId = -1;
            for (int i = 0; i < MyData.nameArray.length; i++) {
                if (selectedName.equals(MyData.nameArray[i])) {
                    selectedItemId = MyData.id_[i];
                }
            }
            removedItems.add(selectedItemId);
            data.remove(selectedItemPosition);
            adapter.notifyItemRemoved(selectedItemPosition);
        }
    }

    @Override
    public boolean onCreateOptionsMenu(Menu menu) {
        super.onCreateOptionsMenu(menu);
        getMenuInflater().inflate(R.menu.menu_main, menu);
        return true;
    }

    @Override
    public boolean onOptionsItemSelected(MenuItem item) {
        super.onOptionsItemSelected(item);
        if (item.getItemId() == R.id.add_item) {
            //check if any items to add
            if (removedItems.size() != 0) {
                addRemovedItemToList();
            } else {
                Toast.makeText(this, "Nothing to add", Toast.LENGTH_SHORT).show();
            }
        }
        return true;
    }

    private void addRemovedItemToList() {
        int addItemAtListPosition = 3;
        data.add(addItemAtListPosition, new DataModel(
                MyData.nameArray[removedItems.get(0)],
                MyData.versionArray[removedItems.get(0)],
                MyData.id_[removedItems.get(0)],
                MyData.drawableArray[removedItems.get(0)]
        ));
        adapter.notifyItemInserted(addItemAtListPosition);
        removedItems.remove(0);
    }
}
In the above lines of code the removeItems() method is invoked from the listener method to remove the CardView with every card is been clicked. ts respective id is stored in an array to retrieve later.
The CustomeAdapter.java class is defined below :
package protocoderspoint.com.cardviewrecycleviewandroid;


import android.view.LayoutInflater;
import android.view.View;
import android.view.ViewGroup;
import android.widget.ImageView;
import android.widget.TextView;

import androidx.recyclerview.widget.RecyclerView;

import java.util.ArrayList;


class CustomAdapter extends RecyclerView.Adapter<CustomAdapter.MyViewHolder> {

    private ArrayList<DataModel> dataSet;


    public static class MyViewHolder extends RecyclerView.ViewHolder {

        TextView textViewName;
        TextView textViewVersion;
        ImageView imageViewIcon;

        public MyViewHolder(View itemView) {
            super(itemView);
            this.textViewName = (TextView) itemView.findViewById(R.id.textViewName);
            this.textViewVersion = (TextView) itemView.findViewById(R.id.textViewVersion);
            this.imageViewIcon = (ImageView) itemView.findViewById(R.id.imageView);
        }
    }

    public CustomAdapter(ArrayList<DataModel> data) {
        this.dataSet = data;
    }

    @Override
    public MyViewHolder onCreateViewHolder(ViewGroup parent,
                                           int viewType) {
        View view = LayoutInflater.from(parent.getContext())
                .inflate(R.layout.cards_layout, parent, false);

        view.setOnClickListener(MainActivity.myOnClickListener);

        MyViewHolder myViewHolder = new MyViewHolder(view);
        return myViewHolder;
    }

    @Override
    public void onBindViewHolder(final MyViewHolder holder, final int listPosition) {

        TextView textViewName = holder.textViewName;
        TextView textViewVersion = holder.textViewVersion;
        ImageView imageView = holder.imageViewIcon;

        textViewName.setText(dataSet.get(listPosition).getName());
        textViewVersion.setText(dataSet.get(listPosition).getVersion());
        imageView.setImageResource(dataSet.get(listPosition).getImage());
    }

    @Override
    public int getItemCount() {
        return dataSet.size();
    }
}
In the CustomAdopter.java code, we have implemented our own ViewHolder by extending RecyclerView.ViewHolder. The view that inflate the cards_layout.xml.
An ArrayList stores all the data in the form of a DataModel class object in an ArrayList and adds them to the respective cards in a form of list.
Here i have made user of data model class that contains specific data for this application,
DataModel.java
package protocoderspoint.com.cardviewrecycleviewandroid;


public class DataModel {

    String name;
    String version;
    int id_;
    int image;

    public DataModel(String name, String version, int id_, int image) {
        this.name = name;
        this.version = version;
        this.id_ = id_;
        this.image=image;
    }

    public String getName() {
        return name;
    }

    public String getVersion() {
        return version;
    }

    public int getImage() {
        return image;
    }

    public int getId() {
        return id_;
    }
}
In the above DataModel.java we have defined a list if variables that stored and fetch data using getters mehods.
In above code i m getting data like name, id, image; that help us in showing data in cardview.
MyData.java
package protocoderspoint.com.cardviewrecycleviewandroid;

public class MyData {

     //list of android version names
    static String[] nameArray = {"Cupcake", "Donut", "Eclair", "Froyo",
"Gingerbread", "Honeycomb", "Ice Cream Sandwich",
"JellyBean", "Kitkat", "Lollipop", "Marshmallow"};

    //list of android version
    static String[] versionArray = {"1.5", "1.6", "2.0-2.1",
"2.2-2.2.3", "2.3-2.3.7", "3.0-3.2.6", "4.0-4.0.4", "4.1-4.3.1",
"4.4-4.4.4", "5.0-5.1.1","6.0-6.0.1"};

    //list of android images
    static Integer[] drawableArray = {R.drawable.cupcake, R.drawable.donut, R.drawable.eclair,
            R.drawable.froyo, R.drawable.gingerbread, R.drawable.honeycomb,R.drawable.icecream,
            R.drawable.jellybean, R.drawable.kitkat,R.drawable.lollipop,R.drawable.marshmallow};

    static Integer[] id_ = {0, 1, 2, 3, 4, 5, 6, 7, 8, 9, 10};
}
That above MyData.java is been used just to store list of data in a form of arrays.
The above list of data will be displayed in a form of RecyclerView with CardView list items.
Refered Article @www.journaldev.com


Nice Post
[…] to Firebase console Sign-In with your Google Account, you will see and cardView to add new Firebase Project, Just Click on […]
[…] Then you need an XML file with TextView in it, so that we can display text in listview. […]
[…] Proto Coders Point, In this android tutorial article we will learn how to add a Search filter to a RecycleView in Toolbar SearchView in Real […]
[…] Guys, Welcome to Proto Coders Point, In this tutorial we will build a app that has a recyclerview with a list of view items and each list item in adapter has a Expense name (TextView) and a […]
[…] Guys, Welcome to Proto Coders Point, In this tutorial we will build a app that has a recyclerview with a list of view items and each list item in adapter has a Expense name (TextView) and a […]