
Hi Guys, welcome to Proto Coders Point,In this Android Tutorial we will implement RecyclerView with GridView basically using GridLayoutManager.
The RecyclerView is one of the advance and most flexiable version of ListView and GridView.
It is mostly used to show large number of data sets to the user when user scrolls the view.
it’s is available to use in Material Design of API leven 21 (i.e Android 5.0 Lollipop).
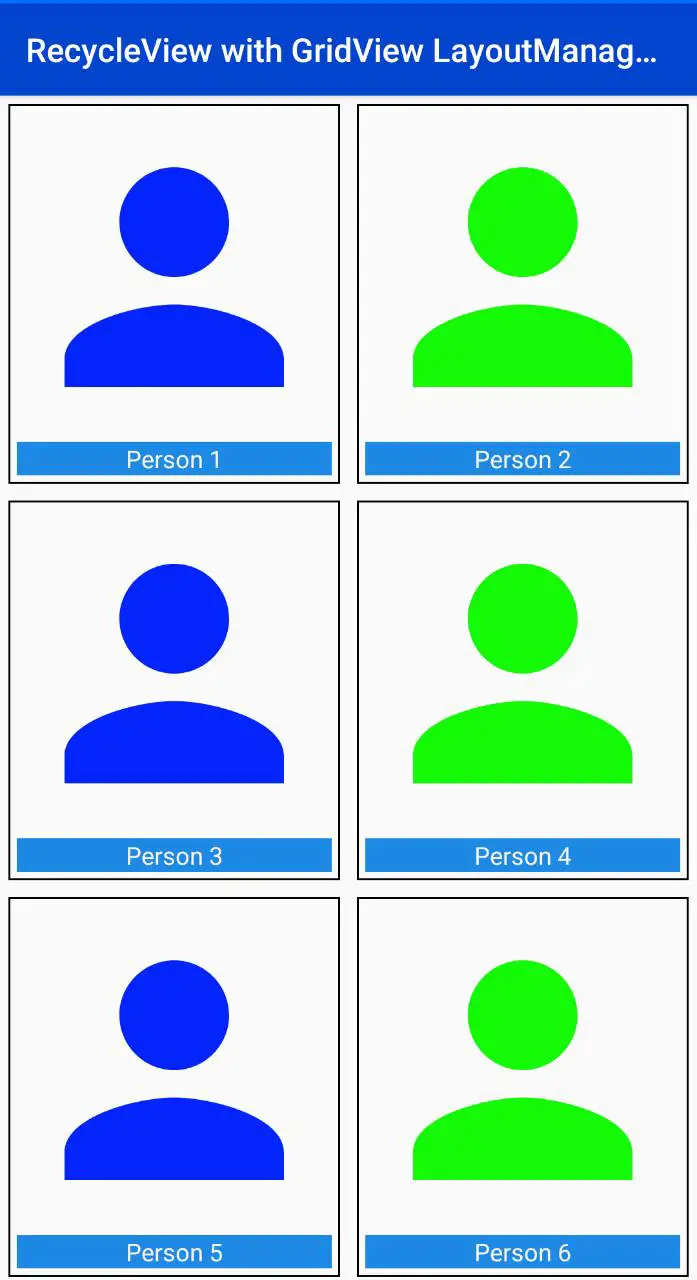
Demo of Final Result of this Tutorial
Gradle Dependency to use RecyclerView:
dependencies {
 ...
 implementation "com.android.support:recyclerview-v7:23.23.4.0"
 }
or
if you have latest version of android studio with androidx
you need to add material dependencies
dependencies
{
..............
implementation 'com.google.android.material:material:1.2.0-alpha04' // recycleView is inbuilt in this
}
The material package comes with RecycleView Components.
RecycleView XML code in older version of android studio
<?xml version="1.0" encoding="utf-8"?>
<RelativeLayout xmlns:android="http://schemas.android.com/apk/res/android"
    xmlns:tools="http://schemas.android.com/tools"
    android:layout_width="match_parent"
    android:layout_height="match_parent"
    tools:context="protocoderspoint.com.recyclerviewexample.MainActivity">
    <android.support.v7.widget.RecyclerView
        android:id="@+id/recyclerView"
        android:layout_width="match_parent"
        android:layout_height="match_parent" />
</RelativeLayout>
RecycleView XML code for androidx
<?xml version="1.0" encoding="utf-8"?>
<LinearLayout xmlns:android="http://schemas.android.com/apk/res/android"
    xmlns:app="http://schemas.android.com/apk/res-auto"
    xmlns:tools="http://schemas.android.com/tools"
    android:layout_width="match_parent"
    android:layout_height="match_parent"
    tools:context=".MainActivity">

    <androidx.recyclerview.widget.RecyclerView
        android:layout_width="match_parent"
        android:layout_height="match_parent"
        android:id="@+id/recycleview"/>

</LinearLayout>
RecyclerView With GridLayoutManager in androidx with Example
Let’s us now start implementing our android application with RecycleView with GridLayoutManager with example.
Step 1: Create a New Project And Name It RecyclerViewExample.
OfCouse, your need to create a new android project using android-studio, or else you can make use of your existing android project.
Step 2 : Add Required Dependencies
Once your project is ready you need to first add the recyclerView Dependencies in to your android project so that you can make user of recyclerView widget.
if you are using android-studio version that comes with migrating to androidx then better use material or else you can use recyclerView Dependencies.
The dependencies is been listed above.
Step 3 : Adding recyclerView in activity_main.xml
open > project > app > res > layout > activity_main.xml
And Copy and paste the below lines of xml code with recyclerView widget.
<?xml version="1.0" encoding="utf-8"?>
<LinearLayout xmlns:android="http://schemas.android.com/apk/res/android"
    xmlns:app="http://schemas.android.com/apk/res-auto"
    xmlns:tools="http://schemas.android.com/tools"
    android:layout_width="match_parent"
    android:layout_height="match_parent"
    tools:context=".MainActivity">

    <androidx.recyclerview.widget.RecyclerView
        android:layout_width="match_parent"
        android:layout_height="match_parent"
        android:id="@+id/recycleview"/>

</LinearLayout>
Step 4 : Create a new XML File and name it as row_layout_view.xml
This XML View will be Displayed under RecyclerView in activity_main.xml in a form of GridView
Here we Simple have an imageView and a textView that will show some date sets.
<?xml version="1.0" encoding="utf-8"?>
<LinearLayout xmlns:android="http://schemas.android.com/apk/res/android"
    android:layout_width="wrap_content"
    android:layout_height="wrap_content"
    android:padding="5dp"
    android:layout_gravity="center"
    android:gravity="center"
    android:orientation="vertical"
    android:layout_margin="5dp"
    android:background="@drawable/recyclebackground"
    >
    <!--
    grid items for RecyclerView GridView Example
    -->
    <ImageView
        android:id="@+id/image"
        android:layout_width="200dp"
        android:layout_height="200dp"
        android:layout_gravity="center"
        android:scaleType="fitXY"
        android:src="@mipmap/ic_launcher" />

    <TextView
        android:id="@+id/name"
        android:layout_width="match_parent"
        android:layout_height="wrap_content"
        android:text="....."
        android:gravity="center"
        android:background="#1E88E5"
        android:layout_gravity="center"
        android:textColor="#FAF5F5"
        android:textSize="15sp" />
</LinearLayout>
Step 5 : create a new xml file in drawable
Create a new drawable XML file in Drawable folder and name it recyclebackground.xml
<?xml version="1.0" encoding="utf-8"?>
<shape xmlns:android="http://schemas.android.com/apk/res/android">
    <!--
       stroke with color and width for creating outer line
    -->
    <stroke
        android:width="1dp"
        android:color="#000" />
</shape>
Step 6: Create a new Adopter Class
Then, you will need a Adopter class that will help you in handling all the data and display then in recyclerView.
Create a new Adopter Class and name it as CustomRecycleAdopter.java
App > java > your Package (Right click) > New > java class
This CustomRecycleAdopter class will extends RecyclerView.Adapter class which incluse Viewholder in it.
Then we will implement some override methods and create a constructor to get the data from Main_Activity Class.
In CustomRecycleAdapter class we have 2 methods those are OnCreateViewHolder that helps use to inflate the row_layout_view.xml view Items and then pass it to ViewHolder and the other method is onBindViewHolder that is been used to set the data in the views by the help of ViewHolder.
Then Finally we implement the setOnClickListener on the itemview that show use which gridView in recyclerView was clicked by the user
Then you Just Copy paste the Below Code
package com.ui.recycleview.gridview.layoutmanager;

import android.content.Context;
import android.view.LayoutInflater;
import android.view.View;
import android.view.ViewGroup;
import android.widget.ImageView;
import android.widget.TextView;
import android.widget.Toast;

import androidx.annotation.NonNull;
import androidx.recyclerview.widget.RecyclerView;

import java.util.ArrayList;
public class CustomRecyclerViewAdopter extends RecyclerView.Adapter {
    ArrayList personNames;
    ArrayList personImages;
    Context context;
    public CustomRecyclerViewAdopter(Context context, ArrayList personNames, ArrayList personImages) {
        this.context = context;
        this.personNames = personNames;
        this.personImages = personImages;
    }
    @Override
    public MyViewHolder onCreateViewHolder(ViewGroup parent, int viewType) {
        // infalte the item Layout
        View v = LayoutInflater.from(parent.getContext()).inflate(R.layout.row_layout_view, parent, false);
        // set the view's size, margins, paddings and layout parameters
        MyViewHolder vh = new MyViewHolder(v); // pass the view to View Holder
        return vh;
    }

    @Override
    public void onBindViewHolder(@NonNull RecyclerView.ViewHolder holder, final int position) {
        // set the data in items
        MyViewHolder viewHolder= (MyViewHolder)holder;
        ((MyViewHolder) holder).name.setText( personNames.get(position).toString());
        ((MyViewHolder) holder).image.setImageResource((Integer) personImages.get(position));
        // implement setOnClickListener event on item view.
        holder.itemView.setOnClickListener(new View.OnClickListener() {
            @Override
            public void onClick(View view) {
                Toast.makeText(context,"Person : "+(position+1),Toast.LENGTH_SHORT).show();
            }
        });
    }


    @Override
    public int getItemCount() {
        return personNames.size();
    }
    public class MyViewHolder extends RecyclerView.ViewHolder {
        // init the item view's
        TextView name;
        ImageView image;
        public MyViewHolder(View itemView) {
            super(itemView);
            // get the reference of item view's
            name = (TextView) itemView.findViewById(R.id.name);
            image = (ImageView) itemView.findViewById(R.id.image);
        }
    }
}
Step 7 : Passing Data from Main_Activity.java to CustomRecyclerAdopter.java
Now, Firstly you need to get References to recycleView and then pass data to Adopter.
Then we are creating a list of data using java ArrayList name it as Person Name and likewise i have created a list of Images using ArrayList.
There after we set the recyclerView with GridLayoutManager and then we set the Adopter that show the Grid Items in out RecyclerView Widget.
Main_Activity.java
package com.ui.recycleview.gridview.layoutmanager;

import android.os.Bundle;

import androidx.appcompat.app.AppCompatActivity;
import androidx.recyclerview.widget.GridLayoutManager;
import androidx.recyclerview.widget.RecyclerView;

import java.util.ArrayList;
import java.util.Arrays;
public class MainActivity extends AppCompatActivity {
    // ArrayList for person names
    ArrayList personNames = new ArrayList<>(Arrays.asList("Person 1", "Person 2", "Person 3", "Person 4", "Person 5", "Person 6", "Person 7","Person 8", "Person 9", "Person 10", "Person 11", "Person 12", "Person 13", "Person 14"));
    ArrayList personImages = new ArrayList<>(Arrays.asList(R.drawable.ic_person_black_24dp, R.drawable.ic_person_black_24dp, R.drawable.ic_person_black_24dp, R.drawable.ic_person_black_24dp, R.drawable.ic_person_black_24dp, R.drawable.ic_person_black_24dp, R.drawable.ic_person_black_24dp,R.drawable.ic_person_black_24dp, R.drawable.ic_person_black_24dp, R.drawable.ic_person_black_24dp, R.drawable.ic_person_black_24dp, R.drawable.ic_person_black_24dp, R.drawable.ic_person_black_24dp, R.drawable.ic_person_black_24dp));
    @Override
    protected void onCreate(Bundle savedInstanceState) {
        super.onCreate(savedInstanceState);

        setContentView(R.layout.activity_main);

        // get the reference of RecyclerView
        RecyclerView recyclerView = (RecyclerView) findViewById(R.id.recycleview);

        // set a GridLayoutManager with default vertical orientation and 2 number of columns
        GridLayoutManager gridLayoutManager = new GridLayoutManager(getApplicationContext(),2); // you can change grid columns to 3 or more

        recyclerView.setLayoutManager(gridLayoutManager); // set LayoutManager to RecyclerView
        //  call the constructor of CustomAdapter to send the reference and data to Adapter
        CustomRecyclerViewAdopter customAdapter = new CustomRecyclerViewAdopter(MainActivity.this, personNames,personImages);
        recyclerView.setAdapter(customAdapter); // set the Adapter to RecyclerView
    }
}
And the last thing is that you need to add some images in drawable to show them into Recycle GridView
I have simple created a vector images assets under drawable folder.
Just Right Click on Drawable folder > New > Vector Assets
person_blue.xml
<vector android:height="24dp" android:tint="#0324FA"
    android:viewportHeight="24.0" android:viewportWidth="24.0"
    android:width="24dp" xmlns:android="http://schemas.android.com/apk/res/android">
    <path android:fillColor="#FF000000" android:pathData="M12,12c2.21,0 4,-1.79 4,-4s-1.79,-4 -4,-4 -4,1.79 -4,4 1.79,4 4,4zM12,14c-2.67,0 -8,1.34 -8,4v2h16v-2c0,-2.66 -5.33,-4 -8,-4z"/>
</vector>
")


[…] Guys, Welcome to Proto Coders Point, In this Android tutorial we will implement Firebase UI RecyclerView […]
[…] You need to add some images under drawable folder, so that you can show image in your recyclerview cards. […]