
")


Hi Guys, Welcome to Proto Coders Point, So i my previous android tutorial blog post i have covered Android RecyclerView with EditText Example + Expense sum calculation
You can check the GIF Video below

Sending Recyclerview Entered data/ array list to Database (phpmyadmin)
So Title itself says then in this part we gonna send our recyclerview entered data to our database i.e. phpmyadmin database.
I have also created a video tutorial on my youtube channel proto coders point on how to send arraylist to database. (Watch it now)
Ok So let’s begin,
Database Setup
My database is hosted with my website hosting protocoderspoint.com, so in my hosting i have created a new database special for this tutorial.
Create a new table in your phpmyadmin database
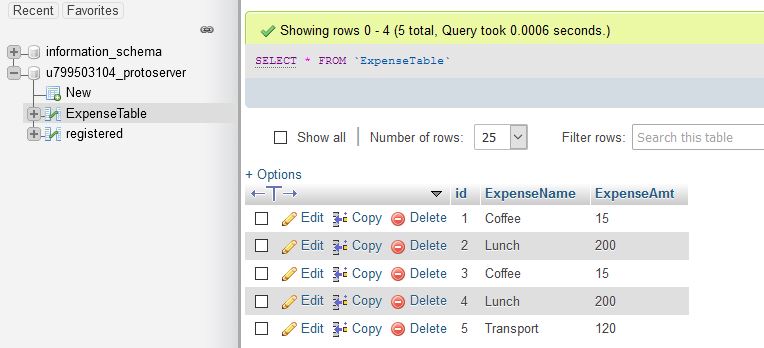
How a look at database, it has a table by name :
‘ExpenseTable’ which has 3 column
- id : type int auto Increment.
- ExpenseName : type varchar(50).
- ExpenseAmt : type varchar(50).
command to create table in your database
CREATE TABLE `ExpenseTable` (
  `id` int(11) NOT NULL,
  `ExpenseName` varchar(50) COLLATE utf8mb4_unicode_ci NOT NULL,
  `ExpenseAmt` varchar(50) COLLATE utf8mb4_unicode_ci NOT NULL
) ENGINE=InnoDB DEFAULT CHARSET=utf8mb4 COLLATE=utf8mb4_unicode_ci;
So now we are done with create the database table now let’s go with php code that helps us in getting connected with database and store the array list data into the table.
Php code – connect database – storing array list to data table
Here are 2 php files/code
- connect.php: Help us in getting connected with our database.
- save_expense.php: Helps us in storing/inserting data into our database.
connect.php
<?php

$conn = mysqli_connect("localhost", "Login username", "Login User password", "database Name");

if($conn)
{
  //echo "Connection Success";
}
else
{
//  echo "Connection Failed";

}

?>
The connect.php is a common php code that help in getting connected with our database, I have created connect.php file separate so that in my other php code i can simply include connect.php code that’s it, whenever i hit or call other php code where connet.php is included it automatically get connected to out database.
save_expense.php
<?php
ini_set('display_errors', 1);
error_reporting(E_ALL);

include 'connect.php';

$expname = $_POST["expname"];
$expname = json_decode($expname,TRUE);

$amount = $_POST["expamt"];
$amount = json_decode($amount,TRUE);


for($i = 0; $i < count($expname); $i++){

      $sql = "INSERT INTO ExpenseTable (ExpenseName, ExpenseAmt) VALUES ('$expname[$i]','$amount[$i]')";

        mysqli_query($conn, $sql);
}

echo "DONE"

?>
Then, in above save_expense.php code i m sending list of jsonArray string from our android app using POST method.
Snippet code Explaination
$expname = $_POST[“expname”];
$expname = json_decode($expname,TRUE);
Here the PHP code is receiving ArrayList in the form of JSON ARRAY, that is been decoded using the json_decode function.
After that we are using for loop to iterate the total number of data present in the array list using count($expname) this will return a number, for example, suppose your array is [‘0’, ‘1’, ‘2’, ‘3’] then count will return 4, so the for loop will run for 4 times.
Then in for loop, we have a SQL query then will insert the data into our database using mysqli_query.
Ok so now we are done with our php script that will insert data into our database, now let’s go to android coding.
Android Coding –
Recyclerview EditText Entered data store in an array and send to database
android project structure
Have a look at my android project structure for easy understanding of the android tutorial on Recyclerview with editText Field.
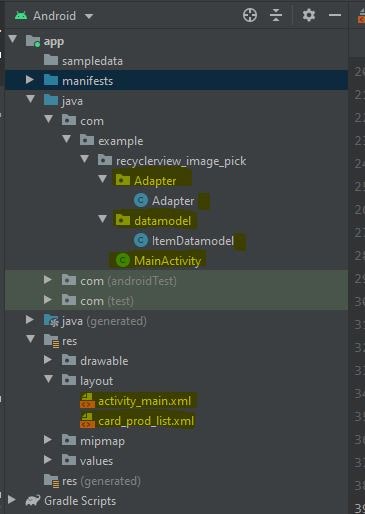
Check out this tutorial article “Android RecyclerView with EditText Example + Expense sum calculation” to know the UI and the calculation part and how i store user entered data in arraylist.
Android Volley library is been used to send data from android to php

build.gradle (module: app)
under dependencies section add the volley library.
implementation 'com.android.volley:volley:1.1.0'
itemdatamodel.java
Our DataModel class holder 2 kinds of datatype i.e integer and a string.
integer to hold Expense Id and String that holds ExpenseName.
package com.example.recyclerview_image_pick.datamodel;

public class ItemDatamodel {

    int ExpenseId;
    String ExpenseName;

    public ItemDatamodel(int expenseId, String expenseName) {
        ExpenseId = expenseId;
        ExpenseName = expenseName;
    }

    public int getExpenseId() {
        return ExpenseId;
    }

    public String getExpenseName() {
        return ExpenseName;
    }
}
MainActivity.java
Here i have created static data, and sending it to our Adapter to display the data in our android recyclerview.
package com.example.recyclerview_image_pick;

import androidx.appcompat.app.AppCompatActivity;
import androidx.recyclerview.widget.DefaultItemAnimator;
import androidx.recyclerview.widget.LinearLayoutManager;
import androidx.recyclerview.widget.RecyclerView;

import android.os.Bundle;
import android.util.Log;

import com.example.recyclerview_image_pick.Adapter.Adapter;
import com.example.recyclerview_image_pick.datamodel.ItemDatamodel;

import java.util.ArrayList;
import java.util.List;

public class MainActivity extends AppCompatActivity {

    private static ArrayList<ItemDatamodel> data;
    ItemDatamodel itemDatamodel;
    // list of Expensesname
    String[] Expensesname = {"Rent","Coffee","Lunch","Dinner","Transport","Other"};

    private static RecyclerView.Adapter adapter;
    private RecyclerView.LayoutManager layoutManager;
    private static RecyclerView recyclerView;

    @Override
    protected void onCreate(Bundle savedInstanceState) {
        super.onCreate(savedInstanceState);
        setContentView(R.layout.activity_main);
        recyclerView = (RecyclerView) findViewById(R.id.my_recycler_view_expenses);
        recyclerView.setHasFixedSize(true);
        layoutManager = new LinearLayoutManager(this);
        recyclerView.setLayoutManager(layoutManager);
        recyclerView.setItemAnimator(new DefaultItemAnimator());

        data = new ArrayList<>();

        // generate ArrayList and store in data model
        for(int i =0;i<Expensesname.length;i++){
            itemDatamodel = new ItemDatamodel(
                    i,
                    Expensesname[i]
            );
            data.add(itemDatamodel);
        }

       // call Adapter class by passing ArrayList data
        adapter = new Adapter(data);
        // set adapter to recyclerview
        recyclerView.setAdapter(adapter);
        adapter.notifyDataSetChanged();
    }
}
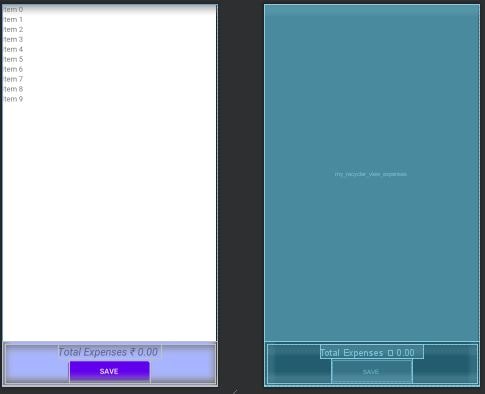
activity_main.xml
<?xml version="1.0" encoding="utf-8"?>
<LinearLayout xmlns:android="http://schemas.android.com/apk/res/android"
    xmlns:app="http://schemas.android.com/apk/res-auto"
    xmlns:tools="http://schemas.android.com/tools"
    android:layout_width="match_parent"
    android:layout_height="match_parent"
    tools:context=".MainActivity"
    android:orientation="vertical">

    <androidx.recyclerview.widget.RecyclerView
        android:layout_weight="0.9"
        android:id="@+id/my_recycler_view_expenses"
        android:layout_width="match_parent"
        android:layout_height="wrap_content"
        android:scrollbars="vertical" />

    <LinearLayout
        android:background="#A7B4FF"
        android:padding="5dp"
        android:layout_width="match_parent"
        android:layout_height="wrap_content"
        android:gravity="center"
        android:orientation="horizontal">

        <LinearLayout
            android:layout_width="match_parent"
            android:layout_height="wrap_content"
            android:layout_weight="1"
            android:layout_gravity="center"
            android:gravity="center"
            android:orientation="vertical">

            <TextView
                android:layout_width="wrap_content"
                android:layout_height="wrap_content"
                android:text="Total Expenses ₹ 0.00 "
                android:textSize="20sp"
                android:textStyle="italic"
                android:id="@+id/totalExpense"
                android:layout_gravity="center"/>

            <Button
                android:id="@+id/saveexpenses"
                android:paddingLeft="60dp"
                android:paddingRight="60dp"
                android:layout_width="wrap_content"
                android:layout_height="wrap_content"
                android:text="Save"/>
        </LinearLayout>
    </LinearLayout>
</LinearLayout>
Adapter.java
I recommend to watch the video tutorial to understand what is going on in below android Adapter.java class.
package com.example.recyclerview_image_pick.Adapter;

import android.app.Activity;
import android.content.Context;
import android.content.Intent;
import android.text.Editable;
import android.text.TextWatcher;
import android.util.Log;
import android.view.LayoutInflater;
import android.view.View;
import android.view.ViewGroup;
import android.widget.Button;
import android.widget.EditText;
import android.widget.ImageView;
import android.widget.TextView;
import android.widget.Toast;

import androidx.annotation.NonNull;
import androidx.recyclerview.widget.RecyclerView;

import com.android.volley.Request;
import com.android.volley.RequestQueue;
import com.android.volley.Response;
import com.android.volley.VolleyError;
import com.android.volley.toolbox.StringRequest;
import com.android.volley.toolbox.Volley;
import com.example.recyclerview_image_pick.R;
import com.example.recyclerview_image_pick.datamodel.ItemDatamodel;

import org.json.JSONArray;

import java.util.ArrayList;
import java.util.HashMap;
import java.util.Map;

public class Adapter extends RecyclerView.Adapter<Adapter.MyViewHolder> {

    View rootView;
    Context context;
    private ArrayList<ItemDatamodel> dataSet;
    ArrayList<String> ExpNameArray = new ArrayList<String>();
    ArrayList<String> ExpAmtArray = new ArrayList<String>();
    boolean isOnTextChanged = false;
    int ExpenseFinalTotal = 0;
    TextView textviewTotalExpense;
    Button saveExpense;
    String SubmitExpenseURL ="https://protocoderspoint.com/php/save_expense.php";
    //constructor with dataSet passed from MainActivity when Adapter is called
    public Adapter(ArrayList<ItemDatamodel> dataSet) {
        this.dataSet = dataSet;
    }

    //Recyclerview ViewHolder
    public static class MyViewHolder extends RecyclerView.ViewHolder {
        TextView expensesName;
        EditText expHeld;
        Button imageButton;

        public MyViewHolder(@NonNull View itemView) {
            super(itemView);
            // finding view by view id.
            expensesName = (TextView) itemView.findViewById(R.id.textViewExpName);
            expHeld = (EditText) itemView.findViewById(R.id.ExpHeld);
            imageButton = (Button) itemView.findViewById(R.id.ExpBimageSelect);
        }
    }

    @NonNull
    @Override
    public MyViewHolder onCreateViewHolder(@NonNull ViewGroup parent, int viewType) {

        // Initialize view for recyclerview
        View view = LayoutInflater.from(parent.getContext())
                .inflate(R.layout.card_prod_list, parent, false);

        context = parent.getContext();
        rootView = ((Activity) context).getWindow().getDecorView().findViewById(android.R.id.content);

        textviewTotalExpense = (TextView) rootView.findViewById(R.id.totalExpense);
        saveExpense =(Button)rootView.findViewById(R.id.saveexpenses);
        //attach view to MyViewHolder
        MyViewHolder myViewHolder = new MyViewHolder(view);
        return myViewHolder;
    }

    @Override
    public void onBindViewHolder(@NonNull MyViewHolder holder, int position) {

        //initialize the view with a view holder
        TextView expensesName = holder.expensesName;
        EditText expHeld = holder.expHeld;
        Button imageButton = holder.imageButton;
        int id = dataSet.get(position).getExpenseId();

        expensesName.setText(dataSet.get(position).getExpenseName());

        expHeld.addTextChangedListener(new TextWatcher() {
            @Override
            public void beforeTextChanged(CharSequence charSequence, int i, int i1, int i2) {

            }

            @Override
            public void onTextChanged(CharSequence charSequence, int i, int i1, int i2) {
                isOnTextChanged = true;
            }

            @Override
            public void afterTextChanged(Editable editable) {

                if(isOnTextChanged){
                    isOnTextChanged = false;

                    try{

                        ExpenseFinalTotal = 0;

                        for (int i = 0;i<=id;i++){
                            if(i!=id){
                                ExpNameArray.add("0");
                                ExpAmtArray.add("0");
                            }else{
                                ExpAmtArray.add("0");
                                ExpNameArray.add("0");
                                ExpNameArray.set(id,dataSet.get(id).getExpenseName());
                                ExpAmtArray.set(id,editable.toString());
                            }
                        }
                        Log.d("ExpAmt",ExpAmtArray.toString());
                        Log.d("ExpName",ExpNameArray.toString());

                        for(int i = 0;i<=ExpAmtArray.size()-1;i++){
                            int tempTotalExpense = Integer.parseInt(ExpAmtArray.get(i));
                            ExpenseFinalTotal = ExpenseFinalTotal +tempTotalExpense;
                        }

                        textviewTotalExpense.setText("Total Expense : " +String.valueOf(ExpenseFinalTotal));
                    }catch (NumberFormatException e)
                    {
                        // catch is used because, when used enter value in editText and remove the value it
                        // it will trigger NumberFormatException, so to prevent it and remove data value from array ExpAmtArray
                        //then
                        // re-perform loop total expense calculation and display the total.

                        ExpenseFinalTotal = 0;
                        for (int i = 0; i <= id; i++) {
                            Log.d("TimesRemoved", " : " + i);

                            if (i == id) {
                                ExpNameArray.set(id,"0");
                                ExpAmtArray.set(id,"0");

                            }

                        }
                        Log.d("ExpAmt",ExpAmtArray.toString());
                        Log.d("ExpName",ExpNameArray.toString());

                        for(int i = 0;i<=ExpAmtArray.size()-1;i++){
                            int tempTotalExpense = Integer.parseInt(ExpAmtArray.get(i));
                            ExpenseFinalTotal = ExpenseFinalTotal +tempTotalExpense;
                        }

                        textviewTotalExpense.setText("Total Expense : " +String.valueOf(ExpenseFinalTotal));

                    }
                }

            }
        });


        saveExpense.setOnClickListener(new View.OnClickListener() {
            @Override
            public void onClick(View view) {
                ArrayList<String> FExpenseAmtArray = new ArrayList<>();
                ArrayList<String> FExpenseNameArray = new ArrayList<>();

                if(!ExpAmtArray.isEmpty()){
                    for(int i =0 ; i<ExpAmtArray.size();i++){
                        if(!ExpAmtArray.get(i).equals("0") && !ExpAmtArray.get(i).equals("")){
                            FExpenseAmtArray.add(ExpAmtArray.get(i));
                            FExpenseNameArray.add(ExpNameArray.get(i));
                        }
                    }

                }

                Log.d("ArrayExpName",FExpenseNameArray.toString());
                Log.d("ArrayExpAmt",FExpenseAmtArray.toString());

                JSONArray jsonArrayName = new JSONArray();
                for(String Expname : FExpenseNameArray){
                    jsonArrayName.put(Expname);
                }

                JSONArray jsonArrayExpAmt = new JSONArray();
                for(String ExpAmt : FExpenseAmtArray){
                    jsonArrayExpAmt.put(ExpAmt);
                }

                SubmitExpenseData(jsonArrayName.toString(),jsonArrayExpAmt.toString());
            }
        });


    }

    private void SubmitExpenseData(String ExpName, String ExpAmt)
    {
        StringRequest stringRequest = new StringRequest(Request.Method.POST,SubmitExpenseURL,
                new Response.Listener<String>() {
                    @Override
                    public void onResponse(String response) {
                        //we get the successful in String response
                        Log.e("response", response);


                    }

                }, new Response.ErrorListener() {
            @Override
            public void onErrorResponse(VolleyError error) {
                Log.e("sellresponseerror", ""+error.toString());


            }
        }) {
            @Override
            protected Map<String, String> getParams() {
                Map<String, String> params = new HashMap<>();

                params.put("expname", ExpName);
                params.put("expamt", ExpAmt);

                return params;
            }
        };
        RequestQueue requestQueue = Volley.newRequestQueue(context);
        requestQueue.add(stringRequest);
    }


    @Override
    public int getItemCount() {
        return dataSet.size();
    }

    @Override
    public long getItemId(int position) {
        return position;
    }

    @Override
    public int getItemViewType(int position) {
        return position;
    }


}
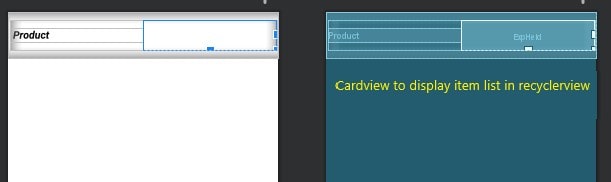
card_prod_list.xml
<?xml version="1.0" encoding="utf-8"?>
<LinearLayout xmlns:android="http://schemas.android.com/apk/res/android"
    android:layout_width="match_parent"
    android:layout_height="wrap_content"
    android:orientation="vertical"
    android:tag="cards main container">

    <androidx.cardview.widget.CardView xmlns:card_view="http://schemas.android.com/apk/res-auto"
        android:id="@+id/card_view"
        android:layout_width="match_parent"
        android:layout_height="70dp"
        card_view:cardBackgroundColor="#ffffff"
        card_view:cardUseCompatPadding="true">

        <LinearLayout
            android:layout_width="match_parent"
            android:layout_height="wrap_content"
            android:layout_gravity="center"
            android:orientation="horizontal"
            android:weightSum="2">

            <TextView
                android:id="@+id/textViewExpName"
                android:layout_width="0dp"
                android:layout_height="wrap_content"
                android:layout_gravity="left|center"
                android:layout_weight="1"
                android:paddingLeft="5dp"
                android:text="Product"
                android:textStyle="italic|bold"
                android:textAppearance="?android:attr/textAppearanceLarge"
                android:textColor="#000000"
                android:textSize="16sp" />

            <EditText
                android:id="@+id/ExpHeld"
                android:layout_width="0dp"
                android:layout_height="wrap_content"
                android:layout_weight="1"
                android:backgroundTint="#000000"
                android:gravity="center"
                android:hint="Value"
                android:inputType="number"
                android:textColor="#000000"
                android:textColorHint="#989898"
                android:textSize="14sp" />


            <Button
                android:id="@+id/ExpBimageSelect"
                android:layout_width="0dp"
                android:visibility="gone"
                android:layout_height="wrap_content"
                android:layout_weight="1"
                android:text="Select Image"
                android:textSize="6dp" />

        </LinearLayout>

    </androidx.cardview.widget.CardView>

</LinearLayout>
Network Security Config
So as we are making internet call to send data to our database, we need to specify which domain or IP we are using to send/receive data, so for that, you need to create a networksecurityconfig.xml file in res>xml>
create a directory “XML” inside res then create an XML resource file networksecurityconfig.xml under that directory and copy-paste the below code.
<?xml version="1.0" encoding="utf-8"?>
<network-security-config>
    <domain-config cleartextTrafficPermitted="true">
        <domain includeSubdomains="true">protocoderspoint.com</domain>  // Here replace with your domain/IP

    </domain-config>
</network-security-config>
Then go to your AndroidManifest.xml and add the network SecurityConfig file under <application> tag
 <application
        android:networkSecurityConfig="@xml/network_conf"
        android:usesCleartextTraffic="true"

/>
")


[…] Send user-entered recyclerview edit text Array list data to database (PHPMyAdmin) […]