Hi Guy’s Welcome to Proto Coders Point, In this Article let’s learn how to convert base64 string to file in NODEJS. This works for all kinds of file like Image File, Video File or any kind of document like text, pdf, word File etc.
Convert base64 string to file in nodejs
To convert base64 string to file we can make use of File System Module of NodeJS.
File System Module is an NodeJS library that lets you work with system file & perform read write operation with computer files.
Install fs in nodeJS project
npm i fs
import fs to use it
const fs = require('fs');
let’s assume you already have a file in base64 format.
var base64Str = "SGkgR3V5J3MgV2VsY29tZSB0byBQcm90byBDb2RlcnMgUG9pbnQs";
Convert base64 to file
use writeFile function from fs module to convert base64 to file in nodejs with desired file extension.
In Flutter, The runApp() function is used to initialize the application and start it. It’s basically a starting point on any flutter application, The runApp(<arg>) as an argument it accept a widget, which is the top-level widget that will be used as the root of the app’s widget tree. This runApp in flutter is should be called in main() function of flutter code and it will kick off the process and render the UI of flutter app on the user screen.
If you have a root-level widget called MyApp, you can run the flutter app using the following code:
void main() {
  runApp(MyApp());
}
Typically runApp() function is called within main() function of flutter app, As I said above it’s an staring point of any flutter app execution. You can say it as entry point of app, it is the first method that execute when user start your flutter app.
In Above Example, MyApp is the root widget passed to runApp(), which initializes and runs the Flutter app.
Basically runApp is responsible to create the WidgetsFlutterBinding that binds the framework and the flutter engine together, and is also responsible of creating RendererBinding object, whose task is to render the given widget on user screen.
Hello, dart and flutter developers! Today’s topic is SOLID principles in Dart. This is not about adding new language features; rather, it is about improving code quality and maintainability. These best practices are intended to be used in any object-oriented language, not just Dart.
Dart SOLID
What are the fundamental principles of Flutter?
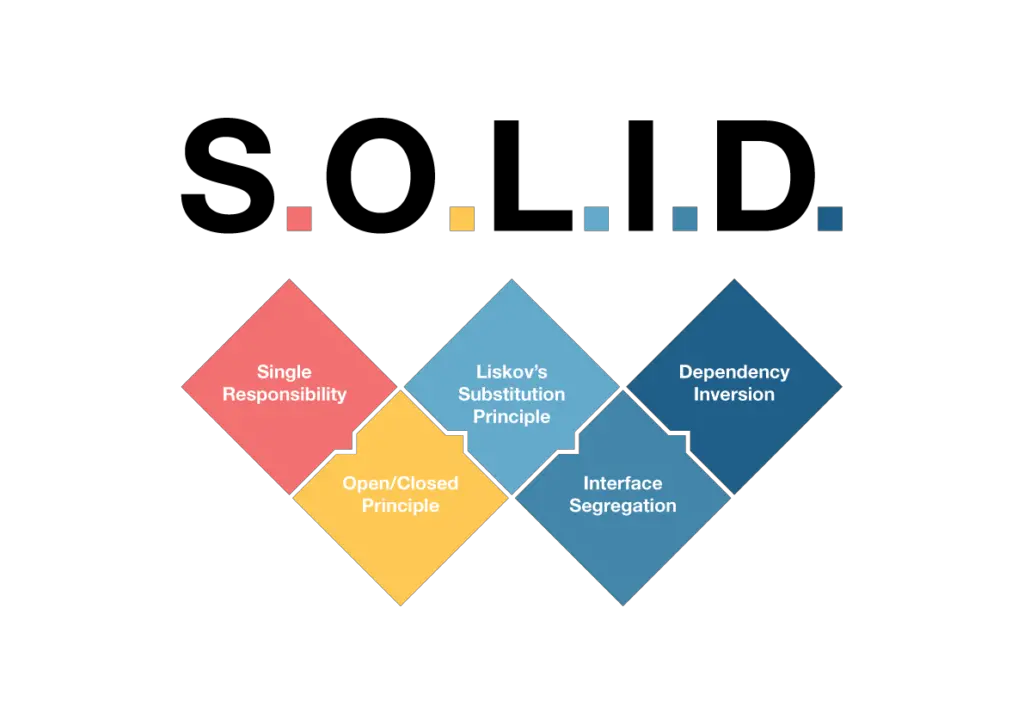
The acronym SOLID stands for five well-known design principles:
Single Responsibility.
Open-Closed.
Liskov Substitution.
Interface Segregation.
and Dependency Inversion.
All of which will be discussed further below. They are very popular among developers and are widely accepted as good practices.
What issue did these S.O.L.I.D principles solve?
Jumping multiple methods with the same name and spending a significant amount of time to fix a minor bug.
Rereading the code several times to find the section that needs to be changed.
It’s difficult to understand what the method does.
Essentially, we spend far more time understanding than we do writing code.
SOLID Principal in dart – flutter
Single Responsibility principle
This principle states that a class should only change for one reason. In other words, you should design classes with a single “responsibility” to make them easier to maintain and more difficult to break.
As the name implies, it is solely responsible. A class should only be responsible for one thing, which means it should only change for one reason.
Let’s start with a bad practice in which maintenance is unpleasant. Because everything is in one place: validation, getRequest, and painting.
class Shapes {
  List < String > cache = List < > ();

  // Calculations
  double squareArea(double l) {
    /* ... */ }
  double circleArea(double r) {
    /* ... */ }
  double triangleArea(double b, double h) {
    /* ... */ }

  // Paint to the screen
  void paintSquare(Canvas c) {
    /* ... */ }
  void paintCircle(Canvas c) {
    /* ... */ }
  void paintTriangle(Canvas c) {
    /* ... */ }

  // GET requests
  String wikiArticle(String figure) {
    /* ... */ }
  void _cacheElements(String text) {
    /* ... */ }
}
Because it handles internet requests, work, and calculations all in one place, This class completely destroys the SRP. This class will change frequently in the future: whenever a method requires maintenance, you’ll have to change some code, which may break other parts of the class. What do you think about this?
// Calculations and logic
abstract class Shape {
  double area();
}

class Square extends Shape {}
class Circle extends Shape {}
class Rectangle extends Shape {}

// UI painting
class ShapePainter {
  void paintSquare(Canvas c) {
    /* ... */ }
  void paintCircle(Canvas c) {
    /* ... */ }
  void paintTriangle(Canvas c) {
    /* ... */ }
}

// Networking
class ShapesOnline {
  String wikiArticle(String figure) {
    /* ... */ }
  void _cacheElements(String text) {
    /* ... */ }
}
Open-Closed Principle
You should be able to extend the behavior of a (class, module, function, etc.) without modifying it.
According to the open-closed principle, a good programmer should add new behaviors without changing the existing source code. This concept is notoriously described as “classes should be open for extension and closed for changes”.
// Looks good but wait! Customer wants a revision in the last second and wants a third number to add. How we can solve this problem without breaking the app?int sum(int a, int b) {
int sum(int a, int b) {
  return a + b;
}

// Breaks old functionality
int sum(int a, int b, int c) {
  return a + b + c;
}

// There is no problem for old codes because this one wont be affected by new codes
int sum(int a, int b, [int c = 0]) {
  return a + b + c;
}
Liskov Substitution Principle
This principle suggests that “parent classes should be easily substituted with their child classes without blowing up the application”. To explain this, consider the following example.
The architecture ensures that the subclass maintains the logic correctness of the code. Composition with interfaces is preferred over inheritance.
This principle suggests that “many client specific interfaces are better than one general interface“. This is the first principle that applies to an interface; the other three principles apply to classes.
abstract class Teacher{
  void work();
  void sleep();
}

class Human implements Teacher{
  void work() => print("I do a lot of work");
  void sleep() => print("I need 10 hours per night...");
}

class Robot implements Teacher{
  void work() => print("I always work");
  void sleep() {} // ??
}
The issue here is that robots do not require sleep, so we are unsure how to implement that method. Worker represents an entity capable of performing work, and it is assumed that if you can work, you can also sleep. In our case, this assumption is not always correct, so we’ll divide the class:
abstract class Teacher{
  void work();
}

abstract class Sleeper {
  void sleep();
}

class Human implements Teacher, Sleeper {
  void work() => print("I do a lot of work");
  void sleep() => print("I need 10 hours per night...");
}

class Robot implements Teacher{
  void work() => print("I'm always iiii work as teacher");
}
Dependency Inversion Principle (DIP)
The issue here is that robots do not require sleep, so we are unsure how to implement that method. Worker represents an entity capable of performing work, and it is assumed that if you can work, you can also sleep. In our case, this assumption is not always correct, so we’ll divide the class:
Assume we have a Firebase-integrated app and want to migrate the database to a PhpDataBaseserver later. If we make them rely on an interface, there will be no problem; all we need to do is change the service.
As if you were changing the batteries in a toy. The toy is still an old toy, but the batteries are new.
abstract class DataApi {
  Future get(String path);
}

class FirebaseService implements DataApi {
  @override
  Future get(String path) async {
    return await Future.value('Data from Firebase');
  }
}

class PhpDBService implements DataApi {
  @override
  Future get(String path) async {
    return await Future.value('Data from PhpDBService ');
  }
}
We’ll concentrate on the Flutter app and utilise Redux to control its state. Redux is an architecture for unidirectional data flow that makes it simple to create, manage, and test apps.
Redux is one of the various state management approaches in Flutter. Redux, in general, is a unidirectional data flow architecture that makes it simple for developers to create and maintain apps.
What is Redux in Flutter?
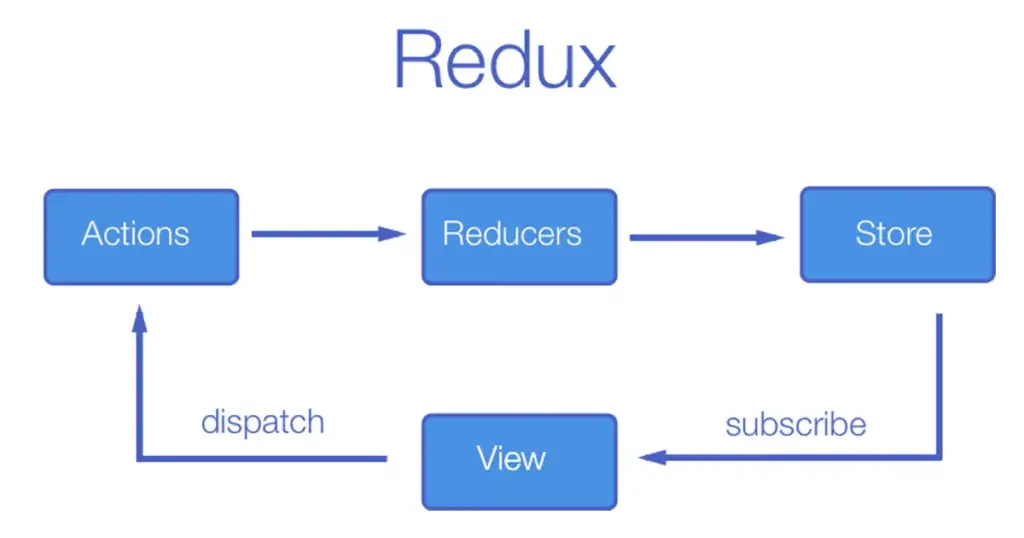
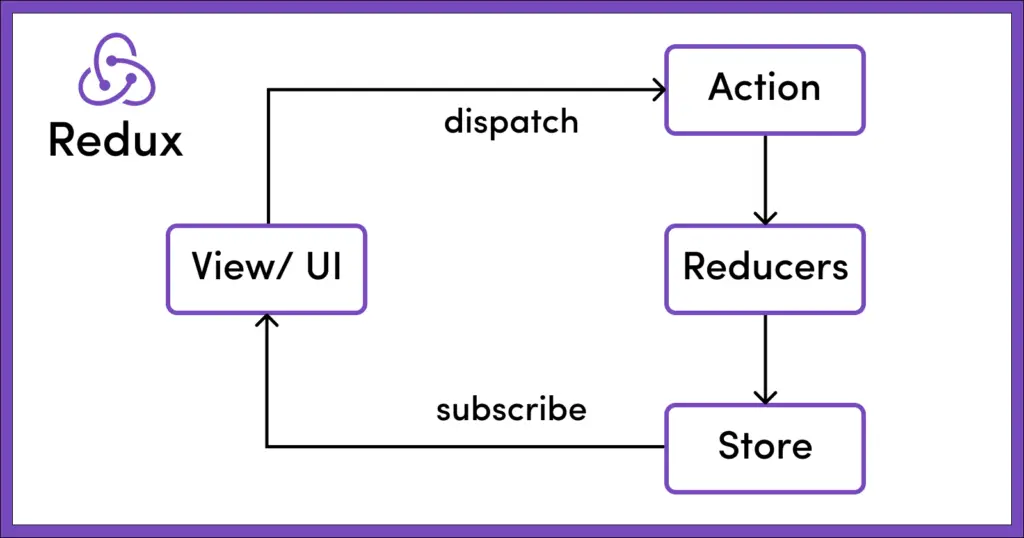
Data is repetitively distributed between widgets with success using Redux, a state management architectural framework. Through the use of a unidirectional data flow, it controls the state of an application. Let’s examine the illustration below:
Here are the four elements that Redux often contains. Redux is ingeniously created so that the user can simply interact with the App, which involves frequent state changes.
i) Action: When an event is created, it is subsequently dispatched to the Reducer as an action.
ii) Reducer: Reducer refreshes the store with the new state it receives whenever it receives an update.
iii) Store: The Store notifies the View of any updates it gets.
iv) View: To demonstrate the changes that have been done, it has been reconstructed.
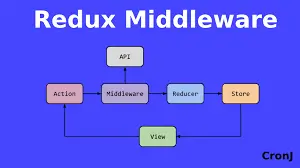
Redux Middleware is the primary component that is essential to the process described above, thus the question arises: what is middleware and what does it do?
So first we’ll discuss about…
What is middleware ??
Every action that is submitted to the reducer can be intercepted using Redux Middleware, allowing you to adjust or stop the action.
You may make asynchronous requests, report errors, and much more with the aid of middleware.
Before your app sends a response back to the server or even within the app itself, middleware plays a crucial function. Depending on the situation, we can utilize middleware to lead the user to a different page or screen.
Application middleware manages data when it is dispatched from the action and before it reaches the reducer while doing any operation, such as fetching any data from a third-party API.
When it comes to Redux’s operation, there are typically two alternative methods that any Basic App can use
1) When every state is kept in one store:
Developers can access the Stored States, which contain all the data updates they require, when all the states are kept in a single store. If a state has to be updated, the app will be notified.
2 ) When information is unidirectional:
Data flow is unidirectional, making it easier to handle data and carry out the procedure that entails the four steps that were previously discussed.
What is the significance of state management?
State management is crucial for Flutter app development since it enables us to centralise all UI states and manage data flow.
When a child widget requires data in a medium or large-scale application with many widgets, it is common to manage the data from the main.dart file.
This data could be distributed as arguments through widget constructors until it reaches the recipient widget, but as we discussed in the introduction, this could result in a long chain of data transfer through widgets that don’t need this data.
It is not only inconvenient and difficult to pass data through constructors, but it can also have an impact on application performance. This is due to the fact that when you manage data from the main widget — or any root widget — the entire widget tree rebuilds whenever any of its child widgets changes. Only the build method in the widget that requires the changed data should be called.
It refers to controlling the state of one or more user interface control systems, such as radio controls, action buttons, input fields, and so on. It is a User Interface programming technique in which the state of a single UI control is completely or partially dependent on the state of all the other UI controls.
Can Redux be used with Flutter?
The store, which will be used to establish the initial state of the store, is one of the key tools needed to utilize Redux in Flutter apps.
The architecture of Flutter Redux
Store
An object that contains the application’s state. This object can be found in the project’s files with the help of the provider. The only way to change its state is to perform an action on it.
There are three important parts of the store:
createStore(): To create a store object in redux.
dispatch(action): To change the state of store data by using the actions.
getState(): For getting the current state of the store in redux.
Flutter manipulates the store using inherited widgets. Among the inherited widgets are:
StoreProvider: This widget injects the store into the application’s widget tree.
StoreBuilder: listens to the entire store and rebuilds the entire widget tree with each update; it receives the store from StoreProvider and StoreConnector.
StoreConnector: a widget that replaces the StoreBuilder. It gets the store from StoreProvider, reads data from our store, and then passes it to its builder function. When that data changes, the builder function rebuilds the widget.
This is the central location where the application state can be found. At any given time, the store contains information about the entire application state or any other, single state.
final Store<AppState> store = Store<AppState>(
reducer, initialState: AppState.initialState()
);
What exactly are Redux actions?
Actions are objects with a type and a payload that can be specified. The type describes the action’s intent, and the payload is the data that goes with it. Sometimes the type of the action is all that is required to transfer the state, in which case the action does not require a payload.
Following the event on this state, the widgets that are tracking the data in the state rebuild, and the data they render is updated to the state’s current values. Any event sent to the store to update the app’s state is considered an action.
final Store<AppState> store = Store<AppState>(
reducer, initialState: AppState.initialState()
);

store.dispatch(Action());
When a widget wants to change the state with an action, it uses the store’s dispatch method to notify the state of the action — the store invokes the action.
Reducers
The root reducer combines all of the reducers that construct various pieces of state.Reducer is a function that adds a new state to the store. It takes as arguments the state and the action and updates the state based on the action. Remember that the state is immutable and can only be changed by creating a new state. The only way to update the state is through the reducer.
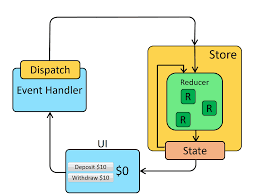
Assume a pop-up appears on the screen and a user response is required in the form of clicking or tapping a button. In our diagram above, we’ll refer to this pop-up as the View.
The Action is the result of clicking the button. This action is wrapped and sent to the Reducer, which processes it and updates the Store data. The store then holds the application’s State, and the state detects the change in data value.
Because the state manages the data rendered on your screen, any change in data is reflected in the View, and the cycle continues.
Redux In Flutter’s goal
Why use Redux when we can utilise straightforward classes and widgets is a common topic?
When building an E-Commerce project in Flutter, the Cart Screen will display the cart’s contents. From other screens where the Cart is shown, we may add, edit, and remove the goods. Redux was required to manage the logic and UI for adding, updating, and deleting items from the Cart since we had to update the Cart screen after any sort of action. Redux is employed in this.
The MVP pattern and managing a View’s state via RX Observables are similar Android design concepts.
Implementation
How to implement Redux in Flutter?
Step 1) : Install the Packages:
Add the pubspec.yaml file in dependencies.
Dependencies:

flutter_redux:
redux:
Step 2) : Run flutter packages get in the root directory of your app.
We next move on to the redux implementation phase, thus first.
Redux :includes and offers the basic tools necessary for Redux to be used in Flutter applications, including:
The shop that will be used to specify the store’s starting state
Reducer functionality
using middleware
Flutter_redux: This adds an extra collection of utility widgets in addition to the Redux package, such as:
StoreProvider
StoreBuilder
StoreConnector
Flutter_redux_dev_tools: When compared to the Flutter Redux package, the flutter redux dev tools package offers more tools for tracking changes to the state and actions taken.
redux thunk: in order to introduce middleware
http: makes it possible to use middleware to call an external API.
After experimenting with various architectures, I decided to combine Flutter with Redux because it is both challenging and enjoyable. I chose a simple and common case to document the development and share this experience with you: the Welcome — Sign-In — Sign-Up flow.
There are two major requirements:
The Flux pattern and the Redux framework are theoretically understood. You should understand Store and why it is the Single Source of Truth, Reducers and why they are Vanilla functions, and so on.
A fundamental understanding of the redux and flutter redux plugins used by the Flutter framework to implement the Redux architecture.
In the article, I have explained the basic architecture of Redux state management , you can modify this code according to your choice, and this was a small introduction of Redux from my side and its working using Flutter.
If you like this article, then do not forget to give your likes & claps! 🙂
Meta Tags are those tags that go inside the head tag of HTML page.
Meta Tags are not for the user interface but are important for a browser.
Meta Tags are always in name: value pair.
Meta tags typically include character encoding, a title, and a description.
2. What is load balancing?
Load balancing involves distributing of incoming network traffic evenly across backend servers to optimize performance and minimize response time. In order to enhance performance and reduce response time, load balancing is a technique used to spread workloads equitably across numerous servers or devices.
3. What is the scope of JavaScript?
In JavaScript, a function’s scope defines the rules for accessing variables and the variables themselves. Every function has its own unique scope.
4. what is Content Security Policy?
Content security Policy is also known as CSP is a header in HTML that lets the site operators gain the whole control over the resources which are loading on the site. CSP Helps to prevent cross-site scripting (XSS) attacks and other types of injection attacks. When a web page is requested, the server sends the client an HTTP header that is implemented as a CSP.
5. How are JavaScript and jQuery different?
JQuery is a library written in JavaScript, which is the programming language it is based on. In comparison to jQuery, which is a library that provides a set of tools and conveniences for dealing with JavaScript, JavaScript is a programming language that can be used to create web apps. JavaScript can be used without jQuery, but jQuery needs JavaScript to function.
6. What is Cross-Site Scripting (XSS)?
Cross-Site Scripting (XSS) is an attack in which an attacker injects malicious code, in the form of browser-side script, into a web application and sends it to another user.
7. What npm stands for?
Npm stands for Node Package Manager, is a package manager for the JavaScript programming language(NodeJS). npm is basically used to install and manage packages (libraries, frameworks, tools, etc.).
8. What is User Centered Design?
User-centered design is a design process that focuses on meeting the needs of users and considering their perspective in every phase of design.
9. What is a grid system in CSS?
The grid system is a layout structure that allows content to be organized horizontally and vertically in a consistent and organized manner. It consists of rows and columns, which are the two key components of the grid.
10. What is Mixin?
A CA Mixin is a group of CSS declarations that can be reused throughout a website to simplify the styling process.
Hi Guy’s Welcome to Proto Coders Point, In this article let’s check out 7 best Free API’s that you can use free of cost to build and practice mobile/web applications.
There are many API’s been provided free on cost on the internet, all you need to do is register and generate a API key and use those api’s to fetch/retrieve data and display on your apps.
7 Best API’s to Learn Application Development
1. MapBox API
Mapbox is an powerful API too to add accurate location data to any web/mobile applications. Mapbox web services has 4 api servicew provided like Maps, Navigation, Search, Account.
MapBox API is very useful to developers through which they can retrieve GeoCoding, Direction API & Maps & accurate location data.
NASA API portal has an amazing data about space information, That you make use of to fetch space related info & show it on your application/project. NASA API provides free data such as imagery(space images) and other space info.
This API simply provides you E-Commerce store fake data, by using which you can build excellent e-commerce application and later use your real api while making it live to public.
This are few free example out of many free API’s available on the internet, By using the prefect and right API, will help you building a powerful functionality into your application and practice building awesome application without writing backend service code.