Home Blog Page 45

How to add/create desktop windows support for existing flutter project

0
lutter window desktop build support

Hi Guys, Welcome to Proto Coders Point. In this article we add windows support for existing flutter project.

To create windows module i.e. desktop support for your flutter project, simple run the below commands in a terminal beening into root folder of your flutter project.

flutter create --platform=windows/macos/linux

Then above command will simple “create a new folder into your existing flutter project by adding windows support” in your flutter config.

After create desktop support for flutter windows you need to config & enable <platform> desktop

run below respective config –enable command as below:-

flutter config --enable-windows-desktop
 flutter config --enable-macos-desktop
 flutter config --enable-linux-desktop

Once you run the above commands, flutter config file will get changed by adding windows config flutter.

Hence now your flutter project has ability to build flutter windows app.

flutter build windows

Unable to find suitable visual studio toolchain – Flutter Doctor Issue Fixed

0
Unable to find suitable visual studio toolchain

Hi Guys, Welcome to Proto Coders Point. In this article let’s fix an Exception : unable to find suitable visual studio toolchain. please run flutter doctor for more details.

Flutter Windows Build Error

You will face Unable to find suitable Visual Studio toolchain error only when you try to run flutter app in windows Desktop. That’s because of 2 reasons.

  1. Visual Studio is Not Installed
  2. Desktop development with C++ ( Windows SDK ) workload, is not installed with Visual Studio.

Unable to find suitable visual studio toolchain

Please run flutter doctor

Unable to find suitable visual studio toolchain

As you can see here, it’s saying you to install Visual Studio – developer from Windows (Visual Studio Build Tools 2017 15.8.42), Visual Studio 2019 or later is required.

Please install the “Desktop development with C++” workload.

Just install Visual Studio and don’t forget to select “Desktop Development with C++”

Desktop Development with C++

Desktop development with C++ is required to be install in visual studio, if you want to build Flutter Windows Apps.

Now Restart Android Studio or your IDE.

Then run flutter doctor again in terminal

flutter doctor

flutter doctor all issues fixed

How to show Slider in bottom sheet in flutter

0
Slider in Bottom Sheet

Hi Guys, Welcome to Proto Coders Point. In this flutter tutorial, will learn how to implement range slider in bottom sheet of flutter app.

Flutter Slider

In fluttter a slider is a widget of material design that is used to set a range value, So basically slider widget in flutter is used as input widget by which user can simply drag the slider point to select the range value.

I have already wrote a complete article on Slider flutter where i have explained it in details


Range Slider in flutter Bottom Sheet

This article is only on “How to use range slider in bottom sheet flutter”.

Video Tutorial

Complete Code: main.dart

import 'package:flutter/material.dart';

void main() {
  runApp(const MyApp());
}

class MyApp extends StatelessWidget {
  const MyApp({Key? key}) : super(key: key);

  // This widget is the root of your application.
  @override
  Widget build(BuildContext context) {
    return MaterialApp(
      title: 'Flutter Demo',
      debugShowCheckedModeBanner: false,
      theme: ThemeData(

        primarySwatch: Colors.blue,
      ),
      home: const MyHomePage(),
    );
  }
}

class MyHomePage extends StatefulWidget {
  const MyHomePage({Key? key}) : super(key: key);

  @override
  _MyHomePageState createState() => _MyHomePageState();
}

class _MyHomePageState extends State<MyHomePage> {
  double height = 180;
  @override
  Widget build(BuildContext context) {
    return Scaffold(
      appBar: AppBar(
        title: Text("Bottom Sheet with slider"),
      ),
      body: Center(
        child: Column(
          mainAxisAlignment: MainAxisAlignment.center,
          children: [
            Text("Height: ${height}", style: TextStyle(fontSize: 30),),
            ElevatedButton(
              onPressed: (){
                 showModalBottomSheet(context: context,
                     builder: (BuildContext context){
                       return Container(
                         height: 200,
                         child: Center(child:
                         StatefulBuilder(
                           builder: (context,state){
                             return Center(
                               child: Slider(
                                 value: height.toDouble(),
                                 max: 200,
                                 min: 50,
                                 onChanged: (double value) {
                                   state(() {
                                     height = value.round() as double;
                                   });
                                   setState(() {

                                   });
                                 },

                               ),
                             );
                           },
                         ),
                         ),
                       );
                     }
                 );
              },
              child: Text(" Select Height "),
            ),
          ],
        ),
      ),
    );
  }
}

Output

flutter show model bottom sheet

In above code, we have 2 widget Text & Elevated.

Text Widget will simple show there ranger value from range slider.

Elevated Button when pressed, will show model bottom sheet flutter.

Inside showModelBottomSheet popup, we are showing a slider where user can select the range. The same selected range value is show in Text Widget.

Flutter slider not moving / updating

Flutter show model bottom sheet is not a stateful widget that is the reason the widget inside it will not update, In our case slider is not moving even after setState() is called from bottom sheet will not rebuild.

Here is the solution

As you can see in above code, Slider widget is been wrapped with StatefulBuilder Widegt, that will have it own setState() to update/rebuild it child on change.

                         StatefulBuilder(
                           builder: (context,state){
                             return Center(
                               child: Slider(
                                 value: height.toDouble(),
                                 max: 200,
                                 min: 50,
                                 onChanged: (double value) {
                                  // rebuild this statefulbuilder
                                   state(() {
                                     height = value.round() as double;
                                   });
                                   setState(() {
                                    // this will rebuild the main 
                                   });
                                 },

                               ),
                             );
                           },
                         ),

How to create a search bar in flutter

0

Hi Guys, Welcome to Proto Coders Point. In this flutter tutorial, will learn how to create a search bar in fluttter appbar.

A search field i.e. a search bar is the must required feature to be provided to your flutter app user.

If you are android developer you might be knowing about searchview, searchbar in React Native & UISearchBar in iOS.

In flutter we have a searchDelegate class to implement searchfield in flutter.

How to add search bar in appbar flutter

In this tutorial, will add a search bar in flutter appbar, where a user can enter their search query & depending on query entered we can suggest quick search list is search bar.

Will make use of flutter showSearch + searchDelegate class

Let’s get started

Adding search bar in AppBar

After creating or opening flutter project, let’s add a search bar field in flutter appbar.

Scaffold(
      appBar: AppBar(
        title: Text("Search Bar"),
        actions: [
          IconButton(onPressed: (){
            // class search delegate here 
          }, icon: const Icon(Icons.search))
        ],
      ),
    );

Here in AppBar, I make use of actions property with has IconButton to show a search magnifying glass icon in appbar.


Flutter show search in Appbar

Now, When user click on search Icon, we must show a search TextField where user can enter his query to make a quick search.

Will use showSearch Delegate class.

showSearch is a widget that shows full screen search page and returns the search query result to the user

AppBar(
        title: Text("Search Bar"),
        actions: [
          IconButton(onPressed: (){
            showSearch(context: context, delegate: MySearch());
          }, icon: const Icon(Icons.search))
        ],
      ),

Here MySearch is a class name that we will called to perform search operation in flutter.


Create class that extends SearchDelegate

Search Delegate class extends 4 override methods, create then by clicking on warning suggestion.

The override widget methods are:-

1. buildLeading:-

  @override
  Widget? buildLeading(BuildContext context) => IconButton(
    icon: const Icon(Icons.arrow_back),
    onPressed: () { close(context, null) ; },
  );
leading back button in search bar flutter

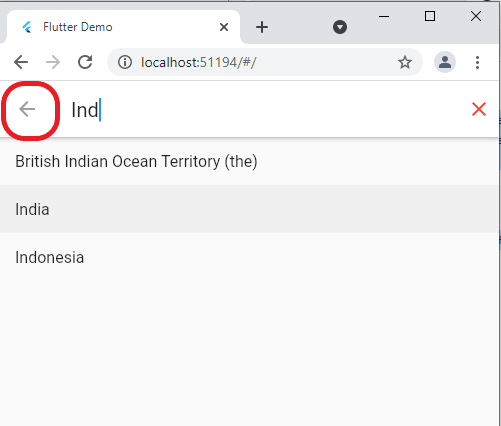
buildLeading is used to show a backbutton in search bar, so that user can click on it to close search box page, Here arrow_back icon is used as you can see in screenshot above.


2. buildAction:

 @override
  List<Widget>? buildActions(BuildContext context) => [
    IconButton(
        icon: const Icon(Icons.clear,color: Colors.red,),
        onPressed: () {
          if(query.isEmpty){
            close(context, null);
          }else{
            query = '';
          }
        },
  ),
];
cancel close button in search bar flutter

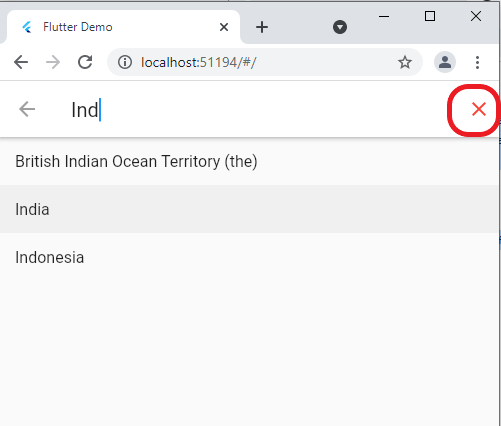
buildAction is used to add some Action widgte in search bar so that use can click on it to perform some action, In out case will use cancel icon so that user can click & cancel it and close search field.


3. buildSuggestions:- flutter search bar with listview

 @override
  Widget buildSuggestions(BuildContext context) {

    List<String> suggesstions = data.where((element) {
      final result = element.toLowerCase();
      final input = query.toLowerCase();

      return result.contains(input);

    }).toList();

    return ListView.builder(
       itemCount: suggesstions.length,
        itemBuilder: (context,index){
          final suggestion = suggesstions[index];
          return ListTile(
            title: Text(suggestion),
            onTap: (){
              query = suggestion;

              showResults(context);
            },
          );
        }
    );
  }

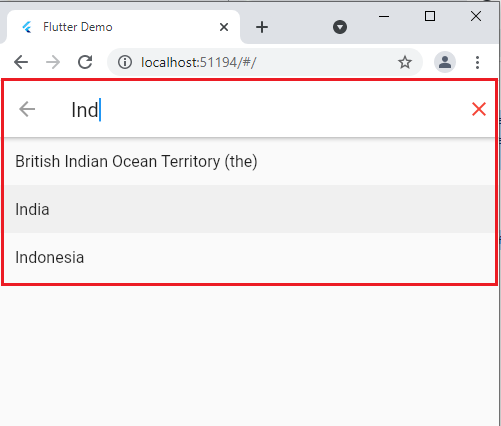
buildSuggestion is used to give a quick suggestion for a search, Here as the user goes on typing user will get hints for his search query, so user can directly select from search box suggestion list as you can see in above screenshot.


buildResults:

@override
  Widget buildResults(BuildContext context) => Center(
    child: Text(
      query,   // query will hold user selected search query
    ),
  );

The result that is finalized after the user make his search query final submission & will be shown in search page as search result.


Complete Code of Search Delegate class

class MySearch extends SearchDelegate{

  List<String> data = [
    'A','B','C','D','E','F','G','H','I','J'
  ];

  @override
  List<Widget>? buildActions(BuildContext context) => [
    IconButton(
        icon: const Icon(Icons.clear,color: Colors.red,),
        onPressed: () {
          if(query.isEmpty){
            close(context, null);
          }else{
            query = '';
          }
        },
  ),
  ];

  @override
  Widget? buildLeading(BuildContext context) => IconButton(
    icon: const Icon(Icons.arrow_back),
    onPressed: () { close(context, null) ; },
  );

  @override
  Widget buildResults(BuildContext context) => Center(
    child: Text(
      query,

    ),
  );

  //flutter search bar with listview
  @override
  Widget buildSuggestions(BuildContext context) {

    List<String> suggesstions = data.where((element) {
      final result = element.toLowerCase();
      final input = query.toLowerCase();

      return result.contains(input);

    }).toList();

    return ListView.builder(
       itemCount: suggesstions.length,
        itemBuilder: (context,index){
          final suggestion = suggesstions[index];
          return ListTile(
            title: Text(suggestion),
            onTap: (){
              query = suggestion;

              showResults(context);
            },
          );
        }
    );
  }

}


Complete source – Flutter add search bar in appbar

main.dart

import 'package:flutter/material.dart';

void main() {
  runApp(const MyApp());
}

class MyApp extends StatelessWidget {
  const MyApp({Key? key}) : super(key: key);
  @override
  Widget build(BuildContext context) {
    return MaterialApp(
      title: 'Flutter Demo',
      debugShowCheckedModeBanner: false,
      theme: ThemeData(
        primarySwatch: Colors.blue,
      ),
      home:  MyHomePage(),
    );
  }
}

class MyHomePage extends StatefulWidget {
  const MyHomePage({Key? key}) : super(key: key);
  @override
  _MyHomePageState createState() => _MyHomePageState();
}

class _MyHomePageState extends State<MyHomePage> {
  @override
  Widget build(BuildContext context) {
    return Scaffold(
      appBar: AppBar(
        title: Text("Search Bar"),
        actions: [
          IconButton(onPressed: (){
            showSearch(context: context, delegate: MySearch());
          }, icon: const Icon(Icons.search))
        ],
      ),
    );
  }
}

class MySearch extends SearchDelegate{
  // this is manual list of query for suggesting user.
  List<String> data = [
    'A','B','C','D','E','F','G','H','I','J'
  ];

  @override
  List<Widget>? buildActions(BuildContext context) => [
    IconButton(
        icon: const Icon(Icons.clear,color: Colors.red,),
        onPressed: () {
          if(query.isEmpty){
            close(context, null);
          }else{
            query = '';
          }
        },
  ),
  ];

  @override
  Widget? buildLeading(BuildContext context) => IconButton(
    icon: const Icon(Icons.arrow_back),
    onPressed: () { close(context, null) ; },
  );

  @override
  Widget buildResults(BuildContext context) => Center(
    child: Text(
      query,
    ),
  );

  @override
  Widget buildSuggestions(BuildContext context) {
     // will show a query hint suggestion "flutter search bar with listview"
    List<String> suggesstions = data.where((element) {

      final result = element.toLowerCase();
      final input = query.toLowerCase();

      return result.contains(input);

    }).toList();

    return ListView.builder(
       itemCount: suggesstions.length,
        itemBuilder: (context,index){
          final suggestion = suggesstions[index];
          return ListTile(
            title: Text(suggestion),
            onTap: (){
              query = suggestion;

              showResults(context);
            },
          );
        }
    );
  }
}


Flutter Auto Size Text – Make app Text Widget Responsive

0
flutter auto size text

Hi Guys, Welcome to Proto Coders Point. In this flutter tutorial will look into how to make text auto size, where our app can auto adjust text size depending of screensize.

An Responsive UI is a must required feature because now a days user uses wide range of devices with different screen size like Tablet, Mobile, PC.

A Developer named “Simon Leier“, has built a flutter package named “auto size text” that can auto adjust text size depending on text length & screen size.

Let’s learn about auto_size_text

A Flutter Widget that we can use to automatically resize texts to get fit into available space and get fit within it boundary defined.

Usage

1. Install:

Add the package in pubspec.yaml file in your flutter project

dependencies:
auto_size_text: ^3.0.0

2. Import it to use

You need to import it, on page where you want to use it eg: main.dart

import 'package:auto_size_text/auto_size_text.dart';

Syntax – Adding simple AutoSizeText Widget example

SizedBox(
          width: 200,
          height: 140,
          child: AutoSizeText(
            'This string will be automatically resized to fit in two lines.',

            style: TextStyle(fontSize: 30),
            maxLines: 2,
          ),
        ),

Here I have made use of SizedBox with width 200, height 140, The Auto Text widget in it will auto adjected with maxLines 2 as defined.

AutoSizeText Widget works & respond exactly like text, The different over here is text will auto resize depending on parent widget or screen size.


Properties of Auto Size Text Widget

maxLines: will work exactly like how it work with Text widget.

minFontSize: The possible smallest font size to fit. Text will not go smallest fontsize then defined, By default minFontSize is 12.

maxFontSize: The maximum posible fontsize.

wrapWords: when set to false, The font will not line break it will only decrease fontsize in same line.

overflowReplacement: Support if the text overflows and not fit in boundary, then replacement text or message can be shown to the user. Very useful if text got too small to read.

stepGranularity: define by show many unit the fontsize should re-size when screen size is sink or enlarged.
Eg: stepGranularity : 8, then font size will decreased by 8 or increased by 8.

AutoSizeText(
  'Welcome to Proto Coders Point, This tutorial is on how to make app responsive',
  style: TextStyle(fontSize: 40),
  minFontSize: 8,
  stepGranularity: 8,
  maxLines: 4,
  overflow: TextOverflow.ellipsis,
)

presetFontSize: Use when you have fixe fontsize, I mean you only allow certain specified fontsize Eg: presetFontSize : [30, 20, 10, 5], so here fontSize will be 30 then as screen get sink the fontsize get decreatsed to 20, then 10, 5.

AutoSizeText(
  'This text will get sink as per defined preset font size ',
  presetFontSizes: [30, 20, 10, 5],
  maxLines: 4,
)

Note: If presetFontSizes is been set, then minFontSizemaxFontSize and stepGranularity will be simply get ignored.


group: To apply same rules to multiple AutoSizeText Widget you can use group instance.

Create a group instance using AutoSizeGroup(),

Eg: final group = AutoSizeGroup().

Here I have created Instance of Auto Size Group that I can use further in multiple AutoSizeText.

final myGroup = AutoSizeGroup();

AutoSizeText(
  'Text 1',
  group: myGroup,
);

AutoSizeText(
  'Text 2',
  group: myGroup,
);

Flutter RichText

The Text with custom text style & font from highlighting. To make RichText with Auto Resize ability will be a great feature. Therefore to add richtext with autoSize, we must use addition constructor AutoSizeText.rich() widget.

RichText Example

flutter richtext auto resize
SizedBox(
          width: 200,
          height: 300,
          child: AutoSizeText.rich(
            TextSpan(
              text: "This is ",
              children: <TextSpan>[
                TextSpan(
                  text: "Example",
                  style: TextStyle(fontSize: 20)
                ),
                TextSpan(
                    text: " on Flutter",

                ),
                TextSpan(
                  text: "Auto Size Text Rich ",
                    style: TextStyle(fontSize: 22,color: Colors.redAccent)
                ),
                TextSpan(
                  text: "Widget",

                ),
              ]
            )
          )
        )

In above RichText, it take a TextSpan & will have multiple textSpan children with different fontSize & style.

Python Interview Questions for Freshers & Experience

0
python interview questions and answers

Hi Guys, Welcome to Proto Coders Point. In this Article. we will look into the most frequently asked interview questions for python developer post, which will help you to get prepared for you amazing job offers.

I have classified Python Interview questions into following section:-

  • python interview questions for freshers
  • python interview questions for experienced

Python Interview Questions for Freshers

1. What is Python?

Python is a General & Interpreted Programming Language . It can be used to build different application using its Tools And Libraries. Python can easily support objects, threads, exception can we handled easily, & memory management is made automatically, that help real-world issues.


2. Why Python ?

Python is General Purpose Language that can be easy to Learn And it is used for Developing Application, Software, Apps And Data Visualization. It can be use Non IT persons also like Banking for to do Day to Day Task.


3. What is Swapcase() Function ?

It is a string’s function which converts all uppercase characters into lowercase and vice versa.

stringValue = “IT IS IN LOWERCASE.”  

print(stringValue.swapcase())  

Output :-  “it is in lowercase.”  


4. How To Remove Whitespaces from string start and end ?

To remove the whitespaces from the string, Python Introduces strip([str]) built-in function. This function return a String by removing Whitespaces. Otherwise returns original string.

Example:

string = "  Proto Coders Point   " #here we have space at start & end
print(string.strip())

Output: Proto Coders Point


5. Python is interpreted Language ? Explain?

Yes, Interpreted Language Execute the Code line by line. Programs written in interpreted language that runs directly on the source code, there is no need to intermediate Compilation.


6. Different types of datatypes In Python?

Datatype is a Type of Data that represent the Classification of Data. In Python we have Different Datatypes Namely:-

  • Numeric Data Type
  1. Integer
  2. Float
  3. Complex
  4. Boolean
  • Sequence Data Type
  1. List
  2. Tuple
  3. Range
  4. String

7. What is List and Tuple ? Explain Difference ?

  • List:- List is Data Structure in python & Store collection of Objects.
  • Tuple:- Tuple is a collection of Python objects separated by commas.
ListTuple
1) List is a Collection of Object, which is used to store multiple data at the same time1) Tuple is sequence a data type in python that can contain elements of different data types
2) List are mutable. i.e. Can be modified Once Declared.2) Tuple are immutable. i.e. cannot be modified Once Declared.
3) Defined With square brackets [].3) Defined With parenthesis ().

8. Difference Between Array and List ?

ArrayList
Array is Collection of homogeneous elements. i.e. same DataType.Array is Collection of heterogeneous elements. i.e. Different DataType.
We need to declare an array before use
No need to declared list
Array Consume less MemoryList Consume Large Memory
Handle Arithmetic operation
Cannot handle arithmetic Operation
It is hard to modify like  addition, Update and deleteEasy Modification can do like  addition, Update and delete

9. What is break, continue, Pass ?

Pass : – The pass keywords is a null operation.  Pass used to execute the empty Piece (block) of Code.

 def my_function():

   # do nothing

   Pass

my_function()    # It Does Not Show Any Error

Break :- The brake Statement terminate the loop immediately and control goes to the Next Statement.

Continue : –  It Ends the Current execution of loop. And control goes to beginning of next iteration


10. Application of Python ?

  • Web Development
  • Games Developments
  • Machine Learning
  • Artificial Intelligence
  • Recommendation System
  • Desktop GUI Application Using Tkinter Library


Python Questions for Experience

11. Attributes in Python ?

Global Attributes :- It is a public variable. This is declared in Global Scope and It can be access using Global Keyword

Private Attributes :- It Can defined By using _ _ (Double Underscore) With Identifier. Ex :- __hello

Protected Attributes :- It Can defined By using _ (Single Underscore) With Identifier. Ex :- _hello


12. What is function ? How to Define?

Function is a block of code that Write at Once and it can be called Anytime in the program after declaration of function.

  • Built-In Functions: copy(), len(), count() are the some built-in functions.
  • User defined Functions: Functions is Created by user .
  • Anonymous functions: Those Function are also called Lambda Function and They are Not Declared by def() Keyword

13. Explain __init__ ?

It is constructor Method, It Can Automatically Called when new object is created and it allocates the memory automatically.


14. What is Lambda Function ?

Lambda Function is a anonymous Function that can declare without def() Keyword. It a Take Any argument in single Expression.

Ex:- mul = lambda a, b : a * b

print(mul(5, 5)) # output => 25


15. Libraries Of Python ?

  • Pandas
  • Numpy
  • Scipy
  • Keras
  • TensarFlow
  • Scikit Learn

16. What is type conversion in Python?

int() – converts any data type into integer type

float() – converts any data type into float type

ord() – converts characters into integer

hex() – converts integers to hexadecimal

oct() – converts integer to octal

tuple() –  convert to a tuple.

set() – This function returns the type after converting to set.

list() – convert any data type to a list type.

dict() – convert a tuple of order (key, value) into a dictionary.

str() – Used to convert integer into a string.


17. What are the different file processing modes supported by Python?

  • Read-only mode (r): Open a file for reading. It is the default mode.
  • Write-only mode (w): Open a file for writing.
  • Read-Write mode (rw): Open a file for reading.
  • Append mode (a): Open for writing, append to the end of the file, if the file exists

18. What are the different types of operators in Python?

Operator have Rich set of Operators for Performing Various Operations.

  • Arithmetic Operators
  • Relational Operators
  • Assignment Operators
  • Logical Operators
  • Membership Operators
  • Identity Operators
  • Bitwise Operators

19. What is dictionary in python?

Dictionary is built in Data Types In Python. Dictionary Contain Value in the form of Key value Pair. It is accessed or Indexed by Key.

my_dict={'Country':'India', 'State':'Maharashtra', 'City':'Pune'}

print(my_dict['Country'])

#Output :- India

print(my_dict['State'])

#Output :- Maharashtra

20. Explain split() and join() functions in Python?

split() function use to Split a String into List by using a delimiter.

join() function to return a new String by Joining 2 String.

Example:-

my_string = "Hello World." 

New_list= my_string .split(' ')   #delimiter is ‘space’ 

print(New_list)   #output: ['Hello', 'World.']

print(' '.join(New_list)) #output: Hello World.