Home Blog Page 50

How to create aws server instance – amazon ec2

0
create aws ubuntu server

Hi Guys, Welcome to Proto Coders Point, In this Article we will learn how to create AWS linux ubuntu server.

Let’s get started

Video Tutorial Guide

1. Create a account in AMAZON WEB SERVICES

link: https://aws.amazon.com/

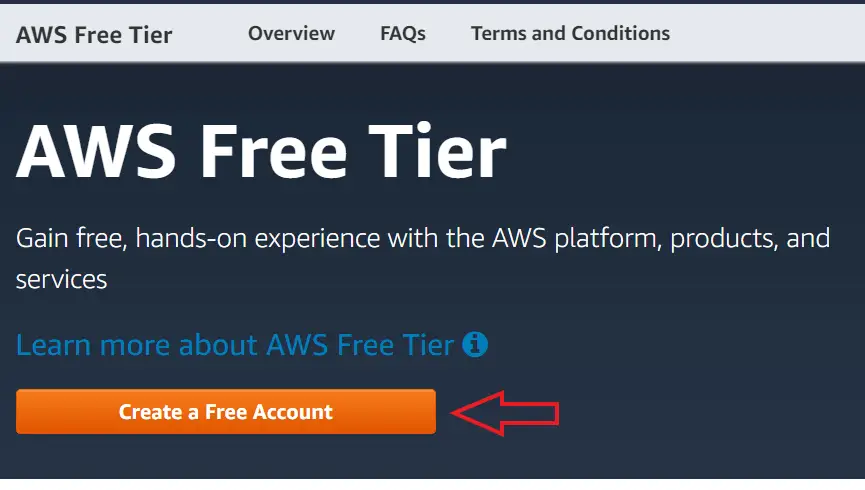
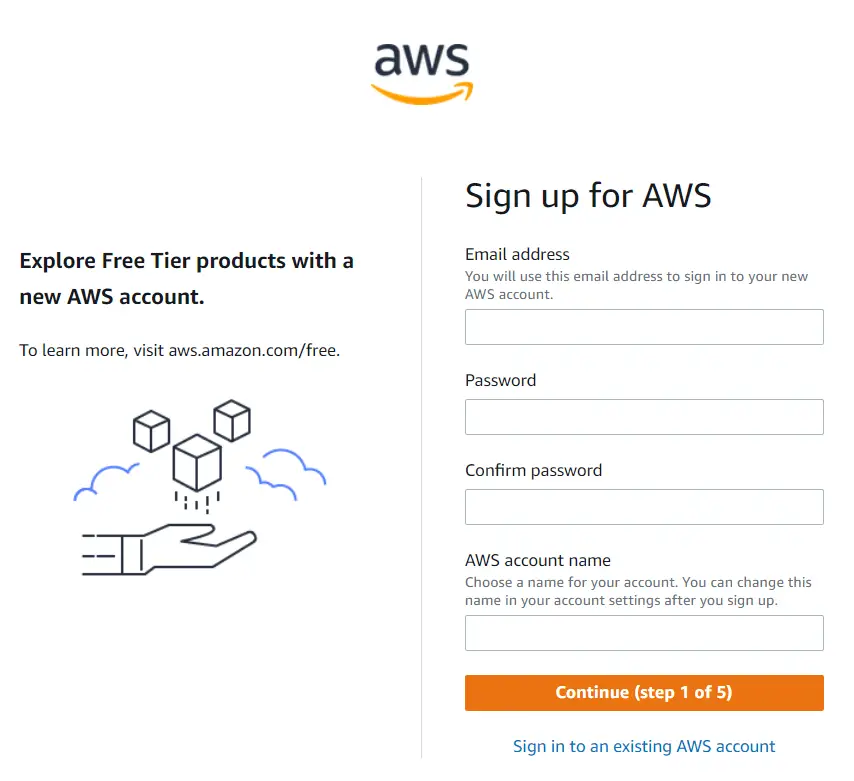
Fill the amazon web service account creation form, note: you must also add your ATM debit/credit card details.

After filling and submitting the aws form amazon, will take 12-24 hours to verify your details & activate aws for you.


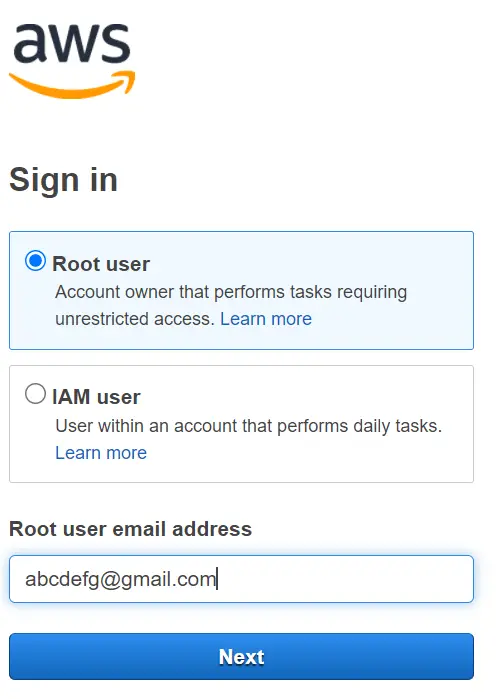
2. Sign In to AWS account

Once your aws account is verified, amazon will update you through email.

Login


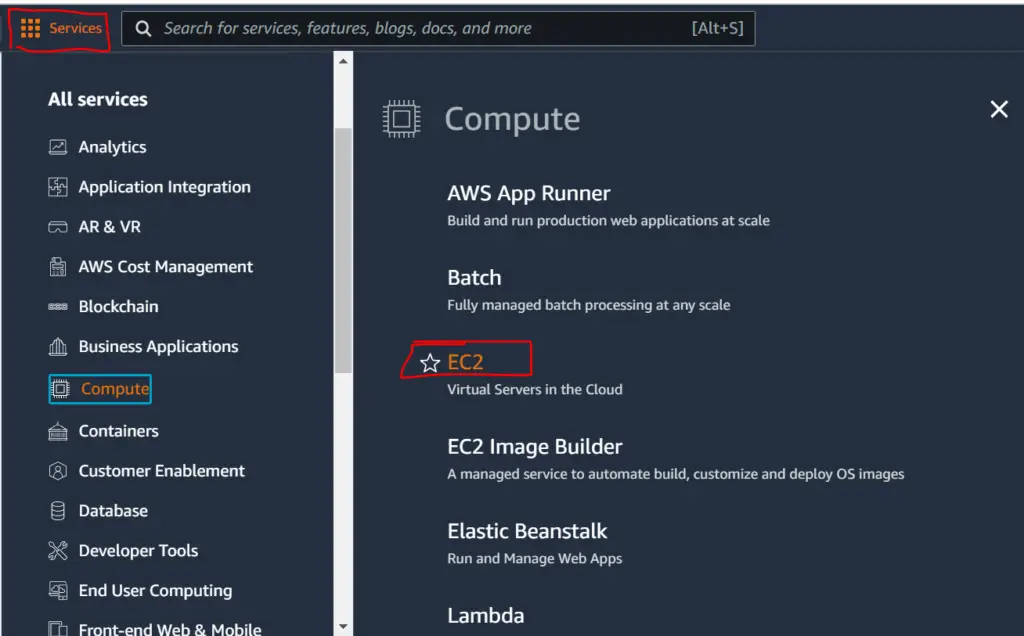
3. Creating AWS Ubuntu Server instance EC2

on aws deashboard on top left, services > compute > EC2


  • Click on Launch Instance

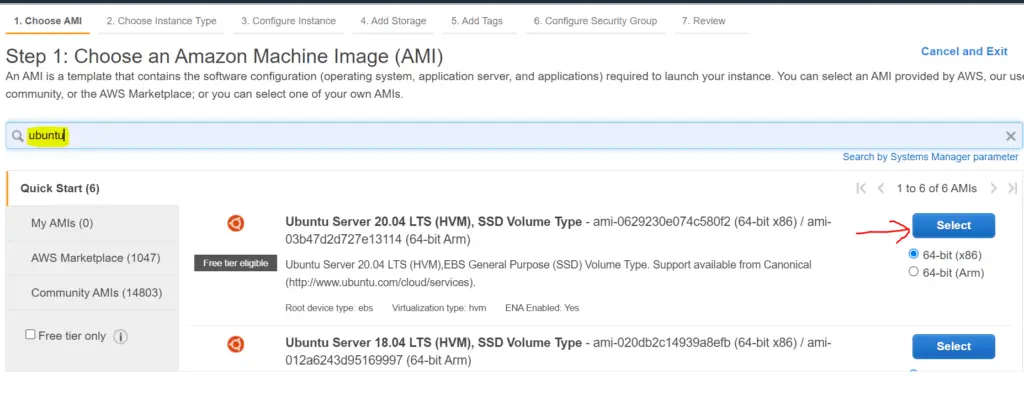
  • search in amazon machine image (AMI)

In search box search for your desired aws server OS image “Linux, ubuntu, windows, macOS”.


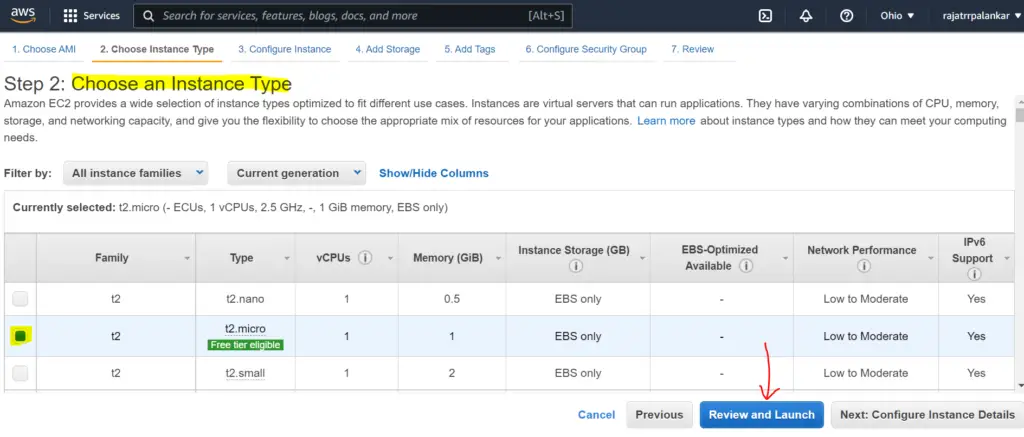
  • choose aws instance type

Amazon EC2 Instance, provides a long lis of instance type, There are varities of aws searver specification like CPU, memory storage, performance speed.The higher specification you choose the best performance you get, and even billing will be huge (Hahahaha).

I recommended, You to go throught Free Tier, because amazon server give you free trial for 12 Month (team & condition is applied).


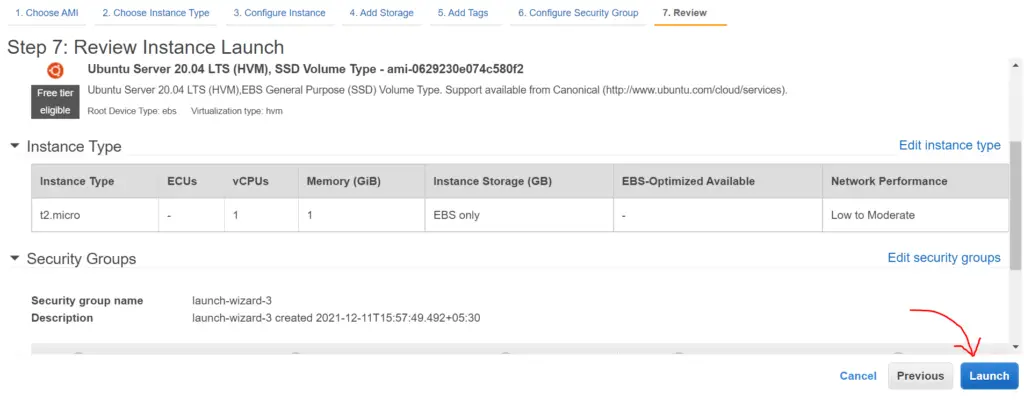
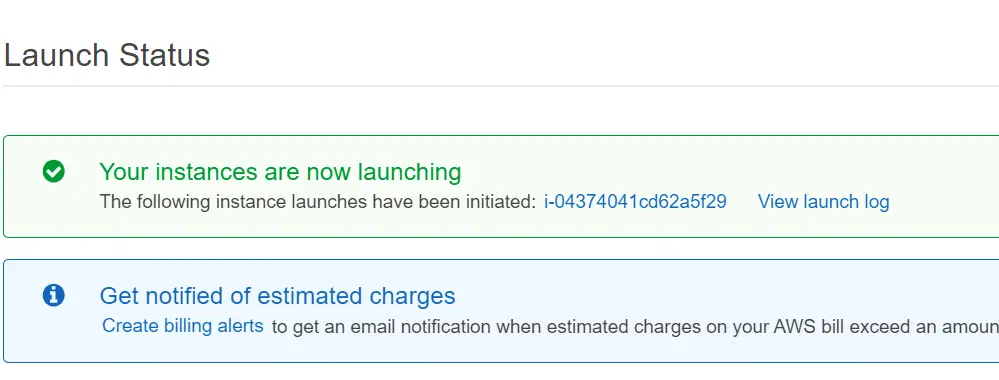
Download .pem file & finally launch instance

Please make sure .pem file is successfully downloaded, beause it’s an authentication key to login to the aws server, using filezilla, WinSCP or Putty.


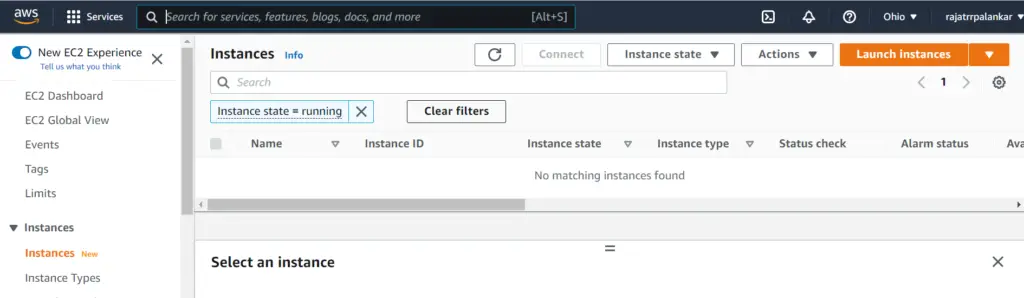
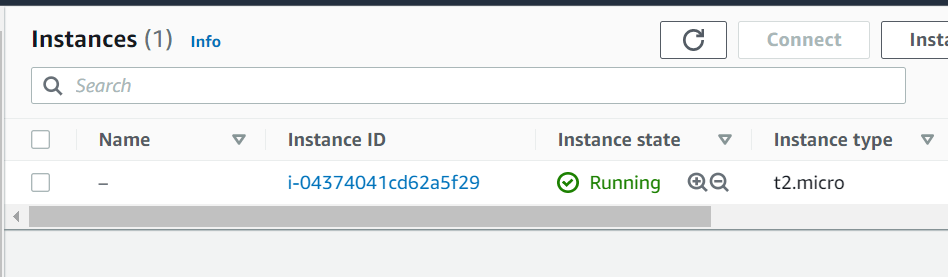
Succesfully created aws server & the instance is runnning


Recommended Articles

Google Cloud Server – File transfer using FileZilla

How to add package from github to flutter project

0
Add package from GitHub to Fluter

Hi Guys, Welcome to Proto Coders Point. In this Article we will learn how to add github package to flutter project.

Sometimes we need to use latest flutter packages that is not yet been published in pub.dev but available in github repo.

or

In you have built your own flutter package & pushed it on github repository but not published in pub.dev, at that time you can add packages from github to flutter project directly.

How to Download Packages from Github to flutter

Open pubspec.yaml file and under dependencies section add the path to your get repository.

1. Method One

dependencies: 
  package_name:
    git:  <--- url --->

2. Method two – git from target branch

package_name:
  git: 
    url: <--url-->
    ref: dev

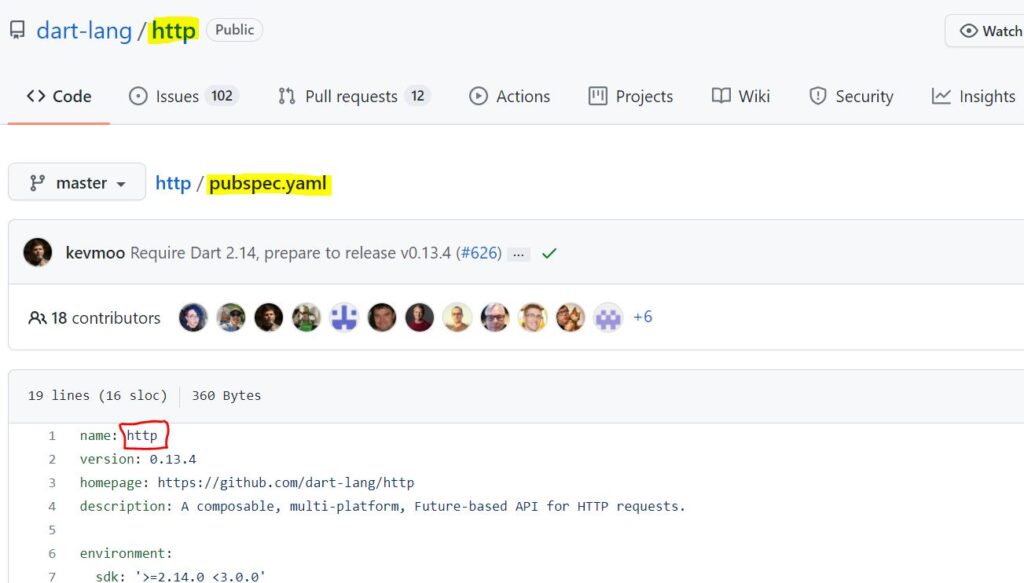
Here package_name descrives the name of the package,

git, it say pubspec.yaml to search for the package from github repo & url after that is to specify from where to clone the package.

Here package name, should be same as the name specified in pubspec.yaml of that github flutter package.

how to add package from github in flutter pubspec.yaml – Example

dependencies:
  http:
    git:
      url: https://github.com/dart-lang/http.git

The above, will download the package directly from github repo into your flutter project.

now you can import it and use anywhere in your flutter project eg: main.dart

import 'package:http/http.dart' as http;

Flutter Cron Job Scheduler

0
Flutter Cron Job Scheduler

Hi Guys, Welcome to Proto Coders Point, In this flutter tutorial article, we will learn how to call a function at a specific interval of time.

There are some situation when we want to run a function every second, minute, hour, day or once a week to execute a task periodically and to do so we can make use of flutter cron job package.

Flutter Cron Job Scheduler

Cron Job in flutter are used to run function at certain time interval.

For Example: Suppose you want to call function every 1 minute, hour, day or month then flutter cron job libray is very useful its also called as time based job scheduler.


How to use cron flutter package

1. Flutter installing cron package

In your flutter project open pubspec.yaml file & under dependencies add cron.

dependencies:
  cron: # keep version empty for latest version

After addmin cron plugin, hit pub get button or run flutter pub get cmd in terminal, to downlaod & install cron in flutter project.


2. Import cron

Now, once the job scheduler package is successfully installed, import it in you flutter dart code to use it.

import 'package:cron/cron.dart';

3. How to use cron in flutter as job scheduler

main() {
  final cron = Cron();
  cron.schedule(Schedule.parse('*/5 * * * *'), () async {
    print('every Five minutes');
  });
  runApp(myApp) ;
}

Example 2

main() {
  final cron = Cron();
  cron.schedule(Schedule.parse('*/5 * * * * *'), () async {
    print('Runs every Five seconds');
  });
  runApp(myApp) ;
}

Syntax for job scheduler using cron in flutter

fieldvalue
second0-59
minute0-59
hour0-23
day of month1-31
month1-12
day of week0 – 7

How to stop cron job

To stop cron job simple use .close

await cron.close()


You can use cron job when you want to trigger local notification in flutter at a specific time internal

Books Directory Project with nodejs – CRUD operation using mongoose

0
Nodejs Book Directory mini project

Hi Guys, Welcome to Proto Coders Point, In this Nodejs project for beginner, We will learn how to build RESTAPI in nodejs using ExpressJS & MongoDB as NoSQL database.

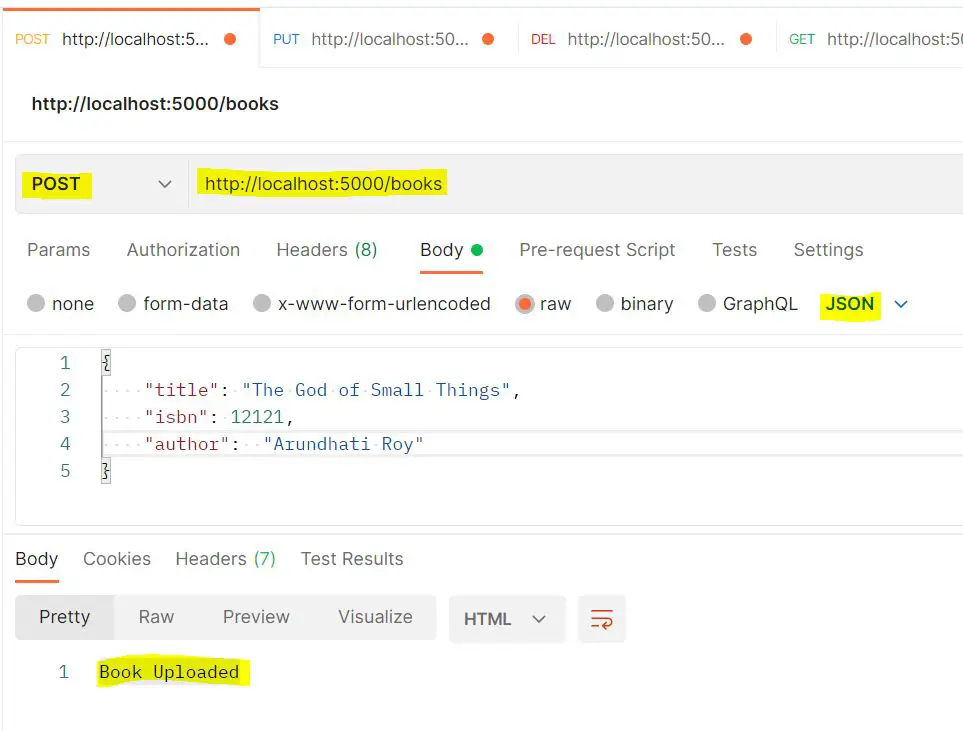
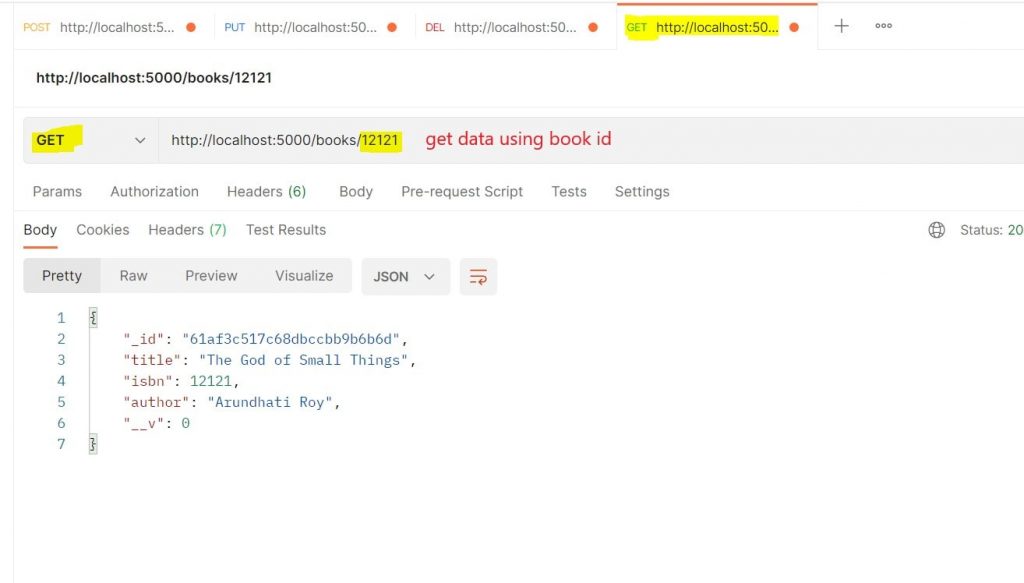
NodeJS RESTAPI Example – Book Directory Project

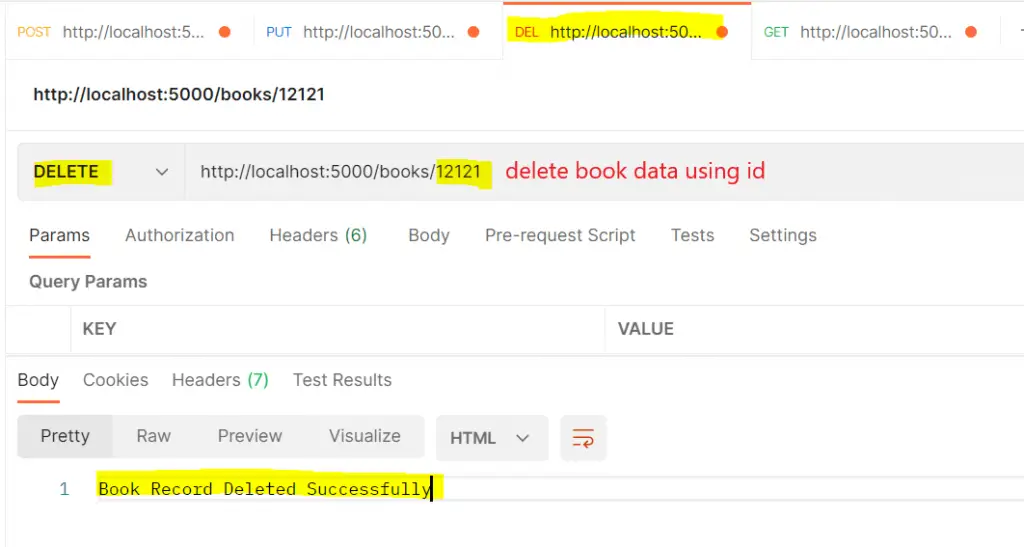
In this NodeJS tutorial, We will develop backend RESTAPI a “Book directory project”, where we will perform CRUD operation like Create, Read, Update & Delete data from MongoDB Database.

Let’s get started with developing book list api using nodejs

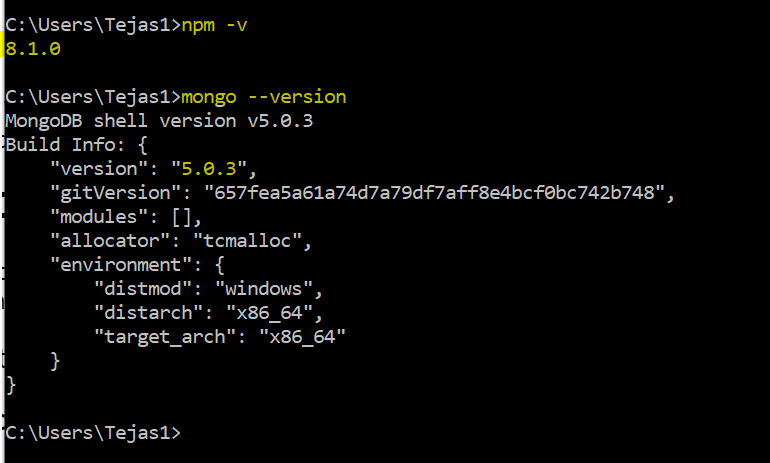
1. Check for NODEJS & MONGODB Installed

I assume that you have installed the required environment(i.e. nodejs & mongoDB).

To check if nodejs & mongodb is installed or no, simply run npm -v & mongo --version in your command prompt & thus if installed it will show the version that is been installed.


2. Create nodejs project folder & Create package.json file

open command prompt

  1. Navigate to drive or directory where you want to create nodejs project
  2. Create folder (book_dir_api) – mkdir book_dir_api
  3. Navigate to newly created folder – cd book_dir_api
  4. create package.json file – npm init
  5. open nodejs project in vscode editor – code .

npm init will create a package.json file & will ask you to enter some details about your nodejs project. if you don’t want to fill any details information then simply run npm init -y


3. Install required nodejs module

We need 4 nodejs packages/modules

  1. Express: For creating server & routes, basically express is used as middleware.
  2. body-Parser: To be able to read & display response in json form.
  3. mongoose: To store data in mongodb and get and update the data(Basicallly for CRUD operation).
  4. nodemon: To auto restart nodejs server, when file changes is made.

Install them all at once using below command

npm i express body-parser mongoose nodemon

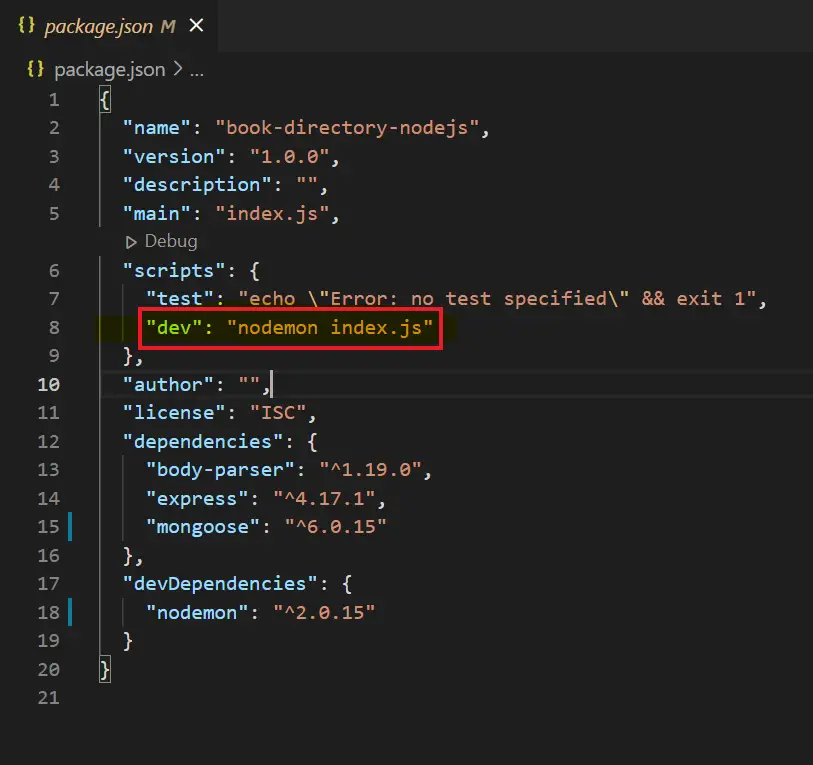
After installing all the above nodejs modules, your package.json will look like this,

dev nodemon index.js

check the highlight in above screenshot

"scripts": {
    "dev": "nodemon index.js" //
  }

index.js is the file that start/restarts every time there is some change in script.


4. Coding for nodejs book directory api mini project
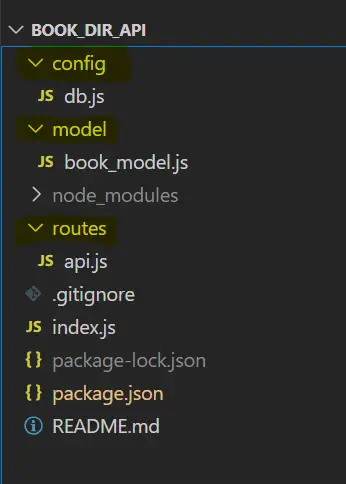
My NodeJS Structure

Create 3 folders & respective js file as in above screenshot

1. config > db.js : Handles MongoDB connection using mongoose.

2. model > book_model.js : Will have mongodb mongoose schema(data structure).

3. routes > api.js : Will have all the routes to perform CRUD operation.
It will handle routes such as:-

4. index.js : Putting all together, main file.

  • get: Get all books list of data from DB.
  • post: Insert new Book records into Database.
  • put: used to perform update operation.
  • delete: delete book record by using book id.

Codes

config -> db.js

const mongoose = require('mongoose');

var url ='mongodb://localhost:27017/booksDB';

const connection = mongoose.createConnection(url);

module.exports = connection;

model -> book_model.js

const mongoose = require('mongoose');
const db = require('../config/db');

const bookSchema = new mongoose.Schema({
    title:{
        type:String,
        default:"----"
    },
    isbn:{
      type:Number,
    },
    author:{
        type:String,
        default:"----"
    }
});

const bookmodel = db.model('books',bookSchema);

module.exports = bookmodel;

routes -> api.js

const router = require('express').Router();
const bookModel = require('../model/book_model');

router.get('/books', async function (req, res) {
   const bookList = await bookModel.find();
   console.log(bookList);
   res.send(bookList);
});

router.get('/books/:id', async function (req, res) {
    const { id } = req.params;
    const book = await bookModel.findOne({isbn : id});
    if(!book) return res.send("Book Not Found");
    res.send(book);
});

router.post('/books', async function (req, res) {
    const title= req.body.title;
    const isbn = req.body.isbn;
    const author = req.body.author;
    const bookExist = await bookModel.findOne({isbn : isbn});
  
    if (bookExist) return res.send('Book already exist');

    var data = await bookModel.create({title,isbn,author});
    data.save();

    res.send("Book Uploaded");
});


router.put('/books/:id', async function (req, res) {
    const { id } = req.params;
    const {
        title,
        authors,
    } = req.body;

    const bookExist = await bookModel.findOne({isbn : id});
    if (!bookExist) return res.send('Book Do Not exist');


    const updateField = (val, prev) => !val ? prev : val;

    const updatedBook = {
        ...bookExist ,
        title: updateField(title, bookExist.title),
        authors: updateField(authors, bookExist.authors),
        
    };

    await bookModel.updateOne({isbn: id},{$set :{title : updatedBook.title, author: updatedBook.authors}})
    
    res.status(200).send("Book Updated");
});

router.delete('/books/:id', async function (req, res) {
    const { id } = req.params;

    const bookExist = await bookModel.findOne({isbn : id});
    if (!bookExist) return res.send('Book Do Not exist');

   await bookModel.deleteOne({ isbn: id }).then(function(){
        console.log("Data deleted"); // Success
        res.send("Book Record Deleted Successfully")
    }).catch(function(error){
        console.log(error); // Failure
    });
});

module.exports = router;

index.js

In index.js, will bring all files together using express as middleware.

const express = require('express');
const bodyParser = require('body-parser');
const api = require('./routes/api');

const app = express();
const PORT = 5000;

app.use(bodyParser.json());
app.use('/', api);

app.listen(PORT, () => console.log(`App listening on port ${PORT}`));

5. Run the nodejs server index.js

npm run dev

thus your script will start running on localhost post 5000

http://localhost:5000/


Testing API in POSTMAN

1. Store Book Data in DB using POST method

postman post operation

2. get book data using book id

postman get operation

3. update book data using book id

postman put operation

4. delete book data using book id

postman delete operation

How to get deviceId in flutter – with and without plugin

0
How to Device ID in flutter

Hi Guys, Welcome to Proto Coders Point, In this flutter tutorial article we will learn how to get deviceID in flutter.

We will checkout, both the ways to get deviceId in flutter

  1. Get DeviceID using Plugin – PlatformDeviceId
  2. Flutter get deviceId without using any plugin

1. Method – Using PlatformDeviceId plugin/packages

Step 1: Install plugin using pubspec.yaml file

dependencies:
  platform_device_id: #keep empty to take latest version

Step 2: Import the platform_device_id.dart class

import 'package:platform_device_id/platform_device_id.dart';

Step 3: Create a function and call it to get deviceID

Future<void> getDeviceIDUsingPlugin() async {
        deviceId = await PlatformDeviceId.getDeviceId;
        print(deviceId);
}

2. Method – Without using plugin get flutter device ID

Learn more on How to call android native code from flutter

In below code’s we will call android native code, that return mobile flutter unique device id. To acheive this we will make use of MethodChannel to communicate with android native code.

Flutter Code – main.dart

import 'package:flutter/material.dart';
import 'package:flutter/services.dart';
import 'package:platform_device_id/platform_device_id.dart';

void main() {
  runApp(const MyApp());
}

class MyApp extends StatelessWidget {
  const MyApp({Key? key}) : super(key: key);
  @override
  Widget build(BuildContext context) {
    return MaterialApp(
      title: 'Flutter Demo',
      theme: ThemeData(
        primarySwatch: Colors.blue,
      ),
      home: MyHomePage(),
      debugShowCheckedModeBanner: false ,
    );
  }
}

class MyHomePage extends StatefulWidget {
  const MyHomePage({Key? key}) : super(key: key);
  @override
  _MyHomePageState createState() => _MyHomePageState();
}

class _MyHomePageState extends State<MyHomePage> {

  static const Channel = MethodChannel('com.example.getdID');
  String? deviceId;
  @override
  Widget build(BuildContext context) {
    return Scaffold(
      appBar: AppBar(
        title: const Text("Get Device ID"),
        centerTitle: true,
      ),
         body: Center(
           child: Column(
             mainAxisAlignment: MainAxisAlignment.center,
             children: [
               ElevatedButton(onPressed: (){
                 getDeviceID(); 
                 },child: const Text("Without using Plugin - Flutter Get Device ID"),),
             ],
           ),
         )
    );
  }
      //call android native code
     Future<void> getDeviceID() async {
          String deviceID = await Channel.invokeMethod('getDeviceId');
          print(deviceID);
      }
      
}

Android module code – MainActivity.kt

package com.example.backpress

import android.provider.Settings
import android.util.Log
import android.widget.Toast
import io.flutter.embedding.android.FlutterActivity
import io.flutter.embedding.engine.FlutterEngine
import io.flutter.plugin.common.MethodChannel
import java.lang.reflect.Method
import java.net.NetworkInterface
import java.util.*

class MainActivity: FlutterActivity() {

    private  val CHANNEL = "com.example.getdID";

    private  lateinit var channel: MethodChannel

    override fun configureFlutterEngine(flutterEngine: FlutterEngine) {
        super.configureFlutterEngine(flutterEngine)

        channel = MethodChannel(flutterEngine.dartExecutor.binaryMessenger,CHANNEL)

        channel.setMethodCallHandler { call, result ->

            if(call.method == "getDeviceId"){
                var dID = Settings.Secure.getString(applicationContext.contentResolver,Settings.Secure.ANDROID_ID);
                result.success(dID);
                Toast.makeText(this, dID, Toast.LENGTH_LONG).show()

            }
        }
    }
}


Complete Source Code to get device ID in flutter

Complete project source code – how to get device id in flutter, with & without using plugin.

main.dart

import 'package:flutter/material.dart';
import 'package:flutter/services.dart';
import 'package:platform_device_id/platform_device_id.dart';

void main() {
  runApp(const MyApp());
}

class MyApp extends StatelessWidget {
  const MyApp({Key? key}) : super(key: key);
  @override
  Widget build(BuildContext context) {
    return MaterialApp(
      title: 'Flutter Demo',
      theme: ThemeData(
        primarySwatch: Colors.blue,
      ),
      home: MyHomePage(),
      debugShowCheckedModeBanner: false ,
    );
  }
}

class MyHomePage extends StatefulWidget {
  const MyHomePage({Key? key}) : super(key: key);
  @override
  _MyHomePageState createState() => _MyHomePageState();
}

class _MyHomePageState extends State<MyHomePage> {

  static const Channel = MethodChannel('com.example.getdID');

  String? deviceId;
  @override
  Widget build(BuildContext context) {
    return Scaffold(
      appBar: AppBar(
        title: const Text("Get Device ID"),
        centerTitle: true,
      ),
         body: Center(
           child: Column(
             mainAxisAlignment: MainAxisAlignment.center,
             children: [
               ElevatedButton(onPressed: (){
                 getDeviceID();
                 },child: const Text("Without using Plugin - Flutter Get Device ID"),),
               const SizedBox(
                 height: 15,
               ),
               ElevatedButton(onPressed: () {
                 getDeviceIDUsingPlugin();

               },child: const Text("By Using PlatformDeviceId Plugin- Flutter Get Device ID"),),
             ],
           ),
         )
    );
  }

      // This function calls android native code using methodchannel and invokeMethod.
     Future<void> getDeviceID() async {
          String deviceID = await Channel.invokeMethod('getDeviceId');
          print(deviceID);
      }

  // deviceid using plugin
  Future<void> getDeviceIDUsingPlugin() async {
    deviceId = await PlatformDeviceId.getDeviceId;
    print(deviceId);
  }


}


Flutter get MAC Address without plugin

0
flutter get mac address

Hi, In this tutorial we will learn how to get device mac address in flutter without using any plugin like get_mac.

Let’s get Started

Video Tutorial – To get mac address in flutter


Learn more on How to call android native code from flutter

So In the below code we will call android native code where we will fetch android device MAC Address.

Flutter main.dart code

Flutter code will call android platform code

In below code we have a button, when pressed call a method that will invoke android native code to get mac address for us

project > lib > main.dart

main.dart

import 'package:flutter/material.dart';
import 'package:flutter/services.dart';

void main() {
  runApp(const MyApp());
}

class MyApp extends StatelessWidget {
  const MyApp({Key? key}) : super(key: key);
  @override
  Widget build(BuildContext context) {
    return MaterialApp(
      title: 'Flutter Demo',
      theme: ThemeData(
        primarySwatch: Colors.blue,
      ),
      home: MyHomePage(),
      debugShowCheckedModeBanner: false ,
    );
  }
}

class MyHomePage extends StatefulWidget {
  const MyHomePage({Key? key}) : super(key: key);
  @override
  _MyHomePageState createState() => _MyHomePageState();
}

class _MyHomePageState extends State<MyHomePage> {
  
   // MethodChannel used to call platform independent code 

  static const Channel = MethodChannel('com.example.getmac');

  @override
  Widget build(BuildContext context) {
    return Scaffold(
      appBar: AppBar(
        title: Text("Get MAC Address"),
        centerTitle: true,
      ),
         body: Center(
           child: ElevatedButton(onPressed: ()
            {
                  getmac();
             },child: const Text("Flutter Get MAC Address"),),
         )
    );
  }
     // a method that calls android code
     Future<void> getmac() async {
          String mac = await Channel.invokeMethod('getMAC');
          print(mac);
      }


}


Android Kotlin code

Android native will get invoked from flutter code, when the user make a call, In our case we can calling android code to get mac address.

project > Android > app > src > main > kotlin

MainActivity.kt

package com.example.backpress

import android.util.Log
import android.widget.Toast
import io.flutter.embedding.android.FlutterActivity
import io.flutter.embedding.engine.FlutterEngine
import io.flutter.plugin.common.MethodChannel
import java.lang.reflect.Method
import java.net.NetworkInterface
import java.util.*

class MainActivity: FlutterActivity() {

    private  val CHANNEL = "com.example.getmac";

    private  lateinit var channel: MethodChannel

    override fun configureFlutterEngine(flutterEngine: FlutterEngine) {
        super.configureFlutterEngine(flutterEngine)

        channel = MethodChannel(flutterEngine.dartExecutor.binaryMessenger,CHANNEL)

        channel.setMethodCallHandler { call, result ->

            if(call.method == "getMAC"){
                var mac =  getMacAddress();
                result.success(mac);
                Toast.makeText(this, mac, Toast.LENGTH_LONG).show()

            }
        }
    }

    // a function that return mac 
    private fun getMacAddress(): String? {
        try {
            val all: List<NetworkInterface> =
                    Collections.list<NetworkInterface>(NetworkInterface.getNetworkInterfaces())
            for (nif in all) {
                if (!nif.getName().equals("wlan0", ignoreCase = true)) continue
                val macBytes: ByteArray = nif.getHardwareAddress() ?: return ""
                val res1 = StringBuilder()
                for (b in macBytes) {
                    res1.append(String.format("%02X:", b))
                }
                if (res1.length > 0) {
                    res1.deleteCharAt(res1.length - 1)
                }
                return res1.toString()
            }
        } catch (ex: java.lang.Exception) {
        }
        return "02:00:00:00:00:00"
    }
}

Note: Since Android 6 & IOS 7, Apple & Google has turned off the access to programmatically get device MAC Address, Therefore if you try to get mac address you will always get response as 02:00:00:00:00:00 .

Please read below Saying of Google & Apple:

Apple Saying’s

In iOS 7 and later, if you ask for the MAC address of an iOS device, the system returns the value 02:00:00:00:00:00. If you need to identify the device, use the identifierForVendor property of UIDevice instead. (Apps that need an identifier for their own advertising purposes should consider using the advertisingIdentifier property of ASIdentifierManager instead.)

Google Saying’s

To provide users with greater data protection, starting in this release, Android removes programmatic access to the device’s local hardware identifier for apps using the Wi-Fi and Bluetooth APIs. The WifiInfo.getMacAddress() and the BluetoothAdapter.getAddress() methods now return a constant value of 02:00:00:00:00:00.