Google Flutter is one of a open source user interface(UI) Software Development Toolkit that is been created/ developed by Google, for Software developer which makes programmer to design UI natively compiled applications for mobile, web, and desktop from a single codebase (Google Flutter).
The First version of Flutter Application was named as “SKY”,That was smoothly running on any of the android operating system. Fluttter was released on 2015 by a developer “Summit”. Google announced Flutter Release Preview 2 which is the last big release before Flutter 1.0.
After somedays of testing the final version was released on December 4th of 2018 as flutter 1.0 at it live event, which was he first “stable” version of the Framework.
Which Language Google Flutter prefers to use?
introduction on flutter
Google Flutter are written in the Dart programming language and make use of many of the language’s more advanced features.
Flutter framework for crafting high-quality native interfaces on iOS and Android in record time. Flutter works with existing code, is used by developers and organizations around the world, and is free and open source. Watch this Video
Widgets in Flutter UI
UI design in Flutter development involves create “Widgets” from other Widgets. Flutter Application is basically a groups of widgets build together to form a beautiful UI/ UX experience.
Flutter widget
A widget is an immutable description of part of a user interface.” A human being will tell you it’s a Blueprint, which is a much easier way to think about it.
The MyApp Widget contains all the other Widgets, which can contain even smaller Widgets, and together they make up your app.
Flutter is very much fast in development, With Statefull Flutter’s hot reload feature helps you quickly and easily experiment, build UIs, add features, and fix bugs within a seconds.
Expressive and Flexiable UI
Quickly ship features with a focus on native end-user experiences. Layered architecture allows for full customization, which results in incredibly fast rendering and expressive and flexible designs.[1]
Native Performation
Flutter’s widgets incorporate all critical platform differences such as scrolling, navigation, icons and fonts to provide full native performance on both iOS and Android. Here are some examples of application that are build using flutter
How to install flutter plugin in android studio?
Here i have demonstrated installation process in ubuntu android-studio same applied to Windows OS.
A dnd dice roller app using android-studio. who want to learn and gain more knowledge in developing an android application.
This tutorial is not be a fancy 3D dice roller but it’ll be a simple dice that roller with some animation effect and generate a random number from 1 – 6 and show similar image of dice roller to the user.
The main moto of this android tutorial is just to build programming skill and logic.
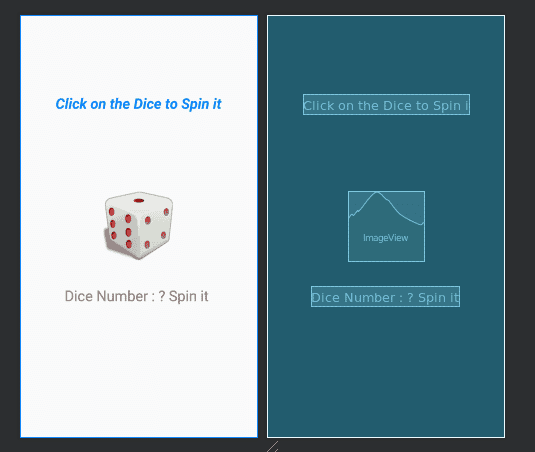
Demo of how the final Dice Roller dnd android app looks
dnd dice roller android studio tutorial mini project.
let’s start with creating a new project in android-studio
File > New > New Project
Give a proper name to project ( Dice Roller ) , Select a project storage destination , select minimum API : 22 ,Android 5.1 (Lollipop), all set android project will be get ready in several seconds.
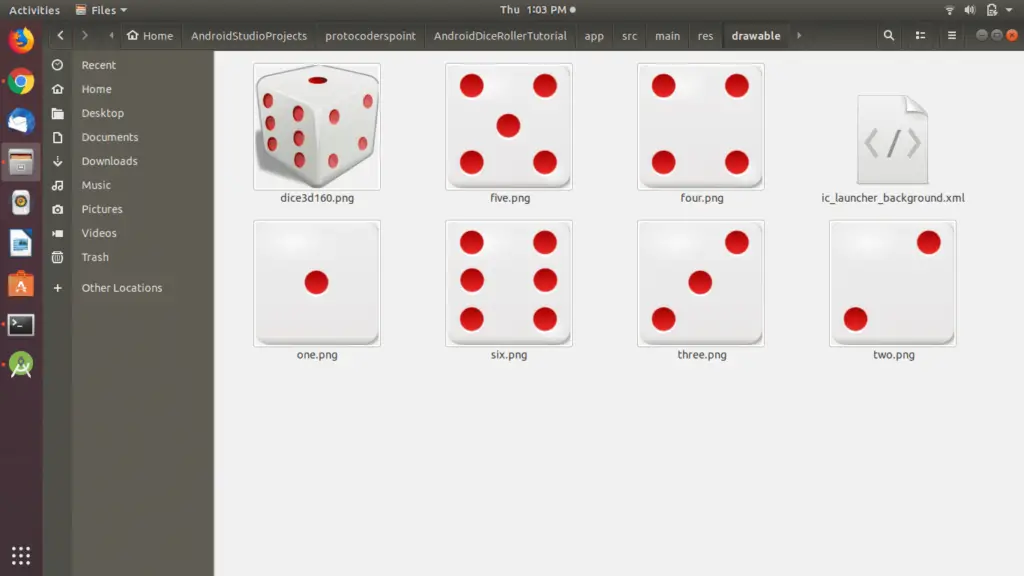
Add the dice resources (from above) to the project by copying them to the res folder in android – studio.
Dice Roller app resources android studio
Optional Changes
To set a icon from this dice roller app project go to AndroidManifest.xml file
android:icon="@drawable/dice3d" and android:roundIcon="@mipmap/dice3d_rounded".
package protocoderspoint.com.androiddicerollertutorial;

import android.media.AudioAttributes;
import android.media.SoundPool;
import android.os.Build;
import android.os.Handler;
import android.os.Message;
import android.os.Bundle;
import android.view.View;
import android.view.animation.Animation;
import android.view.animation.LinearInterpolator;
import android.view.animation.RotateAnimation;
import android.widget.ImageView;
import android.widget.TextView;

import androidx.appcompat.app.AppCompatActivity;

import java.util.Random;
import java.util.Timer;
import java.util.TimerTask;

import protocoderspoint.PreLollipopSoundPool;

public class MainActivity extends AppCompatActivity {
    ImageView dice_picture;     //reference to dice picture
    Random rng=new Random();    //generate random numbers
    SoundPool dice_sound;       //For dice sound playing
    int sound_id;               //Used to control sound stream return by SoundPool
    Handler handler;            //Post message to start roll
    Timer timer=new Timer();    //Used to implement feedback to user
    boolean rolling=false;      //Is die rolling?
    RotateAnimation rotate;
    int soundplay;
    TextView dice_no;

    @Override
    protected void onCreate(Bundle savedInstanceState) {
        super.onCreate(savedInstanceState);
        setContentView(R.layout.activity_main);
        //Our function to initialise sound playing

        dice_no=(TextView)findViewById(R.id.dice_no);
        InitSound();
        //Get a reference to image widget
        dice_picture = (ImageView) findViewById(R.id.imageView);
        dice_picture.setOnClickListener(new HandleClick());
         rotate = new RotateAnimation(0, 360, Animation.RELATIVE_TO_SELF, 0.5f, Animation.RELATIVE_TO_SELF, 0.5f);
        rotate.setDuration(3000);
        rotate.setInterpolator(new LinearInterpolator());

        //link handler to callback
        handler=new Handler(callback);
    }

    //User pressed dice, lets start
    private class HandleClick implements View.OnClickListener {
        public void onClick(View arg0) {
            if (!rolling) {
                rolling = true;
                //Show rolling image
                dice_picture.setImageResource(R.drawable.dice3d160);
                //Start rolling sound
              soundplay=  dice_sound.play(sound_id, 1.0f, 1.0f, 0, 0, 1.0f);
                //Pause to allow image to update
                dice_picture.startAnimation(rotate);
                timer.schedule(new Roll(), 3000);
            }
        }
    }

    //New code to initialise sound playback
    void InitSound() {
        if (Build.VERSION.SDK_INT >= Build.VERSION_CODES.LOLLIPOP) {
            //Use the newer SoundPool.Builder
            //Set the audio attributes, SONIFICATION is for interaction events
            //uses builder pattern
            AudioAttributes aa = new AudioAttributes.Builder()
                    .setUsage(AudioAttributes.USAGE_ASSISTANCE_SONIFICATION)
                    .setContentType(AudioAttributes.CONTENT_TYPE_SONIFICATION)
                    .build();

            //default max streams is 1
            //also uses builder pattern
            dice_sound= new SoundPool.Builder().setAudioAttributes(aa).build();

        } else {
            //Running on device earlier than Lollipop
            //Use the older SoundPool constructor
            dice_sound= PreLollipopSoundPool.NewSoundPool();
        }
        //Load the dice sound
        sound_id=dice_sound.load(this,R.raw.shake_dice,1);
    }

    //When pause completed message sent to callback
    class Roll extends TimerTask {
        public void run() {
            handler.sendEmptyMessage(0);
        }
    }

    //Receives message from timer to start dice roll
    Handler.Callback callback = new Handler.Callback() {
        public boolean handleMessage(Message msg) {
            //Get roll result
            //Remember nextInt returns 0 to 5 for argument of 6
            //hence + 1
            switch(rng.nextInt(6)+1) {
                case 1:
                    rotate.cancel();
                    dice_no.setText("Dice Number : 1");
                    dice_picture.setImageResource(R.drawable.one);
                    break;
                case 2:
                    rotate.cancel();
                    dice_no.setText("Dice Number : 2");
                    dice_picture.setImageResource(R.drawable.two);
                    break;
                case 3:
                    rotate.cancel();
                    dice_no.setText("Dice Number : 3");
                    dice_picture.setImageResource(R.drawable.three);
                    break;
                case 4:
                    rotate.cancel();
                    dice_no.setText("Dice Number : 4");
                    dice_picture.setImageResource(R.drawable.four);
                    break;
                case 5:
                    rotate.cancel();
                    dice_no.setText("Dice Number : 5");
                    dice_picture.setImageResource(R.drawable.five);
                    break;
                case 6:
                    rotate.cancel();
                    dice_no.setText("Dice Number : 6");
                    dice_picture.setImageResource(R.drawable.six);
                    break;
                default:
            }
            rolling=false;  //user can press again
            return true;
        }
    };

    //Clean up
    protected void onPause() {
        super.onPause();
        dice_sound.pause(sound_id);
    }
    protected void onDestroy() {
        super.onDestroy();
        timer.cancel();
    }
}
To support APIs pre Lollipop add a new class called PreLollipopSoundPool,java
package protocoderspoint;

import android.media.AudioManager;
import android.media.SoundPool;

/**
 * Created a pre Lollipop SoundPool
 */
public final class PreLollipopSoundPool {
    @SuppressWarnings("deprecation")
    public static SoundPool NewSoundPool() {
        return new SoundPool(1, AudioManager.STREAM_MUSIC,0);
    }
}
Explanation of the above ActivityMain.java Code
Random number
Random java – user to generate a random number from 1 to 6
Random rng=new Random();

//Get roll result
//Remember nextInt returns 0 to 5 for argument of 6
//hence + 1
rng.nextInt(6)+1
Rotate a imageView in android-studio
RotateAnimation rotate = new RotateAnimation(0, 360, Animation.RELATIVE_TO_SELF, 0.5f, Animation.RELATIVE_TO_SELF, 0.5f);
Set Duration for the rotator in milli-sec like (1 sec = 1000milli sec )
In Android-studio Java Soundpool is used to play a sound like in our project we have used a dice roller sound effect to feel like a real dice is spinning. Code below
  SoundPool dice_sound;       //For dice sound playing

int sound_id;               //Used to control sound stream return by SoundPool
New code to initialise sound playback
 //New code to initialise sound playback
    void InitSound() {
        if (Build.VERSION.SDK_INT >= Build.VERSION_CODES.LOLLIPOP) {
            //Use the newer SoundPool.Builder
            //Set the audio attributes, SONIFICATION is for interaction events
            //uses builder pattern
            AudioAttributes aa = new AudioAttributes.Builder()
                    .setUsage(AudioAttributes.USAGE_ASSISTANCE_SONIFICATION)
                    .setContentType(AudioAttributes.CONTENT_TYPE_SONIFICATION)
                    .build();

            //default max streams is 1
            //also uses builder pattern
            dice_sound= new SoundPool.Builder().setAudioAttributes(aa).build();

        } else {
            //Running on device earlier than Lollipop
            //Use the older SoundPool constructor
            dice_sound= PreLollipopSoundPool.NewSoundPool();
        }
        //Load the dice sound
        sound_id=dice_sound.load(this,R.raw.shake_dice,1);
    }
As java codes runs within a fraction of seconds, it will be hard to view the image is getting spinned or an real animation effect, i have made use of Timer method with will help programmer to show dice rolling effect.
Timer timer=new Timer(); //Used to implement Time to spin
Timer is used to provide a delay in roll.
timer.schedule(new Roll(), 3000);
above snippet code timer is set to 3 sec’s where the viewer will be above to see the animation effect for 3 sec.
Adding a list of options in Alert Dialog
in android tsudio
Working Demo
An AlertDialog is a Simplest way to get response from a user by providing them a option to select .This post will show you how can we add a list of choices to our AlertDialog box in android.
If you check official documentation that have describe that, their are total three kinds of lists that can be used with an AlertDialog in android :
Traditional single-choice list
Persistent single-choice list (radio buttons)
Persistent multiple-choice list (checkboxes)
In this Tutorial i will give demo on all 3 kinds of alert dialog choice list
// create and show the alert dialog
AlertDialog dialog = builder.create();
dialog.show();
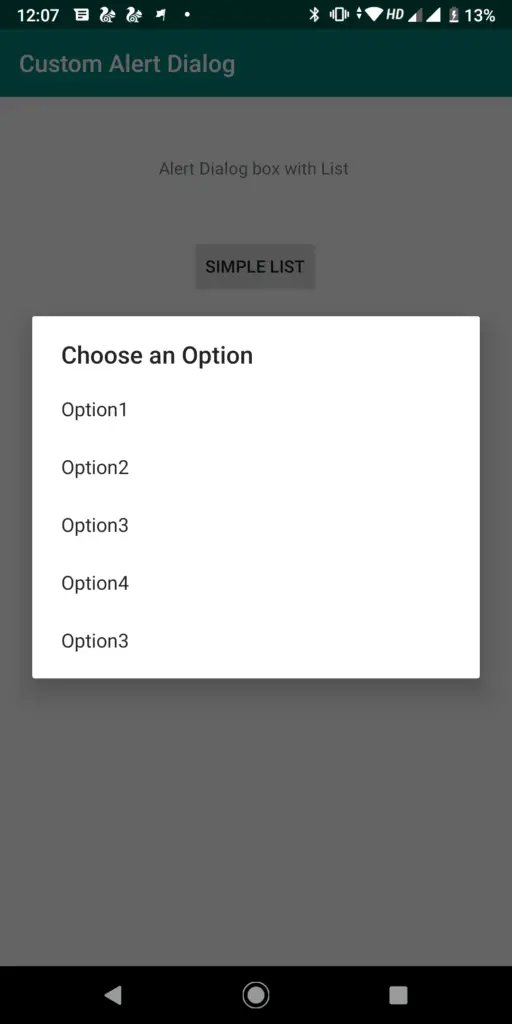
Traditional single-choice Android alert Dialog list.
Traditional Alert Dialog list options
The way to make use of a traditional single-choice list is to use setItems method.
Call the Below Function on button Click
public void TraditionallistDialog()
{
// setup the alert builder

 AlertDialog.Builder builder = new AlertDialog.Builder(MainActivity.this);
        builder.setTitle("Choose an Option");
// add a list
        String[] options = {"Option1", "Option2", "Option3", "Option4", "Option3"};
//Pass the array list in Alert dialog
builder.setItems(options, new DialogInterface.OnClickListener() {
@Override
public void onClick(DialogInterface dialog, int which) {
switch (which) {
case 0: // Select option task
case 1: // Config it as you need here
case 2:
case 3:
case 4:
}
}
});
// create and show the alert dialog
        AlertDialog dialog = builder.create();
        dialog.show();
}
In Traditional list their is no need to set any positive button, as user select any list from alert dialog list the item will automatically gets selected and alert dialog get closed.
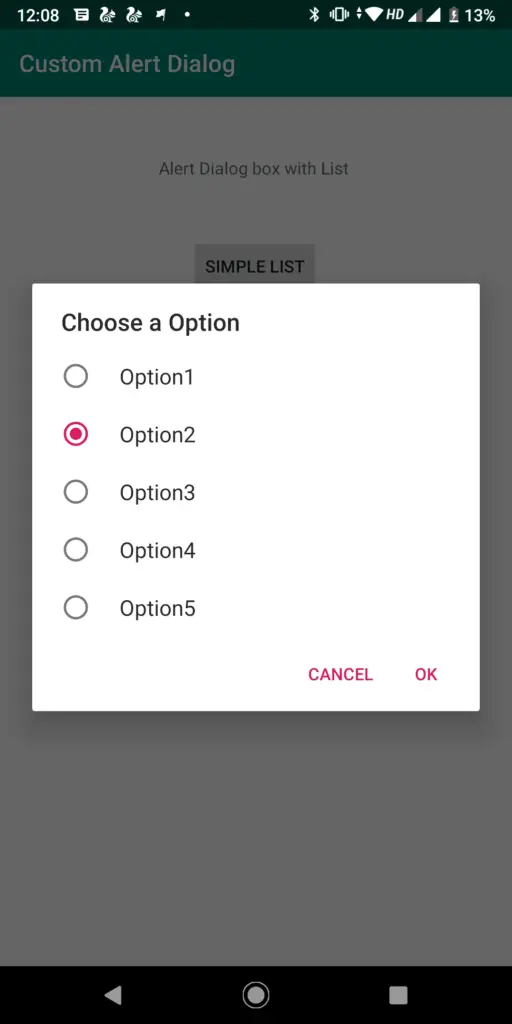
Radio button single-choice Android alert Dialog list.
Radio button alert dialog list options
The Best advantage of the radio button list over a Simple traditional list is that the user will be able to check which is the default selected option in the list where as in Traditional list their is no default option.
The way to make a radio button list is to use setSingleChoiceItems.
Call the below code on button Click.
public  void radiolistDialog()
    {
        // setup the alert builder
        AlertDialog.Builder builder = new AlertDialog.Builder(MainActivity.this);
        builder.setTitle("Choose a Option");
// add a radio button list
        final String[] selectedoption = {"Option1", "Option2", "Option3", "Option4", "Option5"};
        int checkedItem = 1; // cow
        builder.setSingleChoiceItems(selectedoption, checkedItem, new DialogInterface.OnClickListener() {
            @Override
            public void onClick(DialogInterface dialog, int which) {
                // user checked an item
                Toast.makeText(MainActivity.this,"selected option: "+selectedoption[which],Toast.LENGTH_LONG).show();
                //here 'which' is the position selected
            }
        });
// add OK and Cancel buttons
        builder.setPositiveButton("OK", new DialogInterface.OnClickListener() {
            @Override
            public void onClick(DialogInterface dialog, int which) {
                // user clicked OK
            }
        });
        builder.setNegativeButton("Cancel", null);
// create and show the alert dialog
        AlertDialog dialog = builder.create();
        dialog.show();
    }
In Radiobutton list we can implement 2 kinds of buttons in alert dialog box i.e setPositiveButton() and setNegativeButton() with different actions.
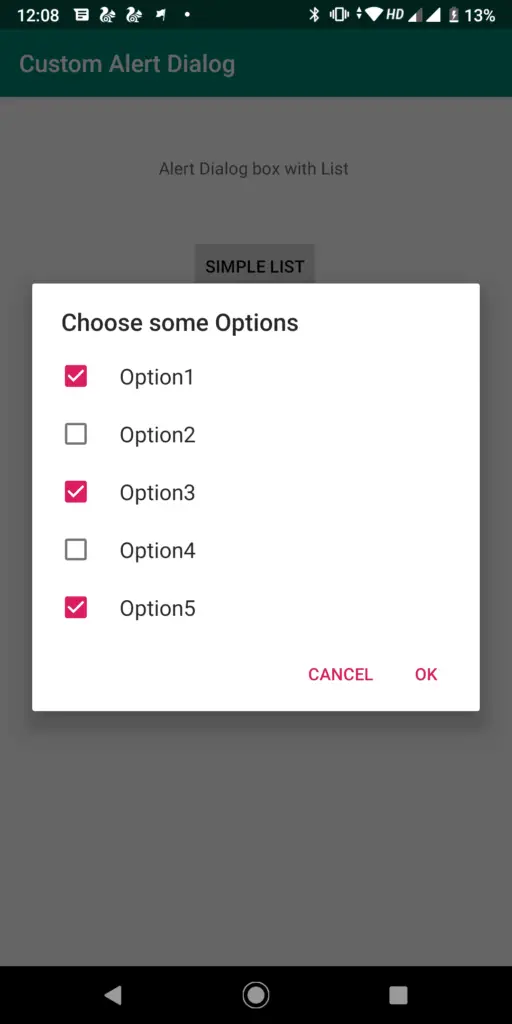
Checkbox list choice Android alert Dialog list.
setMultiChoiceItems alert dialog list
Here in Checkbox list alert dialog list user can select multiple option from the given options.
The way to make a checkbox list is to use setMultiChoiceItems.
public void checkboxlistDialog()
    {
        // setup the alert builder
        AlertDialog.Builder builder = new AlertDialog.Builder(MainActivity.this);
        builder.setTitle("Choose some Options ");
        // add a checkbox list
        String[] selectedoption = {"Option1", "Option2", "Option3", "Option4", "Option5"};
        final boolean[] checkedItems = {true, false, false, false, false};
        builder.setMultiChoiceItems(selectedoption, checkedItems, new DialogInterface.OnMultiChoiceClickListener() {
            @Override
            public void onClick(DialogInterface dialog, int which, boolean isChecked) {
                // user checked or unchecked a box


            }
        });
// add OK and Cancel buttons
        builder.setPositiveButton("OK", new DialogInterface.OnClickListener() {
            @Override
            public void onClick(DialogInterface dialog, int which) {
                // user clicked OK
            }
        });
        builder.setNegativeButton("Cancel", null);
// create and show the alert dialog
        AlertDialog dialog = builder.create();
        dialog.show();
    }
Complete Source Code android Alert Dialog with list of options
package protocoderspoint.com.customalertdialog;

import androidx.appcompat.app.AlertDialog;
import androidx.appcompat.app.AppCompatActivity;

import android.content.DialogInterface;
import android.os.Bundle;
import android.view.View;
import android.widget.Button;
import android.widget.Toast;

public class MainActivity extends AppCompatActivity {

    Button simplelist,radiolist,checkboxlist;
    @Override
    protected void onCreate(Bundle savedInstanceState) {
        super.onCreate(savedInstanceState);
        setContentView(R.layout.activity_main);
        simplelist=(Button)findViewById(R.id.listdialog1);
        radiolist=(Button)findViewById(R.id.radiolist);
        checkboxlist=(Button)findViewById(R.id.checkboxlist);
     simplelist.setOnClickListener(new View.OnClickListener() {
            @Override
            public void onClick(View view) {
                simplelistDialog();
            }
        });

     radiolist.setOnClickListener(new View.OnClickListener() {
         @Override
         public void onClick(View view) {
             radiolistDialog();
         }
     });

     checkboxlist.setOnClickListener(new View.OnClickListener() {
         @Override
         public void onClick(View view) {
             checkboxlistDialog();
         }
     });
    }

    public void simplelistDialog()
    {
        // setup the alert builder

        AlertDialog.Builder builder = new AlertDialog.Builder(MainActivity.this);
        builder.setTitle("Choose an Option");

        // add a list

        String[] options = {"Option1", "Option2", "Option3", "Option4", "Option3"};

        //Pass the array list in Alert dialog
        builder.setItems(options, new DialogInterface.OnClickListener() {
            @Override
            public void onClick(DialogInterface dialog, int which) {
                switch (which) {
                    case 0: // Select option task
                    case 1: // Config it as you need here
                    case 2:
                    case 3:
                    case 4:
                }
            }
        });
// create and show the alert dialog
        AlertDialog dialog = builder.create();
        dialog.show();
    }

    public  void radiolistDialog()
    {
        // setup the alert builder
        AlertDialog.Builder builder = new AlertDialog.Builder(MainActivity.this);
        builder.setTitle("Choose a Option");
// add a radio button list
        final String[] selectedoption = {"Option1", "Option2", "Option3", "Option4", "Option5"};
        int checkedItem = 1; // cow
        builder.setSingleChoiceItems(selectedoption, checkedItem, new DialogInterface.OnClickListener() {
            @Override
            public void onClick(DialogInterface dialog, int which) {
                // user checked an item
                Toast.makeText(MainActivity.this,"selected option: "+selectedoption[which],Toast.LENGTH_LONG).show();
                //here 'which' is the position selected
            }
        });
// add OK and Cancel buttons
        builder.setPositiveButton("OK", new DialogInterface.OnClickListener() {
            @Override
            public void onClick(DialogInterface dialog, int which) {
                // user clicked OK
            }
        });
        builder.setNegativeButton("Cancel", null);
// create and show the alert dialog
        AlertDialog dialog = builder.create();
        dialog.show();
    }

   public void checkboxlistDialog()
    {
        // setup the alert builder
        AlertDialog.Builder builder = new AlertDialog.Builder(MainActivity.this);
        builder.setTitle("Choose some Options ");
        // add a checkbox list
        String[] selectedoption = {"Option1", "Option2", "Option3", "Option4", "Option5"};
        final boolean[] checkedItems = {true, false, false, false, false};
        builder.setMultiChoiceItems(selectedoption, checkedItems, new DialogInterface.OnMultiChoiceClickListener() {
            @Override
            public void onClick(DialogInterface dialog, int which, boolean isChecked) {
                // user checked or unchecked a box


            }
        });
// add OK and Cancel buttons
        builder.setPositiveButton("OK", new DialogInterface.OnClickListener() {
            @Override
            public void onClick(DialogInterface dialog, int which) {
                // user clicked OK
            }
        });
        builder.setNegativeButton("Cancel", null);
// create and show the alert dialog
        AlertDialog dialog = builder.create();
        dialog.show();
    }
}
In This post as you know we are learning how to implement a scan qr code in android android studio where we are making use of zbar or zxing any of this you can user as both of them are similar.
I am making use of zbar library scan qr code android-studio.
Introduction on QR Code
Each and Every barcode contains unique identity number format which are used to represents the product id based. Using this qr code scanner app, you will be able to find out that id from the barcode/qr code by scanning it.
In the end of this tutorial, our Android app will be able to scan both Barcode as well as QRCode.
qr scanner app for android-studio full source code.
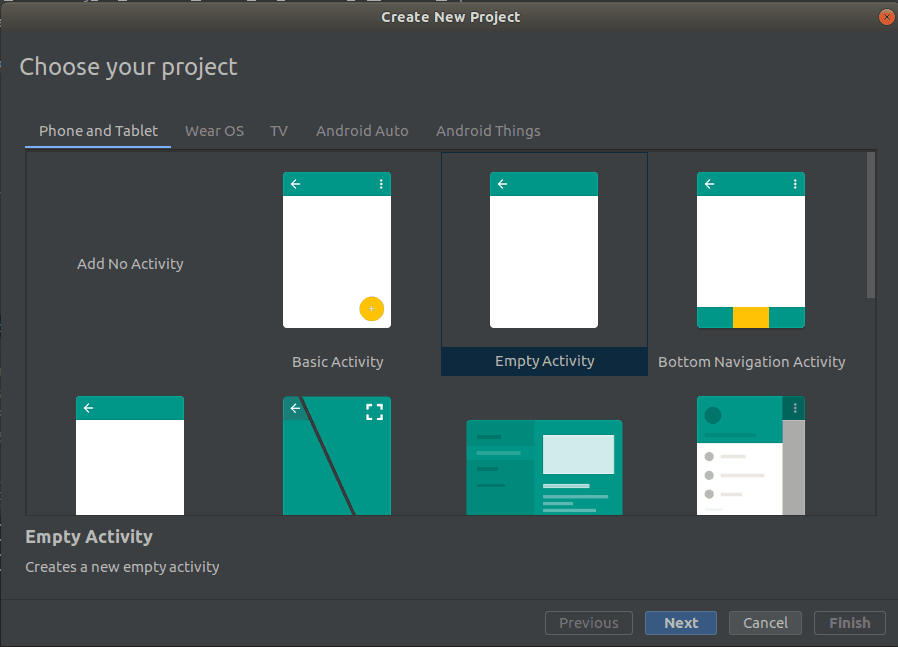
Create a new project in Android Studio.
When you are creating a new qr code project, select empty activity as a default activity in android-studio.
File>new Project > select Empty Activity >Give a Project Name
Add dependencies in build.gradle(Module:app) file
Add the following dependency to your build.gradle (Module : app) file.
Here Button will open a new activity with camara for scanning a bar code or QR code a and After successful scanning, system will enter the value of the barcode or QR code in the textview.
In the above MainActivity.java code we have to initialize a textview and button.
On Button click we are loading a new scanActivity.java code using Intent method. In short Here we will open ScanActivity on the button click.
Opening new activity ScanActivity.java in android studio
Now go to File->New->Activity->Empty Activity and give name of activity as ScanActivity.
Add below code to ScanActivity.java
package protocoderspoint.com.qrcodescannerapp;
import android.os.Bundle;
import android.util.Log;
import android.widget.Toast;

import androidx.appcompat.app.AppCompatActivity;

import me.dm7.barcodescanner.zbar.ZBarScannerView;

public class ScanActivity extends AppCompatActivity implements ZBarScannerView.ResultHandler {
    private ZBarScannerView mScannerView;

    //camera permission is needed.

    @Override
    public void onCreate(Bundle state) {
        super.onCreate(state);
        mScannerView = new ZBarScannerView(this);    // Programmatically initialize the scanner view
        setContentView(mScannerView);                // Set the scanner view as the content view
    }

    @Override
    public void onResume() {
        super.onResume();
        mScannerView.setResultHandler(this); // Register ourselves as a handler for scan results.
        mScannerView.startCamera();          // Start camera on resume
    }

    @Override
    public void onPause() {
        super.onPause();
        mScannerView.stopCamera();           // Stop camera on pause
    }

    @Override
    public void handleResult(me.dm7.barcodescanner.zbar.Result result) {
        // Do something with the result here
        Log.v("Result 1", result.getContents()); // Prints scan results
        Log.v("Result 2", result.getBarcodeFormat().getName()); // Prints the scan format (qrcode, pdf417 etc.)
        MainActivity.tvresult.setText(result.getContents());
        onBackPressed();

        // If you would like to resume scanning, call this method below:
        //mScannerView.resumeCameraPreview(this);
    }
}
Here is Brief Description on ScanActivity.java
In onCreate() method, we have set view as scannerview instead of xml file layout Because we are using Zbar QR Code Library.
In onResume() method, we have set the resulthandler and started camera preview.
In onPause() method, we are stopping camera preview.
Explaining handleResult() method of Zbar and zxing QR Code scanner
@Override
    public void handleResult(me.dm7.barcodescanner.zbar.Result result) {
        // Do something with the result here
        Log.v("kkkk", result.getContents()); // Prints scan results
        Log.v("uuuu", result.getBarcodeFormat().getName()); // Prints the scan format (qrcode, pdf417 etc.)

        MainActivity.tvresult.setText(result.getContents());
        onBackPressed();

        // If you would like to resume scanning, call this method below:
        //mScannerView.resumeCameraPreview(this);
    }
As you can see in above code, we get result object which contains Data of Barcode or QRcode after scanning is completed.
We will get the final result by running result.getContents() method. This method returns the value of barcode in text format.
we have set this barcode text into TextView of MainActivity.
onBackPressed() method will return the user to the Main Activity.
So This Tutorial was all about scan barcode and QRcode programmatically in android studio example. Thank you
QR code reader/scanner android source code download
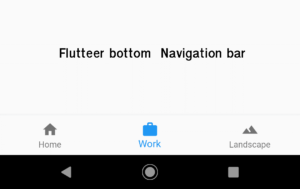
How to use the Flutter Bottom Navigation Bar in Flutter using android studio tuturial.
In this Post we’re going to be adding Flutter’s Bottom Navigation Bar to an app. Here i am making use of android-studio to write flutter codes.
if you don’t know what acutally / how Bottom Navigation bar looks like in Flutter I’m referring to just look at the picture pasted below.
This is how we are going to build an flutter app with has bottom Navigation bar.
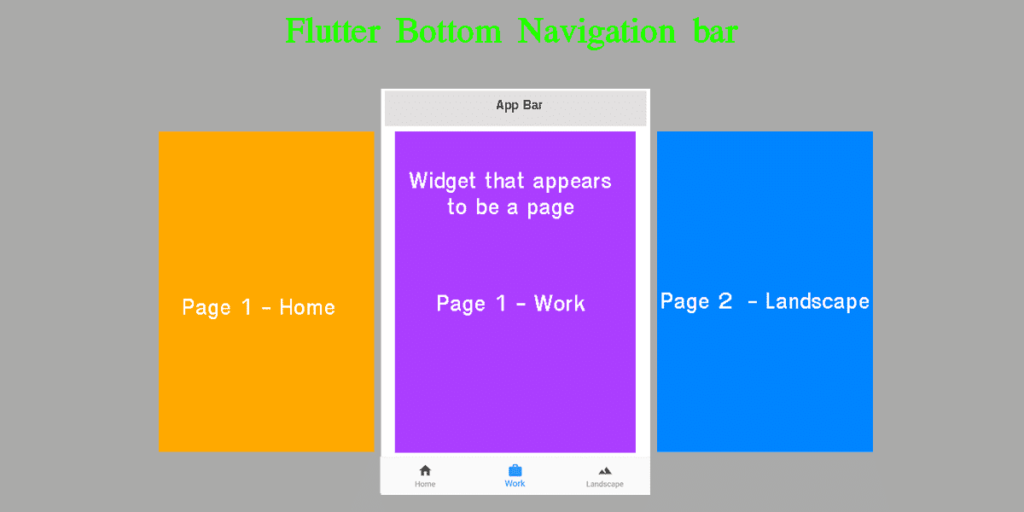
Instead, you’re switching out a over all group of content within a single page to give the appearance that the page is changing.Here is a illustration to visually describe what we’re doing. Not that the overall “scaffolding”, as Flutter calls it, stays the same and the contents within the page change.
Device Screen with bottom navigation bar in flutter with 3 navigation tabs as shown.
So Let’s begin with Creating a new Flutter project for Bottom Navigation bar Implementation .
I am making Use of android studio to write my flutter code.
File >New > New Flutter Project
First We need to start by changing the MyApp widget in main.dart to be a Stateful widget. We need to do this because we will be storing which tab the user is currently on within our state.
After you’ve done that you need to, create the BottomNavigationBar inside the Scaffold widget. It might seem to be little confusing for beginner learner of flutter but no need to worry the complete will given below in the end of this post.
Then, set the currentIndex property of the BottomNavigationBar widget to a variable.
currentIndex: selectedPage,
Now create an integer variable with the same name you set in currentIndex . Set this at the top of the state.
int selectedPage = 0;
Last, create anlist of array variable that holds all the widgets that will be loaded depending on which bottom navigation bar button the user taps on (note the order here matters and should be the same as the buttons).
final _pageOptions = [
    Home(),
    Work(),
    Landpage()
  ];
All codes together looks something like this.
The Complete Flutter bottom Navigation Bar Tutorial.
install flutter plugin in android studio and run your first hello world program
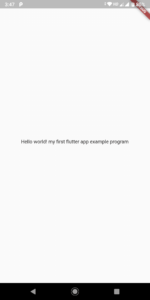
If your are new in flutter app development, then you are in the right place to learn more about flutter and build your own First Flutter App which simply display a Text ” HELLO WORLD ” in your mobile screen.
Installing Flutter SDK in your PC
Installing and running Flutter couldn’t have been more straightforward. The official docs will get you through that. Once you’re done you can run the following command to make sure you’re all set.
Hope you have set all the requirement properly else you can learn how to install flutter and set environment variable PATH. Flutter SDK PATH Set.
Check if the flutter plugin is been installed or you need to install flutter plugin in android studio. Follow below steps in android studio.
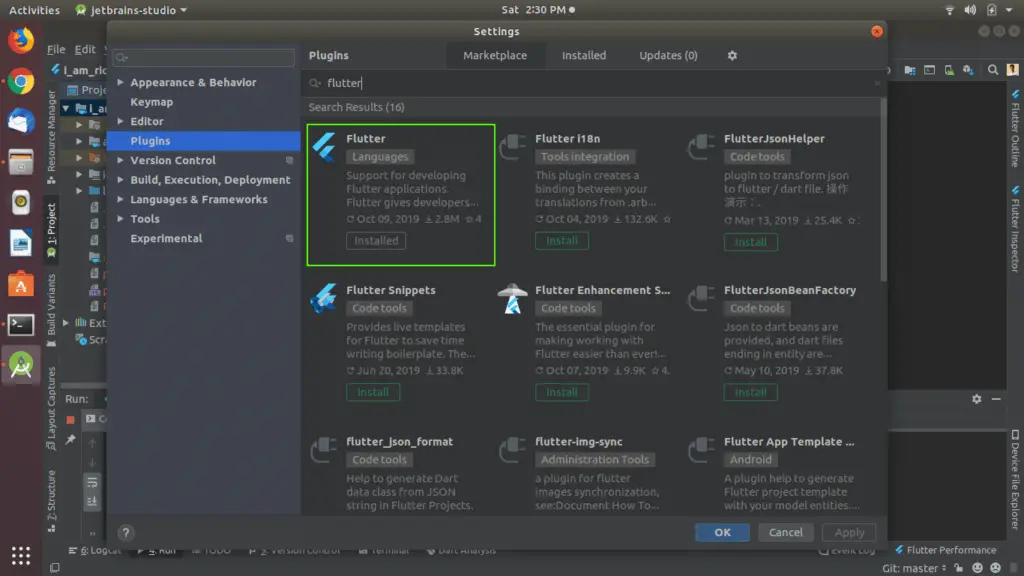
Installing Flutter Plugin in android studio
File > Settings
After navigating to settings in android studio will you get a pop-up window.
Adding Flutter Plugin in android-studio
In pop-up settings window select a option called Plugin and search in the search box “Flutter” and install the plugin as shown in the above highlighted image.
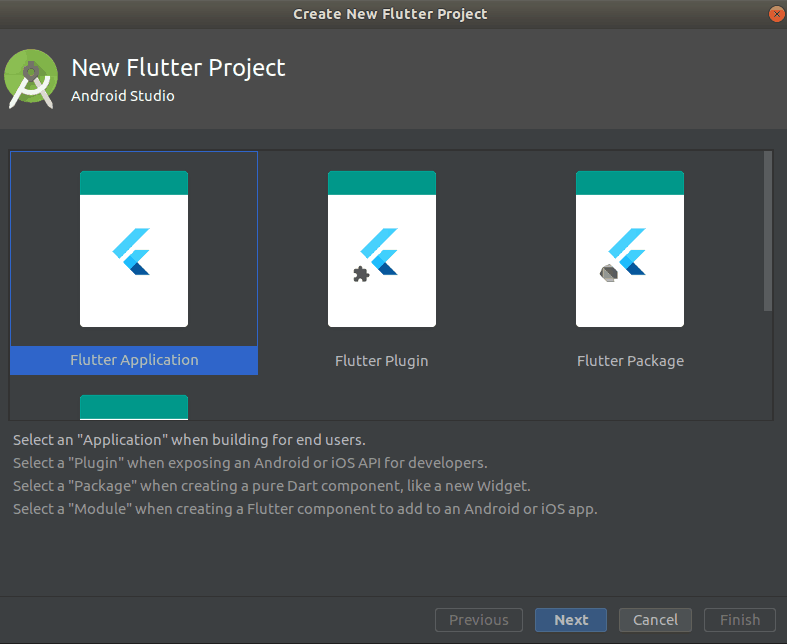
Creating flutter project in android studio.
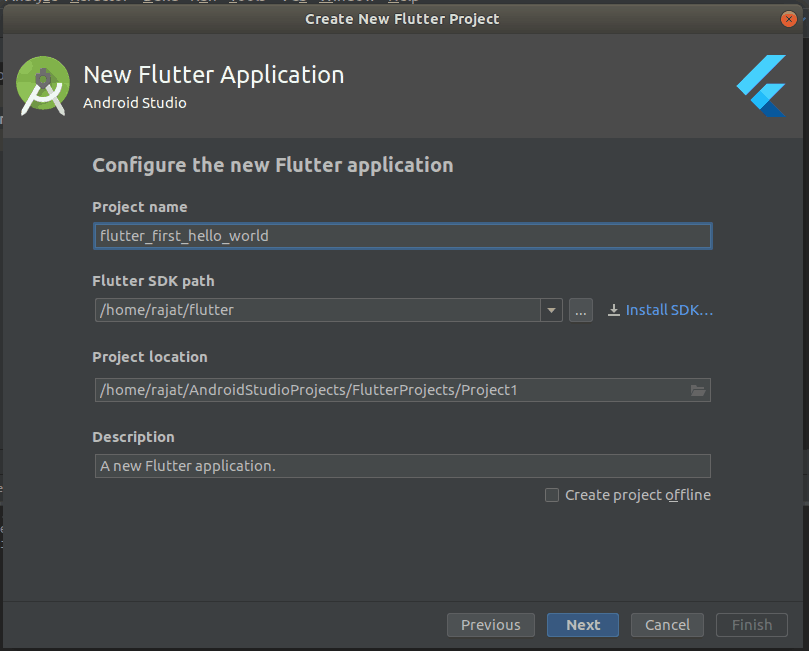
File > New > New Flutter Project
Select an “Application” when Building for end Users.
my first flutter hello world program in android studio
Give a name to you project “Flutter_first_hello_world”.
Choice a Flutter SDK path, select the project location and click the next Button.
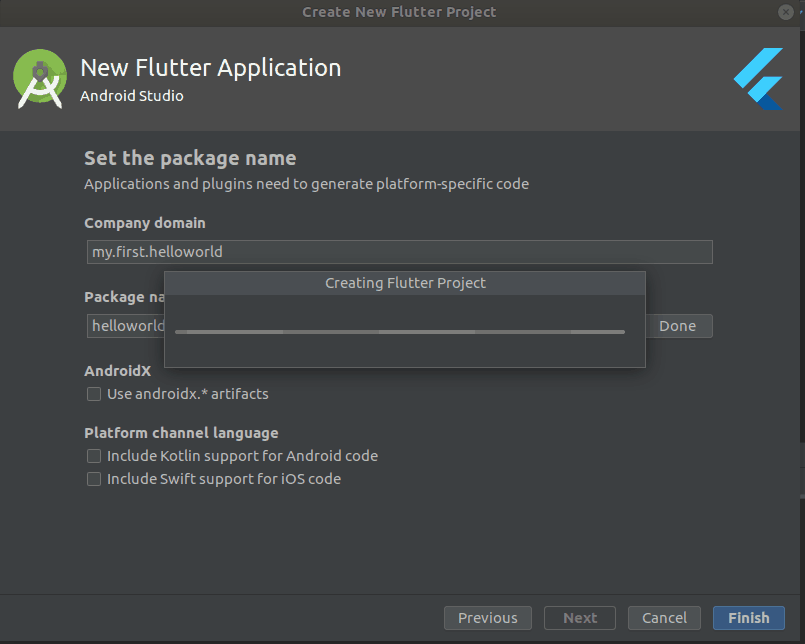
Set a Unique Package Name for the project, this describes a Unique Name for your First Flutter App project.
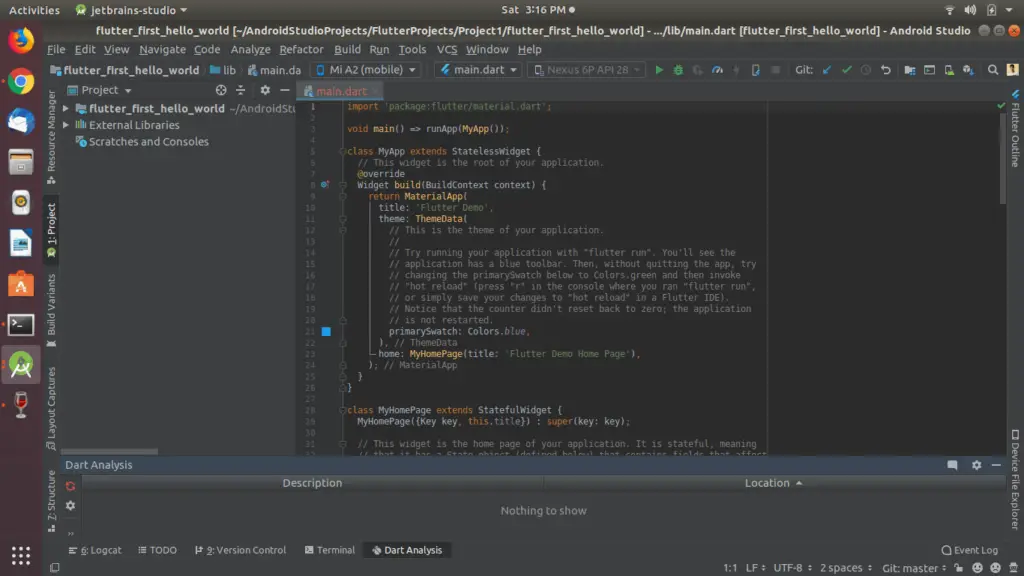
Once the project is created, it should have the following structure:
Creating a First Flutter App Hello World
Creating a Hello World app will require working with only 1 file: main.dart
First of ALL DELETE all the Default Codes from main.dart file. This will give you a error in you project dashboard i.e test folder, you need to Delete the entire test folder.
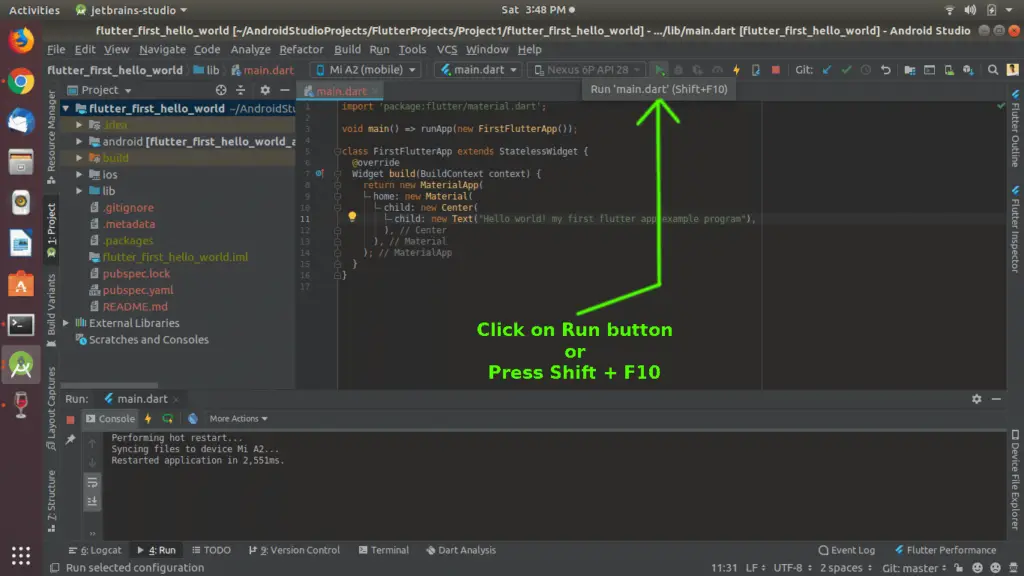
Copy the Below line of code in main.dart
First Flutter App in Android Studio
import 'package:flutter/material.dart';

void main() => runApp(new FirstFlutterApp());

class FirstFlutterApp extends StatelessWidget {
  @override
  Widget build(BuildContext context) {
    return new MaterialApp(
      home: new Material(
        child: new Center(
          child: new Text("Hello world! my first flutter app example program"),
        ),
      ),
    );
  }
}
Let’s go through this code step by step.
import 'package:flutter/material.dart';
In Flutter almost everything is a widget, widgets are the building blocks of Flutter apps, and luckily a variety of widgets are offered by Flutter:
Buttons, input fields, lists, tables, dialogs, tab bars, card views, … You name it!. In the Above import we’re importing the library material.dart containing a rich set of material widgets that implement the material design guidelines.
void main() => runApp(new FirstFlutterApp());
The main function is the entry point to the app. Same a main in C Program language.
Text (text field widget) few widget offered by flutter.
Each widget has a set of attributes (some mandatory, others optional) that describe composition (home, child, children), visual aspects (decoration, position, styling) and behavior(on click listener). As you spend more time building with Flutter, you’ll get to experiment with more widgets and you’ll run into more use cases where you’ll need to implement other attributes.
Running your First Flutter App in android Studio
click on run button or press Shift +F10
finally App will run in you mobile device as shown below