
A widget that provides a canvas for drawing on during the paint phase. To paint in Flutter, use the CustomPaint widget, which basically takes the size of its parent if the child is not provided. Two methods are overridden by the CustomPaint subclass: paint() and shouldRepaint().
What is the CustomPaint in flutter ?
Flutter allows developers to use every pixel on the screen and draw custom shapes. This has been one of Flutter’s main selling points. We use the Custom Paint class to accomplish this.
Custom Paint is a Flutter SDK widget that allows you to draw various shapes on a canvas.
Characteristics of Custom Paint:
This are characteristic of flutter custom paint widget:
painter: The painter who paints before the child. Create a class that extends CustomPaint in this case.
size: The size of this CustomPaint is initially equal to Size.zero, which means that if you do not define a size or a child, the CustomPaint will not appear.
foregroundPainter: The painter who paints after the children. It also requires a class that extends Custom Painter.
child: The widget below this widget tree.
basic syntax:
CustomPaint(
  painter: ,
  foregroundPainter: ,
  size: ,
  child: ,
)
You have two options when using CustomPaint: specify a size property without a child or use the child property with a widget.
What is the Importance of using Custom Paint in Flutter:
Custom Paint essentially ensures the UI design of those components that cannot be derived from the regular shapes provided by Flutter. It means that you can draw your own shapes by using it. This widget distinguishes flutter from its competitors in terms of customizability. Custom Paint is: A widget that serves as a canvas for drawing during the paint phase.
To paint in Flutter, use the Custom Paint widget, which basically takes the size of its parent if the child is not provided.
How to use CustomPainter in a class
Two methods are overridden by the Custom Paint subclass: paint() and shouldRepaint() .
class Rectangle extends CustomPainter {
  @override
  void paint(Canvas canvas, Size size) {
    /// implement paint here
  }

  @override
  bool shouldRepaint(covariant CustomPaint oldDelegate) {
    /// implement shouldRepaint
    throw UnimplementedError();
  }
}
As shown above, the paint() method will be called whenever the object needs to be repainted, and it will take two parameters: Canvas and Size. As we will see later, the Canvas class is used to create various shapes, and the Size method returns the size of this canvas, which includes both the height and width properties that you can use when creating shapes.
When a new instance of the CustomPaint is created, the shouldRepaint() method is called. If the new instance’s property value is always the same, the method can simply return false.
The paint() function returns the Canvas instance, which we can then use to call the drawing functions. It also gives us the canvas size, which is either the child size or the size parameter.
Next, let’s look at the actual drawing logic by investigating the Canvas class.
Painting On Canvas
Most people who have used the CustomPaint widget a few times should be familiar with what has been shown thus far. In this section, we’ll look at drawing on a canvas and all of the possibilities it provides.
All of the drawing will be done within the CustomPaint’s paint() method.
Painting classes that are commonly used
Paint
The paint class stores information about painting or drawing objects on the screen. Here are a few key characteristics:
color: Determines the color of the painting.
strokeWidth: The thickness of each drawn line stroke
var paint = Paint()
      ..color = Colors.yellow
      ..strokeWidth = 20.0;
Rect
A Rect class generates a virtual rectangle with width and height, which is typically used to draw an actual rectangle or set bounds for a shape inside. A Rect can be made in a variety of ways, including:
Rect.fromCenter(
      center: Offset(100, 100),
      width: 50,
      height: 80,
    );
Path
The Flutter Custom Paint includes functions for drawing common shapes like circles and rectangles. Paths, on the other hand, allow us to trace out custom shapes when we need to draw them.
  Path()
      ..moveTo(0, 0)
      ..lineTo(100, 100)
      ..lineTo(0, 100)
      ..lineTo(0, 0);
Flutter Custom Paint Widget Example
Let’s start drawing using CustomPaint
Draw a Rectangle
Before you can add shapes to the canvas, you must first understand the coordinates. The canvas will have coordinates (0,0) in the upper left corner, as in the web, and coordinates (max width,0) in the upper right corner. The coordinates (0,max height) will be in the lower left corner, while the coordinates (max width,max height) will be in the lower right corner.
To draw a rectangle, we must first create a Flutter Custom Paint widget:
CustomPaint(
    size: Size(size.width * 0.5, size.height * 0.1),
    painter: Rectangle(),
)
We give the Flutter Custom Paint its own size here, so the canvas will fit within that size. The Rectangle class must then be created:
 bool? isFilled;
  Rectangle({this.isFilled});
  @override
  void paint(Canvas canvas, Size size) {
    Paint paint = Paint();
    paint.color = Colors.shade900;
    if(isFilled != null){
      paint.style = PaintingStyle.fill;
    }
    else {
      paint.style = PaintingStyle.stroke;
    }
    paint.strokeCap = StrokeCap.round;
    paint.strokeJoin = StrokeJoin.round;
    paint.strokeWidth = 5;
    Offset offset = Offset(size.width * 0.5, size.height);

    Rect rect = Rect.fromCenter(center: offset, width: 50, height: 50);
    canvas.drawRect(rect, paint);
  }

  @override
  bool shouldRepaint(covariant Rectangle oldDelegate) {
    return false;
  }
This would result in the following:
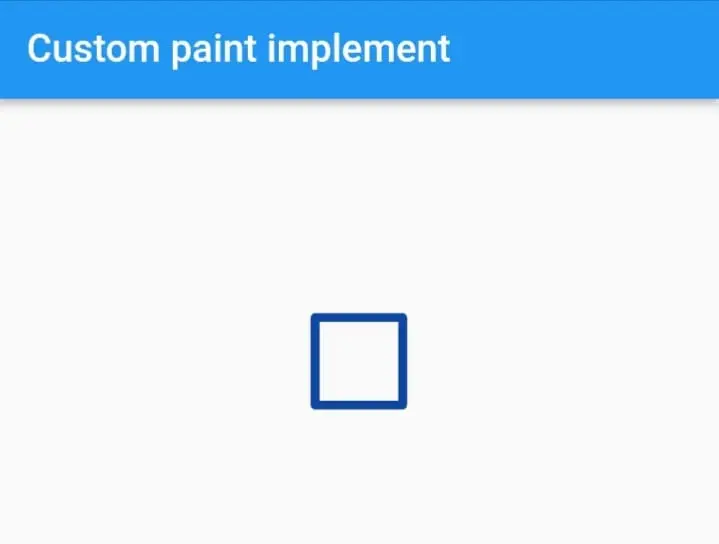
If we look at the code above, we can see that we are first using the Paint class, which is used to style the canvas. We give it the color blue, and because isFilled is null, PaintingStyle.stroke is used to paint the rectangle’s edges, and we also give it the Paint object width 5. Then we make an Offset that is half the width and height of the canvas. Following that, we create the Rect object by calling Rect.fromCenter, which constructs a rectangle based on its center point, width, and height. Finally, we invoke the drawRect method, passing it the arguments rect and paint.
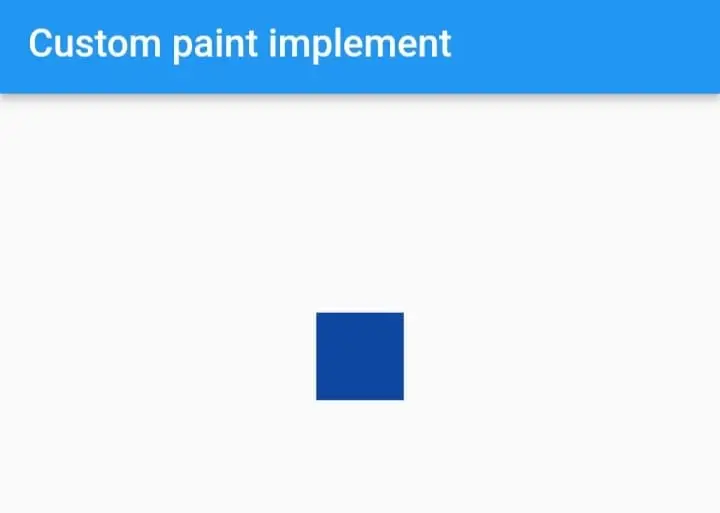
Another option is to use the Flutter Custom Paint widget’s child property:
CustomPaint(
    child: Container(child: const Text("Hello World!"),),
    painter: Rectangle(isFilled: true),
),
The canvas would now be the size of the Container, and because we’re using the painter property, the text would appear above the rectangle. You must use the foregroundPainter property if you want the text to appear behind the rectangle.
This would result in the following:
Drawing a Line
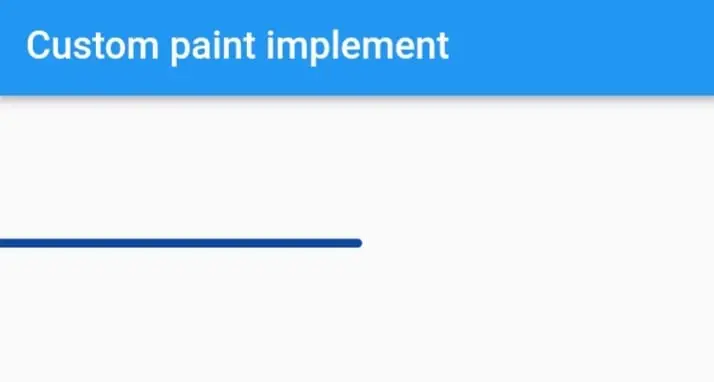
To draw a line without using the Flutter Custom Paint widget, you must also create another class that extends the Flutter Custom Paint class:
  @override
  void paint(Canvas canvas, Size size) {
    Paint paint = Paint();
    paint.color = const Colors.blue.shade900;
    paint.strokeWidth = 5;
    paint.strokeCap = StrokeCap.round;

    Offset startingOffset = Offset(0, size.height);
    Offset endingOffset = Offset(size.width, size.height);

    canvas.drawLine(startingOffset, endingOffset, paint);
  }

  @override
  bool shouldRepaint(covariant CustomPainter oldDelegate) {
    return false;
  }
We also use the Paint object to style the Line in this case, and we give it a width of 5. Then we need to make a starting point and an ending point to represent the beginning and end of the line. So, we specify that the starting point must be on the X-axis with coordinate 0 and the Y-axis with maximum height, while the end point must be on the X-axis with maximum width and the Y-axis with maximum height, resulting in a straight horizontal line.
This would result in the following:
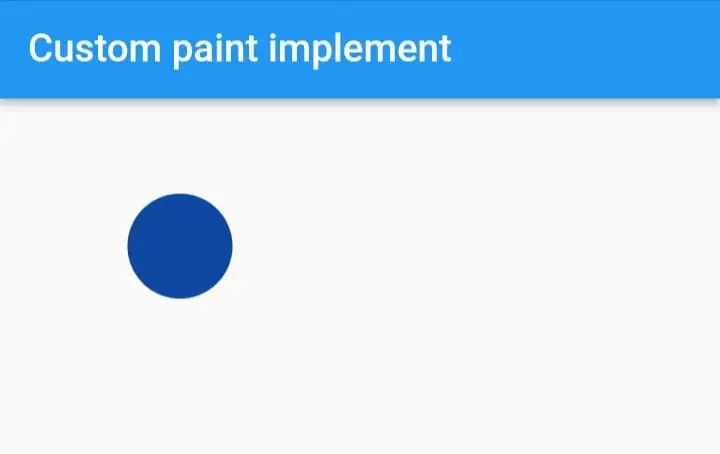
Drawing a Circle
You can draw a circle on the canvas object by calling the drawCircle() method:
@override
  void paint(Canvas canvas, Size size) {
    Paint paint = Paint();
    paint.color = Colors.blue.shade900;
    paint.style = PaintingStyle.fill;
    paint.strokeCap = StrokeCap.round;
    paint.strokeJoin = StrokeJoin.round;

    Offset offset = Offset(size.width * 0.5, size.height);
    canvas.drawCircle(offset, 30, paint);
  }

  @override
  bool shouldRepaint(covariant CustomPainter oldDelegate) {
    return false;
  }
As with the other shapes, we style the canvas with the Paint object and then use the Offset object to determine the position of the circle in relation to the size of the canvas.
This would result in the following:
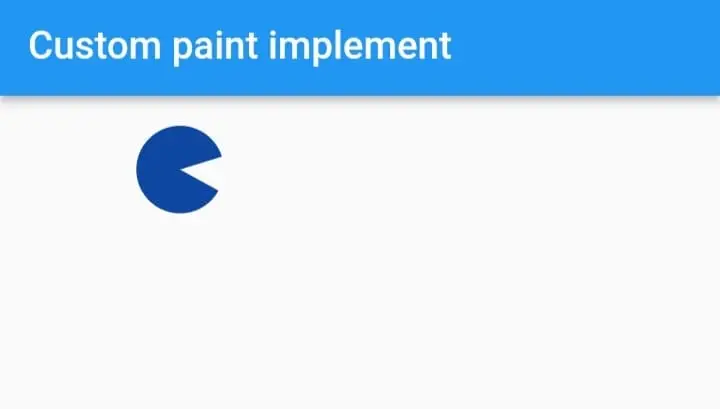
Drawing an arc
Using the canvas, we can draw an arc of a circle. drawArc() is a method for drawing an arc. This simplifies the creation of Pacman:
void paint(Canvas canvas, Size size) {
    var center = size / 2;
    var paint = Paint()..color = Colors.yellow;

    canvas.drawArc(
      Rect.fromCenter(
        center: Offset(center.width, center.height),
        width: 50,
        height: 50,
      ),
      0.5,
      2 * pi - 0.8,
      true,
      paint,
    );
  }
This would result in the following:
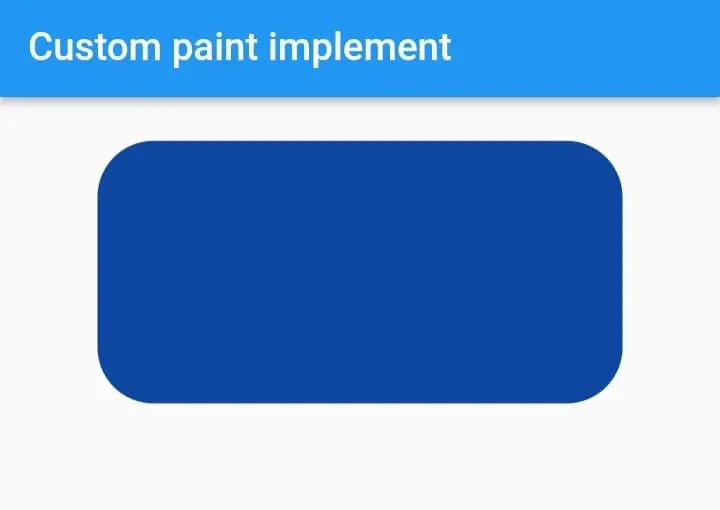
Drawing Rounded Rectangles
Round Rectangle(RR), like the Rect class, represents rounded rectangles in Flutter. This class contains information about the corner radii as well as basic rectangle information. If all corner radii are the same, you can use a normal Rect and the corner radius to create a rounded rectangle. The final rounded rectangle is painted to the screen by the drawRRect() method:
 @override
void paint(Canvas canvas, Size size) {
  var center = Offset(size.width/2, size.height/2);
  var roundedRectangle = RRect.fromRectAndRadius(
    Rect.fromCenter(center: center, width: 300.0, height: 150.0),
    const Radius.circular(32.0),
  );
  var paint = Paint()
    ..color = Colors.blue.shade900
    ..style = PaintingStyle.fill;
  canvas.drawRRect(roundedRectangle, paint);
}
This would result in the following:
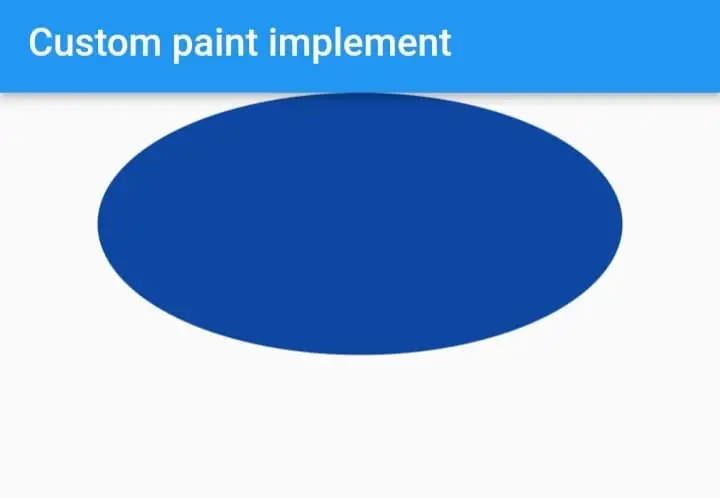
Drawing Ovals
Ovals are more difficult to draw than circles because they can take on a variety of shapes and sizes. You can use the same Rect class as before to define the oval’s boundaries and the drawOval() method to paint it on the screen:
@override
void paint(Canvas canvas, Size size) {
  var center = Offset(size.width/2, size.height/2);
  var rectangle = Rect.fromCenter(center: center, width: 300.0, height: 150.0);
  var paint = Paint()..color = Colors.blue.shade900..style = PaintingStyle.fill;
  canvas.drawOval(rectangle, paint);
}
This would result in the following:
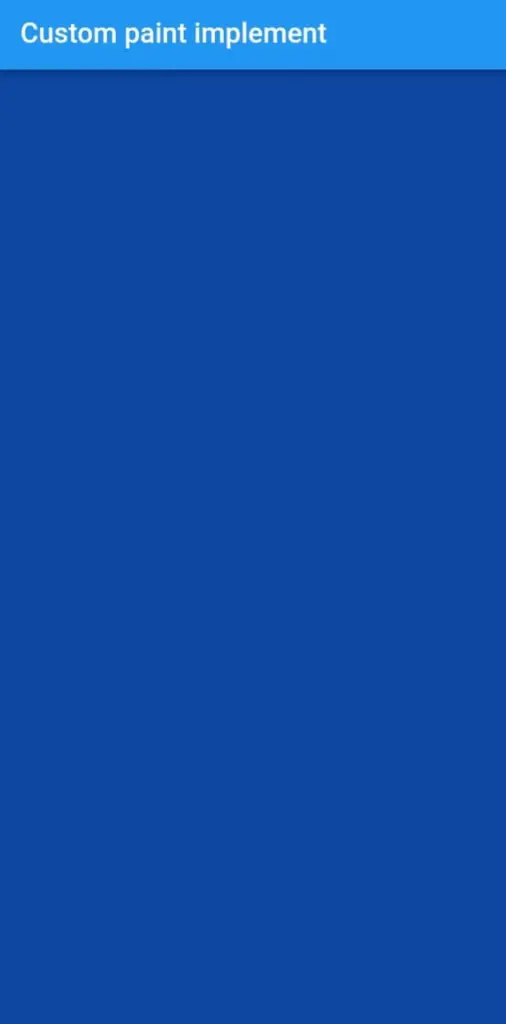
Drawing Paint
The Canvas class’s drawPaint() method simply paints the entire canvas with the given paint:
@override
void paint(Canvas canvas, Size size) {
  var paint = Paint()..color = Colors.blue;
  canvas.drawPaint(paint);
}
This would result in the following:
Drawing Color
While the drawColor() method appears to be similar to the previous method in that paint is applied to the entire canvas, it differs in that this method adds a ColorFilter to the canvas rather than simply painting the entire canvas one color. You can also specify the BlendMode to control how the new color and the color on the existing canvas blend together. The code is as follows:
@override
void paint(Canvas canvas, Size size) {
  canvas.drawPaint(Paint()..color = Colors.blue);
  canvas.drawColor(Colors.purple, BlendMode.plus);
}
This would result in the following:
This matches the existing content on the canvas:

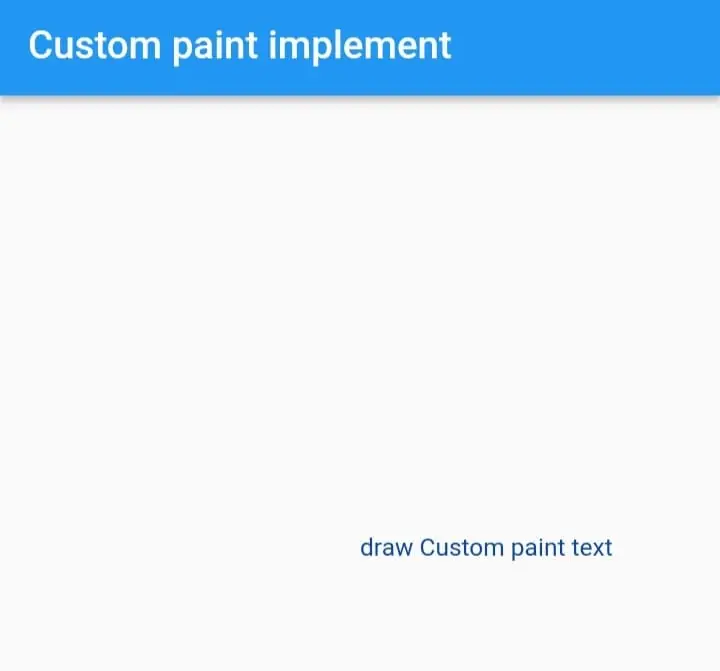
Drawing Text
A call to drawParagraph() is hidden deep within the Text widget and finally paints the given text on the screen. The majority of what the Text widget does is related to layout and sizing rather than text rendering. Here’s a simple example of painting ‘Demo Text’ on the screen:
@override
void paint(Canvas canvas, Size size) {
  var center = size / 2;
  var style = const TextStyle();

  final ui.ParagraphBuilder paragraphBuilder = ui.ParagraphBuilder(
    ui.ParagraphStyle(
      fontSize: style.fontSize,
      fontFamily: style.fontFamily,
      fontStyle: style.fontStyle,
      fontWeight: style.fontWeight,
      textAlign: TextAlign.justify,
    ),
  )
    ..pushStyle(style.getTextStyle())
    ..addText('Draw custom paint  text');
  final ui.Paragraph paragraph = paragraphBuilder.build()
    ..layout(ui.ParagraphConstraints(width: size.width));
  canvas.drawParagraph(paragraph, Offset(center.width, center.height));
This would result in the following:
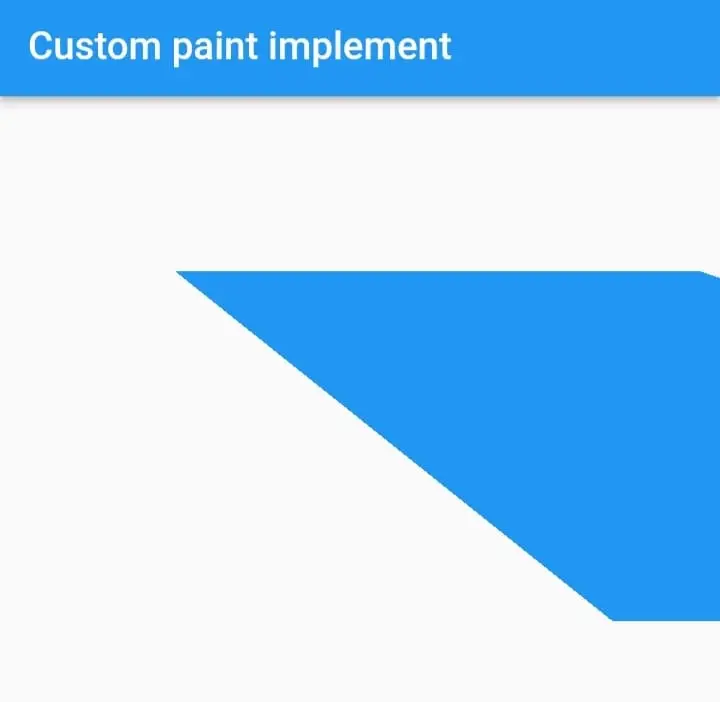
Drawing Vertices
The Canvas’s drawVertices() method is a convenient way to draw connected vertices, allowing you to easily create grids and patterns. The method can generate three types of patterns:
i) Triangles: Selects three adjacent points from the list, shapes them into a triangle, and then moves on to the next. (Each point is used only once.)
ii) Triangle Strip: Draws a triangle from each set of three adjacent points. (Each point may be used multiple times.)
iii) Triangle Fan: The first point serves as the center point, with each subsequent point serving as a triangle vertex. (In all triangles, the first vertex is used; all others may be used up to twice.)
@override
void paint(Canvas canvas, Size size) {
  var vertices = ui.Vertices(VertexMode.triangleStrip, [
    Offset(100, 100),
    Offset(200, 100),
    Offset(350, 300),
    Offset(400, 100),
    Offset(500, 300),
    Offset(700, 200),
  ]);
  canvas.drawVertices(
    vertices,
    BlendMode.plus,
    Paint()..color = Colors.blue,
  );
}
This would result in the following:
Adding Polygons
Polygons can be made by defining multiple points and then passing them along a path. addPolygon() is a method for adding polygons. The method also includes a boolean that can be used to specify whether the polygon should be closed after the final defined point. Here’s an illustration:
@override
void paint(Canvas canvas, Size size) {
    var path = Path();

  var points = [
        Offset(100, 100),
    Offset(150, 100),
    Offset(200, 200),
    Offset(150, 200),
    Offset(125, 125),
    ];

  path.addPolygon(points, true);
}
Git link :
https://github.com/Mitali8620/custom_paint_app_flutter.git
I hope this blog has given you enough information to experiment with custom paint in your flutter projects. Thank you for taking the time to read this article.
What if I’m mistaken? Please let me know in the comments section. I’d like to improve.
Clap 👏 If you found this article useful.
The source code for the Flutter CustomPaint Demo is available on GitHub.
Thank you …have a Happy day!!
")


