
Hi Guys, Welcome to Proto Coders Point, In this android tutorial we will build an application that can recognize text in image with Firebase ML Kit.
Introduction to Firebase Machine Learning(ML) Kit
Firebase ML Kit is an mobile SDK that helps you in building an android or iOS apps that can help developer to add Machine Learning feature into there mobile application, This ML Kit is very powerfull and very easy to use.
Whether you’re new to Machine Learning or you have experienced in ML, you can easily implement the ML functionality that you need that too in just few lines of firebase ML Codes.
So as the title says that we gonna build an simple application that can read text from a image and display it to use.
RESULT OF FINAL OUTPUT OF APPLICATION
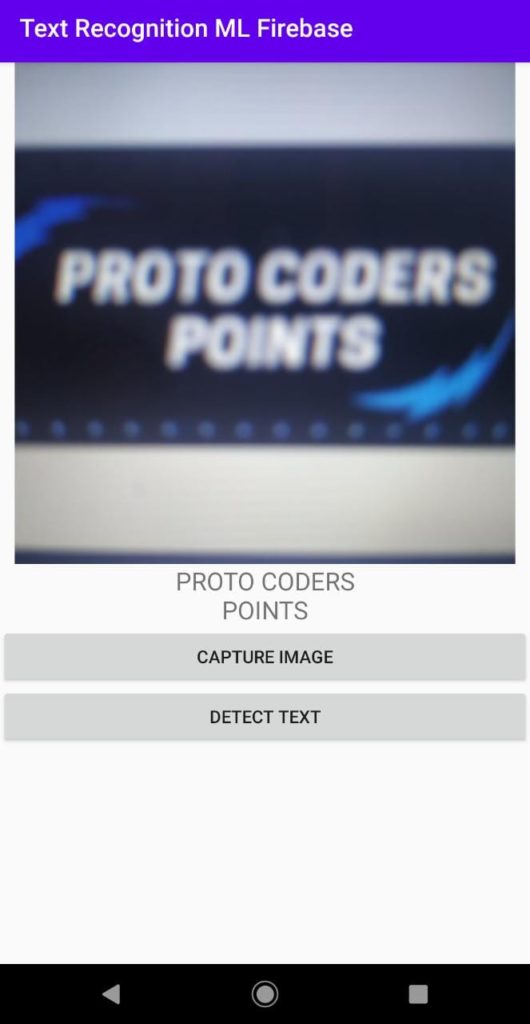
Firebase ML Kit text Recognition
Let’s start this Firebase ML Kit Android Project to read text from image, Just follow the below Steps
Step 1: Create a new android project in android studio
ofcourse you need to create a new android project or you may just open any existing android project
File > New > New Project ( here select Empty Activity )
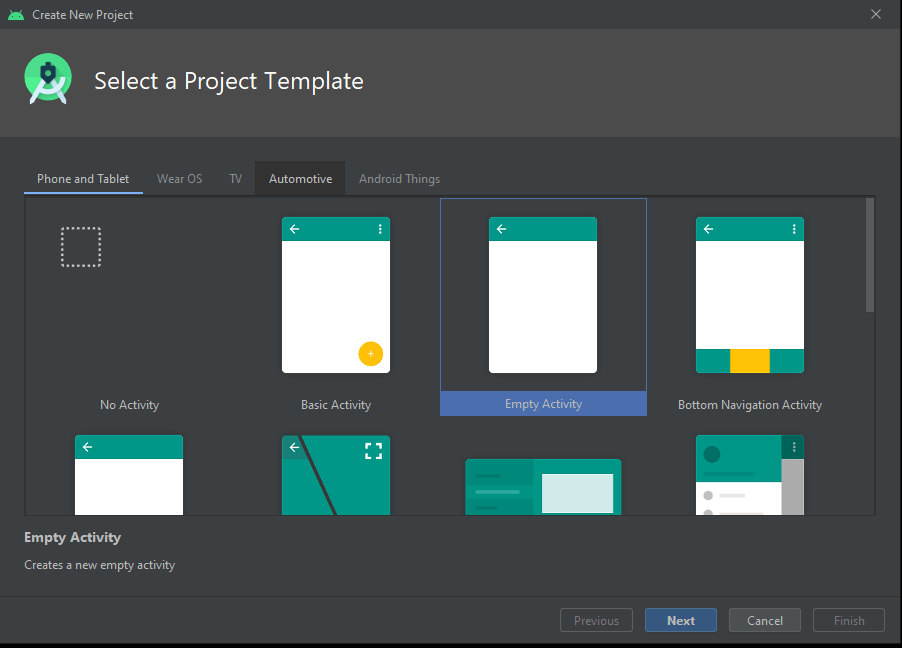
Hit Next Button
Then Give a Good name to your android project, In my case i have named it as “TextRecognitionMLFirebase” you may name it as per your choice
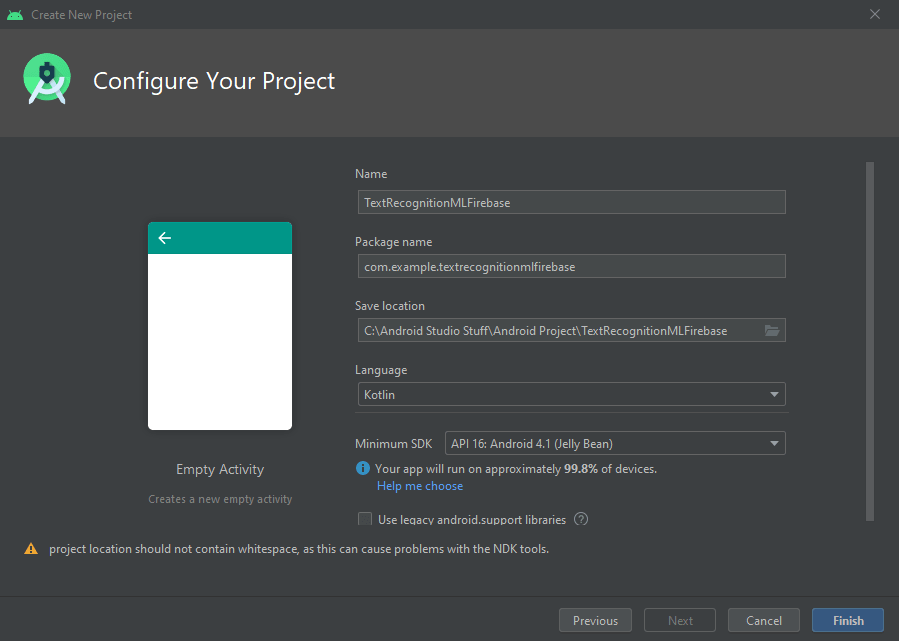
Then, Hit the Finish Button, your android project will get built in few minutes.
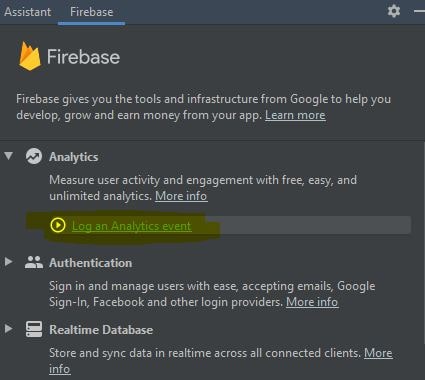
Step 2 : Connect your android app to firebase console
First you need to be signedIn with Google Account in your android Studio.
Then, Go to Tools > Firebase a Android Assistant will open a side window from where you can connect your app to firebase console. Here select Analytics
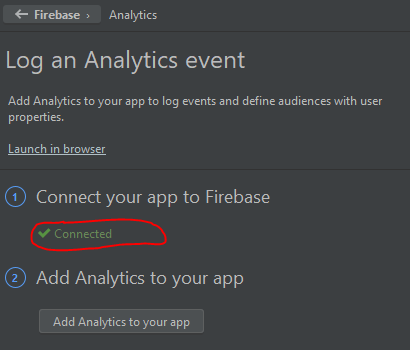
In place of Connected in above image you may see Connect to Firebase Button, Click on it and it will open a default Browser so that you can connect android application to firebase console, Then In browser you need to follow some steps
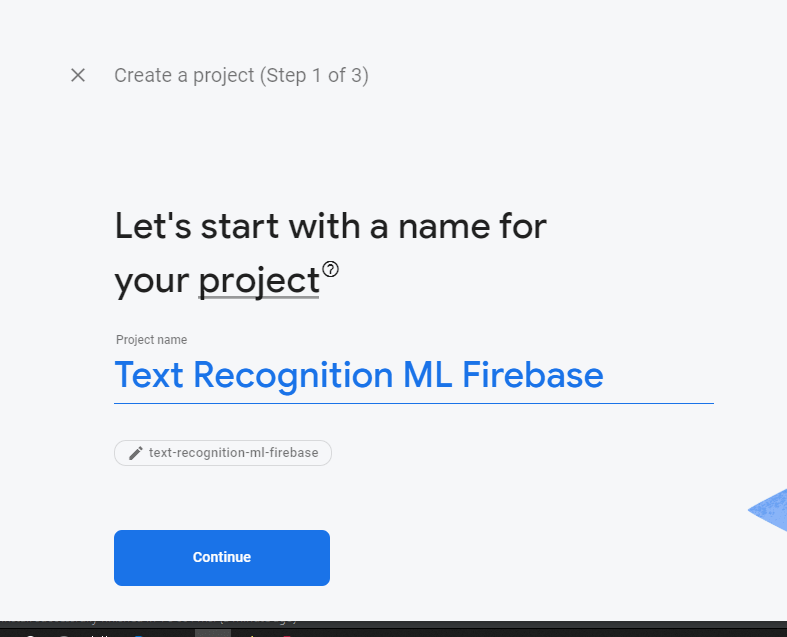
1: Add project
Now, on your browser with Firebase website opened click on Add Project
This page will get Loaded
2: Config Google Analysis
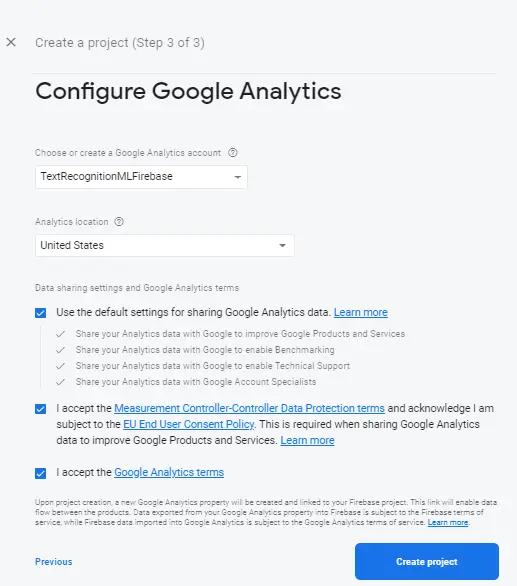
Here you need to accept all the terms and conditions of firebase console & then Hit Create Project.
Therefore your android studio project is successfully connected to Firebase Console

Now, Come back to Android Studio IDE.
Step 3 : Add Firebase Dependencies
Add Firebase ml vision and firebase core dependencies into yor android studio project.
Open built.gradle(Module:app) then in dependencies section just add below Implementation code
implementation 'com.google.firebase:firebase-core:15.0.2'

implementation 'com.google.firebase:firebase-ml-vision:15.0.0'
Step 4 : Adding Camera Feature
Open Androidmanifest.xml and add the following required camera Feature permission
<uses-feature android:name="android.hardware.camera" android:required="true"/>
Step 5 : XML UI Design
Now it’s time to work with some UI Design for Text Recognition in android
open activity_main.xml and add the below lines of XML code
<?xml version="1.0" encoding="utf-8"?>
<LinearLayout  xmlns:android="http://schemas.android.com/apk/res/android"
    xmlns:app="http://schemas.android.com/apk/res-auto"
    xmlns:tools="http://schemas.android.com/tools"
    android:layout_width="match_parent"
    android:layout_height="match_parent"
    tools:context=".MainActivity"
    android:orientation="vertical">

 <ImageView
     android:id="@+id/imageview1"
     android:layout_gravity="center"
     android:layout_width="match_parent"
     android:layout_height="400dp"
     />

    <TextView
        android:id="@+id/text1"
        android:layout_width="match_parent"
        android:layout_height="wrap_content"
        android:layout_gravity="center"
        android:gravity="center"
        android:textSize="20dp"
        android:text="Display the text from the image"/>

    <Button
        android:layout_width="match_parent"
        android:layout_height="wrap_content"
        android:id="@+id/captureImage"
        android:text="Capture Image"
        />

    <Button
        android:layout_width="match_parent"
        android:layout_height="wrap_content"
        android:id="@+id/detectText"
        android:text="Detect Text"/>
</LinearLayout>
Above xml code has :
ImageView to display image captured by camera.
TextView to display text read by Firebase ML Kit.
Button 1 to Open Camera to capture image from camera
Button 2 to read or detect text from captured image.
Step 6 : Java Coding for firebase ML Kit Text Recognition
Open MainActivity.java and copy paste below code
package com.example.textrecognitionmlfirebase;

import android.content.Intent;
import android.graphics.Bitmap;
import android.os.Bundle;
import android.provider.MediaStore;
import android.view.View;
import android.widget.Button;
import android.widget.ImageView;
import android.widget.TextView;
import android.widget.Toast;
import androidx.annotation.NonNull;
import androidx.annotation.Nullable;
import androidx.appcompat.app.AppCompatActivity;
import com.google.android.gms.tasks.OnFailureListener;
import com.google.android.gms.tasks.OnSuccessListener;
import com.google.firebase.ml.vision.FirebaseVision;
import com.google.firebase.ml.vision.common.FirebaseVisionImage;
import com.google.firebase.ml.vision.text.FirebaseVisionText;
import com.google.firebase.ml.vision.text.FirebaseVisionTextDetector;
import java.io.ByteArrayOutputStream;
import java.util.List;

public class MainActivity extends AppCompatActivity {

    Button captureImage,DetectText;
    ImageView imageView1;
    TextView text1;
    static  final int REQUEST_IMAGE_CAPTURE = 1;
    Bitmap imageBitmap;

    @Override
    protected void onCreate(@Nullable Bundle savedInstanceState) {
        super.onCreate(savedInstanceState);
        setContentView(R.layout.activity_main);
        // initialization of Views
        captureImage = (Button)findViewById(R.id.captureImage);
        imageView1 = (ImageView)findViewById(R.id.imageview1);
        DetectText = (Button)findViewById(R.id.detectText);
        text1 = (TextView)findViewById(R.id.text1);

        //on button click open camera to capture image
        captureImage.setOnClickListener(new View.OnClickListener() {
            @Override
            public void onClick(View v) {
                Intent takePictureIntent = new Intent(MediaStore.ACTION_IMAGE_CAPTURE);
                if(takePictureIntent.resolveActivity(getPackageManager())!=null){
                    startActivityForResult(takePictureIntent,REQUEST_IMAGE_CAPTURE);
                }
            }
        });

        //on click read the text from captured image
        DetectText.setOnClickListener(new View.OnClickListener() {
            @Override
            public void onClick(View v) {
                DetectTextFromImage();
            }
        });
    }

    private void DetectTextFromImage() {
        //read bitmap image
        FirebaseVisionImage firebaseVisionImage = FirebaseVisionImage.fromBitmap(imageBitmap);
        //text detector from selected image
        FirebaseVisionTextDetector textDetector = FirebaseVision.getInstance().getVisionTextDetector();

        textDetector.detectInImage(firebaseVisionImage).addOnSuccessListener(new OnSuccessListener<FirebaseVisionText>() {
            @Override
            public void onSuccess(FirebaseVisionText firebaseVisionText) {

                List<FirebaseVisionText.Block> blockList = firebaseVisionText.getBlocks();
                if(blockList.size()==0){
                    Toast.makeText(MainActivity.this,"No Text Found no images",Toast.LENGTH_LONG).show();
                }
                else{
                    for(FirebaseVisionText.Block block : firebaseVisionText.getBlocks())
                    {
                        String text = block.getText();
                        //set text to textview
                        // that is been read from imagebitmap
                        text1.setText(text);
                    }
                }
            }
        }).addOnFailureListener(new OnFailureListener() {
            @Override
            public void onFailure(@NonNull Exception e) {
                Toast.makeText(MainActivity.this,"Something Went Wrong",Toast.LENGTH_LONG).show();
            }
        });
    }

    @Override
    protected void onActivityResult(int requestCode, int resultCode, @Nullable Intent data) {
        super.onActivityResult(requestCode, resultCode, data);
        Bundle extras  = data.getExtras();
        imageBitmap = (Bitmap) extras.get("data");

        ByteArrayOutputStream bytes = new ByteArrayOutputStream();
        imageBitmap.compress(Bitmap.CompressFormat.JPEG, 100, bytes);
        // camera captured image set to ImageView
        imageView1.setImageBitmap(imageBitmap);
    }
}
And there you go your app is ready to recognize text in image with ML Kit on android application.
")


