
")


Hi Guys, Welcome to Proto Coders Point, In this Android tutorial we will implement Firebase UI RecyclerView Adopter
This Project will basically fetch / retrive data from firebase using Firebase UI recyclerview adapter library and display it’s contents in recyclerview as a GridView.
check out : RecyclerView With GridLayoutManager Show Grid View in androidx this post will help you in understanding basic about RecycleView in android and how to show data in RecyclerView with GridLayoutManager.
Let’s Start Implementation the project.
Demo on How this Project will look at End of this tutorial
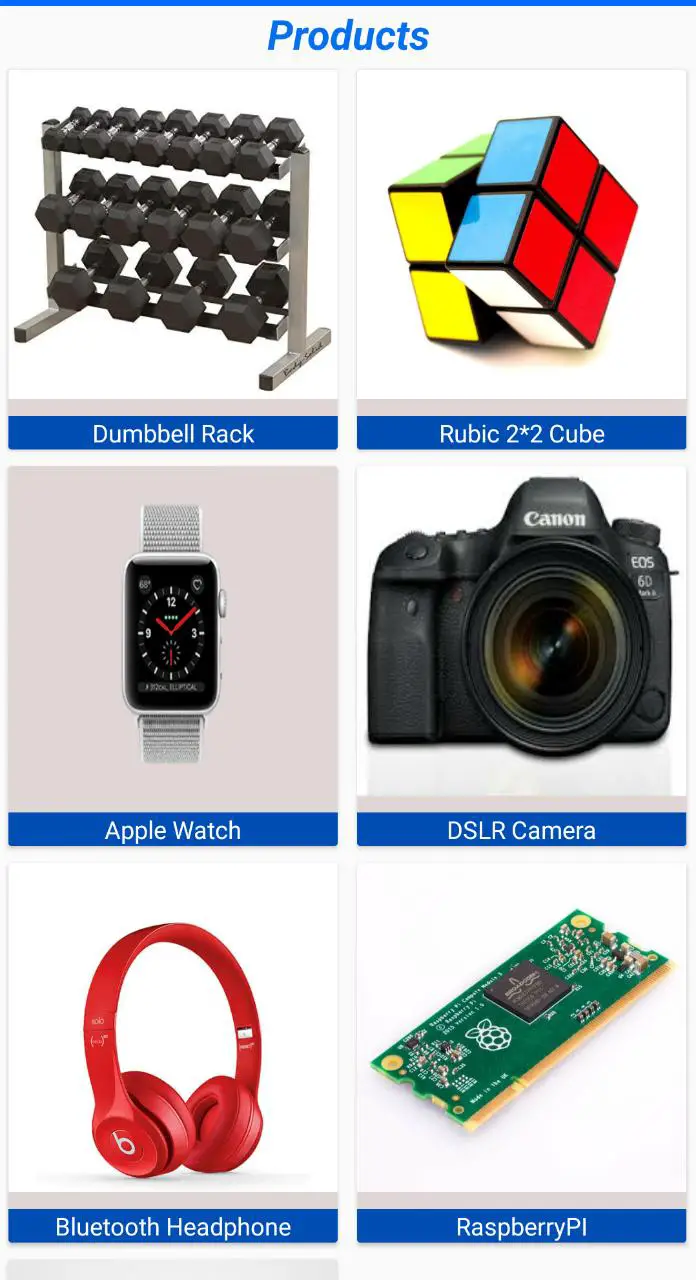
Firebase Ui RecyclerView Adapter Android Tutorial with Example
FirebaseUI makes it simple to bind data from the Firebase Realtime Database to your app’s UI.
Step 1 : Create a new Android Project
OfCouse, your need to create a new android project using android-studio, or else you can make use of your existing android project.
Step 2 : Adding your project to Firebase Console
Check out below video on how to connect android app to firebase console from android studio.
Note: this video is related to Cloud Messaging FCM to send push Notification but the process is same so watch 0 to 2 min minutes of the video to add project to firebase console
or
Follow this steps :
tools -> firebase -> analytics -> log-on Analytics event
you will see 2 button just click on then
- Connect your project to firebase.
- add Analytic dependencies to your project
and you are done your app is now connected to Firebase Console project.
Step 3 : Adding Required Firebase UI Dependencies in your project.
dependencies {
    implementation fileTree(dir: 'libs', include: ['*.jar'])
    implementation 'androidx.appcompat:appcompat:1.1.0'
    implementation 'androidx.constraintlayout:constraintlayout:1.1.3'
    testImplementation 'junit:junit:4.12'
    androidTestImplementation 'androidx.test.ext:junit:1.1.1'
    androidTestImplementation 'androidx.test.espresso:espresso-core:3.1.1'

    implementation 'com.firebaseui:firebase-ui-database:5.0.0' //add firebase ui recyclerview dependency
    implementation 'com.google.firebase:firebase-core:17.2.2' // adding firebase core dependency
    implementation 'com.google.android.material:material:1.2.0-alpha02'  //material design for RecycleView
    implementation 'com.squareup.picasso:picasso:2.71828'  // picasso library dependencies to show image in imageView
}
For this project we need total 4 dependencies
FirebaseUI – this is used to show data retrieved from firebase realtime database in recyclerView.
material – this has the design view for example: this library has recyclerView Widget in it.
picasso library : used to show image fetched from firebase realtime database to imageView.
check out : Picasso android library tutorial – Picasso image loader
Step 4 : Create a RealTime Database in firebase console
Follow this steps to create realtime database.
- open your firebase console,
- navigate to your project under firebase console
- on the left side you will see develop option under that open Database
- create a new RealTime Database
Here is how my data looks in Firebase console
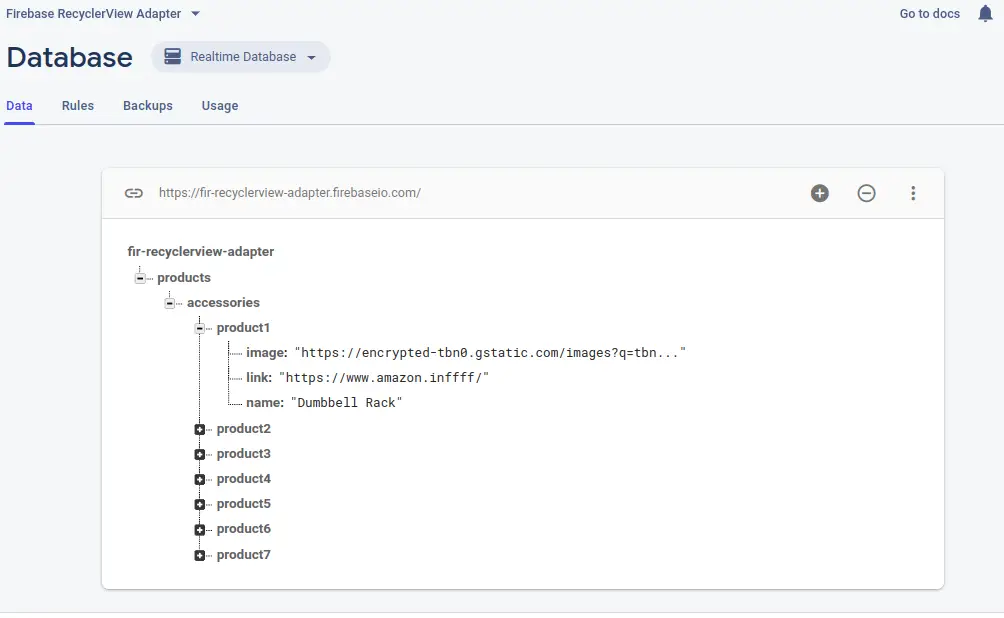
Firebase stored data in JSON format
Here is how the above data looks in json format
{
  "products" : {
    "accessories" : {
      "product1" : {
        "image" : "https://encrypted-tbn0.gstatic.com/images?q=tbn%3AANd9GcRcJUkOrtmOwQFdLVHt--R-q-4SHO5CEFZcmR14LYNhyMLwOUTg",
        "link" : "https://www.amazon.inffff/",
        "name" : "Dumbbell Rack"
      },
      "product2" : {
        "image" : "https://encrypted-tbn0.gstatic.com/images?q=tbn%3AANd9GcT_PQP9-9MWy7lmZBaYMpDb2jyBh4KLyJOA37uSXgiXQZ-3th3e",
        "link" : "https://www.amazon.in/",
        "name" : "Rubic 2*2 Cube"
      },
      "product3" : {
        "image" : "https://support.apple.com/library/content/dam/edam/applecare/images/en_US/homepod/watch-product-lockup-callout.png",
        "link" : "https://www.amazon.in/",
        "name" : "Apple Watch"
      },
      "product4" : {
        "image" : "https://encrypted-tbn0.gstatic.com/images?q=tbn%3AANd9GcQtZ5xPeZyLwIMnIXQgODfr20YSgTUP-6l3Xc-J2pOgUZyPwx3L",
        "link" : "https://www.amazon.in/",
        "name" : "DSLR Camera"
      },
      "product5" : {
        "image" : "https://encrypted-tbn0.gstatic.com/images?q=tbn%3AANd9GcSYYCpkawEmDTQoCipEaP4BGBEHtgAjbJDS6G9CIigDu-EBsG2V",
        "link" : "https://www.amazon.in/",
        "name" : "Bluetooth Headphone"
      },
      "product6" : {
        "image" : "https://images.prismic.io/rpf-products/c4f1986d2ba2737359c10225d1dc1c8d59d3cfd7_compute-module-main-1-1793x1080.jpg?auto=compress,format",
        "link" : "https://www.amazon.in/",
        "name" : "RaspberryPI"
      },
      "product7" : {
        "image" : "https://img-prod-cms-rt-microsoft-com.akamaized.net/cms/api/am/imageFileData/RE4mQFV?ver=c77b&q=90&m=6&h=195&w=348&b=%23FFFFFFFF&l=f&o=t&aim=true",
        "link" : "https://www.amazon.in/",
        "name" : "Play Station"
      }
    }
  }
}
create your own database or just download my database file from https://drive.google.com/file/d/1EPJofN5OA6wQG_jy0tggFZU5PKmz91hC/view?usp=sharing
after downloading just import the file in realtime database
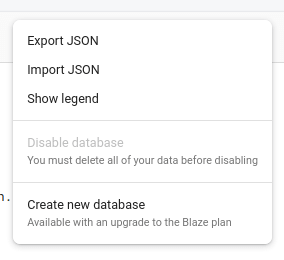
Just open realtime database and click on 3 vertical line a popup dropdown list will open click on import JSON > select the file you have downloaded and next..
Hence my Firebase Database structure will get imported into you firebase project.
Then, Now all is been set on the server – side
Just go back to our android Studio.
step 5 : Create a new XML file and Name it as customlayout
customelayout.xml
This xml file 2 views that are ImageView and a text View.
<?xml version="1.0" encoding="utf-8"?>
<LinearLayout android:layout_height="wrap_content"
    android:layout_width="wrap_content"
    xmlns:android="http://schemas.android.com/apk/res/android">

    <androidx.cardview.widget.CardView
        android:layout_width="wrap_content"
        android:layout_height="wrap_content"
        xmlns:app="http://schemas.android.com/apk/res-auto"
        app:cardBackgroundColor="#E0D5D5"
        android:orientation="vertical"
        android:layout_margin="5dp">

        <LinearLayout
            android:layout_width="wrap_content"
            android:layout_height="wrap_content"
            android:orientation="vertical"
            >
            <ImageView
                android:id="@+id/productimage"
                android:layout_width="200dp"
                android:layout_height="200dp"
                android:scaleType="fitXY"
                android:layout_gravity="center_horizontal"
                />
            <TextView
                android:id="@+id/text1"
                android:layout_width="match_parent"
                android:layout_height="match_parent"
                android:layout_gravity="center"
                android:layout_marginTop="10dp"
                android:background="#004DB4"
                android:textSize="15sp"
                android:textColor="#FFF"
                android:gravity="center"
                android:text="logo1"/>

        </LinearLayout>
    </androidx.cardview.widget.CardView>
</LinearLayout>
Step 6 : Open activity_main.xml and Copy below Code
activity_main.xml
This XML file have only one View that is RecyclerView where we gonna show our data that is retrieve from firebase database using Firebase UI RecyclerViewAdapter.
<?xml version="1.0" encoding="utf-8"?>
<LinearLayout xmlns:android="http://schemas.android.com/apk/res/android"
    android:layout_width="match_parent"
    android:layout_height="match_parent"
    android:orientation="vertical"
    android:theme="@style/Theme.AppCompat.Light">

    <TextView
        android:layout_width="wrap_content"
        android:layout_height="wrap_content"
        android:gravity="center"
        android:textColor="#056FF0"
        android:textSize="25sp"
        android:layout_gravity="center"
        android:textStyle="bold|italic"
        android:text="Products"/>


    <androidx.recyclerview.widget.RecyclerView
        android:layout_width="match_parent"
        android:layout_height="match_parent"
        android:id="@+id/recyclerViewGirdView"/>


</LinearLayout>
Step 7 : Create a Constructor class that holders all the data from firebase.
you need a class that handles data retrieved from firebase.
create a new java file and name it as product_getter_setter.java this file has a constructor and getter and setter methods that helps in getting and setiing the data.
product_getter_setter.java
package com.ui.recycleview.gridview.firebaserecyclerviewadapter;

public class product_getter_setter {

    String name,image,link;

    public product_getter_setter() {
    }

    public product_getter_setter(String name, String image, String link) {
        this.name = name;
        this.image = image;
        this.link = link;
    }

    public String getName() {
        return name;
    }

    public void setName(String name) {
        this.name = name;
    }

    public String getImage() {
        return image;
    }

    public void setImage(String image) {
        this.image = image;
    }

    public String getLink() {
        return link;
    }

    public void setLink(String link) {
        this.link = link;
    }
}
Step 8 : Main_Activity.java with has FirebaseRecyclerAdapter method
Main_Activity.java
open Main_Activity.java and copy paste below lines of java code
package com.ui.recycleview.gridview.firebaserecyclerviewadapter;

import android.app.Activity;
import android.app.ProgressDialog;
import android.content.Intent;
import android.net.Uri;
import android.os.Bundle;
import android.util.Log;
import android.view.LayoutInflater;
import android.view.View;
import android.view.ViewGroup;
import android.widget.ImageView;
import android.widget.TextView;

import androidx.annotation.NonNull;
import androidx.annotation.Nullable;
import androidx.recyclerview.widget.GridLayoutManager;
import androidx.recyclerview.widget.LinearLayoutManager;
import androidx.recyclerview.widget.RecyclerView;

import com.firebase.ui.database.FirebaseRecyclerAdapter;
import com.firebase.ui.database.FirebaseRecyclerOptions;
import com.google.firebase.database.DataSnapshot;
import com.google.firebase.database.DatabaseError;
import com.google.firebase.database.DatabaseReference;
import com.google.firebase.database.FirebaseDatabase;
import com.google.firebase.database.Query;
import com.google.firebase.database.ValueEventListener;
import com.squareup.picasso.Picasso;

public class MainActivity extends Activity {

    RecyclerView recyclerView;

    Query query1;
    private DatabaseReference mdatabasereference;
    private ProgressDialog progressDialog;
    FirebaseRecyclerAdapter<product_getter_setter, BlogViewHolder> firebaseRecyclerAdapter;
    LinearLayoutManager mLayoutManager;

    @Override
    protected void onCreate(@Nullable Bundle savedInstanceState) {
        super.onCreate(savedInstanceState);
        setContentView(R.layout.activity_main);

        progressDialog = new ProgressDialog(MainActivity.this);
        progressDialog.setMessage("Loading Products Please Wait...");
        progressDialog.show();

        mdatabasereference = FirebaseDatabase.getInstance().getReference("products").child("accessories");

        recyclerView = (RecyclerView) findViewById(R.id.recyclerViewGirdView);


    }

    @Override
    protected void onStart() {
        super.onStart();
        query1 = FirebaseDatabase.getInstance().getReference().child("products").child("accessories");
        FirebaseRecyclerOptions<product_getter_setter> options =
                new FirebaseRecyclerOptions.Builder<product_getter_setter>()
                        .setQuery(query1, product_getter_setter.class)
                        .build();

        Log.d("Options"," data : "+options);


        firebaseRecyclerAdapter = new FirebaseRecyclerAdapter<product_getter_setter, BlogViewHolder>(options) {
            @Override
            protected void onBindViewHolder(@NonNull BlogViewHolder blogViewHolder, final int i, @NonNull product_getter_setter product_get_set_v) {

                blogViewHolder.setname(product_get_set_v.getName());
                String image_url =blogViewHolder.setimage(product_get_set_v.getImage());
                String link= product_get_set_v.getLink();
                Log.d("LINKDATA"," data : "+link);

                blogViewHolder.itemView.setOnClickListener(new View.OnClickListener() {
                    @Override
                    public void onClick(View v) {
                        final String productid=getRef(i).getKey();
                        Log.d("productid"," data : "+productid);


                        mdatabasereference.child(productid).addValueEventListener(new ValueEventListener() {
                            @Override
                            public void onDataChange(@NonNull DataSnapshot dataSnapshot) {
                                String finallink = dataSnapshot.child("link").getValue(String.class);
                                Log.d("productLink"," data : "+finallink);

                                if(finallink!=null)
                                {
                                    Uri uriUrl = Uri.parse(finallink);
                                    Intent launchBrowser = new Intent(Intent.ACTION_VIEW, uriUrl);
                                    startActivity(launchBrowser);
                                }

                            }

                            @Override
                            public void onCancelled(@NonNull DatabaseError databaseError) {

                            }
                        });

                    }
                });

            }

            @NonNull
            @Override
            public BlogViewHolder onCreateViewHolder(@NonNull ViewGroup parent, int viewType) {
                View view = LayoutInflater.from(parent.getContext())
                        .inflate(R.layout.custom_layout, parent, false);
                progressDialog.dismiss();
                return new BlogViewHolder(view);
            }
        };
        firebaseRecyclerAdapter.startListening();
        GridLayoutManager gridLayoutManager = new GridLayoutManager(getApplicationContext(),2);
        recyclerView.setLayoutManager(gridLayoutManager);

        recyclerView.setAdapter(firebaseRecyclerAdapter);
    }

    public static class BlogViewHolder extends RecyclerView.ViewHolder
    {
        View mView;

        public BlogViewHolder(View itemView)
        {
            super(itemView);
            mView=itemView;


        }
        public void setname(String name)
        {
            TextView ename=(TextView)mView.findViewById(R.id.text1);
            ename.setText(name);

        }

        public String setimage(String url)
        {
            ImageView image = (ImageView)mView.findViewById(R.id.productimage);
            Picasso.get().load(url).into(image);
            return url;
        }
    }
}
Step 9 : Adding Internet Permisson for your project
Then, as you know that we are fetching data from external source i,e our Firebase server, We definitely need access to internet permission to be set for our android project
open AndroidManifest.xml file and app internet permission tag before <application> tag
<uses-permission android:name="android.permission.INTERNET"/>
All set now the app is ready to run for testing…..
Download Complete Firebase RecyclerView Adopter project from here:
https://drive.google.com/file/d/1qQRgVGN6nYpFwSh2UrZc74TjRIJOaYv5/view?usp=sharing
")


[…] let’s precedure in creating a Recyclerview with Filterable search filter – android filter recyclerview using searchview in […]