Hi Guys, Welcome to Proto Coders Point, In this Flutter tutorial, we will learn how to create a profile page UI Design app using Dart and Flutter. A quick sample app on how to implement a flutter profile page.
In will be Simple Profile Page UI Design using flutter to build social media profile UI.
Flutter Profile Page UI Design – Social Media profile page
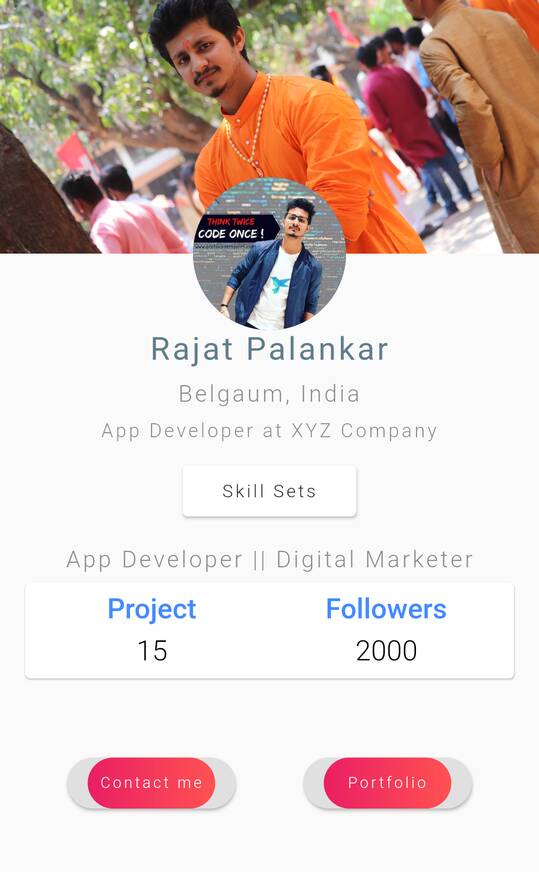
The Final UI of Flutter profile page will look something like below screenshot.

Implementing of flutter user profile page UI design templete example
Step 1: Create a new Flutter Project
I am making use of android studio to build flutter project, you can choice any of you favorite IDE to build Flutter app.
Open android Studio and create a new flutter project.
File > New > New Flutter Project
Give a name you your flutter project and set a path to store your flutter project. and hit next to create project.
You may see that flutter provide you a simple application code that simply counts or increment the number when a user clicks on a button and the counter variable get incremented and displayed on the screen.
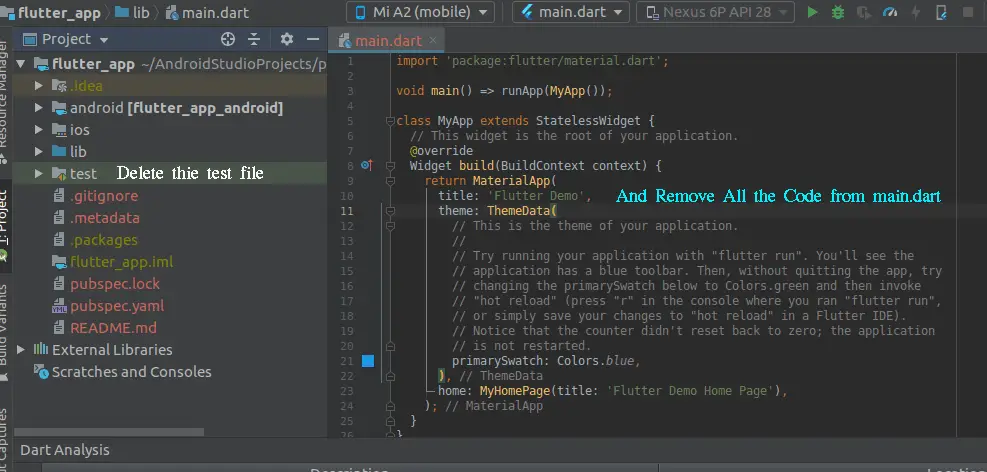
Step 2: Remove all default code
You can just remove default code of flutte and shown in below Image.

Step 3: Add this code in main.dart file
So let’s begin with the actual code for build Social media Flutter profile page UI Design.
Navigate towards lib directory of project and open main.dart file
main.dart
import 'package:flutter/material.dart';
import 'package:flutter_app/ProfileUI2.dart';

void main() {
  runApp(MyApp());
}

class MyApp extends StatelessWidget {
  // This widget is the root of your application.
  @override
  Widget build(BuildContext context) {
    return MaterialApp(
      title: 'Flutter Demo',
      debugShowCheckedModeBanner: false,
      theme: ThemeData(

        primarySwatch: Colors.blue,
        visualDensity: VisualDensity.adaptivePlatformDensity,
      ),
      home: ProfileUI2(),  // calling  profilepage Ui design
    );
  }
}
And paste the above code in main.dart file.
In above code what i am doing is, in home tag of MaterialApp i am calling a class ProfileUI2 where our user profile page Ui is design exist.
Step 4: Creating new dart file in lib directory
Right click on lib directiory > New > New Dart File
and name it as per your choice, i have named it as “ProfileUI2.dart”
ProfileUI2.dart
import 'package:flutter/cupertino.dart';
import 'package:flutter/material.dart';

class ProfileUI2 extends StatelessWidget {
  @override
  Widget build(BuildContext context) {
    return Scaffold(
      body: SafeArea(
        child: Column(

          children: [
            Container(
              decoration: BoxDecoration(
                image: DecorationImage(
                  image: NetworkImage(
                    "add you image URL here "
                  ),
                  fit: BoxFit.cover
                )
              ),
            child: Container(
              width: double.infinity,
              height: 200,
              child: Container(
                alignment: Alignment(0.0,2.5),
                child: CircleAvatar(
                  backgroundImage: NetworkImage(
                      "Add you profile DP image URL here "
                  ),
                  radius: 60.0,
                ),
              ),
            ),
            ),

            SizedBox(
              height: 60,
            ),
            Text(
              "Rajat Palankar"
              ,style: TextStyle(
                fontSize: 25.0,
                color:Colors.blueGrey,
                letterSpacing: 2.0,
                fontWeight: FontWeight.w400
            ),
            ),
            SizedBox(
              height: 10,
            ),
            Text(
              "Belgaum, India"
              ,style: TextStyle(
                fontSize: 18.0,
                color:Colors.black45,
                letterSpacing: 2.0,
                fontWeight: FontWeight.w300
            ),
            ),
            SizedBox(
              height: 10,
            ),
            Text(
              "App Developer at XYZ Company"
              ,style: TextStyle(
                fontSize: 15.0,
                color:Colors.black45,
                letterSpacing: 2.0,
                fontWeight: FontWeight.w300
            ),
            ),
            SizedBox(
              height: 10,
            ),
            Card(
              margin: EdgeInsets.symmetric(horizontal: 20.0,vertical: 8.0),

              elevation: 2.0,
              child: Padding(
                  padding: EdgeInsets.symmetric(vertical: 12,horizontal: 30),
                  child: Text("Skill Sets",style: TextStyle(
                      letterSpacing: 2.0,
                      fontWeight: FontWeight.w300
                  ),))
            ),
            SizedBox(
              height: 15,
            ),
            Text(
              "App Developer || Digital Marketer"
              ,style: TextStyle(
                fontSize: 18.0,
                color:Colors.black45,
                letterSpacing: 2.0,
                fontWeight: FontWeight.w300
            ),
            ),
            Card(
              margin: EdgeInsets.symmetric(horizontal: 20.0,vertical: 8.0),
              child: Padding(
                padding: const EdgeInsets.all(8.0),
                child: Row(
                  mainAxisAlignment: MainAxisAlignment.spaceEvenly,
                  children: [
                    Expanded(
                      child: Column(
                        children: [
                          Text("Project",
                            style: TextStyle(
                                color: Colors.blueAccent,
                                fontSize: 22.0,
                                fontWeight: FontWeight.w600
                            ),),
                          SizedBox(
                            height: 7,
                          ),
                          Text("15",
                            style: TextStyle(
                                color: Colors.black,
                                fontSize: 22.0,
                                fontWeight: FontWeight.w300
                            ),)
                        ],
                      ),
                    ),
                    Expanded(
                      child:
                      Column(
                        children: [
                          Text("Followers",
                            style: TextStyle(
                                color: Colors.blueAccent,
                                fontSize: 22.0,
                                fontWeight: FontWeight.w600
                            ),),
                          SizedBox(
                            height: 7,
                          ),
                          Text("2000",
                            style: TextStyle(
                                color: Colors.black,
                                fontSize: 22.0,
                                fontWeight: FontWeight.w300
                            ),)
                        ],
                      ),
                    ),
                  ],
                ),
              ),
            ),
            SizedBox(
              height: 50,
            ),
            Row(
              mainAxisAlignment: MainAxisAlignment.spaceEvenly,
              children: [
                RaisedButton(
                  onPressed: (){

                  },
                  shape:  RoundedRectangleBorder(
                    borderRadius: BorderRadius.circular(80.0),
                  ),
                  child: Ink(
                    decoration: BoxDecoration(
                      gradient: LinearGradient(
                          begin: Alignment.centerLeft,
                          end: Alignment.centerRight,
                          colors: [Colors.pink,Colors.redAccent]
                      ),
                      borderRadius: BorderRadius.circular(30.0),

                    ),
                    child: Container(
                      constraints: BoxConstraints(maxWidth: 100.0,maxHeight: 40.0,),
                      alignment: Alignment.center,
                      child: Text(
                        "Contact me",
                        style: TextStyle(
                            color: Colors.white,
                            fontSize: 12.0,
                            letterSpacing: 2.0,
                            fontWeight: FontWeight.w300
                        ),
                      ),
                    ),
                  ),
                ),
                RaisedButton(
                  onPressed: (){

                  },
                  shape:  RoundedRectangleBorder(
                    borderRadius: BorderRadius.circular(80.0),
                  ),
                  child: Ink(
                    decoration: BoxDecoration(
                      gradient: LinearGradient(
                          begin: Alignment.centerLeft,
                          end: Alignment.centerRight,
                          colors: [Colors.pink,Colors.redAccent]
                      ),
                      borderRadius: BorderRadius.circular(80.0),

                    ),
                    child: Container(
                      constraints: BoxConstraints(maxWidth: 100.0,maxHeight: 40.0,),
                      alignment: Alignment.center,
                      child: Text(
                        "Portfolio",
                        style: TextStyle(
                            color: Colors.white,
                            fontSize: 12.0,
                            letterSpacing: 2.0,
                            fontWeight: FontWeight.w300
                        ),
                      ),
                    ),
                  ),
                )
              ],
            )
          ],
        ),
      )
    );
  }
}
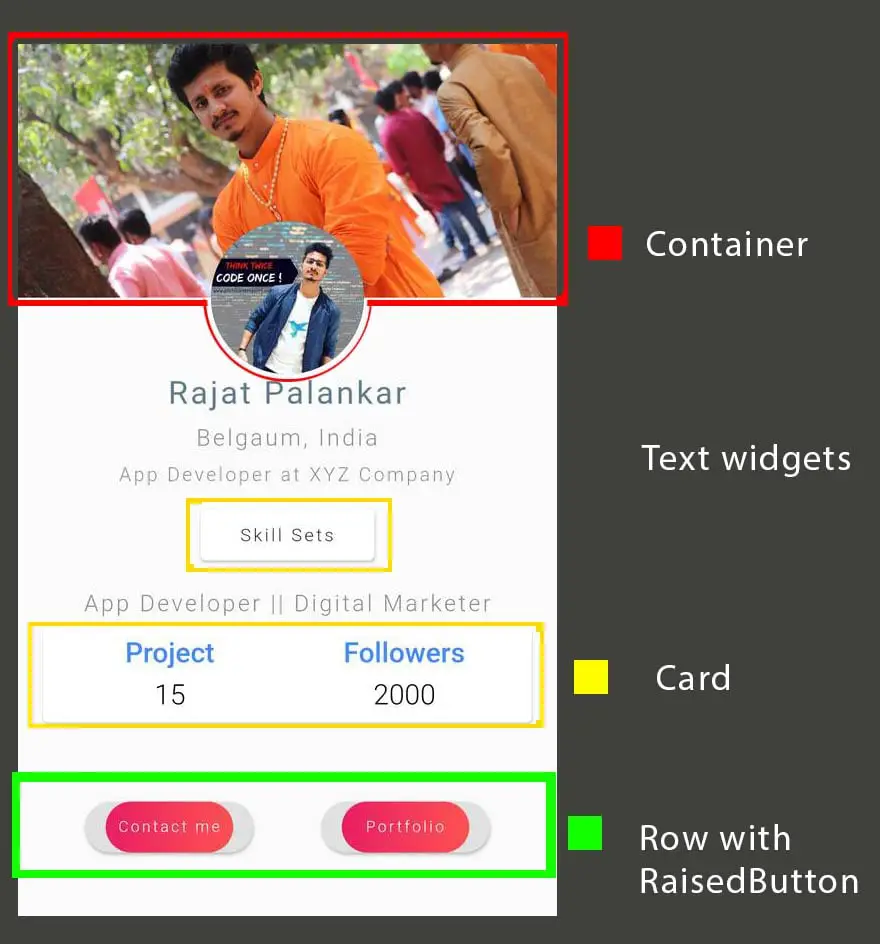
Explaination of flutter widget used in the above code.
Flutter Container class
A convenience widget that combines common painting, positioning, and sizing widgets.
read more about container class in official site
Flutter Card Class
A material design card. A card has slightly rounded corners and a shadow.
A card is a sheet of Material used to represent some related information, for example an album, a geographical location, a meal, contact details, etc.
Flutter Column, Row and RaisedButton
Column widget: A widget that displays its children in a vertical array.
Row widget: A widget that displays, its child in Horizontal
RaisedButton: To show a button on the screen
This are the places where all this widgets is been used. (Compair it with above profileUI2.dart code)

Read more above flutter card on official site.
Similar article Profile page UI


[…] Similar profile page UI design 2 […]
[…] on multiple platform like ANDROID,IOS & WEB with single codebase & Flutter gives a greate UI design […]