We’ll concentrate on the Flutter app and utilise Redux to control its state. Redux is an architecture for unidirectional data flow that makes it simple to create, manage, and test apps.
Redux is one of the various state management approaches in Flutter. Redux, in general, is a unidirectional data flow architecture that makes it simple for developers to create and maintain apps.
What is Redux in Flutter?
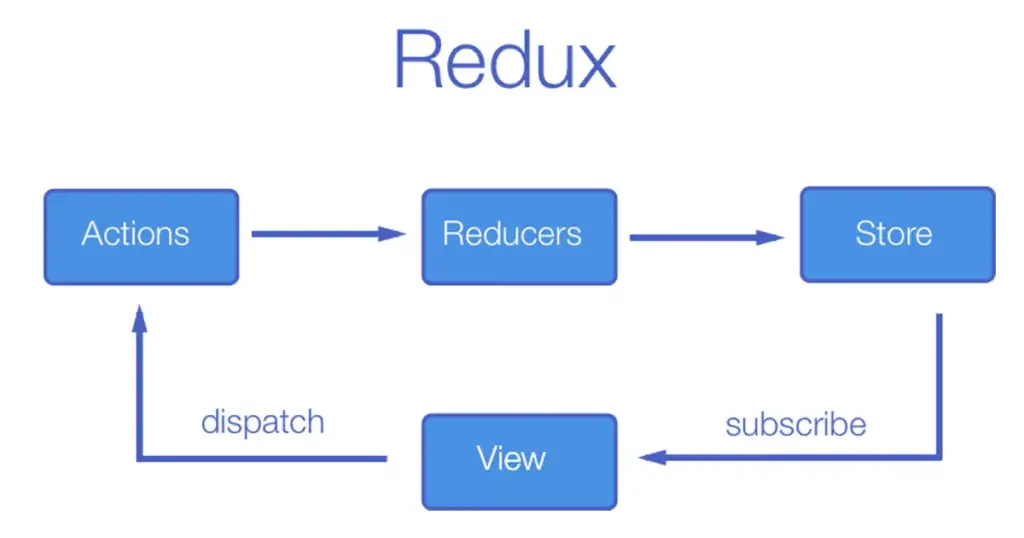
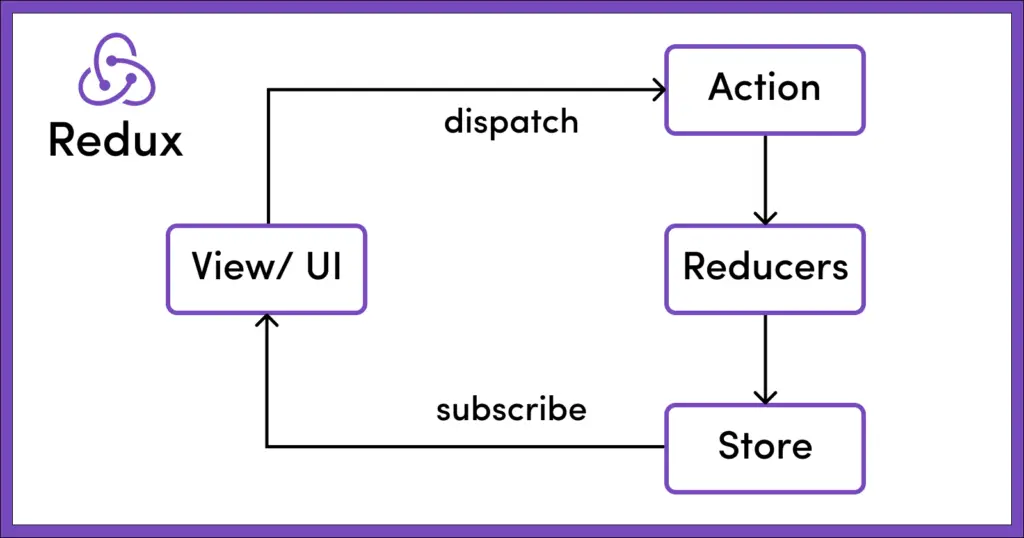
Data is repetitively distributed between widgets with success using Redux, a state management architectural framework. Through the use of a unidirectional data flow, it controls the state of an application. Let’s examine the illustration below:

Here are the four elements that Redux often contains. Redux is ingeniously created so that the user can simply interact with the App, which involves frequent state changes.
i) Action: When an event is created, it is subsequently dispatched to the Reducer as an action.
ii) Reducer: Reducer refreshes the store with the new state it receives whenever it receives an update.
iii) Store: The Store notifies the View of any updates it gets.
iv) View: To demonstrate the changes that have been done, it has been reconstructed.
Redux Middleware is the primary component that is essential to the process described above, thus the question arises: what is middleware and what does it do?
So first we’ll discuss about…
What is middleware ??
Every action that is submitted to the reducer can be intercepted using Redux Middleware, allowing you to adjust or stop the action.
You may make asynchronous requests, report errors, and much more with the aid of middleware.
Before your app sends a response back to the server or even within the app itself, middleware plays a crucial function. Depending on the situation, we can utilize middleware to lead the user to a different page or screen.

Application middleware manages data when it is dispatched from the action and before it reaches the reducer while doing any operation, such as fetching any data from a third-party API.
When it comes to Redux’s operation, there are typically two alternative methods that any Basic App can use
1) When every state is kept in one store:
Developers can access the Stored States, which contain all the data updates they require, when all the states are kept in a single store. If a state has to be updated, the app will be notified.
2 ) When information is unidirectional:
Data flow is unidirectional, making it easier to handle data and carry out the procedure that entails the four steps that were previously discussed.
What is the significance of state management?
State management is crucial for Flutter app development since it enables us to centralise all UI states and manage data flow.
When a child widget requires data in a medium or large-scale application with many widgets, it is common to manage the data from the main.dart file.
This data could be distributed as arguments through widget constructors until it reaches the recipient widget, but as we discussed in the introduction, this could result in a long chain of data transfer through widgets that don’t need this data.
It is not only inconvenient and difficult to pass data through constructors, but it can also have an impact on application performance. This is due to the fact that when you manage data from the main widget — or any root widget — the entire widget tree rebuilds whenever any of its child widgets changes. Only the build method in the widget that requires the changed data should be called.
It refers to controlling the state of one or more user interface control systems, such as radio controls, action buttons, input fields, and so on. It is a User Interface programming technique in which the state of a single UI control is completely or partially dependent on the state of all the other UI controls.
Can Redux be used with Flutter?
The store, which will be used to establish the initial state of the store, is one of the key tools needed to utilize Redux in Flutter apps.
The architecture of Flutter Redux

Store
An object that contains the application’s state. This object can be found in the project’s files with the help of the provider. The only way to change its state is to perform an action on it.
There are three important parts of the store:
- createStore(): To create a store object in redux.
- dispatch(action): To change the state of store data by using the actions.
- getState(): For getting the current state of the store in redux.
Flutter manipulates the store using inherited widgets. Among the inherited widgets are:
StoreProvider: This widget injects the store into the application’s widget tree.
class MyApp extends StatelessWidget {

 @override
 Widget build(BuildContext context) {

     ...

   return StoreProvider<AppState>(
     store: store,
     child: MaterialApp(
       title: 'Flutter Redux app’,
       theme: ThemeData.dark(),
       home: StoreBuilder<AppState>(
        ...// do here
       ),

     ),
   );
 }
}
StoreBuilder: listens to the entire store and rebuilds the entire widget tree with each update; it receives the store from StoreProvider and StoreConnector.
@override
 Widget build(BuildContext context) {

  ...

   return StoreProvider<AppState>(
     store: store,
     child: MaterialApp(
       title: 'Flutter Redux app,
       theme: ThemeData.dark(),
       home: StoreBuilder<AppState>(
           onInit: (store) => store.dispatch(Action()),
         builder: (BuildContext context, Store<AppState> store) => MyHomePage(store),
       ),

     ),
   );
 }
StoreConnector: a widget that replaces the StoreBuilder. It gets the store from StoreProvider, reads data from our store, and then passes it to its builder function. When that data changes, the builder function rebuilds the widget.
class HomePage extends StatelessWidget{
 final Store<AppState> store;

 MyHomePage(this.store);

 @override
 Widget build(BuildContext context){

   return Scaffold(
     appBar: AppBar(
       title: Text('Redux '),
     ),
     body: StoreConnector<AppState, Model>(
       builder: (BuildContext context, Model model) {
   ...
  }
 }
}
This is the central location where the application state can be found. At any given time, the store contains information about the entire application state or any other, single state.
final Store<AppState> store = Store<AppState>(
reducer, initialState: AppState.initialState()
);
What exactly are Redux actions?
Actions are objects with a type and a payload that can be specified. The type describes the action’s intent, and the payload is the data that goes with it. Sometimes the type of the action is all that is required to transfer the state, in which case the action does not require a payload.
Following the event on this state, the widgets that are tracking the data in the state rebuild, and the data they render is updated to the state’s current values. Any event sent to the store to update the app’s state is considered an action.
final Store<AppState> store = Store<AppState>(
reducer, initialState: AppState.initialState()
);

store.dispatch(Action());
When a widget wants to change the state with an action, it uses the store’s dispatch method to notify the state of the action — the store invokes the action.
Reducers
The root reducer combines all of the reducers that construct various pieces of state.Reducer is a function that adds a new state to the store. It takes as arguments the state and the action and updates the state based on the action. Remember that the state is immutable and can only be changed by creating a new state. The only way to update the state is through the reducer.

Assume a pop-up appears on the screen and a user response is required in the form of clicking or tapping a button. In our diagram above, we’ll refer to this pop-up as the View.
The Action is the result of clicking the button. This action is wrapped and sent to the Reducer, which processes it and updates the Store data. The store then holds the application’s State, and the state detects the change in data value.
Because the state manages the data rendered on your screen, any change in data is reflected in the View, and the cycle continues.
Redux In Flutter’s goal
Why use Redux when we can utilise straightforward classes and widgets is a common topic?
When building an E-Commerce project in Flutter, the Cart Screen will display the cart’s contents. From other screens where the Cart is shown, we may add, edit, and remove the goods. Redux was required to manage the logic and UI for adding, updating, and deleting items from the Cart since we had to update the Cart screen after any sort of action. Redux is employed in this.
The MVP pattern and managing a View’s state via RX Observables are similar Android design concepts.
Implementation
How to implement Redux in Flutter?
Step 1) : Install the Packages:
Add the pubspec.yaml file in dependencies.
Dependencies:

flutter_redux:
redux:
Step 2) : Run flutter packages get in the root directory of your app.
Step 3) : Import the file
import 'package:redux/redux.dart';
import 'package:flutter_redux/flutter_redux.dart';
We next move on to the redux implementation phase, thus first.
Redux : includes and offers the basic tools necessary for Redux to be used in Flutter applications, including:
- The shop that will be used to specify the store’s starting state
- Reducer functionality
- using middleware
Flutter_redux: This adds an extra collection of utility widgets in addition to the Redux package, such as:
- StoreProvider
- StoreBuilder
- StoreConnector
Flutter_redux_dev_tools: When compared to the Flutter Redux package, the flutter redux dev tools package offers more tools for tracking changes to the state and actions taken.
redux thunk: in order to introduce middleware
http: makes it possible to use middleware to call an external API.
After experimenting with various architectures, I decided to combine Flutter with Redux because it is both challenging and enjoyable. I chose a simple and common case to document the development and share this experience with you: the Welcome — Sign-In — Sign-Up flow.
There are two major requirements:
The Flux pattern and the Redux framework are theoretically understood. You should understand Store and why it is the Single Source of Truth, Reducers and why they are Vanilla functions, and so on.
A fundamental understanding of the redux and flutter redux plugins used by the Flutter framework to implement the Redux architecture.
Example
Add this in main.dart file
  @override
  Widget build(BuildContext context) {
    return StoreProvider<int>(
      store: store,
      child: MaterialApp(
        debugShowCheckedModeBanner: false,
        theme: ThemeData.light(),
        title: "Redux App",
        home: const MyHomeScreen(),
      ),
    );
  }
Create the dart file name with HomePage and add this code
@override
  Widget build(BuildContext context) {
    return Scaffold(
      appBar: AppBar(title: const Text("How to use Redux")),
      body: Center(
        child: Column(
          mainAxisAlignment: MainAxisAlignment.center,
          children: [
            StoreConnector<int, String>(
              converter: (store) => store.state.toString(),
              builder: (context, count) {
                return Text(
                  count,
                  style: const TextStyle(fontSize: 20),
                );
              },
            ),
            Row(
              mainAxisSize: MainAxisSize.min,
              children: [
                StoreConnector<int, VoidCallback>(
                  converter: (store) {
                    return () => store.dispatch(ReducerAction.Increment);
                  },
                  builder: (context, callback) {
                    return TextButton(
                      onPressed: callback,
                      child: const Icon(Icons.add),
                    );
                  },
                ),
                StoreConnector<int, VoidCallback>(
                  converter: (store) {
                    return () => store.dispatch(ReducerAction.Decrement);
                  },
                  builder: (context, callback) {
                    return TextButton(
                      onPressed: callback,
                      child: const Icon(Icons.remove),
                    );
                  },
                )
              ],
            )
          ],
        ),
      ),
    );
  }
Flutter Bloc vs. Flutter Redux
- Redux employs a global store, which allows for the representation of your whole application state in a single state.
- The application state is split into several blocs by the bloc.
- The Business Logic Component is referred to as Bloc.
- For the Flutter Bloc, you don’t need to write reducers, actions, etc.
Code link 👍
https://github.com/kevalv001/flutter_redux_example.git
Conclusion
In the article, I have explained the basic architecture of Redux state management , you can modify this code according to your choice, and this was a small introduction of Redux from my side and its working using Flutter.
If you like this article, then do not forget to give your likes & claps! 🙂
Thank you!!!!!!! Have a happy day !!


