Hi Guys, Welcome to Proto Coders Point, In this Flutter Tutorial we gonna implement Flutter State Management using the GetX plugin (Flutter Made Easy) & also an example to reflect the firebase firestore data change using GetX & StreamBuilder.
What is Flutter GetX?
The GetX library in flutter is a very extra lightweight plugin & a powerful package that will help flutter developers to build apps much faster.
Using GetX we can easily switch between screens, show snack bar, show dialog and bottom sheet that too without passing any context.
Then, it combines high-performance state management, intelligent dependency injection & route management that to quickly.
learn more: Introduction to getx library
Video Tutorial
Let’s begin
Required Flutter Dependencies for the tutorial
under your project open pubspec.yaml file and under dependencies section add them.
dependencies:
  get:   # getx plugin

  #firebase
  cloud_firestore: ^0.14.1+3 #to make use of firebase classes and methods
Here I have made use of 2 dependencies
- get: to add getx package to our flutter project, Using getx, flutter app development become much faster, you can easily achieve task such as showing snack bar, dialog and many more like state management and route management. learn more: https://pub.dev/packages/get
- cloud_firestore: To play with Firebase cloud firestore data, Cloud Firestore is a flexible, NoSQL cloud database to store data. learn more: https://pub.dev/packages/cloud_firestore
Flutter State Management using GetX – Example 1
This Example 1 – will be on Normal/Static data to demonstrate State Management using GetX.
1st Step: Create a new Flutter Project
2nd Step: Add Get dependencies
dependencies:
  get:
Add the dependencies and hit the pub get button.
3rd Step: Create a new Dart file in the lib
In your lib directory create a new dart file and name it as “CounterState.dart”
Then the below code has
A variable count with an initial value of 0 which is kept in observable
observable means any changes in this variable will be reflected to its consumer.
Then, I have an increment() function, when called will increase count by +1.
import 'dart:async';
import 'package:get/get.dart';

class CounterState extends GetxController{

  var count = 0.obs;

  increment()=> count++;
}
4th Step: Under main.dart file
main.dart
In the below code I have added a comment refer it
As you can see below code
First of all, I have created an instance of a class CounterState, then I am using Instance Object to get data of the class variable (count) and to call increment to increment the count value by +1.
import 'package:cloud_firestore/cloud_firestore.dart';
import 'package:firebase_core/firebase_core.dart';
import 'package:flutter/material.dart';
import 'package:flutter_getx_demo/CounterState.dart';
import 'package:get/get.dart';
import 'Page2.dart';
void main(){
  runApp(MyApp());
}

class MyApp extends StatelessWidget {
  // This widget is the root of your application.
  @override
  Widget build(BuildContext context) {
    return GetMaterialApp(
      title: 'Flutter Demo',
      debugShowCheckedModeBanner: false,
      theme: ThemeData(

        primarySwatch: Colors.blue,

        visualDensity: VisualDensity.adaptivePlatformDensity,
      ),
      home: MyHomePage(),
    );
  }
}

class MyHomePage extends StatefulWidget {
  @override
  _MyHomePageState createState() => _MyHomePageState();
}

class _MyHomePageState extends State<MyHomePage> {

  final CounterState counterState = Get.put(CounterState());  // create instance of a class.

  @override
  Widget build(BuildContext context) {
    return Scaffold(
      body: Column(
        mainAxisAlignment: MainAxisAlignment.center,
        children: [
          Center(
            child: Obx(()=>Text("Counter Value is : ${counterState.count} ") ), //get count variable value
          ),
          FlatButton(onPressed: (){

            Get.to(Page2());  //getx to navigate

          }, child: Text("GO TO PAGE 2"),color: Colors.blue,),
        ],
      ),
      floatingActionButton: FloatingActionButton(
        onPressed: () {
               counterState.increment();  //on button press call increment function
        },
        child: Icon(Icons.add),
      ),
    );
  }
}
5th Step: Create a new dart Page
Create a new Dart file by the name “Page2.dart”.
Here first create an Instance of a class and using Get we can find the updated value of the data present in that CounterState class.
I mean to say the incremented value on both the page will be same.
import 'package:flutter/material.dart';
import 'package:flutter_getx_demo/CounterInstance.dart';
import 'package:get/get.dart';

class Page2 extends StatelessWidget {

  final CounterInstance counterInstance = Get.find();
  @override
  Widget build(BuildContext context) {
    return Scaffold(
      body: Center(
        child: Text("${counterInstance.count}",
                 style: TextStyle(fontSize: 25),
                 ),
      ),
    );
  }
}
Watch this video tutorial for the basic of Flutter GetX
Flutter State Management using GetX – Firebase firestore Example 2
This is Example 2 – Will be dynamic state management using GetX controller and StreamBuilder.
First of all, you need to connect your flutter project with the firebase console
1st Step: Create a new project in the firebase console
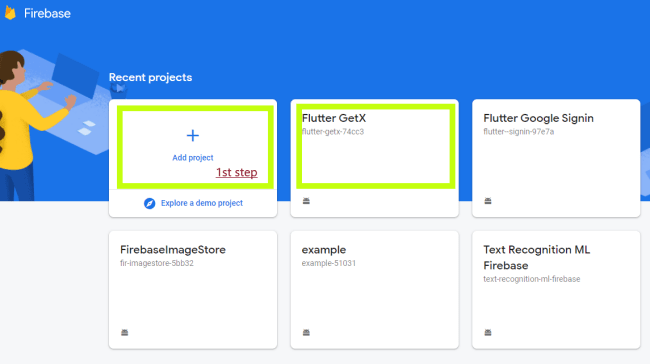
Then, add the app
Select Android
(Sorry, I don’t have iPhone or MAC BOOK to show to iOS steps)
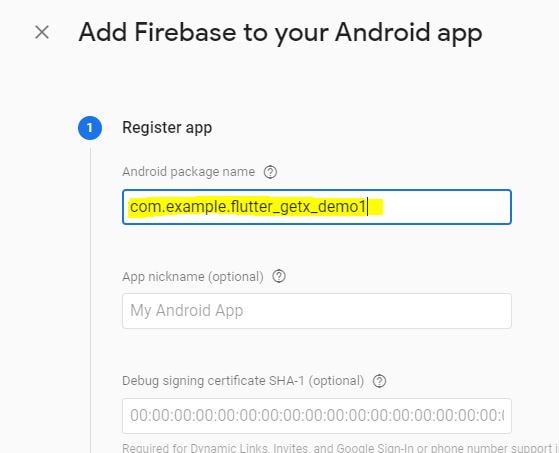
Find Android package name under AndroidManifest.xml file
Flutter Project > android > app > AndroidManifest.xml
Then Firebase will give you a googleservices.json file that you need to add under
Flutter Project > android > app
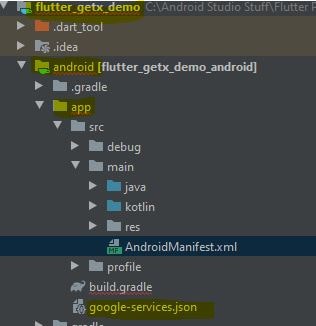
then, you need to add some firebase dependencies and classpath
Project-level build.gradle (<project>/build.gradle):
buildscript {
  repositories {
    // Check that you have the following line (if not, add it):
    google()  // Google's Maven repository
  }
  dependencies {
    ...
    // Add this line
    classpath 'com.google.gms:google-services:4.3.4'
  }
}

allprojects {
  ...
  repositories {
    // Check that you have the following line (if not, add it):
    google()  // Google's Maven repository
    ...
  }
}
App-level build.gradle (<project>/<app-module>/build.gradle):
apply plugin: 'com.android.application'
// Add this line
apply plugin: 'com.google.gms.google-services'    //add this line

dependencies {
  // Import the Firebase BoM
  implementation platform('com.google.firebase:firebase-bom:25.12.0')   //add this line

  implementation 'com.google.firebase:firebase-analytics'    //add this line


}
then, you are done, now just run your app on your physical device to check if your app is connected to the firebase server.
Firebase Console will show you a message, saying you are successfully connected.
2nd Step: Add Required Dependencies
dependencies:
  get:     #for GETX plugin
  cloud_firestore: ^0.14.1+3    #to get data from Firestore cloud
add this to both dependencies and hit the pub get button.
3rd Step: Let’s Create firestore database collection
Go to Firebase Console, and open the recent project you are work on and then go to Cloud Firestore > here create a new Database,
and Enter the path/data collection as shown in the below screenshot
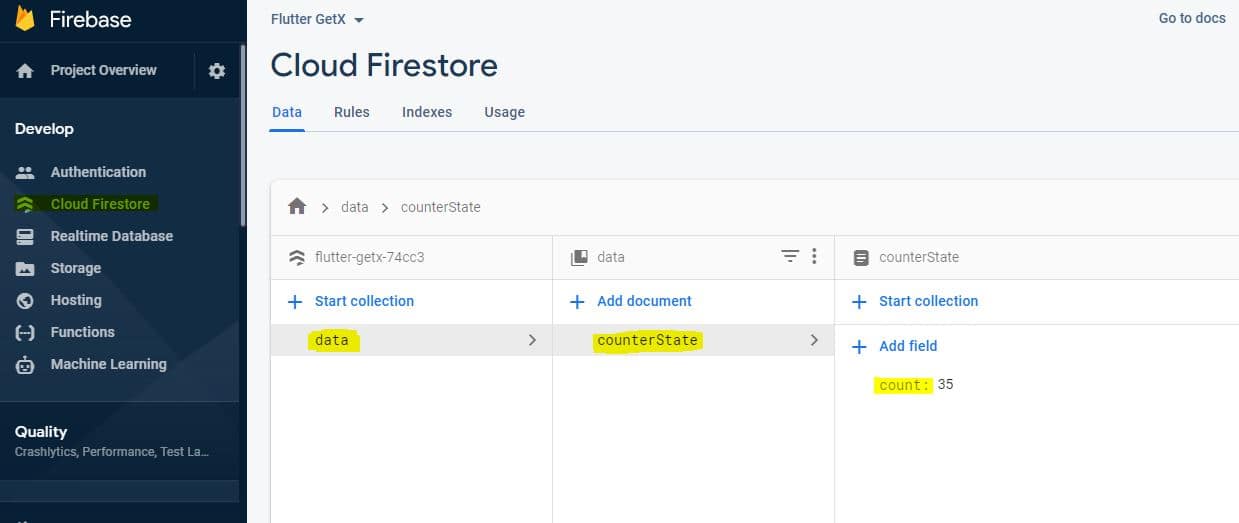
this will be the path where we will store the count variable data.
4th Step: Coding – using GetX and StreamBuilder
CounterState.dart
Here Stream is used to keeping a look at data snapshot changes, Whenever any data is been changed in the server, automatically the consumer of that data will get updated Stream to listen, StreamController and StreamBuilder.
import 'dart:async';
import 'package:cloud_firestore/cloud_firestore.dart';
import 'package:get/get.dart';

class CounterState extends GetxController{

  StreamController<int> streamController   = StreamController<int>();

  // the path from where our data will be fetched and displayed to used
  Stream<DocumentSnapshot> doc =      Firestore.instance.collection("data").document("counterState").snapshots();

  void StartStream(){
      doc.listen((event) {
         // here count is a field name in firestore database
        streamController.sink.add(event.data()['count']);
      });
  }

  @override
  FutureOr onClose() {
    streamController.close();
  }
}
main.dart
import 'package:cloud_firestore/cloud_firestore.dart';
import 'package:firebase_core/firebase_core.dart';
import 'package:flutter/material.dart';
import 'package:flutter_getx_demo/CounterState.dart';
import 'package:get/get.dart';
import 'Page2.dart';
void main() async{
  WidgetsFlutterBinding.ensureInitialized();
  await Firebase.initializeApp();    // initializedApp with Firebase
  runApp(MyApp());
}

class MyApp extends StatelessWidget {
  // This widget is the root of your application.
  @override
  Widget build(BuildContext context) {
   // wrap full app with GetMaterialApp so that GetX properties can be used
    return GetMaterialApp(
      title: 'Flutter Demo',
      debugShowCheckedModeBanner: false,
      theme: ThemeData(

        primarySwatch: Colors.blue,

        visualDensity: VisualDensity.adaptivePlatformDensity,
      ),
      home: MyHomePage(),
    );
  }
}

class MyHomePage extends StatefulWidget {
  @override
  _MyHomePageState createState() => _MyHomePageState();
}

class _MyHomePageState extends State<MyHomePage> {

  int count ; // a variable that store data value available in server

  // create instance of a class using getX put properties
  final CounterState counterState = Get.put(CounterState());

  @override
  void initState() {
    super.initState();
    //start fetching data from firebase server
    counterState.StartStream();
  }

  @override
  Widget build(BuildContext context) {
    return Scaffold(
      body: Center(
        child: Column(
          mainAxisAlignment: MainAxisAlignment.center,
          children: [
             // StreamBuilder that keep UI up to date
             // in the sense when data is been changed is refected to app UI
            StreamBuilder(
                stream:  counterState.streamController.stream,
                builder: (BuildContext context,AsyncSnapshot<dynamic> snapshot){
                  count = snapshot.data;
                  return Text("Stream : $count ");
                }
            ),

            FlatButton(
              onPressed: (){
               // call function to add +1
              _Add_data();

              },color: Colors.blue,

              child: Text("Add +1 ",style: TextStyle(color: Colors.white),),
            ),
          ],
        ),
      ),

    );
  }

  void _Add_data() {
    // collection field where data should be updated
    Map<String,int> demodata = {
      "count":(count+1).toInt(),
    };

    //the document path where data much be updated
    DocumentReference  documentReference = Firestore.instance.collection("data").document("counterState");
    //
    documentReference.update(demodata);
  }

}
The explanation is been done in the above code in //comment read them
Output
View post on imgur.com
Recommended post on Flutter GetX Library
Firebase Authentication using Flutter GetX library – VelocityX
Flutter Firebase Google Sign In method




[…] Single TextField to login with Email, Username, phoneno – using Flutter GetX State Management […]