Hi Guys, Welcome to Proto Coders Point. In this flutter article let’s learn about Chip widget in flutter. In this tutorial will understand the fundamentals of chip widget with example & then implement the same to understand real-world use-case of chip widget.
Without any further ado, let’s get started.
What is Flutter Chip Widget
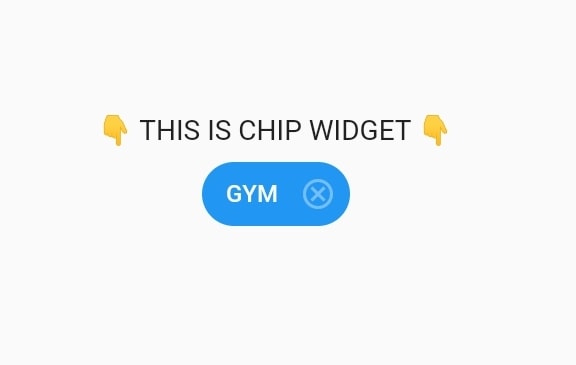
A Chip in flutter is a material design widget which is in-build in flutter framework sdk. It is a roundeded rectangle shaped compact element that hold a label & other customizable properties in it. Here is how chip looks:
Real-world use case of flutter chip widget:
- ToDo app -> List of remembering sort notes, keeping single key note as chips.
- Add to favorite -> List of removeable items, for Example: Adding favorite contacts to chip, creating list of favorite songs etc.
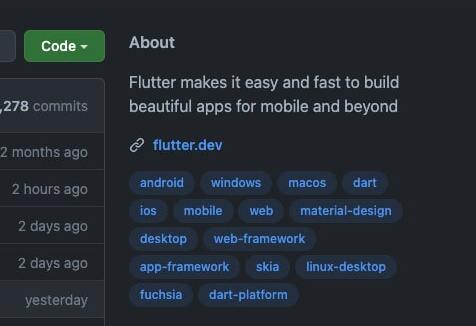
- Post Tags -> You might have seen in GitHub, StackOverFlow etc.
- HashTag on social media.
Flutter Chip Widget Constructor
Here one property is required i.e. label. Other’s are set default and customizable.
Chip({
  Key? key,
  Widget? avatar,
  required Widget label,
  TextStyle? labelStyle,
  EdgeInsetsGeometry? labelPadding,
  Widget? deleteIcon,
  VoidCallback? onDeleted,
  Color? deleteIconColor,
  bool useDeleteButtonTooltip = true,
  String? deleteButtonTooltipMessage,
  BorderSide? side,
  OutlinedBorder? shape,
  Clip clipBehavior = Clip.none,
  FocusNode? focusNode,
  bool autofocus = false,
  Color? backgroundColor,
  EdgeInsetsGeometry? padding,
  VisualDensity? visualDensity,
  MaterialTapTargetSize? materialTapTargetSize,
  double? elevation,
  Color? shadowColor
})
Commonly used properties of chip widget:
- padding: Give padding space arount the chip widget.
- backgroundColor: As the name itself says, used to set color to chips.
- avator: Show a leading Widget inside chip: Display a Small image or Icon before label in chip widget.
- deleteIcon: Show a delete icon in chip.
- onDeleted(): Event Function is called when user click on deleteIcon.
Learn more about other properties in Offlical Docs.
Chip Widget Simple Example
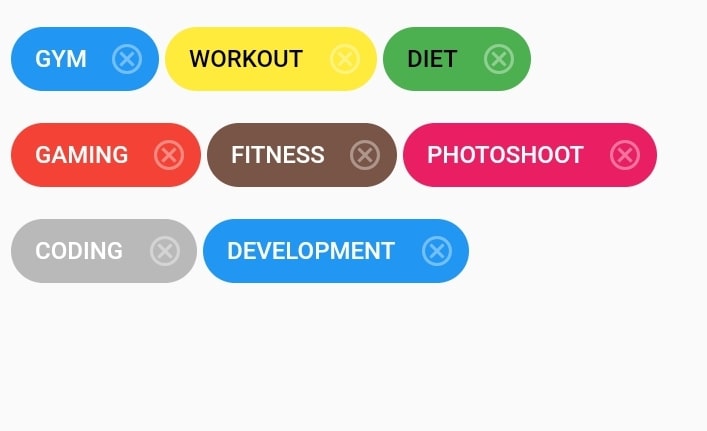
The below Code is an example to show many chips in flutter. In below code I used Wrap widget as parent, which has multiple children i.e. Chips, I used Wrap widget because it will automatically adjust and be responsive, The chip will automatically move down line when used Wrap.
Code:
import 'package:flutter/material.dart';

void main() {
  runApp(const MyApp());
}

class MyApp extends StatelessWidget {
  const MyApp({Key? key}) : super(key: key);

  // This widget is the root of your application.
  @override
  Widget build(BuildContext context) {
    return MaterialApp(
      debugShowCheckedModeBanner: false,
      title: 'Flutter Demo',
      theme: ThemeData(
        primarySwatch: Colors.blue,
      ),
      routes: {'/': (context) => MyHomePage()},
    );
  }
}

class MyHomePage extends StatefulWidget {
  const MyHomePage({Key? key}) : super(key: key);

  @override
  State<MyHomePage> createState() => _MyHomePageState();
}

class _MyHomePageState extends State<MyHomePage> {
  @override
  Widget build(BuildContext context) {
    return SafeArea(
      child: Scaffold(
        body: Padding(
            padding: const EdgeInsets.only(top: 10, left: 8),
            child: Wrap(
              spacing: 3,
              children: [
                Chip(
                  label: Text("GYM"),
                  labelStyle: TextStyle(fontSize: 12, color: Colors.white),
                  backgroundColor: Colors.blue,
                  deleteIcon: Icon(
                    Icons.cancel_outlined,
                    color: Colors.white38,
                    size: 18,
                  ),
                  onDeleted: () {
                    print("deleted");
                  },
                ),
                Chip(
                  label: Text("WORKOUT"),
                  labelStyle: TextStyle(fontSize: 12, color: Colors.black),
                  backgroundColor: Colors.yellow,
                  deleteIcon: Icon(
                    Icons.cancel_outlined,
                    color: Colors.white38,
                    size: 18,
                  ),
                  onDeleted: () {
                    print("deleted");
                  },
                ),
                Chip(
                  label: Text("DIET"),
                  labelStyle: TextStyle(fontSize: 12, color: Colors.black),
                  backgroundColor: Colors.green,
                  deleteIcon: Icon(
                    Icons.cancel_outlined,
                    color: Colors.white38,
                    size: 18,
                  ),
                  onDeleted: () {
                    print("deleted");
                  },
                ),
                Chip(
                  label: Text("GAMING"),
                  labelStyle: TextStyle(fontSize: 12, color: Colors.white),
                  backgroundColor: Colors.red[500],
                  deleteIcon: Icon(
                    Icons.cancel_outlined,
                    color: Colors.white38,
                    size: 18,
                  ),
                  onDeleted: () {
                    print("deleted");
                  },
                ),
                Chip(
                  label: Text("FITNESS"),
                  labelStyle: TextStyle(fontSize: 12, color: Colors.white),
                  backgroundColor: Colors.brown,
                  deleteIcon: Icon(
                    Icons.cancel_outlined,
                    color: Colors.white38,
                    size: 18,
                  ),
                  onDeleted: () {
                    print("deleted");
                  },
                ),
                Chip(
                  label: Text("PHOTOSHOOT"),
                  labelStyle: TextStyle(fontSize: 12, color: Colors.white),
                  backgroundColor: Colors.pink,
                  deleteIcon: Icon(
                    Icons.cancel_outlined,
                    color: Colors.white38,
                    size: 18,
                  ),
                  onDeleted: () {
                    print("deleted");
                  },
                ),
                Chip(
                  label: Text("CODING"),
                  labelStyle: TextStyle(fontSize: 12, color: Colors.white),
                  backgroundColor: Colors.black26,
                  deleteIcon: Icon(
                    Icons.cancel_outlined,
                    color: Colors.white38,
                    size: 18,
                  ),
                  onDeleted: () {
                    print("deleted");
                  },
                ),
                Chip(
                  label: Text("DEVELOPMENT"),
                  labelStyle: TextStyle(fontSize: 12, color: Colors.white),
                  backgroundColor: Colors.blue,
                  deleteIcon: Icon(
                    Icons.cancel_outlined,
                    color: Colors.white38,
                    size: 18,
                  ),
                  onDeleted: () {
                    print("deleted");
                  },
                ),
              ],
            )),
      ),
    );
  }
}
Result:
How to Dynamically Add & remove Chips in flutter – Example
Basically, Our app will have a TextField & a Button by which user can create a chip in flutter app, The user need to enter text in textField and press on submit button to add a new chip. if user want to remove any chip that he created then he can simply click on delete icon that is associated with chip.
Complete Source Code
Create a dart file in lib directory, This will be our dataModel class (ChipModel.dart)
ChipModel.dart
//Here id is used so that we can identify which chip to delete when delete event performed.
// and name is the label text that will be shown on chips

class ChipModel{
  final String id;
  final String name;
  ChipModel({required this.id,required this.name});
}
main.dart
import 'dart:math';

import 'package:flutter/material.dart';
import 'package:flutter_remove_hash/Chip_Model.dart';

class ChipExample extends StatefulWidget {
  const ChipExample({Key? key}) : super(key: key);
  @override
  State<ChipExample> createState() => _ChipExampleState();
}

class _ChipExampleState extends State<ChipExample> {
  final List<ChipModel> _chipList = []; // To Store added chips.

  final TextEditingController _chipTextController = TextEditingController();

  //A Function to delete a Chip when user click on deleteIcon on Chip
  void _deleteChip(String id) {
    setState(() {
      _chipList.removeWhere((element) => element.id == id);
    });
  }

  @override
  Widget build(BuildContext context) {
    return SafeArea(
      child: Scaffold(
        body: Column(
          children: [
            Text("Add Chips",style: TextStyle(fontSize: 25),),
            Padding(
              padding: EdgeInsets.all(10),
              child: Wrap(
                spacing: 10,
                children: _chipList.map((chip) => Chip(
                          label: Text(chip.name),
                          backgroundColor: Colors.primaries[Random().nextInt(Colors.primaries.length)],
                          onDeleted: ()=> _deleteChip(chip.id), // call delete function by passing click chip id
                        ))
                    .toList(),
              ),
            ),
            Expanded(
              child: Align(
                alignment: FractionalOffset.bottomCenter,
                child: Padding(
                    padding: EdgeInsets.only(bottom: 10.0),
                    child: Row(
                      children: [
                        Expanded(
                          child: TextField(
                            controller: _chipTextController,
                            decoration:
                                InputDecoration(border: OutlineInputBorder()),
                          ),
                        ),
                        SizedBox(
                          width: 5,
                        ),
                        ElevatedButton(
                            onPressed: () {
                              // add data text enter in textField into ChipModel
                              setState(() {
                                _chipList.add(ChipModel(
                                    id: DateTime.now().toString(),
                                    name: _chipTextController.text));
                                _chipTextController.text = '';
                              });
                            },
                            child: Text("Add Chip"))
                      ],
                    )),
              ),
            )
          ],
        ),
      ),
    );
  }
}
Here is how above code works:


![AWS Load Balancers with EC2 Instances – Complete Tutorial [2025] Overview image of AWS Load Balancer tutorial setup steps](https://protocoderspoint.com/wp-content/uploads/2025/06/AWS-Load-Balancer-741x486.png)











![AWS Load Balancers with EC2 Instances – Complete Tutorial [2025] Overview image of AWS Load Balancer tutorial setup steps](https://protocoderspoint.com/wp-content/uploads/2025/06/AWS-Load-Balancer-324x160.png)