
")


Hi Guys, Welcome to Proto Coders Point, In this flutter tutorial we will discuss on flutter provider,
By using provider in flutter we will develop an simple Notes app or to do list app in flutter.
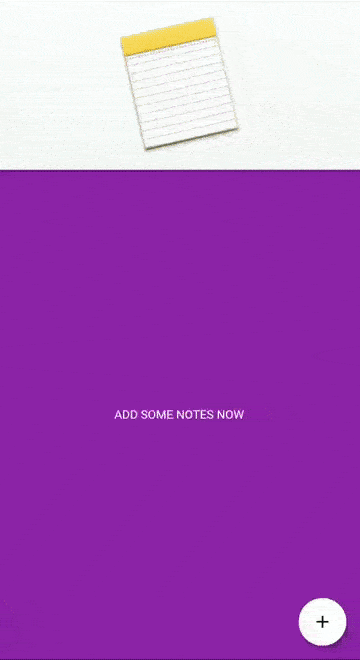
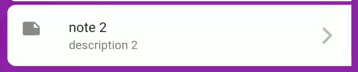
DEMO
What is Flutter provider?
A Provider in flutter is a wrapper around Inherited widget to make it easier to use & more reusable.
By using flutter provider instead of manual writting inheritedwidget, you get simplied alocation of resourse & greatly reduce boilerplate over making new class each time when data gets changed.
For Example: If any data gets changed and need to updated into the App UI, then Instead of rebuilding full hierarchy of Widgets, we can simply Update value of Flutter Provider Consumer Widgets.
Learn more about Flutter Provider
Beginner in provider? Have a look at basic of it : https://protocoderspoint.com/flutter-provider-for-beginners-tutorial-with-example/
So let’s begin…
Video Tutorial
Creating Notes/ To do List app using flutter – provider
Step 1: Create a new Flutter Project
Offcourse you need to create new flutter project, In my case i am making use of android studio as my IDE to develop flutter applications.
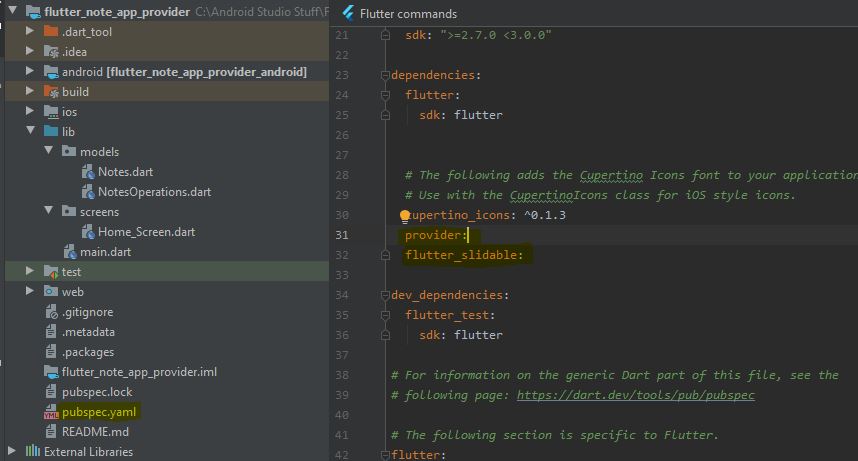
Step 2: Add required dependencies – Provider library and Slidable library
Then, as we are building Notes app/to do list app in flutter by using Provider class we need to add Provider dependencies in our flutter project.
And then, we also need Slidable so that using can easily slide the listTile to delete or remove any notes to do.
Slidabe listTile to delete list
add this both dependencies in pubspec.yaml file as soon in below screenshot
Learn more about this plugin library
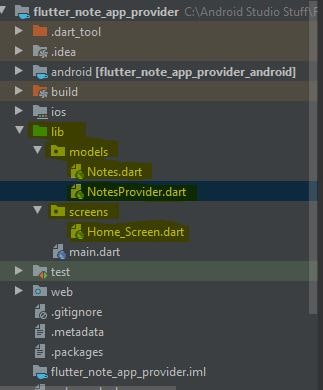
Step 3: Create 2 folder in lib directory and create dart files
Then in lib directory of your flutter project, you need to create 2 directory by name
- model : Will have 2 files : Notes.dart and NotesProvider.dart
- Screen : Will have 1 file : Home_Screen.dart
Create respective dart files under those folder as shown below
Step 4: Source code
main.dart
import 'package:flutter/material.dart';
import 'package:flutter_note_app_provider/models/NotesProvider.dart';
import 'package:flutter_note_app_provider/screens/Home_Screen.dart';
import 'package:provider/provider.dart';

void main() {
  runApp(MyApp());
}

class MyApp extends StatelessWidget {
  // This widget is the root of your application.
  @override
  Widget build(BuildContext context) {
    return ChangeNotifierProvider(
      create: (context)=>NotesProviders(),
      child: MaterialApp(
        title: 'Flutter Demo',
        debugShowCheckedModeBanner: false,
        theme: ThemeData(
          primarySwatch: Colors.blue,
          visualDensity: VisualDensity.adaptivePlatformDensity,
        ),
        home: Home_Screen()
      ),
    );
  }
}
Under Model folder
Notes.dart
In Notes Class we have 2 field to hold data i.e title,description and a Constructor.
This class will work and data model to handle them.
class Notes{
  String title;
  String description;

  Notes(this.title,this.description);
}
NotesProviders.dart
In NotesProviders class has a list of type<Notes> where we gonna store all the data the user create to store ToDo List notes.
It has 2 function
addNotes: that will help us to add data to the List of Array notes.
removeNotes: that will help us deleting/removing notes from the List
NoteProvider class is extended with ChangeNotifier because whenever any data is been changed or when user add notes, the data consumer will get notified, for that we make use of notifyListeners(); to notify all the data consumer.
import 'package:flutter/cupertino.dart';
import 'package:flutter_note_app_provider/models/Notes.dart';
class NotesProviders extends ChangeNotifier {

  //Notes List
 List<Notes> _notes = new List<Notes>();

 List<Notes> get getNotes{
   return _notes;
 }

// function to add data to list of notes
 void addNotes(String title,String descriptions)
 {
   Notes note = new Notes(title, descriptions);

   _notes.add(note);

    notifyListeners();
 }

 // function to remove or delete notes by using list index position
 void removeNotes(int index)
 {
   _notes.removeAt(index);
   notifyListeners();
 }


}
Screen Folder
Home_Screen.dart
import 'package:flutter/cupertino.dart';
import 'package:flutter/material.dart';
import 'package:flutter_note_app_provider/models/Notes.dart';
import 'package:flutter_note_app_provider/models/NotesProvider.dart';
import 'package:provider/provider.dart';
import 'package:flutter_slidable/flutter_slidable.dart';

// ignore: camel_case_types
class Home_Screen extends StatelessWidget {
  @override
  Widget build(BuildContext context) {
    return Scaffold(
      backgroundColor: Colors.purple[600],
     appBar: AppBar(
         titleSpacing: 0.0,
       toolbarHeight: 200,
       title: Image.network("https://9to5mac.com/wp-content/uploads/sites/6/2019/11/how-to-quickly-select-move-delete-notes-iphone-ipad-two-finger-tap.jpeg?quality=82&strip=all",fit: BoxFit.cover,)
     ),

      body: Padding(
        padding: const EdgeInsets.all(8.0),
        child: Consumer<NotesProviders>(
          builder: (context,NotesProviders data,child){
            return data.getNotes.length !=0 ? ListView.builder(
              itemCount: data.getNotes.length,
              itemBuilder: (context,index){
                return CardList(data.getNotes[index],index);
              },
            ): GestureDetector(onTap: (){
              showAlertDialog(context);
            },child: Center(child: Text("ADD SOME NOTES NOW",style: TextStyle(color: Colors.white,),)));
          },
        ),
      ),

      floatingActionButton: FloatingActionButton(onPressed: () {
        showAlertDialog(context);
      },
          backgroundColor: Colors.white,
          child: Icon(Icons.add,color: Colors.black,),
      ),
    );

  }

}

// ignore: must_be_immutable
class CardList extends StatelessWidget {
  final Notes notes;
  int index;

  CardList(this.notes,this.index);

  @override
  Widget build(BuildContext context) {
    return Padding(
      padding: const EdgeInsets.all(2.0),
      child:Slidable(
        actionPane: SlidableDrawerActionPane(),
        actionExtentRatio: 0.25,
        child: Container(
          decoration: BoxDecoration(
            color: Colors.white,
            borderRadius: BorderRadius.only(
              bottomLeft: Radius.circular(10),
              topLeft: Radius.circular(10),

            )
          ),
          child: ListTile(
           leading: Icon(Icons.note),
              title: Text(notes.title),
            subtitle: Text(notes.description),
            trailing: Icon(Icons.arrow_forward_ios,color: Colors.black26,),
          ),
        ),

        secondaryActions: <Widget>[
          IconSlideAction(
            caption: 'Delete',
            color: Colors.red,
            icon: Icons.delete,
            onTap: (){
              print("HELLO DELETED");
              Provider.of<NotesProviders>(context,listen: false).removeNotes(index);
            }
          ),
        ],
      ),
    );
  }
}

showAlertDialog(BuildContext context) {

  TextEditingController _Title = TextEditingController();
  TextEditingController _Description = TextEditingController();
  // Create button
  Widget okButton = FlatButton(
    child: Text("ADD NOTE"),
    onPressed: () {
      Provider.of<NotesProviders>(context,listen: false).addNotes(_Title.text, _Description.text);
      Navigator.of(context).pop();
    },
  );

  // Create AlertDialog
  AlertDialog alert = AlertDialog(
    title: Text("ADD A NEW NOTE "),
    content: Column(
      mainAxisSize: MainAxisSize.min,
      children: [
        TextField(
          controller: _Title,
          decoration: InputDecoration(hintText: "Enter Title"),
        ),
        TextField(
          controller: _Description,
          decoration: InputDecoration(hintText: "Enter Description"),
        ),
      ],
    ),
    actions: [
      okButton,
    ],
  );

  // show the dialog
  showDialog(
    context: context,
    builder: (BuildContext context) {
      return alert;
    },
  );
}
Download the Project from GITHUB


