
Hi Guys, Welcome to Proto Coders Point, In this Flutter Tutorial we gonna learn about Provider in Flutter.
Here is Official Library document https://pub.dev/packages/provider
What is Flutter Provider?
In Short, Provider is like a way to use an InheritedWidget.
For Example: If any data gets changed and need to updated into the App UI, then Instead of rebuilding full hierarchy of Widgets, we can simply Update value of Flutter Provider Consumer Widgets.
Video Tutorial
Below Example is by using setState() method
Using setState method is good when there is Small UI data change.
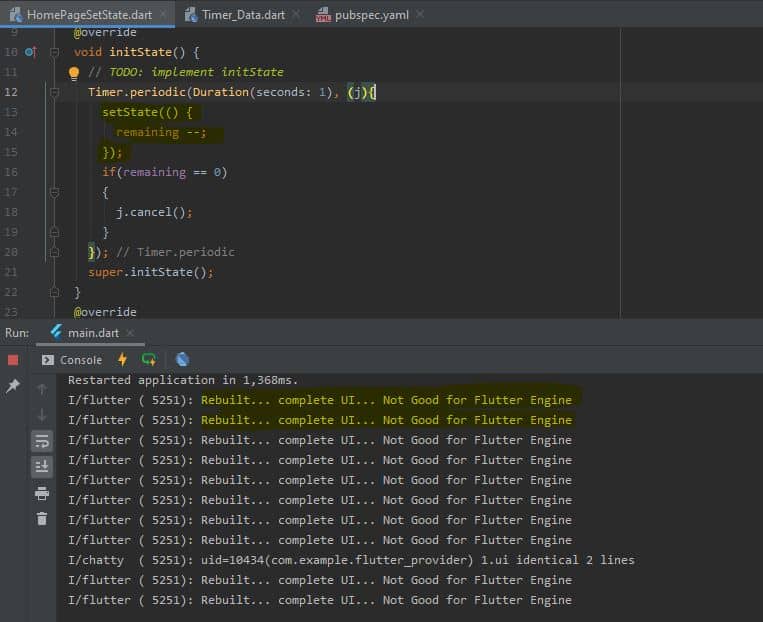
Normally by making us of setState() method whole application UI gets rebuilt and continuously keeps rebuilding full application which is not a good sign to be a Flutter developer and this may give lots of load to the flutter engine (which may led to app performance issue).
As you can see in above screenshot: i have made use of Count timer to decrement a variable value then simple display the updated variable value into the UI
Here Count down will be from 10 – 0, and every 1 second decrement the value by 1 and as value gets updated, whole app UI gets rebuilt for 10 time
You can view the logcat print statement above.
For a simple application which has very few data change/update then, it’s fine to make use of setState() method, but it is better to make use of other method like flutter provider when it comes for complex application build.
Flutter provider tutorial and Explaination
In provider we have 3 important part that are :
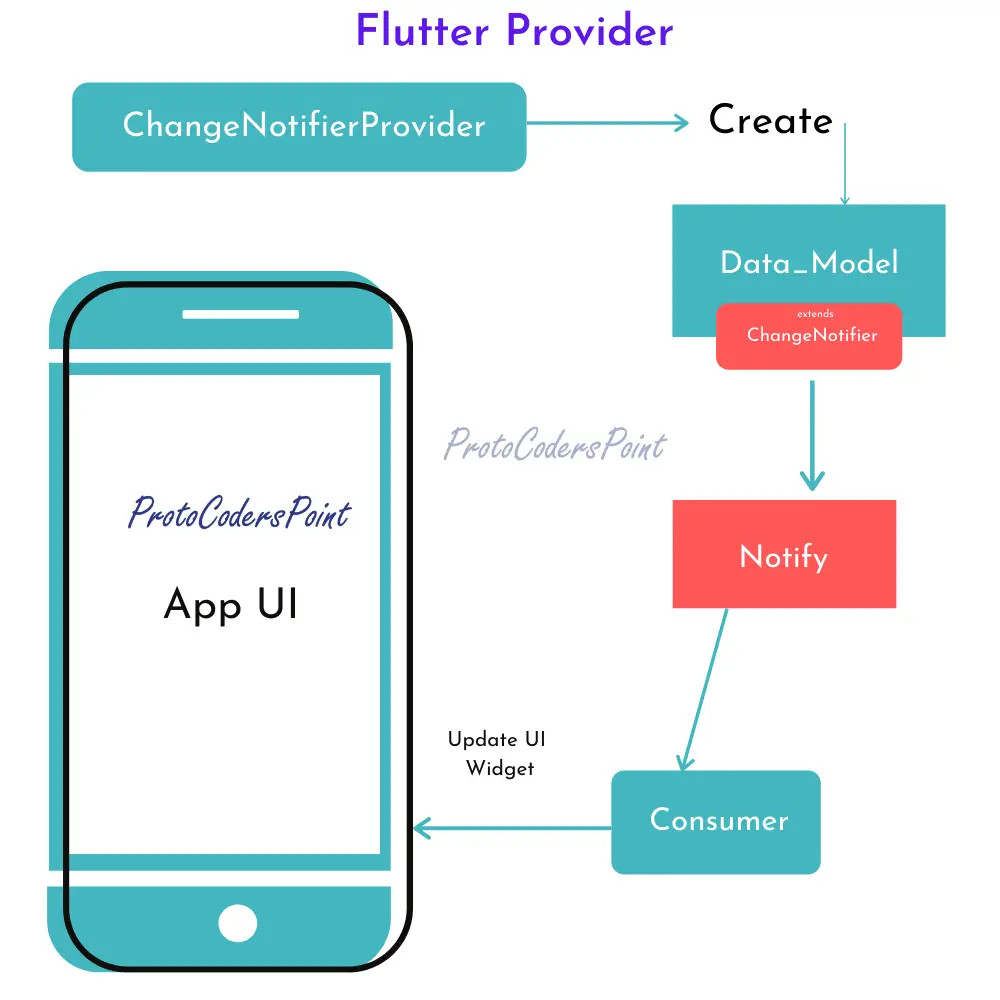
- ChangeNotifierProvider
- Update/ChangeNotifier
- Consumer
ChangeNotifierProvider : which creates the instance of your data, as you can see in above diagram changeNotifierProvider will create instance of DataModel class
Update: from any where inside your page you want to update the value, you just get instance of that provider and manupulate that value as per and then as soon as the value is been change, data model will notify all the Flutter Consumer widgets.
And then once the consumer get Notified about the data change, you can update your widget as per.
Flutter provider tutorial with Example
Step 1: Creating a new Flutter Project
Step 2: Open pubspec.yaml file and add the dependencies
dependencies:
  provider: ^4.3.2+2  #latest version check official site
Step 3: Create a new Dart file in lib directory
After adding dependencies, then create a new dart file in lib directory on your flutter project
then name it as “Timer_Data.dart”
Timer_Data.dart
import 'package:flutter/cupertino.dart';
import 'package:flutter/foundation.dart';

class Timer_Data extends ChangeNotifier
{
  int _time_remain_provider=11; // initial value of count down timer

  int gettime_remain_provider() => _time_remain_provider;   //method to get update value of variable

  updateRemainingTime(){
    _time_remain_provider --;  //method to update the variable value

    notifyListeners();
  }

}
In above source we have a variable that holds initial value,
then there is a method that gets updated value of variable
and then it has updateRemainingTime() method that will decrement the value by -1.
Step 4: Create one more dart file for UI Design (Homepage.dart)
Homepage.dart
import 'dart:async';

import 'package:flutter/material.dart';
import 'package:flutter_provider/Timer_Data.dart';
import 'package:provider/provider.dart';

class HomePage extends StatefulWidget {
  @override
  _HomePageState createState() => _HomePageState();
}

class _HomePageState extends State<HomePage> {

  var remaining = 10;

  @override
  void initState() {
    // TODO: implement initState

    Timer.periodic(Duration(seconds: 1), (j){
      setState(() {
        remaining --;
      });

      if(remaining == 0)
        {
          j.cancel();
        }


    });

    Timer.periodic(Duration(seconds: 1), (t){

      var timeinfo = Provider.of<Timer_Data>(context,listen: false);

      timeinfo.updateRemainingTime();

      print(timeinfo.gettime_remain_provider());

      if(timeinfo.gettime_remain_provider() == 0)
        {

          t.cancel();
        }


    });
    super.initState();


  }
  @override
  Widget build(BuildContext context) {

    print("Rebuilt... complete UI... Not Good for Flutter Engine");
    return Scaffold(
      appBar: AppBar(title: Text("Flutter Provider Example"),),
      body: Center(
        child: Column(
          mainAxisAlignment: MainAxisAlignment.center,
          children: [
            Text("With setState property",style: TextStyle(fontSize: 20),),
            Text("$remaining",style: TextStyle(fontSize: 30),),

            SizedBox(height: 25,),

            Text("By using providers",style: TextStyle(fontSize: 20),),
            Consumer<Timer_Data>(builder: (context, data,child) {
              return Text(data.gettime_remain_provider()?.toString()?? " ",style: TextStyle(fontSize: 30),);
            },)
          ],
        ),
      ),
    );
  }
}
Step 5: create instance using ChangeNotifierProvider in main.dart
This ChangeNotifier Provider will create a instance of Data_Model and then we can easily use the instance value any where inside it’s child widget.
import 'package:flutter/material.dart';
import 'package:flutter_provider/HomePage.dart';
import 'package:flutter_provider/Timer_Data.dart';
import 'package:provider/provider.dart';

void main() {
  runApp(MyApp());
}

class MyApp extends StatelessWidget {
  // This widget is the root of your application.
  @override
  Widget build(BuildContext context) {
    return MaterialApp(
      title: 'Flutter Demo',
      debugShowCheckedModeBanner: false,
      theme: ThemeData(

        primarySwatch: Colors.blue,
        visualDensity: VisualDensity.adaptivePlatformDensity,
      ),
      home: ChangeNotifierProvider(create: (BuildContext context) =>Timer_Data(),
      child: HomePage()),
    );
  }
}
Result
Conclusion
In this Tutorial we learnt basic of flutter provider example – Flutter Application development
Related Articles
Firebase Login using Flutter Provider
")


[…] Beginner in provider? Have a look at basic of it : https://protocoderspoint.com/flutter-provider-for-beginners-tutorial-with-example/ […]
[…] Learn basic of flutter provider […]
[…] Flutter provider for beginners tutorial with app example […]