Hi Guys, Welcome to Proto Coders Point, You might have went across many web application that has feature of sending email to the users, the mail can be for account verification through OTP or any kind of mail.
In this node.js Tutorial, we will implement a nodejs script to learn how to send email from node.js app by using Nodemailer module library.
In this NodeJS send email Article, will learn how to send email using NodeMailer through Gmail Account. (You can use any mail sending service provider)
What is NodeMailer module
When it comes to send email from web app with nodejs as backend, the most famous & widely used module is nodemailer for sending email from nodejs app.
By using NodeMailer we can send emails with content like plainText, HTML Pages, or File Attachment.
Feature of NodeMailer
- Secured Emails Delivery.
- We can embed HTML page in email.
- Add Attachment in email
- Various email transport supported (gmail, yahoo mail, mailtrap etc).
- Zero dependencies on other modules.
Let’s get Started
How to send email using nodemailer example – NODE.JS
There are many modules & packages that helps us in sending emails, from them the most famous & widely used is nodemailer module & one of the favorite module of all the nodejs developer to send email.
Step-by-Step Guide to implement nodejs send email using nodemailer gmail
Step 1: Create NodeJS Project
create a folder for nodejs project & run npm init -y, to generate package.json file.
use below command to do it.
$mkdir email_node
$cd email_node
$npm init -y
Step 2: Install Nodemailer Dependencies
To install the required mailer dependencies run below commond in your terminal
$npm install nodemailer
Step 3: Create javascript file & import required module
To Create file, run:
touch app.js
Import the npm mailer module
const nodejsmailer = require('nodemailer');
Step 4: connect to gmail account using gmail services
initialize create transport using gmail service
var transporter = nodejsmailer.createTransport({
    service:'gmail',
    auth:{
        user:'rajatrrpalankar@gmail.com',
        pass:'<your google account password here>'
    }
});
The above code will simple make a authentication to gmail account by creating transport to send email using nodejs mailer.
Step 5: Sending email using nodemailer through gmail
create a object var that content email details i.e. from, to, subject, & text.
var mailOptions ={
    from:'from----@gmail.com',
    to:'to---@gmail.com',
    subject:"Sending Email to Rajat",
    text:"Welcome to NodeMailer, It's Working",
}
now simple run sendMail function using transport we that we have created above to send the email
transporter.sendMail(mailOptions,function(error,info){
     if(error){
         console.log(error);
     }else{
         console.log('Email Send ' + info.response);
     }
});
Step 6: (optional) send email with file/attachment
var mailOptions ={
    from:'----from----@gmail.com',
    to:'----to---@gmail.com',
    subject:"Sending Email to Rajat",
    text:"Welcome to NodeMailer, It's Working",
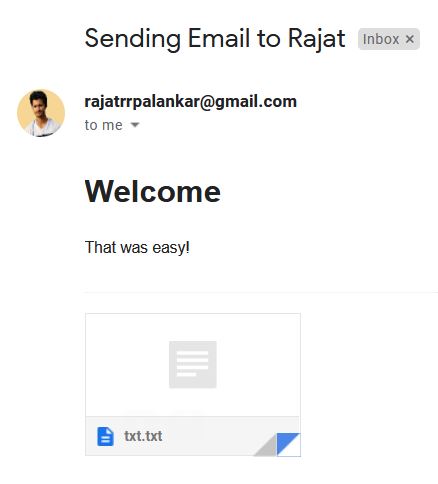
    html: '<h1>Welcome</h1><p>That was easy!</p>',
    attachments: [
        { filename: 'txt.txt', path: './txt.txt' }
     ]
}    // details of to send from, to,  subject, text(message),
Complete Source Code to send email using nodejs script
email_node> app.js
// send an Email from NODEJS Server using nodemailer module
//This tutorial will show you how to use your Gmail account to send an email:

var nodejsmailer  = require('nodemailer'); // use mailer nodejs module

var mailOptions ={
    from:'---from---@gmail.com',
    to:'----to----@gmail.com',
    subject:"Sending Email to Rajat",
    text:"Welcome to NodeMailer, It's Working",
    html: '<h1>Welcome</h1><p>That was easy!</p>',
    attachments: [
        { filename: 'txt.txt', path: './txt.txt' }
     ]
}    // details of to send from, to,  subject, text(message),


var transporter = nodejsmailer.createTransport({
    service:'gmail',
    auth:{
        user:'rajatrrpalankar@gmail.com',
        pass:'<your password>'      // note: always keep password in .env file to keep it hidden
    }
}); // initialize create Transport service

//sends the mail
transporter.sendMail(mailOptions,function(error,info){

     if(error){
         console.log(error);
     }else{
         console.log('Email Send ' + info.response);
     }
});
Result – Output


