
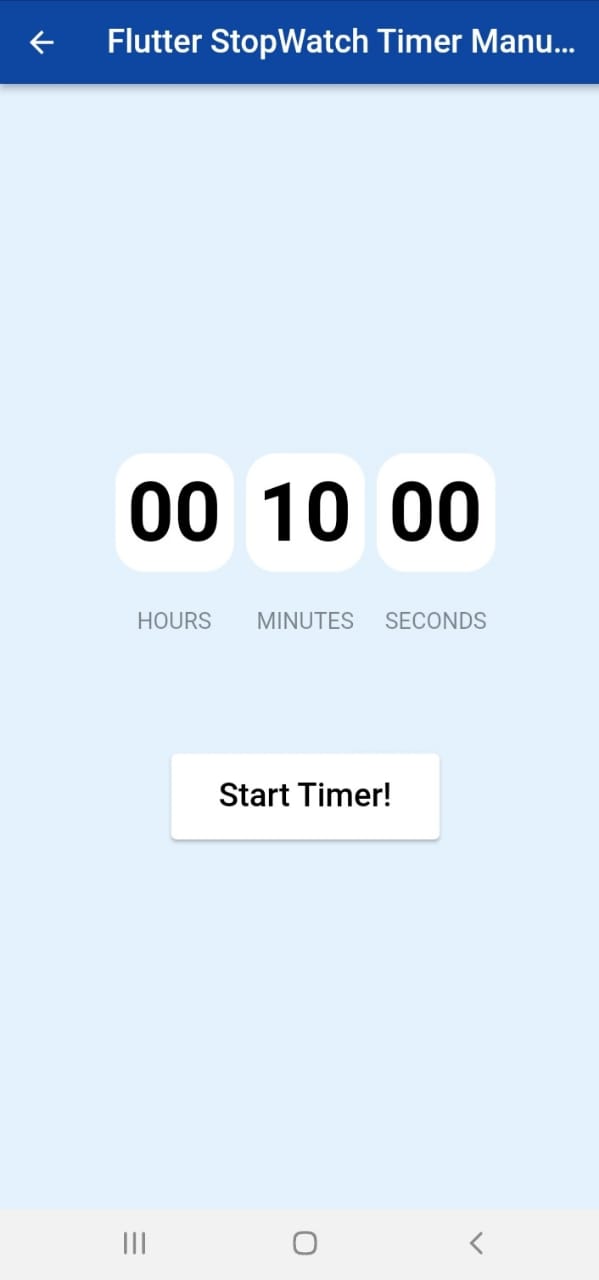
It shows how the stopwatch timer will function in your flutter applications. It displays when the code is successfully executed, the user presses the start timer button, the countdown timing begins, and the user also presses the stop and cancel timer buttons. It will be displayed on your devices.
Returning to the main topic of this article, let’s make a stopwatch app. There are some posts on how to build a stopwatch (such as this one), but I’d like to share an alternative method.
How does a stopwatch work as a timer?
The elapsed time can be obtained in a variety of formats, including elapsed, elapsedMilliseconds, elapsedMicroseconds, and elapsedTicks. Start the stopwatch by calling start. Use stop to stop or pause the stopwatch. When only temporarily pausing, use starts to resume.
Flutter has a Stopwatch class. It can be started and stopped, and the elapsed time is displayed in the elapsedMilliseconds property. In theory, we could create a page with a Stopwatch instance and then simply display the stopwatch. elapsedMilliseconds.
However, there is one issue: Stopwatch does not provide any callbacks, so we don’t know when to re-render. The Timer class comes in handy here. It sets off a callback at the specified interval. As a result, we can trigger the re-render with a Timer, read stopwatch.elapsedMilliseconds, and rebuild the page.
This blog will go over the Stopwatch Timer in Flutter. We will look at how to implement a stopwatch timer demo programme and show how to create it in your flutter applications.
Flutter StopWatch Example
How to Implement Code in a Flutter without using package:
Inside the lib folder, create a new dart file called StopWatchTimerDemoPage.dart
First, we’ll make a const countdownDuration is equal to Duration as a ten minutes variable and a duration variable. We’ll also make a timer variable and a bool countDown equal to true.
static const countdownDuration = Duration(minutes: 10);
Duration duration = Duration();
Timer? timer;

bool countDown =true;
We will define the initState() method. The resetTime() function will be added to this method. We will define the code below.
@override
void initState() {
  // TODO: implement initState
  super.initState();
  resetTime();
}
We’ll define the resetTime() function:
We’ll make a resetTime() method. If countDown is true in this method, we will add duration equal to countdownDuration to setState((){}). Otherwise, duration equals Duration in setState((){}) .
void resetTime(){
  if (countDown){
    setState(() =>
      duration = countdownDuration);
  } else{
    setState(() =>
      duration = Duration());
  }
}
We’ll now write a startTimer() function. That dart will be imported: async;
import 'dart:async';
We’ll add a timer variable that’s the same as the Timer. The periodic add duration was one second, and the addTime() method was used. The code will be defined further below.
void startTimer(){
  timer = Timer.periodic(Duration(seconds: 1),(_) => addTime());
}
We will define the addTime() method as follows:
Inside the addTime method, we will add the final addSeconds equal to the count. If down is true, countDown is true then -1 else 1. We will include setState(){}. Inside, the duration is equal to the final seconds. addSeconds plus inSeconds. If the second is less than zero, the timer is triggered. cancel() Otherwise, the duration equals the Duration (seconds: seconds).
void addTime(){
  final addSeconds = countDown ? -1 : 1;
  setState(() {
    final seconds = duration.inSeconds + addSeconds;
    if (seconds < 0){
      timer?.cancel();
    } else{
      duration = Duration(seconds: seconds);
    }
  });
}
We’ll now write a stopTimer() method. If the resetTime is equal to true, then the resetTime() method is called. We’ll include a timer. In the setState((){}) method, cancel.
void stopTimer({bool resetsTime = true}){
  if (resetsTime){
    resetTime();
  }
  setState(() => timer?.cancel());
}
Insert the body portion into the buildTime() and buildButtons() widgets. The code will be defined further below.
children: [
    buildTime(),
    SizedBox(height: 80,),
    buildButtons()
  ],
We will define the buildTime() widget as follows:
In this method, we will generate a final hour that is equal to two digits (duration.inHours). The sum of the final minutes is equal to twoDigits(duration.inMinutes.remainder(60)). Final seconds added equals twoDigits(duration.inSeconds.remainder(60)). Row will be returned (). Inside, we’ll add three buildTimeCard() methods, with arguments time and headers. The code will be explained further below.
Widget buildTime(){
  String twoDigits(int n) => n.toString().padLeft(2,'0');
  final hours =twoDigits(duration.inHours);
  final minutes =twoDigits(duration.inMinutes.remainder(60));
  final seconds =twoDigits(duration.inSeconds.remainder(60));
  return Row(
    mainAxisAlignment: MainAxisAlignment.center,
    children: [
      buildTimeCard(time: hours, header:'HOURS'),
      SizedBox(width: 8,),
     buildTimeCard(time: minutes, header:'MINUTES'),
     SizedBox(width: 8,),
     buildTimeCard(time: seconds, header:'SECONDS'),
  ]
  );
}
We will define the buildTimeCard() widget as follows:
We will pass two arguments to this widget: time and header. Column will be returned. Inside, add a container with decoration and its child, to which we will add text when the time comes. We’ll also include another text as a header.
Widget buildTimeCard({required String time, required String header}) =>
    Column(
      mainAxisAlignment: MainAxisAlignment.center,
      children: [
        Container(
          padding: EdgeInsets.all(8),
          decoration: BoxDecoration(
            color: Colors.white,
            borderRadius: BorderRadius.circular(20)
          ),
          child: Text(
          time, style: TextStyle(fontWeight: FontWeight.bold,
          color: Colors.black,fontSize: 50),),
        ),
        SizedBox(height: 24,),
        Text(header,style: TextStyle(color: Colors.black45)),
      ],
    );
The buildButtons() widget will be defined as follows:
In this widget, we will add the final isRunning is equal to the timer is equal to null, then false, otherwise timer.
isActive. We will include a final isCompleted equal to duration. inSeconds equals zero. We’ll return isRunning || isCompleted before inserting a Row() widget. Insert the ButtonWidget class inside. We will define the code below. Two buttons were stopped, and the others were canceled. We will also include a start timer button.
Widget buildButtons(){
  final isRunning = timer == null? false: timer!.isActive;
  final isCompleted = duration.inSeconds == 0;
   return isRunning || isCompleted
       ? Row(
     mainAxisAlignment: MainAxisAlignment.center,
     children: [
       ButtonWidget(
           text:'STOP',
           onClicked: (){
             if (isRunning){
               stopTimer(resetsTime: false);
             }
           }),
       SizedBox(width: 12,),
       ButtonWidget(
           text: "CANCEL",
           onClicked: stopTimer
       ),
     ],
   )
       : ButtonWidget(
       text: "Start Timer!",
       color: Colors.black,
       backgroundColor: Colors.white,
       onClicked: (){
         startTimer();
       });
}
The class ButtonWidget will be defined as follows:
We will make an ElevatedButton in this class(). We’ll add the onPressed method and text inside.
class ButtonWidget extends StatelessWidget {
  final String text;
  final Color color;
  final Color backgroundColor;
  final VoidCallback onClicked;

  const ButtonWidget({Key? key, required this.text, required this.onClicked,
    this.color = Colors.white, this.backgroundColor = Colors.black}) : super(key: key);
  @override
  Widget build(BuildContext context) => ElevatedButton(
    style: ElevatedButton.styleFrom(
      primary: backgroundColor,
      padding: EdgeInsets.symmetric(horizontal: 32, vertical: 16)
    ),
      onPressed: onClicked,
      child: Text(text,style: TextStyle(fontSize: 20,color: color),)
  );

}
Output :
Stopwatch-Timer using Flutter package :
We will now implement the stopwatch Timer using the flutter stop_watch_timer package.
What is the purpose of a stopwatch?
A stopwatch is a watch with buttons that you press at the start and end of an event to determine how long it takes.
Implementation
Step 1: Your requirements should contain the following packages:
stop_watch_timer: ^any
Step 2: Import the library
import 'package:stop_watch_timer/stop_watch_timer.dart';
Step 3: Run flutter packages from your app’s root directory.
Features of stopwatch:
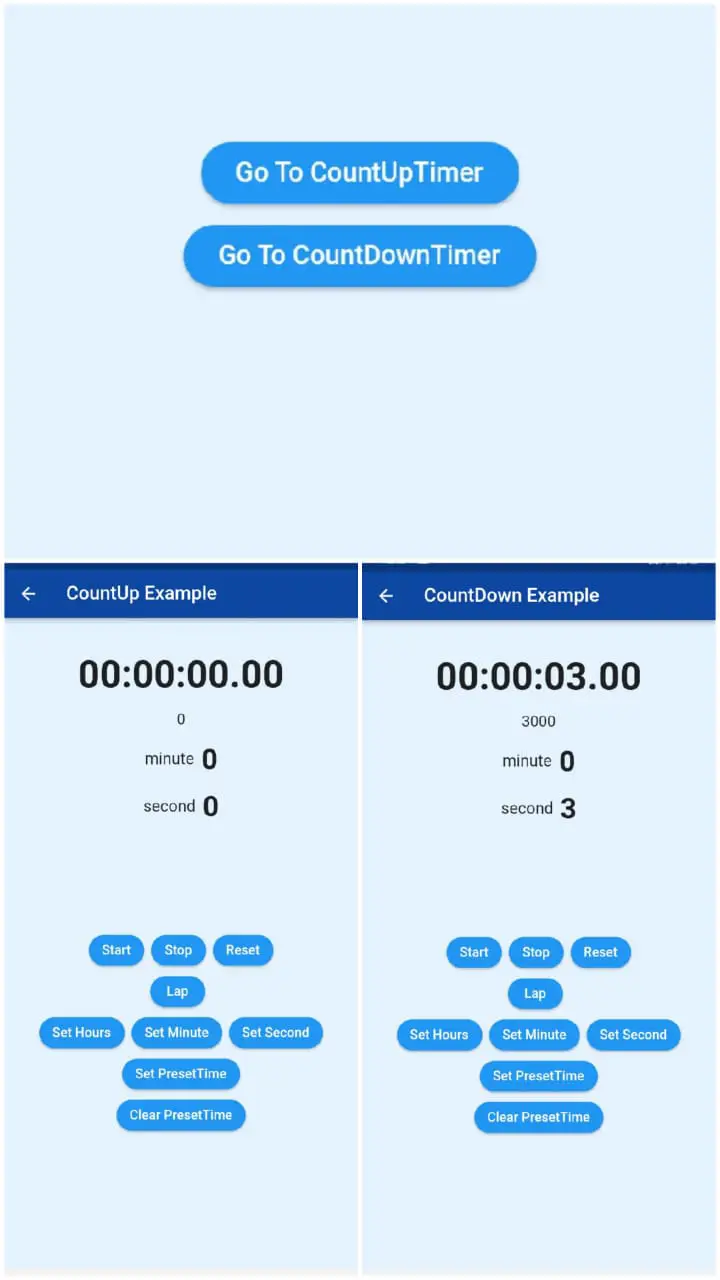
1: CountUp
2: CountDown
Set the mode of stopWatch
1. CountUp :
This is the default setting. Set StopWatchMode.countUp to mode if you want to set it explicitly.
final stopWatchTimer = StopWatchTimer(
  mode: StopWatchMode.countUp
);
2. CountDown :
StopWatchMode can be configured. countDown mode and millisecond delay.
final stopWatchTimer = StopWatchTimer(
  mode: StopWatchMode.countDown,
  presetMillisecond: StopWatchTimer.getMilliSecFromMinute(1), // millisecond => minute.
);
Stopwatch operation
/// Start
_stopWatchTimer.onExecute.add(StopWatchExecute.start);

/// Stop
_stopWatchTimer.onExecute.add(StopWatchExecute.stop);

/// Reset
_stopWatchTimer.onExecute.add(StopWatchExecute.reset);

/// Lap time
_stopWatchTimer.onExecute.add(StopWatchExecute.lap);
Making use of callbacks
final _stopWatchTimer = StopWatchTimer(
  onChange: (value) {
    final displayTime = StopWatchTimer.getDisplayTime(value);
    print('displayTime $displayTime');
  },
  onChangeRawSecond: (value) => print('onChangeRawSecond Value :: $value'),
  onChangeRawMinute: (value) => print('onChangeRawMinute Value :: $value'),
);
Using the stream Show time formatted stopwatch. Using the “rawTime” and “getDisplayTime” functions.
_stopWatchTimer.rawTime.listen((value) => print('rawTime $value ${StopWatchTimer.getDisplayTime(value)}'));
Code implement
Stream builder code example.
StreamBuilder<int>(
  stream: _stopWatchTimer.rawTime,
  initialData: 0,
  builder: (context, snap) {
    final value = snap.data;
    final displayTime = StopWatchTimer.getDisplayTime(value);
    return Column(
      children: <Widget>[
        Padding(
          padding: const EdgeInsets.all(8),
          child: Text(
            displayTime,
            style: TextStyle(
              fontSize: 40,
              fontFamily: 'Helvetica',
              fontWeight: FontWeight.bold
            ),
          ),
        ),
        Padding(
          padding: const EdgeInsets.all(8),
          child: Text(
            value.toString(),
            style: TextStyle(
                fontSize: 16,
                fontFamily: 'Helvetica',
                fontWeight: FontWeight.w400
            ),
          ),
        ),
      ],
    );
  },
),
),
Every minute, “minuteTime” will send a notification.
_stopWatchTimer.minuteTime.listen((value) => print('minuteTime $value'));
StreamBuilder<int>(
  stream: _stopWatchTimer.minuteTime,
  initialData: 0,
  builder: (context, snap) {
    final value = snap.data;
    print('Listen every minute. $value');
    return Column(
      children: <Widget>[
        Padding(
            padding: const EdgeInsets.all(8),
            child: Row(
              mainAxisAlignment: MainAxisAlignment.center,
              crossAxisAlignment: CrossAxisAlignment.center,
              children: <Widget>[
                const Padding(
                  padding: EdgeInsets.symmetric(horizontal: 4),
                  child: Text(
                    'minute',
                    style: TextStyle(
                      fontSize: 17,
                      fontFamily: 'Helvetica',
                    ),
                  ),
                ),
                Padding(
                  padding: const EdgeInsets.symmetric(horizontal: 4),
                  child: Text(
                    value.toString(),
                    style: TextStyle(
                        fontSize: 30,
                        fontFamily: 'Helvetica',
                        fontWeight: FontWeight.bold
                    ),
                  ),
                ),
              ],
            )
        ),
      ],
    );
  },
),
The getDisplayTime func can be used to calculate the parsing time. It displays time in the manner of a traditional stopwatch timer.
Hours \Minute \Second \Millisecond
For example, “02:50:50.50” is 1 hour, 30 minutes, 50 seconds, and 20 milliseconds.
In addition, the display time and split character can be set.
Set the Preset Time
A preset time can be set. “00:01.23” is the time in this case.
This can be set when the timer is in the idle state.
/// Set Millisecond.
_stopWatchTimer.setPresetTime(mSec: 1234);

/// Set Hours. (ex. 1 hours)
_stopWatchTimer.setPresetHoursTime(1);

/// Set Minute. (ex. 30 minute)
_stopWatchTimer.setPresetMinuteTime(30);

///Set Second. (ex. 120 second)
_stopWatchTimer.setPresetSecondTime(120);
Output:
You can refer to this code by clicking on the defined text here.
Link to the GitHub code:
https://github.com/Mitali8620/stop_watch_timer_flutter_app_master.git
Conclusion
I explained the basic structure of the Stopwatch Timer in a flutter in the article; you can modify this code to suit your needs. This was my brief introduction to Effect On User Interaction, and it works with Flutter.
I hope this blog has given you enough information to try out the Stopwatch Timer in your flutter projects. We will demonstrate what the Introduction is. It demonstrates that when the user presses the start timer button, the countdown timing begins, and that the user can also press the stop and cancel timer buttons in your flutter applications. So please give it a shot.
Thank you for taking the time to read this 🙂 Have a Happy day……..
")


