
1. Introduction to Load Balancers
Let’s understand what Load balancers are & how it is helpful. Load balancers are used to handle the incoming traffic and distribute it to multiple servers, it prevent server going to a bottleneck, let’s. assume i have one server it has hundred of request at a same time and thus it will not be able to respond to further request in this case if we have another server to handle those traffic it will be a quick response to the end user so that is the reason for using load balancer through which we can navigate traffic to different servers. They help improve the fault tolerance and performance of applications.
Step By Step Video Tutorial on Load Balancer
Types of Load Balancers in AWS Services:
- Application Load Balancer (ALB): Best for HTTP/HTTPS traffic, layer 7.
- Network Load Balancer (NLB): Ideal for ultra-high performance, layer 4.
- Getway Load Balancer (GWLB): Ultra high-performance, uses GENEVE(Generic Network Virtualization Encapsulation) Protocol on port 6081, layer 3.
In this tutorial, we’ll use the Application Load Balancer, which is perfect for distributing web traffic across multiple EC2 instances.
2. Launching Two EC2 Instances with NGINX Server
To setup a load balance, we require two EC2 instances running Amazon Linux. These will serve as our backend web servers.
Steps:
- Go to the EC2 Dashboard in AWS Console.
- Click Launch Instance.
- Select Amazon Linux AMI.
- Choose t2.micro (free tier eligible).
- In the Configure Instance section, make sure to launch two instances (set count to 2).
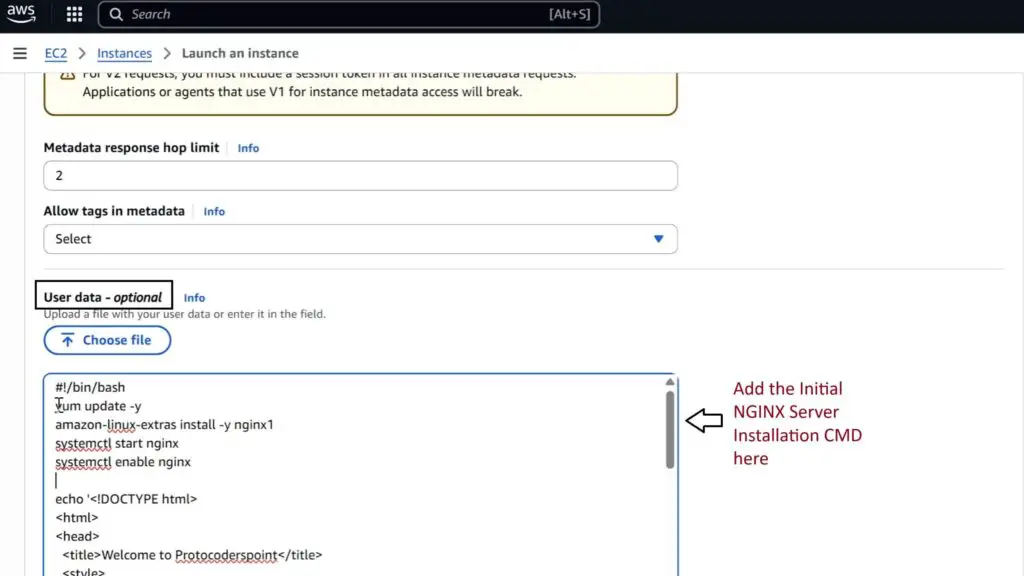
- Scroll to Advanced Details and in the User data, add a script to:
- Install NGINX.
- Create a basic
index.htmlthat shows the private IP of the instance.
#!/bin/bash
sudo apt update
sudo dnf install -y nginx
sudo systemctl start nginx
sudo systemctl enable nginx

set +H
echo "<!DOCTYPE html><html><head><title>Welcome to Protocoderspoint</title><style>body {font-family: Arial, sans-serif; background-color: #f0f0f0; text-align: center; padding-top: 50px;} h1 {color: #333;} p, a {color: #444; font-size: 18px;} .button {display: inline-block; margin-top: 20px; padding: 10px 20px; background-color: #FF0000; color: white; text-decoration: none; border-radius: 5px; font-weight: bold;}</style></head><body><h1>Hello from $(hostname -f)</h1><p>My Website: <a href=\"https://protocoderspoint.com\" target=\"_blank\">protocoderspoint.com</a></p><p>Visit and Subscribe to my YouTube Channel:</p><a class=\"button\" href=\"https://www.youtube.com/@protocoderspoint\" target=\"_blank\">Subscribe on YouTube</a></body></html>" > /usr/share/nginx/html/index.html
The Above Script will install nginx and create a html page, On the page will be just print the Private IP Address of the EC2 server, This helps identify which instance serves the request when accessed through the Load Balancer.
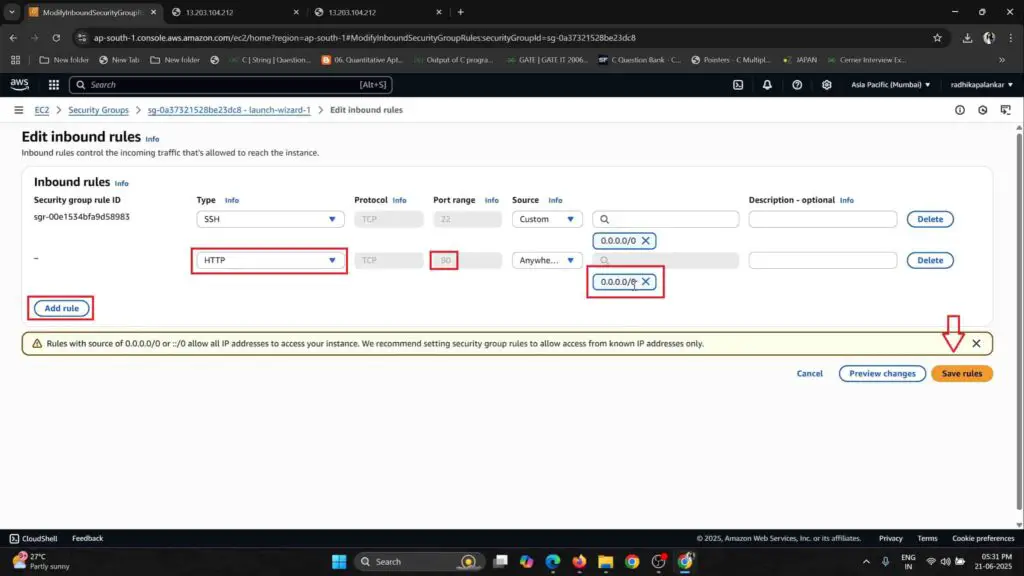
3. Configuring Security Group with Port 80 Access
To access your NGINX server, you need to open port 80 in the instance’s Security Group.
Steps:
- In the Configure Security Group step of EC2 launch:
- Add HTTP (port 80) under Inbound Rules.
- You may also allow SSH (port 22) for troubleshooting (optional).
- Name your security group for easy identification.
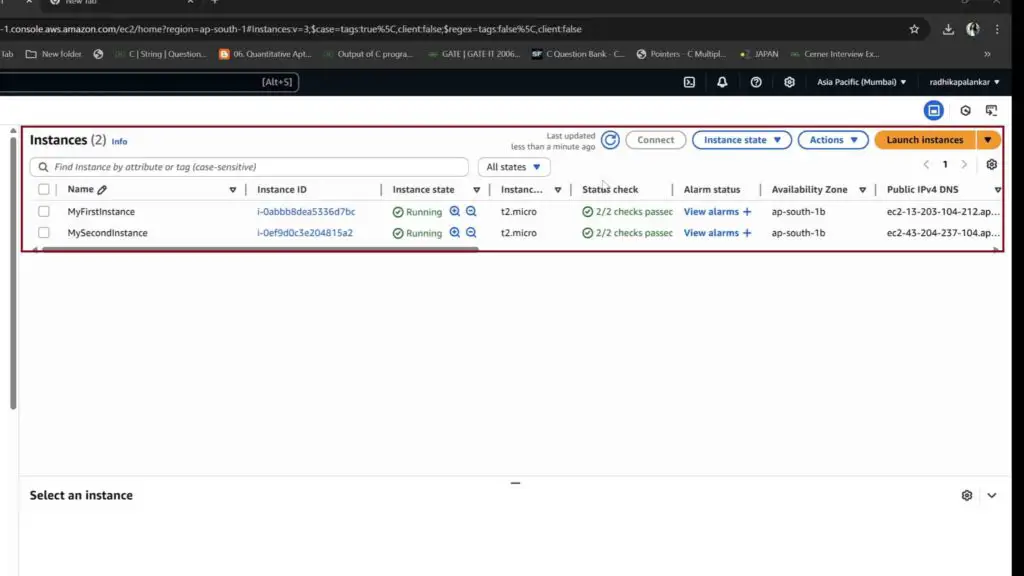
4. Verifying EC2 Instance Web Servers
Once your EC2 instances are running:
- Navigate to the Instances section.
- Copy the Public IP of each instance.
- Open a browser and visit
http://<EC2_Public_IP>.
You should see the web page served by NGINX, displaying the Private IP of that instance.

Repeat the same and check the second instance to confirm both are working.
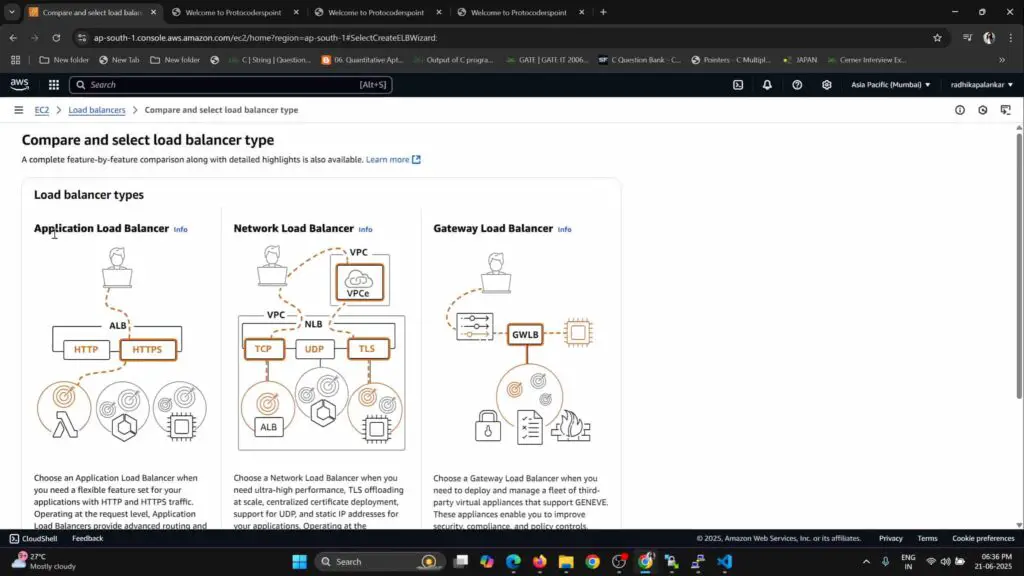
5. Creating a Load Balancer
Now that both servers are ready, let’s create a Load Balancer to distribute traffic among the above 2 instances been created.
Steps:
- Go to the EC2 Dashboard → Load Balancers.
- Click Create Load Balancer.
- Choose Application Load Balancer.
- Provide a name (e.g.,
myLB). - Set the scheme to Internet-facing.
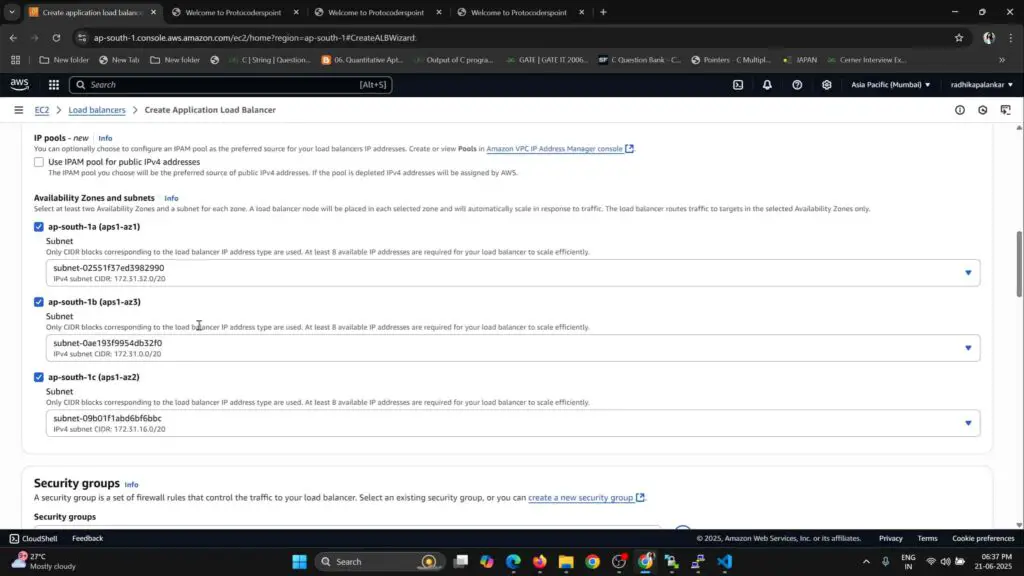
- Choose IPv4 and select at least two Availability Zones with public subnets.
6. Setting Up Security Group on Port 80
You’ll need to assign a security group to the Load Balancer that allows HTTP traffic.
Steps:
- Create or choose a Security Group with Inbound Rule on port 80 (HTTP).
- This security group will be associated with the Load Balancer, not EC2.

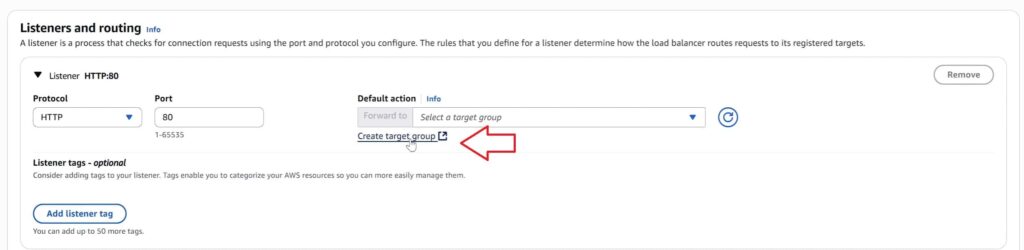
7. Creating Target Group and Registering EC2 Instances
Now we need to create a Target Group that defines how the Load Balancer routes requests to the registered EC2 instances, depending on the traffic.
Steps:
- In Load Balancer setup, create a new Target Group:
- Target type: Instance
- Protocol: HTTP
- Port: 80
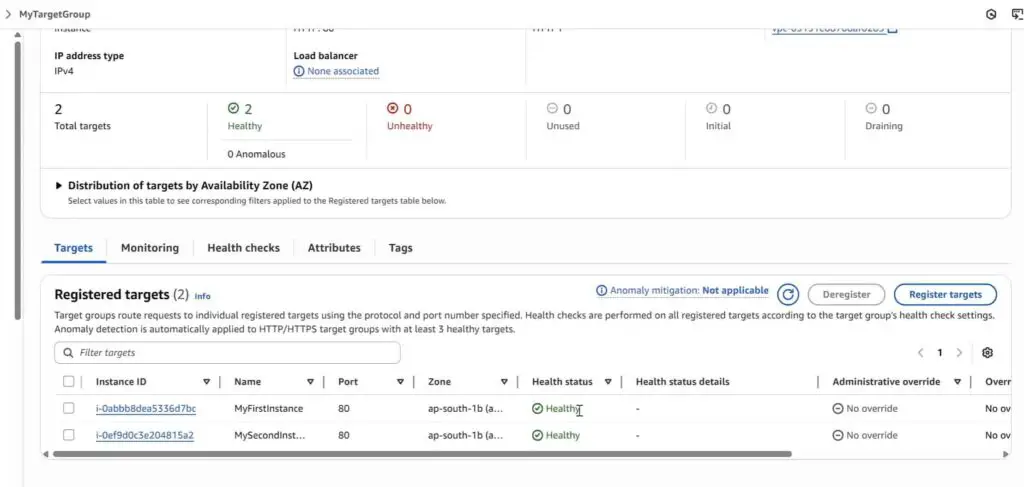
- After creation, go to the Targets tab and click Register Targets.
- Add both EC2 instances and confirm.
8. Completing Load Balancer Setup
Once the Target Group is set, finish creating the Load Balancer:
- Attach the listener to HTTP (port 80).
- Select your previously created Target Group.
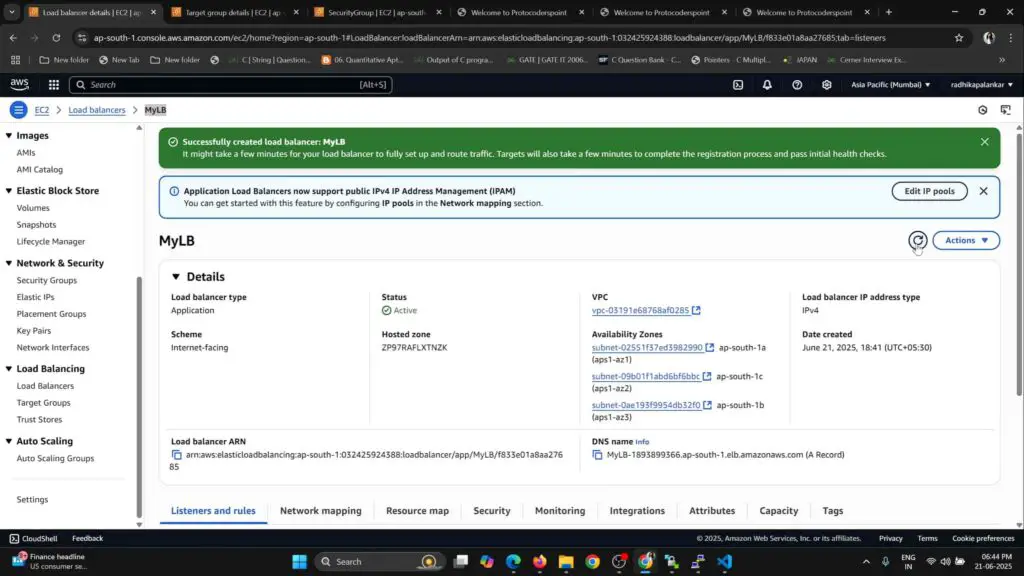
- Click Create Load Balancer.
AWS will take a couple of minutes to provision and bring the Load Balancer into service.
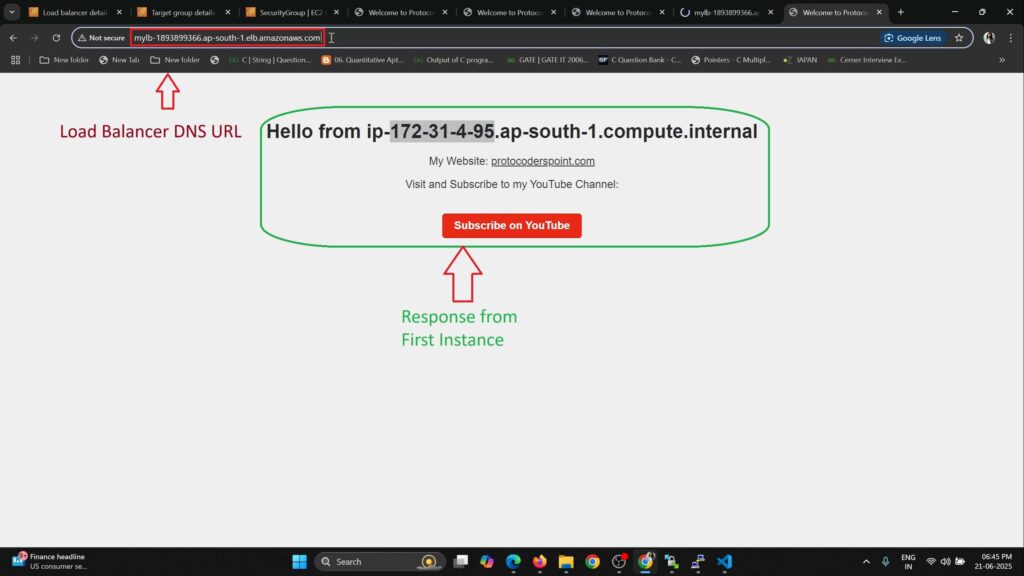
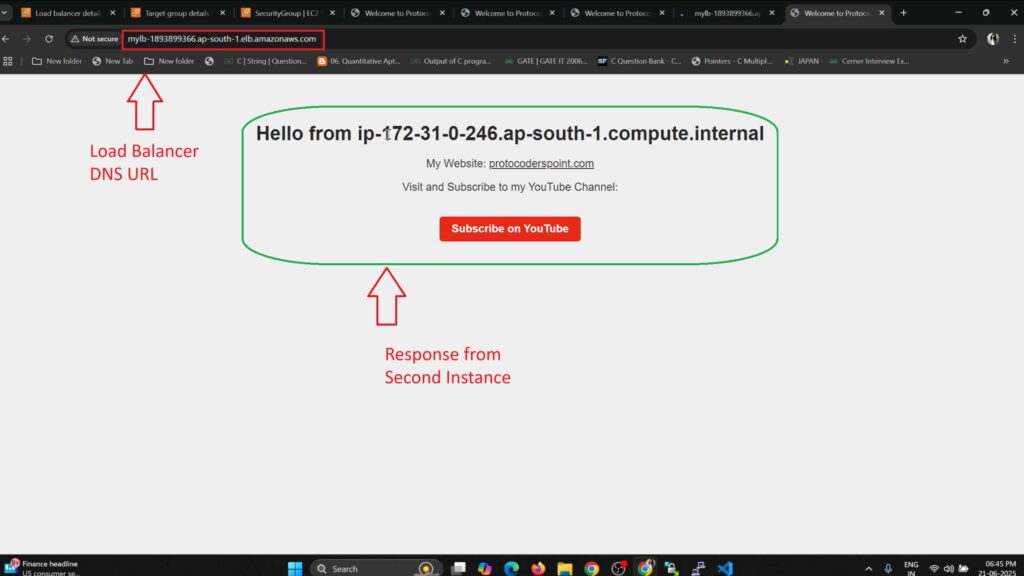
9. Testing with Load Balancer DNS URL
After the Load Balancer is active:
- Go to the Description tab of your Load Balancer.
- Copy the DNS Name.
- Visit the DNS in your browser (
http://<LoadBalancerDNS>).
Refresh the page multiple times. You should see the Private IP change as the Load Balancer alternates requests between the two EC2 instances.
Load Balance Responce from first EC2 Instance
Conclusion
Hurry Congratulations! Now we have successfully created a Load Balancer in AWS with two EC2 instances that simply serve a HTML page, then print the IP address of the respective server. This load-balancing setup ensures that your web traffic is evenly distributed, offering both performance and fault tolerance.


