
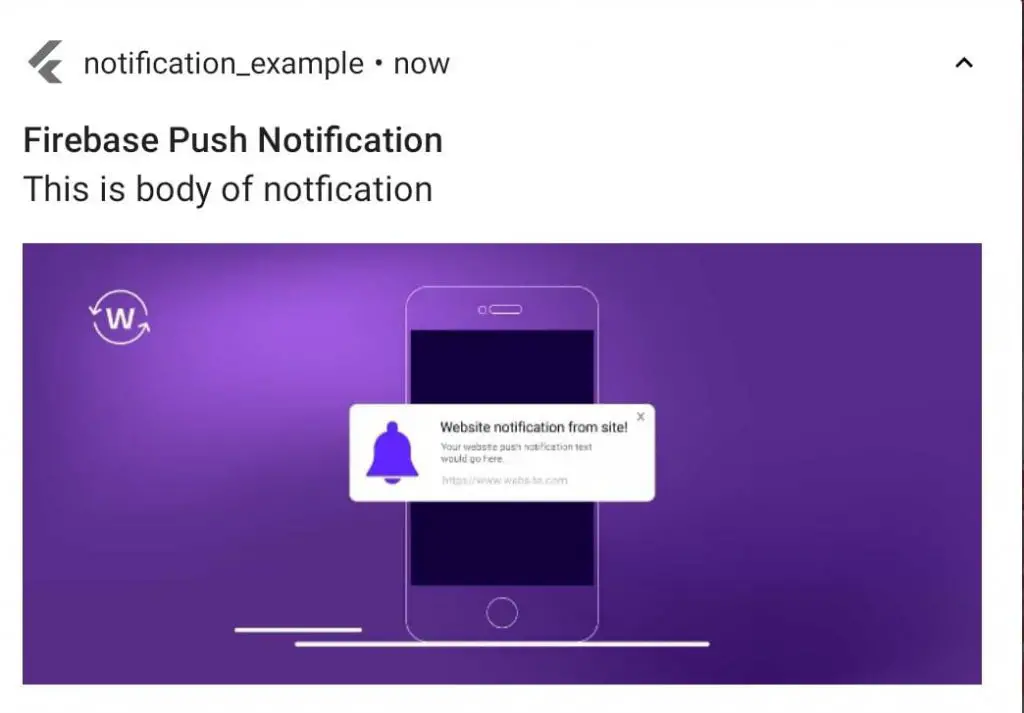
Hi Welcome to Proto Coders Point, In this firebase flutter tutorial, we will learn how to integrate firebase notification in your flutter app.
Note: We’re going to use ‘awesome_notification package‘.
This Article, is a step-by-step tutorial on how to add flutter project to firebase or how to connect flutter project to firebase console & Then code for push notification in flutter app with complete source code at bottom of this article.
What is a push Notification?
A push notification is a way of communication with your app user/customer. Now a days each & every business app, implement push notification into there application so that user get re-engaged to app whenever they get important push notification updates.
Now firebase push notification technology is been rapidly growing in market to communicate with customer/app user.
Let’s quickly start by creating new flutter project & connecting flutter project to firebase.
How to connect flutter project to firebase console for cloud messaging
Video Tutorial
1. Create a new flutter project
Open any existing flutter project, where you want to add firebase push notfication or just create a new flutter project. My favorite IDE is Android Studio, you can choose your favorite IDE to build Flutter Project.
File > New > New Flutter project( give a good name to your flutter project & finish)
2. Add Firebase to your flutter app
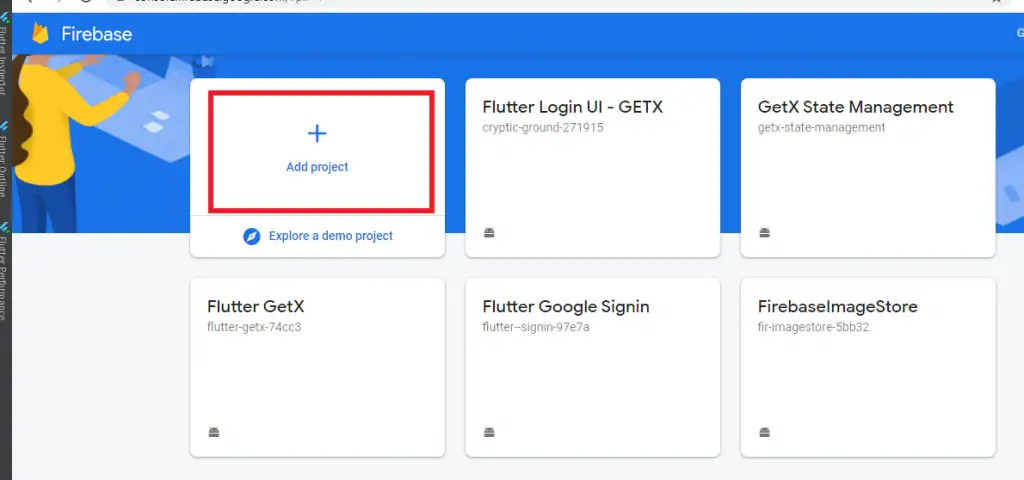
Visit firebase.google.com, SignIn with your Google Account & go to firebase console.
Add Project
click on Add Project to create new firebase project for your flutter app.
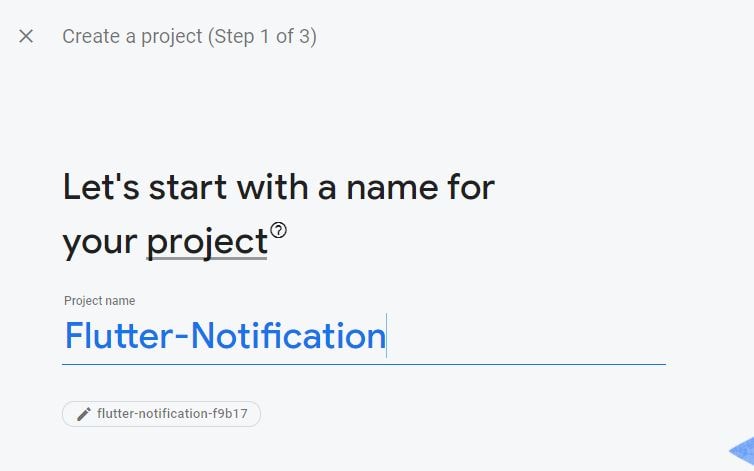
Give a good name for firebase project
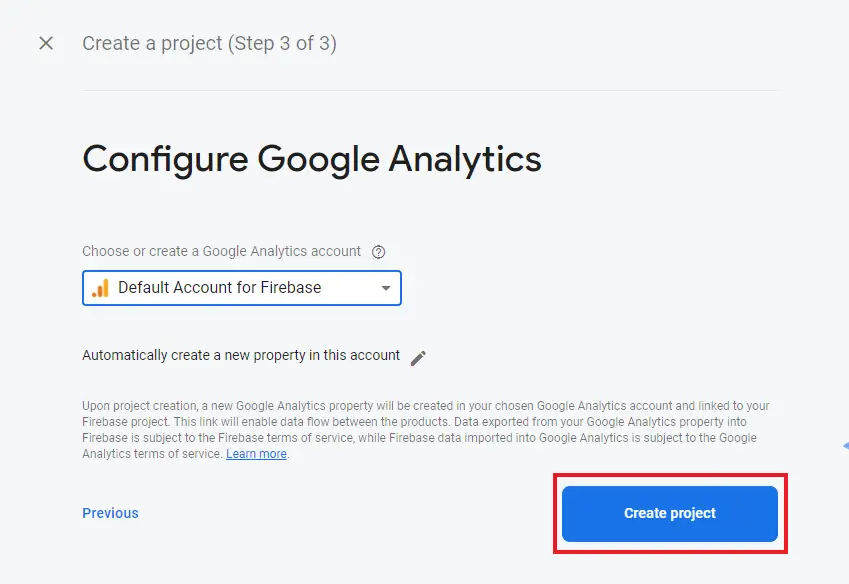
Hit create project button
Then, now our firebase project is ready, now we use need to connect our flutter project to firebase project.
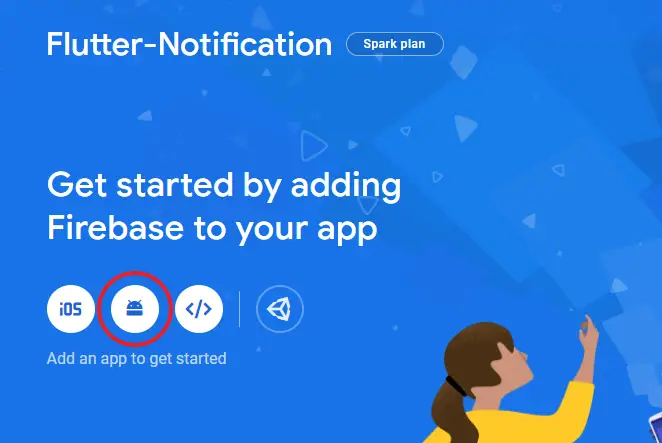
3. [ANDROID] Adding Firebase to your flutter android module
To add android module of your flutter project click on android icon button on firebase console as show in below screenshot.
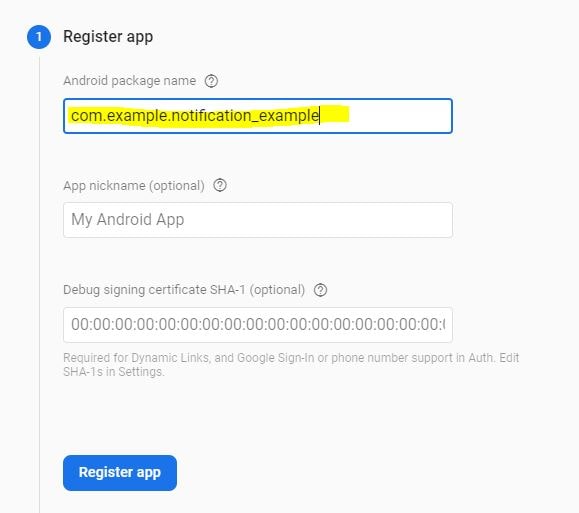
1. Register app in firebase project console
To get android package name, go to your flutter project
[project] android > app > src > main > AndroidManifest.xml as shown in below screenshot.
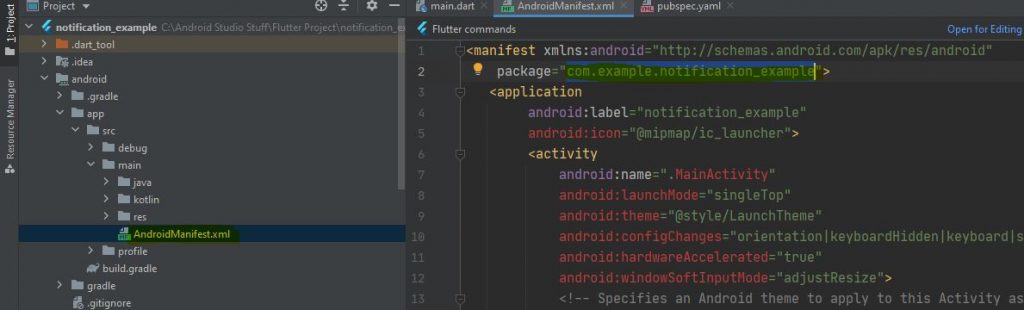
Copy the package name & paste in “Android Package name” for registration of your app.
2. Download google-services.json that firebase provides
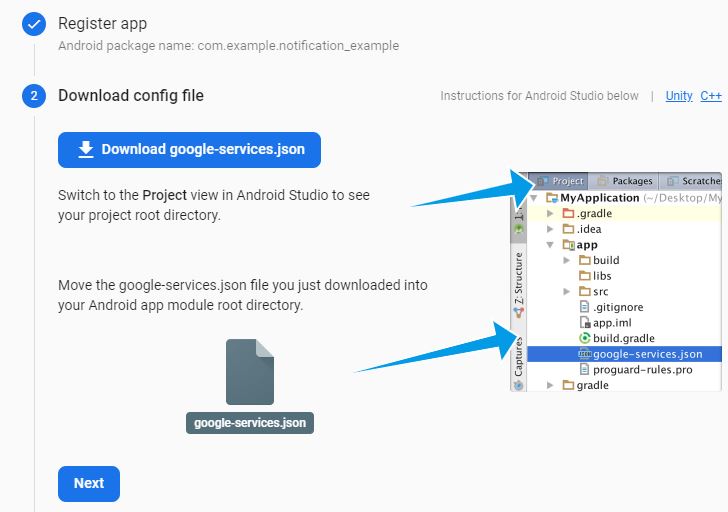
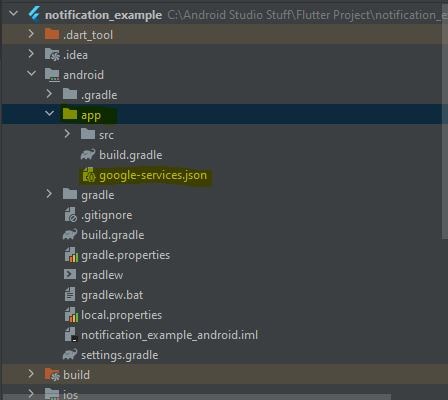
3. copy/paste the google-services.json file in your flutter android module
Now, copy/paste firebase generated google-services.json file into [project] > android > app [ paste here ]. Refer below screenshot to understand where to paste google-services.json file.
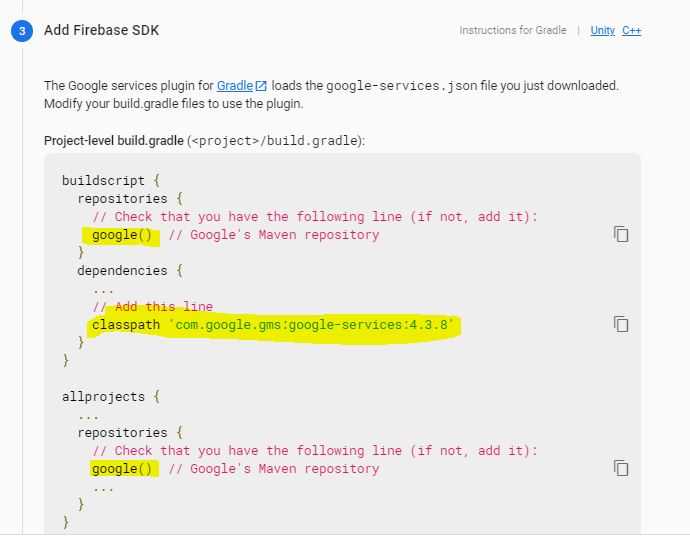
4. Add Firebase SDK
We need google services to load google-services.json file, so add a classpath of google service in your android module
project-level build.gradle file
dependencies {
    classpath 'com.android.tools.build:gradle:4.1.0'
    classpath "org.jetbrains.kotlin:kotlin-gradle-plugin:$kotlin_version"
    // add this line
    classpath 'com.google.gms:google-services:4.3.8'
}
then at bottom of project level build gradle.
// ADD THIS AT THE BOTTOM
apply plugin: 'com.google.gms.google-services'
app-level build gradle
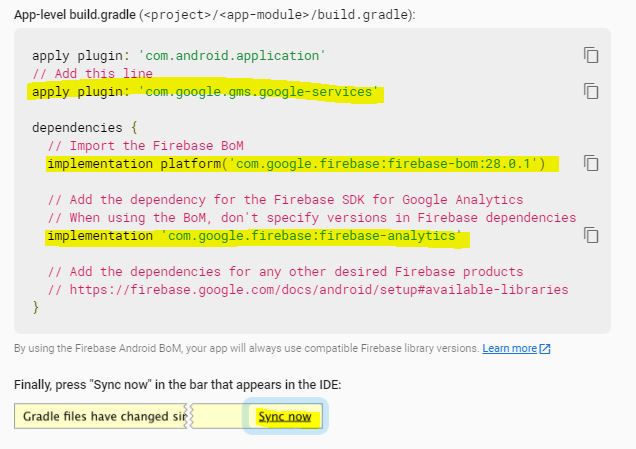
apply plugin: 'com.google.gms.google-services'
dependencies {
    implementation "org.jetbrains.kotlin:kotlin-stdlib-jdk7:$kotlin_version"
    implementation platform('com.google.firebase:firebase-bom:28.0.1')
    implementation 'com.google.firebase:firebase-analytics'
}
Now, We are done with adding Flutter Android Module to Firebase. Now let’s add flutter iOS module to firebase.
3. [iOS] Adding Firebase to your flutter iOS module[iphone]
1. connecting flutter iOS to firebase
Just like we did in android firebase connection, now click on iOS button in firebase console.
2. Register app – Add firebase to ios module of flutter.

where to find bundle ID of iOS flutter?
In iOS the package name key is CFBundleIdentifier in Info.plist
<key>CFBundleIdentifier</key>
<string>$(PRODUCT_BUNDLE_IDENTIFIER)</string>
Which is found in Runner.xcodeproj/project.pbxproj
PRODUCT_BUNDLE_IDENTIFIER = com.example.notificationExample;
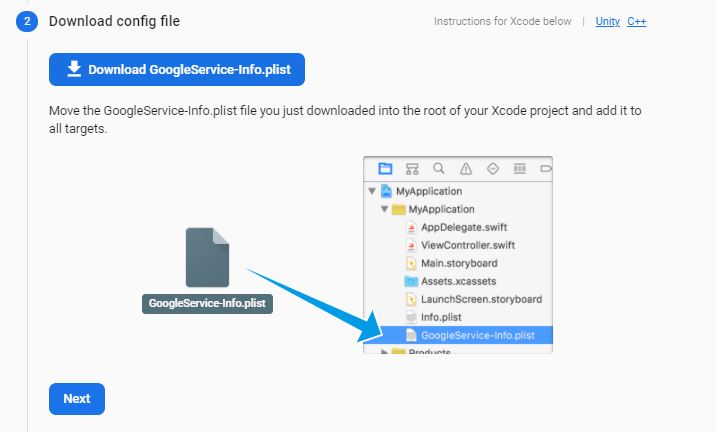
3. Download GoogleService-info.plist and paste it in iOS
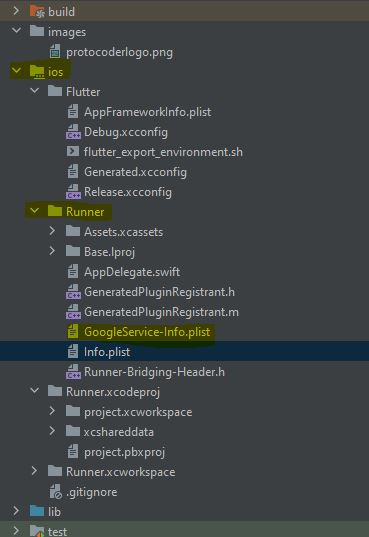
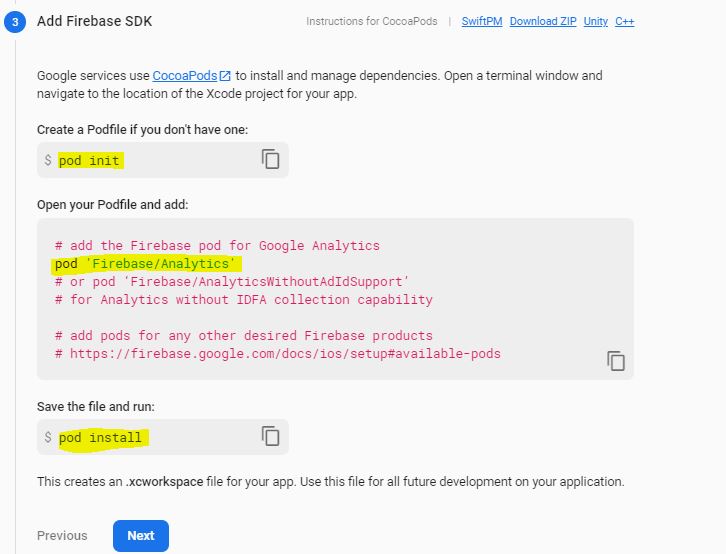
4. Add firebase SDK using pod
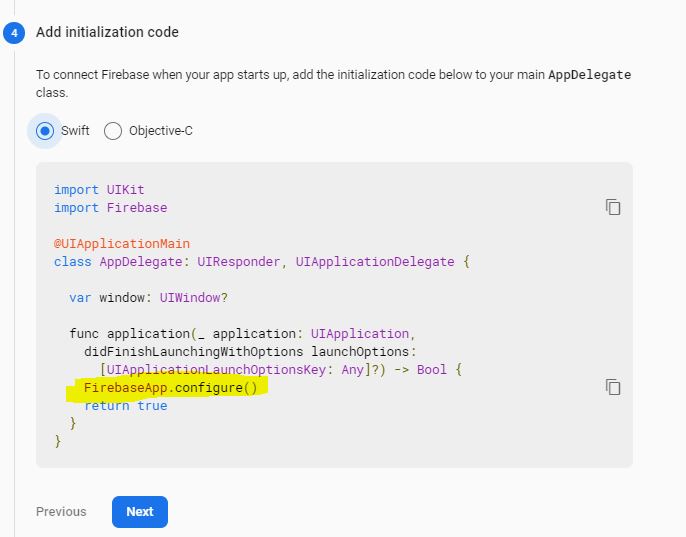
5. ios firebase initialization FirebaseApp.configure()
Hit the next button, now run your flutter project with mobile device connected to internet, Hurrrryy..!!! your Flutter android & iOS module is now connected to firebase project.
Now you have successfully added your flutter project into firebase console.
Integrate firebase push notification in flutter
Now let’s start working with integrating firebase cloud messaging i.e. push notification in flutter.
1. Add dependencies required
In your flutter project open pubspec.yaml file & add this 3 dependencies that are required.
dependencies:
  awesome_notifications: ^0.0.6+7
  firebase_core: ^1.2.1
  firebase_messaging: ^10.0.1
then hit pub get, to download above package into your flutter project.
2. Initialization of Firebase services and AwesomeNotification
Firebase initialization
void main() async {
  WidgetsFlutterBinding.ensureInitialized();

  await Firebase.initializeApp(); // initialize firebase before actual app get start.

  FirebaseMessaging.onBackgroundMessage(_firebaseMessagingBackgroundHandler);

  runApp(MyApp());
}
FirebaseMessaging.onBackgroundMessage will keep track of incoming push notification from firebase.
Then it will transfer the message to firebaseMessagingBankgroundHandler with message parameter.
Future<void> _firebaseMessagingBackgroundHandler(RemoteMessage message) async {

  print("Handling a background message: ${message.messageId}");

  //call awesomenotification to how the push notification.
 AwesomeNotifications().createNotificationFromJsonData(message.data);
}
Awesome Notification initialization
void main() async {
  WidgetsFlutterBinding.ensureInitialized();
  // firebase initialization

  AwesomeNotifications().initialize(
      null,
      [
        NotificationChannel(
            channelKey: 'basic_channel',
            channelName: 'Basic notifications',
            channelDescription: 'Notification channel for basic tests',
            defaultColor: Color(0xFF9D50DD),
            ledColor: Colors.white
        )
      ]
  );

  FirebaseMessaging.onBackgroundMessage(_firebaseMessagingBackgroundHandler);


  runApp(MyApp());
}
Future<void> _firebaseMessagingBackgroundHandler(RemoteMessage message) async {

  // If you're going to use other Firebase services in the background, such as Firestore,
  // make sure you call `initializeApp` before using other Firebase services.


  print("Handling a background message: ${message.messageId}");

  // Use this method to automatically convert the push data, in case you gonna use our data standard
  AwesomeNotifications().createNotificationFromJsonData(message.data);
}
Then once onBackgroundMessage detect any incoming message i.e. push notification message from firebase cloud messaging, you can use RemoteMessage to show notification to user using AwesomeNotification package.
AwesomeNotifications().createNotificationFromJsonData(message.data);
optional: If you want to show notification to users locally, when users performer some action in app, then you can use local notification that can we done easily by awesome notification.
AwesomeNotifications().createNotification(
      content: NotificationContent(
          id: 10,
          channelKey: 'basic_channel',
          title: 'Simple Notification',
          body: 'Simple body',
          bigPicture:'assets://images/protocoderlogo.png'
      )
  );

Complete Source code – Flutter Push Notification using firebase & awesome notification package
main.dart
import 'package:firebase_core/firebase_core.dart';
import 'package:firebase_messaging/firebase_messaging.dart';
import 'package:flutter/material.dart';
import 'package:awesome_notifications/awesome_notifications.dart';

void main() async {
  WidgetsFlutterBinding.ensureInitialized();
  await Firebase.initializeApp();
  AwesomeNotifications().initialize(
      null,
      [
        NotificationChannel(
            channelKey: 'basic_channel',
            channelName: 'Basic notifications',
            channelDescription: 'Notification channel for basic tests',
            defaultColor: Color(0xFF9D50DD),
            ledColor: Colors.white
        )
      ]
  );

  FirebaseMessaging.onBackgroundMessage(_firebaseMessagingBackgroundHandler);


  runApp(MyApp());
}

class MyApp extends StatelessWidget {
  // This widget is the root of your application.
  @override
  Widget build(BuildContext context) {
    return MaterialApp(
      title: 'Flutter Demo',
      theme: ThemeData(
        primarySwatch: Colors.blue,
      ),
      home: MyHomePage(title: 'Flutter Demo Home Page'),
    );
  }
}

class MyHomePage extends StatefulWidget {
  MyHomePage({Key? key, required this.title}) : super(key: key);

  final String title;

  @override
  _MyHomePageState createState() => _MyHomePageState();
}

class _MyHomePageState extends State<MyHomePage> {


  int _counter = 0;

  void _incrementCounter() {
    setState(() {

      _counter++;
    });
  }

  @override
  Widget build(BuildContext context) {

    return Scaffold(
      appBar: AppBar(

        title: Text(widget.title),
      ),
      body: Center(
        // Center is a layout widget. It takes a single child and positions it
        // in the middle of the parent.
        child: Column(

          mainAxisAlignment: MainAxisAlignment.center,
          children: <Widget>[
            Text(
              'You have pushed the button this many times:',
            ),
            Text(
              '$_counter',
              style: Theme.of(context).textTheme.headline4,
            ),
            ElevatedButton(onPressed: (){
              //local notification
               Notify();
            }, child: Text("Notify"))
          ],
        ),
      ),
      floatingActionButton: FloatingActionButton(
        onPressed: _incrementCounter,
        tooltip: 'Increment',
        child: Icon(Icons.add),
      ), // This trailing comma makes auto-formatting nicer for build methods.
    );
  }
}

void Notify() async{
  // local notification
  AwesomeNotifications().createNotification(
      content: NotificationContent(
          id: 10,
          channelKey: 'basic_channel',
          title: 'Simple Notification',
          body: 'Simple body',
          bigPicture:'assets://images/protocoderlogo.png'
      )
  );

}


Future<void> _firebaseMessagingBackgroundHandler(RemoteMessage message) async {

  print("Handling a background message: ${message.messageId}");

  //firebase push notification
  AwesomeNotifications().createNotificationFromJsonData(message.data);
}
")


