
")


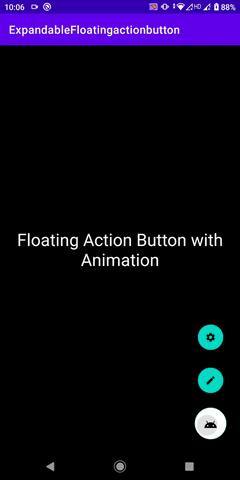
Hi Guys, Welcome to Proto Coders Point, In this Android Tutorial Article, we will learn How to Implement the Floating action button with an animation pop-up menu example.
What is Floating Action Button ?
The floating action button is a speical and different as compared to normal button. They are in circle or round button in android that will be floating above the UI. This Floating Button is known as primary action used by users to perform main task.
For Example: Using Floating Button a user can perform action like adding a new item to an existing list.
So in this article, we will learn how to implement Floating Action Button in android with menu pop-up animation example.
NOTE: we are going to implement this project using kotlin android language.
then let’s begin with the tutorial.
Steps for Creating Extended Floating Action Button with Animation
Step 1: Create new Project
Just Create a new Android Project in your android studio IDE
Step 2: check for material design dependencies
If you are using latest version of android studio IDE (4.1.1) then material design dependencies will automatically been added in your project while creating new project. To check that, open build.gradle(Module:app) under dependencies section check if material dependencies is there if not then add it.
// material design

implementation 'com.google.android.material:material:1.3.0'
After adding any new dependencies, a button/text “Sync Now” will appear on the top right corner of your android Studio IDE just click on it.
Make user you are connected to Internet before hiting Sync Now button. It will download all the files of the depencencies into your project.
We need Material dependencies because FloatingActionButton library exist in it.
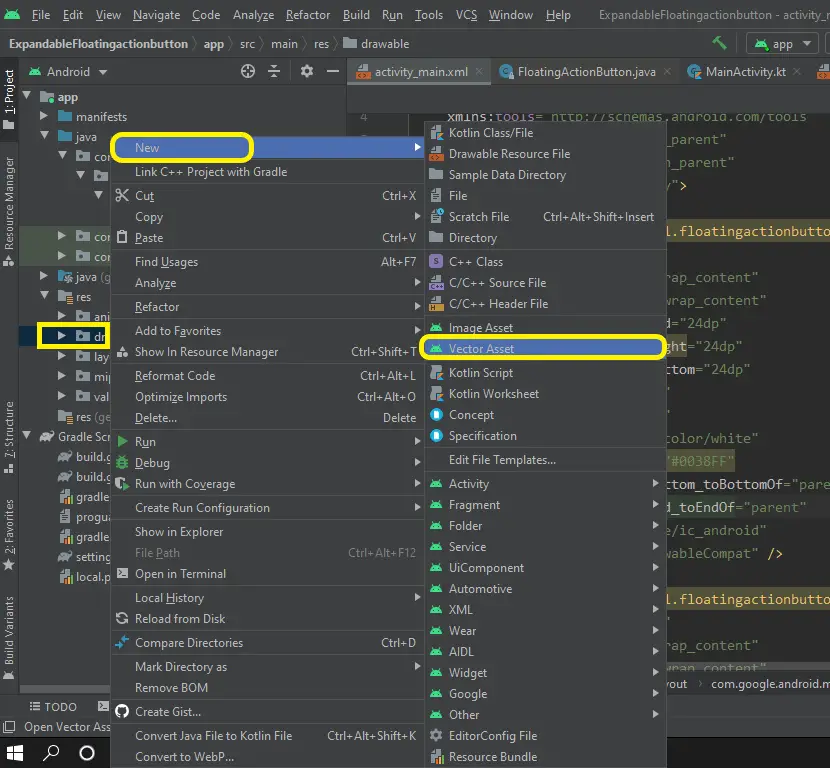
Step 3 : Create Vector Images Icon
Now In Drawable folder create some vector Icon Image, to display icons on fab buttons.
- To create new vector images in the project right-click on the drawable folder -> New -> Vector Asset.
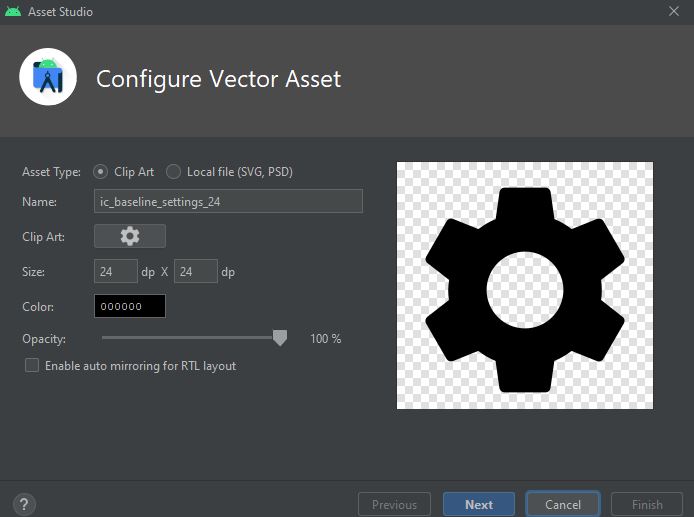
- A new pop window will be opened and choose any vector you want by clicking on the Clip Art button.
- Please refer below images.
click on clip art to select vector image icons.
Step 4: Create fab animation files
Here is How my animation xml file structure looks.

So as you can see in above screenshot, you need to create 4 animation files.
firstly under res folder create Android Resource directory(anim), res(right click) > New > Android Resource Directory > a dialog open’s under resource type select anim.
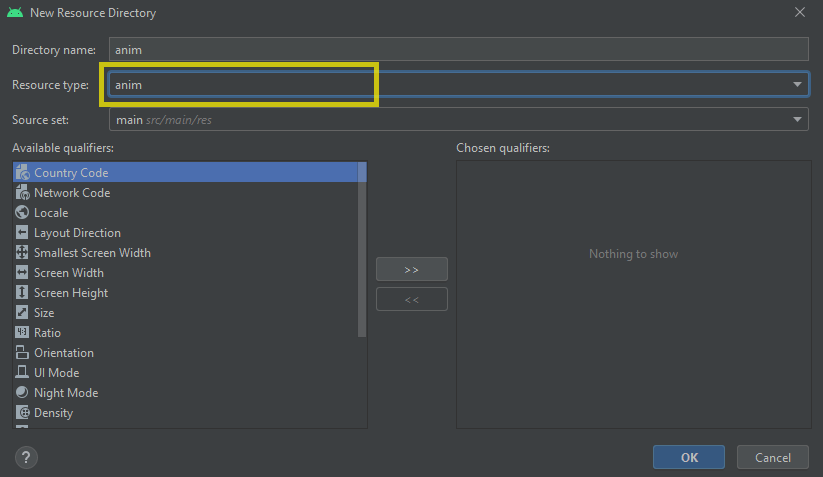
Then, anim directory is been created, now under anim folder create 4 android resource files.
res > anim(right click) > New > Animation Resources File
from_bottom_anim.xml
<?xml version="1.0" encoding="utf-8"?>
<set xmlns:android="http://schemas.android.com/apk/res/android"
    android:fillAfter="true">

    <translate
        android:fromYDelta="100%"
        android:toYDelta="0%"
        android:duration="300"/>

    <scale android:pivotX="50%"
        android:pivotY="50%"
        android:toXScale="0.8"
        android:toYScale="0.8"/>

    <alpha
        android:fromAlpha="0"
        android:toAlpha="1"
        android:duration="800"/>

</set>
to_bottom_anim.xml
<?xml version="1.0" encoding="utf-8"?>
<set xmlns:android="http://schemas.android.com/apk/res/android"
    android:fillAfter="true">

    <translate
        android:fromYDelta="0%"
        android:toYDelta="100%"
        android:duration="300"/>

    <scale android:pivotX="50%"
        android:pivotY="50%"
        android:fromXScale="0.8"
        android:fromYScale="0.8"
        android:toXScale="0.8"
        android:toYScale="0.8"/>

    <alpha
        android:fromAlpha="1"
        android:toAlpha="0"
        android:duration="150"/>

</set>
rotate_open_anim.xml
<?xml version="1.0" encoding="utf-8"?>
<set xmlns:android="http://schemas.android.com/apk/res/android"
    android:fillAfter="true">

    <rotate
        android:fromDegrees="0"
        android:pivotX="50%"
        android:pivotY="50%"
        android:toDegrees="360"
        android:duration="300"
        />
</set>
rotate_close_anim.xml
<?xml version="1.0" encoding="utf-8"?>
<set xmlns:android="http://schemas.android.com/apk/res/android"
    android:fillAfter="true">

    <rotate
        android:fromDegrees="360"
        android:pivotX="50%"
        android:pivotY="50%"
        android:toDegrees="0"
        android:duration="300" />

</set>
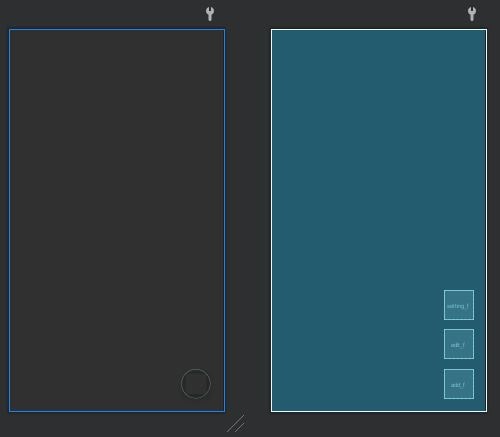
Step 5: Working with activity_main.xml
Kindly refer the comment in below xml code for easy understanding
<?xml version="1.0" encoding="utf-8"?>
<androidx.constraintlayout.widget.ConstraintLayout xmlns:android="http://schemas.android.com/apk/res/android"
    xmlns:app="http://schemas.android.com/apk/res-auto"
    xmlns:tools="http://schemas.android.com/tools"
    android:layout_width="match_parent"
    android:layout_height="match_parent"
    tools:context=".MainActivity">

    <!--This is a parent Floating Action Button-->
    <!-- When this FAB Button is been pressed/clicked the following two button will get pop-up with animation -->
    <!-- the Functionality is been done in MainActivity.java file -->
    <!-- The other two FAB button is been set to InVisible so when user click on this button those 2 will get visible-->

    <com.google.android.material.floatingactionbutton.FloatingActionButton
        android:id="@+id/add_f"
        android:layout_width="wrap_content"
        android:layout_height="wrap_content"
        android:layout_marginEnd="24dp"
        android:layout_marginRight="24dp"
        android:layout_marginBottom="24dp"
        android:clickable="true"
        android:focusable="true"
        android:tint="@android:color/white"
        android:backgroundTint="#0038FF"
        app:layout_constraintBottom_toBottomOf="parent"
        app:layout_constraintEnd_toEndOf="parent"
        app:srcCompat="@drawable/ic_android"
        tools:ignore="VectorDrawableCompat" />

    <!--This act a child Floating Action Button-->
    <!-- The visibility is been set to INVISIBLE -->

    <com.google.android.material.floatingactionbutton.FloatingActionButton
        android:id="@+id/edit_f"
        android:layout_width="wrap_content"
        android:layout_height="wrap_content"
        android:layout_marginBottom="20dp"
        android:clickable="true"
        android:visibility="invisible"
        android:focusable="true"
        android:tint="@color/white"
        app:layout_constraintBottom_toTopOf="@+id/add_f"
        app:layout_constraintEnd_toEndOf="@+id/add_f"
        app:srcCompat="@drawable/ic_edit_24" />

    <!--This act a child Floating Action Button-->
    <!-- The visibility is been set to INVISIBLE -->

    <com.google.android.material.floatingactionbutton.FloatingActionButton
        android:id="@+id/setting_f"
        android:layout_width="wrap_content"
        android:layout_height="wrap_content"
        android:layout_marginBottom="20dp"
        android:clickable="true"
        android:focusable="true"
        android:visibility="invisible"
        android:tint="@color/white"
        app:layout_constraintBottom_toTopOf="@+id/edit_f"
        app:layout_constraintEnd_toEndOf="@+id/edit_f"
        app:srcCompat="@drawable/ic_settings_24" />
</androidx.constraintlayout.widget.ConstraintLayout>
In you want to change floating action button color then you can user
android:backgroundTint="@color/white"

and you easily change floating action button icon size then use

app:maxImageSize="45dp"
Step 6: Handling Floating Action Button Animation in MainActivity.java
package com.example.expandablefloatingactionbutton

import androidx.appcompat.app.AppCompatActivity
import android.os.Bundle
import android.view.View
import android.view.animation.Animation
import android.view.animation.AnimationUtils
import android.widget.Toast
import com.example.expandablefloatingactionbutton.R
import com.google.android.material.floatingactionbutton.FloatingActionButton
import kotlinx.android.synthetic.main.activity_main.*

class MainActivity : AppCompatActivity() {

     // creating variable that handles Animations loading
    // and initializing it with animation files that we have created
    private  val rotateOpen : Animation by lazy { AnimationUtils.loadAnimation(this,R.anim.rotate_open_anim) }
    private  val rotateClose : Animation by lazy { AnimationUtils.loadAnimation(this,R.anim.rotate_close_anim) }
    private  val fromBottom: Animation by lazy { AnimationUtils.loadAnimation(this,R.anim.from_bottom_anim) }
    private  val toBottom : Animation by lazy { AnimationUtils.loadAnimation(this,R.anim.to_bottom_anim) }

   //used to check if fab menu are opened or closed
    private var closed = false


    override fun onCreate(savedInstanceState: Bundle?) {
        super.onCreate(savedInstanceState)
        setContentView(R.layout.activity_main)
        //add fab button
        add_f.setOnClickListener {

            OnAddButtonClick()
        }

         //edit fab button on click
        edit_f.setOnClickListener {
            Toast.makeText(this,"Edit",Toast.LENGTH_SHORT).show();
        }

        //setting fab button on click
        setting_f.setOnClickListener {
            Toast.makeText(this,"Search",Toast.LENGTH_SHORT).show();
        }


    }

    private fun OnAddButtonClick() {

         setVisibility(closed)
         setAnimation(closed)

        closed = !closed;

    }

   // A Function used to set the Animation effect
    private fun setAnimation(closed:Boolean) {

        if(!closed){
            edit_f.startAnimation(fromBottom)
            setting_f.startAnimation(fromBottom)
            add_f.startAnimation(rotateOpen)
        }else{
            edit_f.startAnimation(toBottom)
            setting_f.startAnimation(toBottom)
            add_f.startAnimation(rotateClose)
        }
    }

    // used to set visibility to VISIBLE / INVISIBLE
    private fun setVisibility(closed:Boolean) {

        if(!closed)
        {
            edit_f.visibility = View.VISIBLE
            setting_f.visibility = View.VISIBLE
        }else{
            edit_f.visibility = View.INVISIBLE
            setting_f.visibility = View.INVISIBLE
        }

    }
}
")


