
Hi Guys,Welcome to Proto Coders Point, In this Flutter Tutorial we gonna design a beautiful Login UI Screen in Flutter using Velocity X Library developed by Pawan Kumar.
How to add Velocity X in flutter Project? Check this tutorial
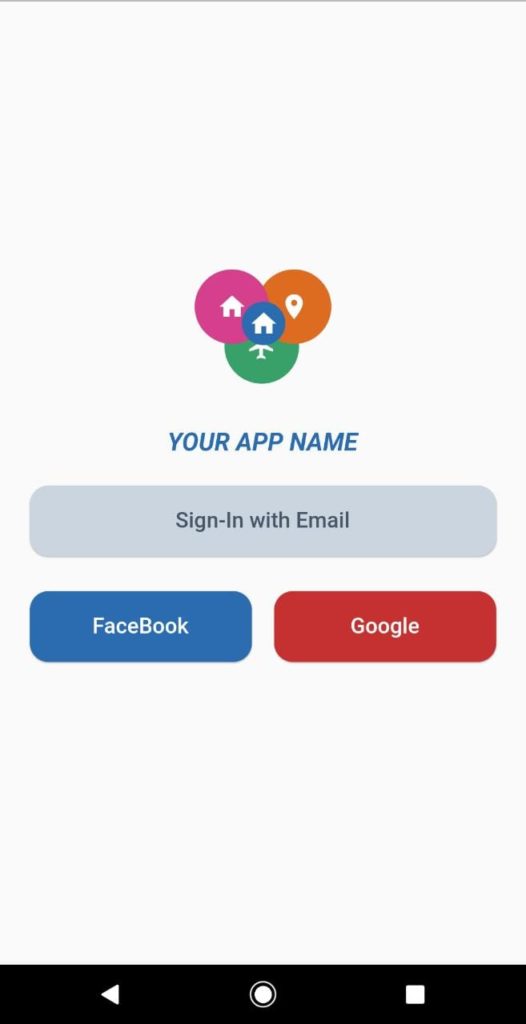
Final Flutter UI Design for Login Screen
What is Velocity X in Flutter ?
The Velocity X library in flutter development is a minimalist flutter framework that helps you in building custom Application design Rapidly.
Velocity X comes with various properties that we can apply to our flutter widget such as Color, Padding, Text , Box, Card, SizedBox and many more.
Flutter Login UI Screen using VelocityX
So, Here we will be making use of some VelocityX Classes and Properties
VelocityX Flex Box
The VelocityX comes with a predefined Flex Box that help you in creating Flexiable Flutter Widget.
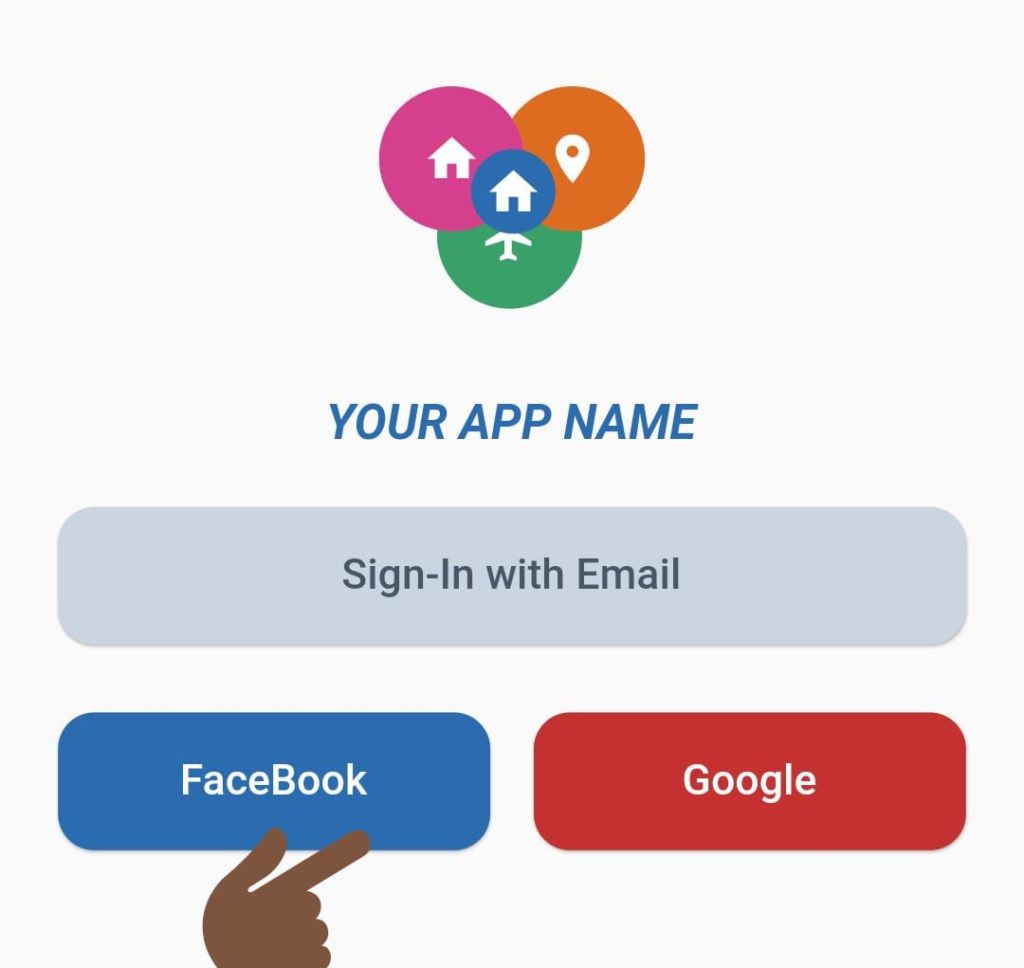
Using VX Flex Widget,I have created a simple logo in app as show below
![]()
To get This kind of design i have made use of ZStack() and VxBox() which are widget Classes of VelocityX library.
Code to get above design
ZStack([
              VxBox(
                      child: Icon(Icons.local_airport, color: Colors.white,
              )).width(60.0).height(60.0).roundedLg .green600.make().pOnly(top: 32, left: 24),

              VxBox(child: Icon(Icons.location_on,color: Colors.white,
              )).width(60.0).height(60.0).roundedLg.orange600.make().pOnly(left: 50),

              VxBox(child: Icon(Icons.home,color: Colors.white,
              )).width(60.0).height(60.0).roundedLg.pink600.make().pOnly(right: 50),

              VxBox( child: Icon(Icons.home,color: Colors.white,
              )).width(35.0).height(35.0).roundedLg.blue700.make().pOnly(left: 38, top: 26),

     ]),
ZStack is a widget of Velocity X that Will simply Overlap the children and display it.
VxBox is a widget of Velocity X that will simple display by default in square shape, you can customize it as per your requirement.
Flutter Sign In with Email
Then, let’s have a look on next button design SignIn with Email which is actual a Card Widget that works as a button.

GestureDetector(
              onTap: () {
               // perform your action here
                print("Sign in Email Clicked");
              },
              child: 'Sign-In with Email'
                  .text
                  .xl
                  .semiBold
                  .gray700
                  .makeCentered()
                  .card
                  .rounded
                  .gray400
                  .make()
                  .wh(MediaQuery.of(context).size.width, 65)
                  .pOnly(left: 20, right: 20, top: 20),
            ),
Here i have Converted a Text String into a Text Widget using VelocityX make() property, Then i have wrapped the whole Text widget with card view so that it looks like a button.
Facebook/Google Signin flutter UI Design
Then the last step we will create 2 buttons inside a row widget so that each button get set side by side as how below:
Then, As you can see there are 2 buttons for Facebook SignIn flutter and flutter signIn using google.
here is code to get that
Row(
              children: <Widget>[
                Expanded(
                  child: GestureDetector(
                    onTap: () {
                      print("Facebook Clicked ");
                    },
                    child: 'FaceBook'
                        .text
                        .xl
                        .semiBold
                        .white
                        .makeCentered()
                        .card
                        .rounded
                        .blue700
                        .make()
                        .wh(MediaQuery.of(context).size.width, 65)
                        .pOnly(left: 20, right: 5, top: 20),
                  ),
                ),
                Expanded(
                  child: GestureDetector(
                    onTap: () {
                      print("Google Clicked");
                    },
                    child: 'Google'
                        .text
                        .xl
                        .semiBold
                        .white
                        .makeCentered()
                        .card
                        .rounded
                        .red700
                        .make()
                        .wh(MediaQuery.of(context).size.width, 65)
                        .pOnly(left: 5, right: 20, top: 20),
                  ),
                ),
              ],
            )
Complete Source Code – Flutter UI Design – Login UI Screen using Velocity X Library
Copy paste the below code in main.dart then you are good to go app is ready with beautiful Login UI.
import 'package:flutter/material.dart';
import 'package:velocity_x/velocity_x.dart';

void main() => runApp(MyApp());

class MyApp extends StatelessWidget {
  // This widget is the root of your application.

  @override
  Widget build(BuildContext context) {
    return MaterialApp(
      debugShowCheckedModeBanner: false,
      title: 'Flutter Demo',
      theme: ThemeData(
        primarySwatch: Colors.blue,
      ),
      home: MyHomePage(),
    );
  }
}

class MyHomePage extends StatefulWidget {
  @override
  _MyHomePageState createState() => _MyHomePageState();
}

class _MyHomePageState extends State<MyHomePage> {
  @override
  Widget build(BuildContext context) {
    return Scaffold(
      body: Center(
        child: Column(
          mainAxisAlignment: MainAxisAlignment.center,
          children: <Widget>[
            ZStack([
              VxBox(
                      child: Icon(
                Icons.local_airport,
                color: Colors.white,
              ))
                  .width(60.0)
                  .height(60.0)
                  .roundedLg
                  .green600
                  .make()
                  .pOnly(top: 32, left: 24),
              VxBox(
                      child: Icon(
                Icons.location_on,
                color: Colors.white,
              ))
                  .width(60.0)
                  .height(60.0)
                  .roundedLg
                  .orange600
                  .make()
                  .pOnly(left: 50),
              VxBox(
                      child: Icon(
                Icons.home,
                color: Colors.white,
              ))
                  .width(60.0)
                  .height(60.0)
                  .roundedLg
                  .pink600
                  .make()
                  .pOnly(right: 50),
              VxBox(
                      child: Icon(
                Icons.home,
                color: Colors.white,
              ))
                  .width(35.0)
                  .height(35.0)
                  .roundedLg
                  .blue700
                  .make()
                  .pOnly(left: 38, top: 26),
            ]),
            "YOUR APP NAME"
                .text
                .blue700
                .bold
                .italic
                .size(20)
                .make()
                .pOnly(top: 35),
            GestureDetector(
              onTap: () {
                print("Sign in Email Clicked");
              },
              child: 'Sign-In with Email'
                  .text
                  .xl
                  .semiBold
                  .gray700
                  .makeCentered()
                  .card
                  .rounded
                  .gray400
                  .make()
                  .wh(MediaQuery.of(context).size.width, 65)
                  .pOnly(left: 20, right: 20, top: 20),
            ),
            Row(
              children: <Widget>[
                Expanded(
                  child: GestureDetector(
                    onTap: () {
                      print("Facebook Clicked ");
                    },
                    child: 'FaceBook'
                        .text
                        .xl
                        .semiBold
                        .white
                        .makeCentered()
                        .card
                        .rounded
                        .blue700
                        .make()
                        .wh(MediaQuery.of(context).size.width, 65)
                        .pOnly(left: 20, right: 5, top: 20),
                  ),
                ),
                Expanded(
                  child: GestureDetector(
                    onTap: () {
                      print("Google Clicked");
                    },
                    child: 'Google'
                        .text
                        .xl
                        .semiBold
                        .white
                        .makeCentered()
                        .card
                        .rounded
                        .red700
                        .make()
                        .wh(MediaQuery.of(context).size.width, 65)
                        .pOnly(left: 5, right: 20, top: 20),
                  ),
                ),
              ],
            )
          ],
        ),
      ),
    );
  }
}
")


