
Hi Guys, Welcome to Proto Coders Point.
In this flutter tutorial Article, We will learn how do you change whole app language in flutter.
Allow the app user to select his desired language to use your flutter app.
To Add Localization in flutter app, We will use flutter getX Internationalization to change app language in flutter.
Video Tutorial
Flutter GetX Localization – Change App Language
1. Create a New Flutter Project or open Exisiting Project
Use your favorite IDE( Android Studio, VSCode or IntelliJS) to build Flutter App, Create a new Flutter Project.
I use Android Studio to build Flutter Application.
2. Install/Add Flutter GetX Dependencies
Open pubspec.yaml file & add getx Package under dependencies like this as shown below:
dependencies:
   get: #any version
After adding the dependencies hit pub get button or run flutter pub get command in your IDE Terminal.
Now, you have successfully added getx package in your flutter, Now to make use of getx you need to import get.dart in flutter dart code to use it.
import 'package:get/get.dart';
How to use GetX Flutter library to add multiple language in flutter app
1. Change root Widget ‘MaterialApp’ to ‘GetMaterialApp’
By using ‘GetMaterialApp’, you can pass 2 parameter i.e. locale & translations.
GetMaterialApp Properties
There are many properties(parameter) that can be used.
In this project example we will use locale & translations.
- locale: initial/default language translations of App.
- translations: pass your translation class that contain translated strings of locales language.
Eg: runApp(MyApp());

//root class (MyApp)

return GetMaterialApp(
      debugShowCheckedModeBanner: false,
      translations: LocaleString(),
      locale: Locale('en','US'),
      title: 'Flutter Demo',
      theme: ThemeData(
        primarySwatch: Colors.blue,
      ),
      home: HomePage(),
    );
2. Create custom locale key-value translation class
Create a new Dart file, that extends Translations class.
This class has Translations as key-value dictionary map language strings.
Here we will define our locale language translated Strings.
import 'package:get/get.dart';

class Messages extends Translations {
  @override
  Map<String, Map<String, String>> get keys => {
        'en_US': {
          'hello': 'Hello World',
        },
        'hi_IN': {
          'hello': 'नमस्ते दुनिया',
        }
      };
}
Here For Example ‘en’ stands for ENGLISH LANGUAGE and ‘US’ stands for Country(United States), Likewise other locale is been defined HINDI, ‘hi’ and Country ‘IN’ INDIA.
3. How to use translations in flutter with Getx
You have defined your locale languages in translations class.
you can use the specified ‘key’ & just append with .tr & thus the locale language will be translated in your flutter app.
 Eg:
         Text('hello'.tr),
Note: Here ‘hello’ is the key specified in translation class above.
4. How to change app language in flutter – Change Locale
GetX Provide a function to change locale language
Get.updateLocale(locale);you need to pass locale to change the language. Eg:
var locale = Locale('hi','IN');
Get.updateLocale(locale);
Now, your app will use the key- value strings from hindi language as defined in Translations class.
Translations will automatially make use of new locale & your app language will get changed.
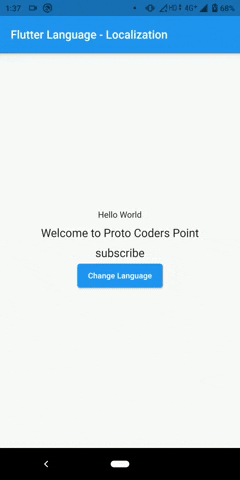
Flutter Change whole app language – GetX Localization
My Project Source Code for Reference
Project File Structure.
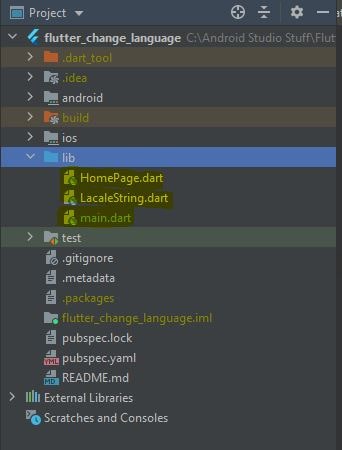
1. localeString.dart
This file will have string of translated langauge Country wise in a form of key-value pair.
import 'package:get/get.dart';
class LocaleString extends Translations{
@override
// TODO: implement keys
Map<String, Map<String, String>> get keys => {
//ENGLISH LANGUAGE
'en_US':{
'hello':'Hello World',
'message':'Welcome to Proto Coders Point',
'title':'Flutter Language - Localization',
'sub':'Subscribe Now',
'changelang':'Change Language'
},
//HINDI LANGUAGE
'hi_IN':{
'hello': 'नमस्ते दुनिया',
'message':'प्रोटो कोडर प्वाइंट में आपका स्वागत है',
'title':'स्पंदन भाषा - स्थानीयकरण',
'subscribe':'सब्सक्राइब',
'changelang':'भाषा बदलो'
},
//KANNADA LANGUAGE
'kn_IN':{
'hello': 'ಹಲೋ ವರ್ಲ್ಡ್',
'message':'ಪ್ರೋಟೋ ಕೋಡರ್ ಪಾಯಿಂಟ್ಗೆ ಸುಸ್ವಾಗತ',
'title':'ಬೀಸು ಭಾಷೆ - ಸ್ಥಳೀಕರಣ',
'subscribe':'ವಂತಿಗೆ ಕೊಡು',
'changelang':'ಭಾಷೆ ಬದಲಿಸಿ'
}
};
}
2. main.dart
This page will have root widget ‘GetMaterialApp’ which will load HomePage.dart & we have parameter translations class & locale language to be used as default.
import 'package:flutter/material.dart';
import 'package:flutter_change_language/LacaleString.dart';
import 'HomePage.dart';
import 'package:get/get.dart';

void main() {
  runApp(MyApp());
}

class MyApp extends StatelessWidget {
  // This widget is the root of your application.
  @override
  Widget build(BuildContext context) {
    return GetMaterialApp(
      debugShowCheckedModeBanner: false,
      translations: LocaleString(),
      locale: Locale('en','US'),
      title: 'Flutter Demo',
      theme: ThemeData(
        primarySwatch: Colors.blue,
      ),
      home: HomePage(),
    );
  }
}
3. HomePage.dart
In HomePage.dart we have a AlertDialog Box by which a user can change the language of your flutter app.
import 'package:flutter/material.dart';
import 'package:get/get.dart';

class HomePage extends StatelessWidget {

  final List locale =[
    {'name':'ENGLISH','locale': Locale('en','US')},
    {'name':'ಕನ್ನಡ','locale': Locale('kn','IN')},
    {'name':'हिंदी','locale': Locale('hi','IN')},
  ];

  updateLanguage(Locale locale){
    Get.back();
    Get.updateLocale(locale);
  }

  buildLanguageDialog(BuildContext context){
    showDialog(context: context,
        builder: (builder){
           return AlertDialog(
             title: Text('Choose Your Language'),
             content: Container(
               width: double.maxFinite,
               child: ListView.separated(
                 shrinkWrap: true,
                   itemBuilder: (context,index){
                     return Padding(
                       padding: const EdgeInsets.all(8.0),
                       child: GestureDetector(child: Text(locale[index]['name']),onTap: (){
                         print(locale[index]['name']);
                         updateLanguage(locale[index]['locale']);
                       },),
                     );
                   }, separatorBuilder: (context,index){
                     return Divider(
                       color: Colors.blue,
                     );
               }, itemCount: locale.length
               ),
             ),
           );
        }
    );
  }

  @override
  Widget build(BuildContext context) {
    return Scaffold(
      appBar: AppBar(title: Text('title'.tr),),
      body: Column(
        mainAxisAlignment: MainAxisAlignment.center,
        children: [
          Text('hello'.tr,style: TextStyle(fontSize: 15),),
          SizedBox(height: 10,),
          Text('message'.tr,style: TextStyle(fontSize: 20),),
          SizedBox(height: 10,),
          Text('subscribe'.tr,style: TextStyle(fontSize: 20),),

          ElevatedButton(onPressed: (){
            buildLanguageDialog(context);
          }, child: Text('changelang'.tr)),
        ],
      )
    );
  }
}
")


