
Hi Guy’s Welcome to Proto Coders Point. In this Flutter Article let’s learn how to Implement In-App purchase in flutter a step by step guide.
First, we’ll look at what an in-app purchase ??.
An in-app purchase (IAP) is a purchase made from within an application, most commonly a mobile app running on a smartphone or other mobile device. Software vendors can sell anything from within apps. For example, Users can buy characters, upgrade abilities, and spend real money on in-game currencies in games.
Although we always make our applications with care, they are not always free. Aside from charging a fee to upload our apps to the Play store, another way we make money is through in-app purchases. Flutter in app purchase (IAP) is a first-party Flutter package that allows developers to integrate in-app purchases from the iOS App Store or Google Play into their app. Similar functionality is provided by two other solutions: flutter in app purchase and purchases flutter.
Our goal in this article is to guide you through the in_app_purchase package.
So, why are in-app purchases necessary?
In-app purchases enable developers to provide their programmers for free. After downloading the free version, users are bombarded with advertisements for paid feature unlocks, premium version upgrades, exclusive goods for sale, and even additional applications and services. Because in-app transactions are required when selling digital content, services such as Stripe api will not be applicable in this case.
KEY LESSONS
- In-app purchasing is the purchase of goods and services from within an app on a mobile device such as a smartphone or tablet.
- In-app purchases enable developers to make their applications available for free.
- Because in-app purchases are made via a mobile device, unauthorized purchases may cause security issues.
In flutter, what exactly is an in-app purchase?
An in-app purchase, or IAP, is a method of selling content to customers from within the app rather than through an online store. It could be anything from access to premium content to a competitive advantage in a mobile game. In some cases, in-app purchases can be combined with other forms of monetization. Users, for example, may choose to upgrade to a premium version in order to avoid seeing advertisements.
For Android, Google Play distinguishes two types of in-app purchases. The first is subscription — ongoing access to paid content. When users’ regular payments stop, they lose access to premium services. This paradigm is most commonly used in the distribution of corporate programmers as well as services that generate content on a consistent basis, such as online magazines.
We need a payment mechanism in our app to include a premium user feature. Payment gateway setup is a major pain. The simplest way to incorporate a payment gateway is to include in-app purchases in your app. Let’s talk about in-app purchases before we get into the code.
It was the first time I’d ever added in-app purchases to an app. I had a lot of inquiries.
How do I make the product price international?
How can I avoid hardcoding product details into my app?
How much will Google charge in commission?
The answer is that Google Play Store takes care of everything for you. And retains 30%. You get 70% of the money.
Before you continue reading, please keep in mind that this tutorial only covers the Android portion. A developer account is also required to integrate IAP, even for testing. So, before you begin, I recommend that you spend $25 and purchase a Play Store developer account.
Android Products
Consumable item: Consumable items include in-game currency. The user can repurchase them after they have been consumed.
Non-consumable item: These items can only be purchased once and provide a long-term benefit.
Subscriptions: These items provide users with benefits for a set period of time. Subscriptions to Netflix, Medium, and Spotify can be compared to these items. Unless canceled, subscriptions renew automatically.
In both the iOS and Android platforms, a subscription cannot be repurchased before it expires.
You must create items on Google Play Console based on your specifications.
Both platforms offer features like a grace period, a trial period, the ability to upgrade or downgrade a membership, and so on.
This tutorial will walk you through the process of adding subscribers to the Flutter app. In order to test the in-app purchase, your app must have an alpha release in Android.
The Value of IAPs in App Store Optimization:
IAPs are metadata components that influence the visibility of apps. They are made up of three distinct types of metadata:
IAP icon, title, and brief description
The IAP title is essential for app store optimization. It is significant because the App Store and Google Play algorithms index the names of non-consumable and subscription IAPs, respectively. If these phrases contain such keywords, the algorithms will rank the app for them. Even more importantly, the app will rank for long-tail keywords that are a combination of the phrases in the app title and the IAP title.
Integration
Step 1): Create an Android product.
1) Go to Google Play Console.
2) Select the app for which you want to create a subscription.
3). From the Monetize > Products menu, choose Subscriptions.
4). Complete the form with the required information. The product id is the most important field in this case. The product id is a unique identifier for each product.
Any product in one subscription group can be activated, and users can upgrade and downgrade their subscriptions within the group.
Let us proceed to the next step.
Step 2): Make a New test account.
You must test the in-app purchase flow before releasing it to the stable version. You don’t want to pay every time you purchase a product while testing the in-app purchasing flow. To begin, you must create an Android tester account. Create an Android Testing Account,
Simply follow the two steps below to create an Android testing account.
Step i). Enter the tester’s email address in the app’s license testers.
Step ii). Using the same email address, add yourself to the app’s tester list.
Follow this detailed guide to test your Google Play Billing Library integration:
Step 3): Learn About Subscription Purchases flow
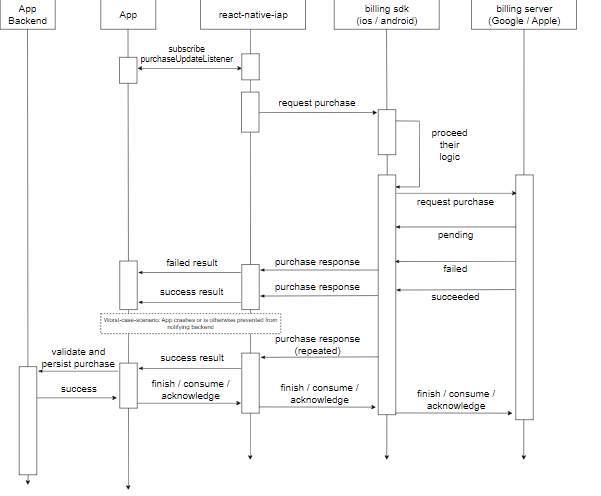
The purchase flow is based on flutter_inapp_purchase
You start the app by connecting to the Google / Apple billing server. Connection establishment may fail if the billing SDK is not supported by the current OS version. After the connection is established, your app subscribes to the billing server’s PurchaseUpdateStream. The billing server notifies you via PurchaseUpdateStream of the status of every purchase made by the current user.
You load a list of all available products for the user after your app successfully subscribed to the PurchaseUpdateStream.
The user chooses a product from the list and proceeds to buy it. The following events occur now.
1) The app notifies the billing server that the current user wants to buy a product with this product id.
2) The billing Server finishes the transaction and returns the result. The response is sent to the app via PurchaseUpdateStream.
Your app will monitor the transaction’s progress and take appropriate action.
3) If the transaction was successful, your app will notify the back end that this user successfully purchased a product, and here is the purchase token I received from the billing server. The app’s back end will validate the purchase with the billing server before providing any benefits to the user. Following successful validation, your app’s back end will mark the current user as a premium user and respond to your app.
4) Your application must now complete the transaction with the billing server. The transaction’s completion notifies the billing server that the product has been successfully delivered to the user. The way transactions are completed differs between Android and iOS. In Android, you simply need to complete the successful transaction. In iOS, regardless of transaction state, you must complete all transactions. If you do not complete the transaction on Android, Google will refund the purchase amount as if the transaction failed.When the user reopens the app after it has crashed or if a network problem occurs during the transaction, your app will be notified of all uncompleted transactions via the PurchaseUpdateStream. As a result, you can go ahead and buy the product.
5) Based on the response from the app’s back end, you will show the user a specific screen.
Let’s move on to our final and most important step: integrating in-app purchases into Flutter.
Step 4) : Connect Flutter to In-App Purchases.
This is the most important metric. You will be in charge of the payment and purchase information. You must deal with any and all possible exceptions that may arise during the course of a purchase.
You must deal with any and all possible exceptions that may arise when purchasing a product.
If you understand the flow of subscription purchase, this step will make more sense to you.
So let’s get started coding.
Step 1) :: Include an in-app purchase package
in_app_purchase: ^any
Step 2) :: Run flutter package command in the root directory of your app.
Step 3) :: Following that, we must grant certain permissions so that the Play Store recognises that this app contains in-app purchases. In your app/src/main/AndroidManifest.xml, include the billing permission.
<uses-permission android:name=”com.android.vending.BILLING”>;
Let us now create a sample app for Google Play. Make a signed apk file for your Flutter app. The official flutter dev documentation includes instructions for creating a release apk. Remember that the Play Store uses your app package name (application ID) to identify your in-app items.
Let’s make some in-app items now. Go to Store Presence > Managed Products > In-app Products to get started. CREATE MANAGED PRODUCTS is the option to choose.

Make an in-app product in the Play Console.
The Product ID is unique and cannot be changed once it has been generated. You will not be able to create another product with the same id for the same app if you delete it. So proceed with caution.

Set a prize for any specific country’s product.
Following that, we will create the flutter code that will initiate the purchase and deliver the goods after payment is received.
Make a list of all the product IDs. Because this is a set, pay attention to the order of the product ids. They’ll be listed alphabetically.
var _productIdList = {'product1', 'product2', 'product3'};Define the instance :
final InAppPurchase _inAppPurchase = InAppPurchase.instance;
  late StreamSubscription<List<PurchaseDetails>> _subscription;
  List<ProductDetails> _products = <ProductDetails>[];
_products is an array of ProductDetails objects. They are associated with each product ID and contain data such as packageName, purchaseTime, and so on. In your initState function, initialize these variables and assign a handler to them.
@override
  void initState() {
    ///Step: 1
    final Stream<List<PurchaseDetails>> purchaseUpdated =
        _inAppPurchase.purchaseStream;
    _subscription = purchaseUpdated.listen((purchaseDetailsList) {
      _listenToPurchaseUpdated(purchaseDetailsList);
    }, onDone: () {
      _subscription.cancel();
    }, onError: (Object e) {
      debugPrint("error :${e.toString()}");
    });

    ///Step: 2
    initStoreInfo();
    super.initState();
  }
We’ll begin by examining how to obtain product data from product IDs. That is what our initStoreInfo function accomplishes.
Future<void> initStoreInfo() async {
    final bool isAvailable = await _inAppPurchase.isAvailable();
    if (!isAvailable) {
      setState(() {
        _isAvailable = isAvailable;
        _products = <ProductDetails>[];
        _notFoundIds = <String>[];
        _loading = false;
      });
      return;
    }

    Set<String> _subcriptionProductIds = <String>{
      sub1Id,
      sub2Id,
    };

    if (Platform.isIOS) {
      final InAppPurchaseStoreKitPlatformAddition iosPlatformAddition =
          _inAppPurchase
              .getPlatformAddition<InAppPurchaseStoreKitPlatformAddition>();
      await iosPlatformAddition.setDelegate(ExamplePaymentQueueDelegate());
    }

    final ProductDetailsResponse productDetailResponse =
        await _inAppPurchase.queryProductDetails(_subcriptionProductIds);
    if (productDetailResponse.error != null) {
      setState(() {
        _queryProductError = productDetailResponse.error!.message;
        _isAvailable = isAvailable;
        _products = productDetailResponse.productDetails;
        _notFoundIds = productDetailResponse.notFoundIDs;
        print('_notFoundIds :: ${_notFoundIds.toList()}');
        _loading = false;
      });
      return;
    }

    if (productDetailResponse.productDetails.isEmpty) {
      setState(() {
        _queryProductError = null;
        _isAvailable = isAvailable;
        _products = productDetailResponse.productDetails;
        _notFoundIds = productDetailResponse.notFoundIDs;
        print('_notFoundIds : ${_notFoundIds.toList()}');
        print('productDetailResponse error :: ${productDetailResponse.error}');
        _loading = false;
      });
      return;
    } else {
      print('=====}');
    }

    setState(() {
      _isAvailable = isAvailable;
      _products = productDetailResponse.productDetails;
      _notFoundIds = productDetailResponse.notFoundIDs;
      print('No Products :: ${_notFoundIds.toList()}');
      _purchasePending = false;
      _loading = false;
    });
  }
Simply make the application public! In-app purchases will not be available until the app has been launched. Saving in a drought is impossible. You can choose to publish in alpha or beta. Go to your Play Store dashboard and select the Publish option. After two days, return to this blog.
After you’ve published your app, you’ll notice that your _products or ProductDetails object contains information such as the Id, title, description, and price.
The pricing is automatically translated to the local currency. Simply use your app’s price field to display internationalized pricing. Finally, we’ll put the _listenToPurchaseUpdated function into action.
_listenToPurchaseUpdated(List<PurchaseDetails> purchaseDetailsList) async {
    for (final PurchaseDetails purchaseDetails in purchaseDetailsList) {
      if (purchaseDetails.status == PurchaseStatus.pending) {
        ///Step: 1, case:1
        showPendingUI();
      } else {
        if (purchaseDetails.status == PurchaseStatus.error) {
          ///Step: 1, case:2
          handleError(purchaseDetails.error!);
        } else if (purchaseDetails.status == PurchaseStatus.purchased ||
            purchaseDetails.status == PurchaseStatus.restored) {
          ///Step: 1, case:3
          verifyAndDeliverProduct(purchaseDetails);
        }
        if (purchaseDetails.pendingCompletePurchase) {
          await _inAppPurchase.completePurchase(purchaseDetails);
        }
      }
    }
  }
You can use the PurchaseDetails object in your product delivery logic. It includes the following useful parameters.
purchaseID: The unique identifier of the purchase.
productID: The product ID of the purchase.
transactionDate: The transaction’s millisecond timestamp.
You can now begin the purchasing process by calling a simple function. In this case, I bought the first item in the _products array. You can use your own logic to decide which items to buy.
onTap: () {
     late PurchaseParam purchaseParam;
     final GooglePlayPurchaseDetails? oldSubscription =
           _getOldSubscription(productDetails, purchases);
         PurchaseParam = GooglePlayPurchaseParam(
                productDetails: productDetails,
                changeSubscriptionParam: (oldSubscription != null)
                ? ChangeSubscriptionParam(
                oldPurchaseDetails: oldSubscription,
                prorationMode: ProrationMode
                .immediateWithTimeProration,
          )
             null);
 },
So we finally completed it.
All you have to do now is call the initConnection method when your app launches. Bring all of the items from PaymentService into the UI and display your products. When a user selects a product and clicks the buy button, the buyProduct() method is invoked with the product in question. To handle all scenarios, listen to the _proStatusChangedListeners and _errorListeners.
Flutter In-App Purchase Output
The source code for the this in-app purchase App integrated with in-app-purchase can be found on GitHub.
https://github.com/Mitali8620/in_app_purchase_demo
Read these official blogs to learn more about In-App Purchases.
Android: Integrate the Google Play Billing Library into your app
Thank you for taking the time to read this. If you have any questions or comments about this article, please leave them below.
In the article, I explained the basic architecture of In-app purchase ; you can modify this code to suit your needs; and this was a brief introduction to In-app purchase from my end, with Flutter support.
I hope this blog has provided you with sufficient information to experiment with in-app in your flutter projects. Please try this demo programmer, which will integrate In-app in a flutter application.
Thank you …. Have a beautiful day 🙂🙂🙂🙂🙂
Even though this article cover the majority of what to do to get in-app purchases working, I highly recommend reading the official documentation of the package supplied by the flutter team at https://pub.dev/packages/in app purchase.
Recommended Article’s
Paypal Payment integration in flutter
")


