
In this Flutter Article let’s explore about Razorpay a payment gateway and learn how to integration it into our flutter application.
What is Razorpay
Razor pay if basically a payment gateway/portal, A secure payments service provider called Razorpay (www.razorpay.com) accepts a variety of payment methods, including credit and debit cards, UPI, and some mobile wallets.
Through its product line, Razorpay enables your company to accept, handle, and distribute payments. One of the greatest payment gateways that offers a plugin quickly is Razor Pay. We started working with Razorpay because they had the easiest in-product payment widget to integrate, but we have continued to work with them because of their prompt and consistent support for both problem resolution and adding new features.
The majority of businesses today, like Zomato, Goibibo, Zoho, Spicejet, BookMyShow, Nykaa, Urbanclap, and many others, use Razorpay in their
applications. Razorpay offers mobile wallets, credit and debit cards, and UPI as payment options. The fastest growing firm in India and a provider of online payment services is Razorpay.
How does razorpay work
Razorpay contacts the acquiring bank with a capture request on behalf of the merchant. After that, the funds are transferred from the issuing bank to the acquiring bank. The transaction money is then settled to the merchant by Razorpay in collaboration with the acquiring bank.
Therefore, let’s begin the step-by-step tutorial for adding Razorpay to a flutter application.
Getting Started
Razorpay Payment Gateway
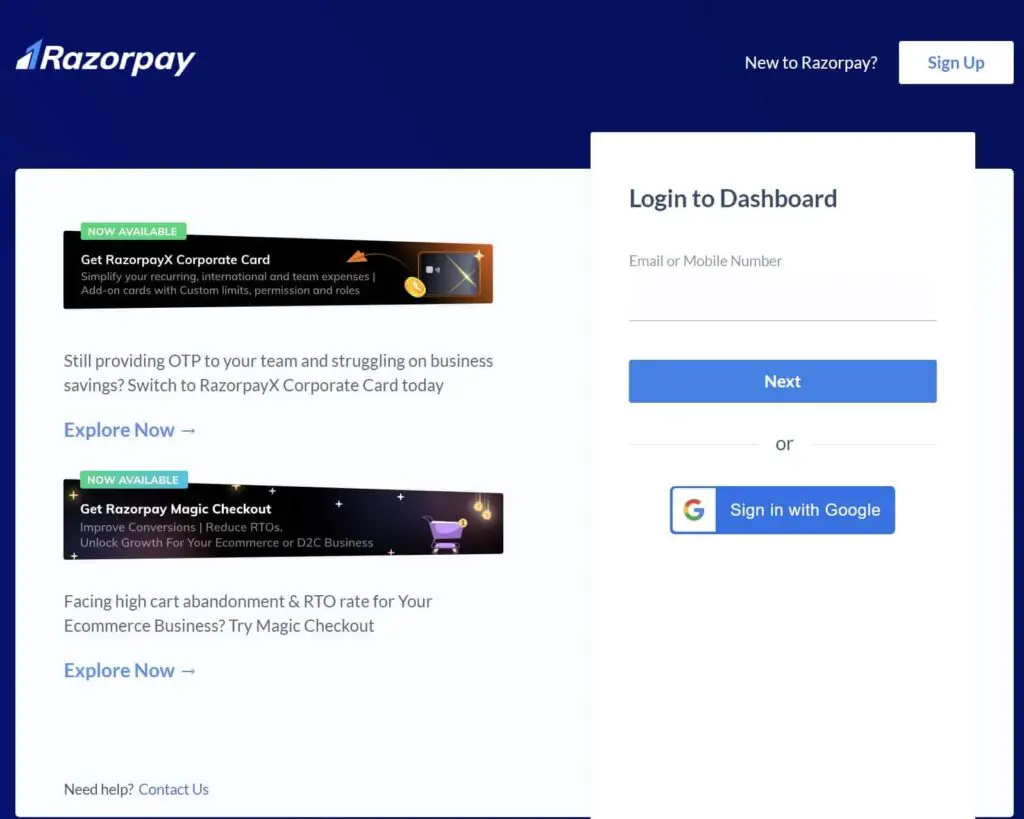
1. Create a Account/Login into razorpay
Firstly you need to create a account and get signIn into razorpay and access the dashboard.
2. Get API key from razorpay
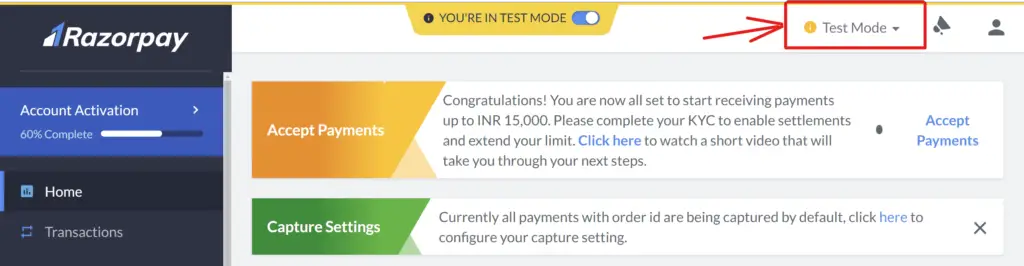
Here choose whether you are willing for testing or live, depending on that create an API key as show below.
1. For a key to be generated for the selected mode (testing or live), navigate to Settings API Generate Key.
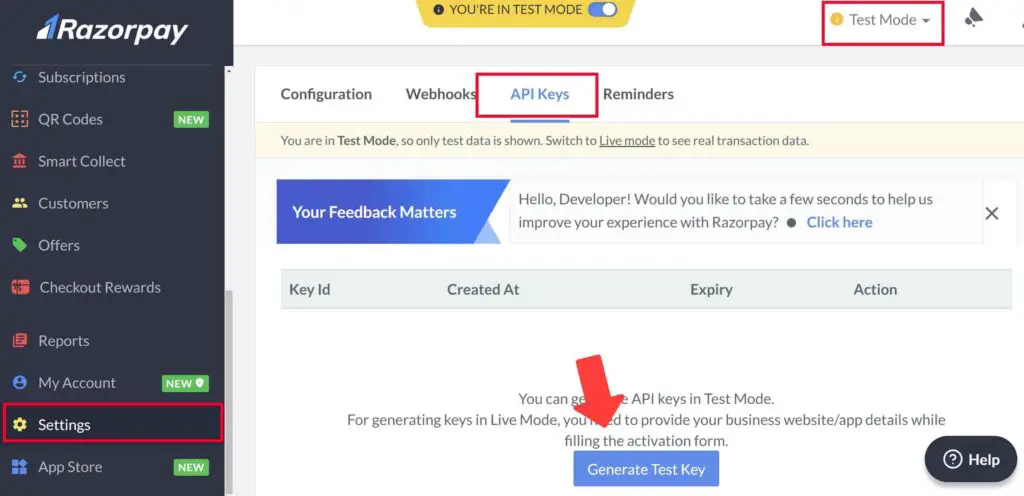
Note for key:
- For the test and live modes, distinct API Keys must be generated. In test mode, no money is taken from your real account.
Razorpay Integration in flutter
Create or open a flutter application where you want to payment gateway to accept payments from your app user.
Implementation:
Step 1: Adding Required external dependencies
razorpay_flutter: any
http: any
fluttertoast: any
http:
Http is a flutter plugin that will help you in making HTTP requests.
fluttertoast
enables you to display a toast message in your flutter.
razorpay_flutter:
Is a plugin that allows you to include Razorpay into your flutter application and take user payments. Both iOS and Android are supported by this plugin. You can review the following documentation:
Android: https://razorpay.com/docs/checkout/android/
iOS: https://razorpay.com/docs/ios/
Step 2: Import razorpay_flutter
Now you need to import it where you want to integrate payment portal.
import 'package:razorpay_flutter/razorpay_flutter.dart';
Notes about Android/IOS platform requirement:
- The required minimum version is:
Make sure your app’s base minimum API level is 19 or greater for Android.
- Make sure iOS 10.0 or above is the minimum deployment target for your app. Remember to enable bitcode for your project as well.
Step 3: Implementing razor pay in flutter
Make an instance of Razorpay:
To create a Razorpay instance, use this code.
Razorpay? _razorpay = Razorpay();
Event Listeners:
This plugin uses event-based communication and emits the event of a successful or unsuccessful payment.
The constants
- EVENT PAYMENT SUCCESS.
- EVENT PAYMENT ERROR.
- EVENT EXTERNAL WALLET.
To add event listeners, use the Razorpay instance’s on(String event, Function handler) method.
EVENT PAYMENT SUCCESS - for Successful payment
EVENT PAYMENT ERROR - for Error while payment is recorded
EVENT EXTERNAL WALLET - for The external wallet that was used for payment
In the Razorpay class, these events are designated as constants. The following code demonstrates how to handle events by establishing listener methods for each individual event:
Events is:
 @override
  void initState() {
    super.initState();
    _razorpay = Razorpay();
    _razorpay?.on(Razorpay.EVENT_PAYMENT_SUCCESS, _handlePaymentSuccess);
    _razorpay?.on(Razorpay.EVENT_PAYMENT_ERROR, _handlePaymentError);
    _razorpay?.on(Razorpay.EVENT_EXTERNAL_WALLET, _handleExternalWallet);
  }
initial step to create Instance is completed, Now let’s move to app page creation for payment gateway integration in flutter app.
Create a file name payment_page.dart
Import following package
import 'package:fluttertoast/fluttertoast.dart';
import 'package:razorpay_flutter/razorpay_flutter.dart';
Now, The razorpay instance and payment event listeners should now be initialized in the initState() function.
 @override
  void initState() {
    super.initState();
    _razorpay = Razorpay();
    _razorpay?.on(Razorpay.EVENT_PAYMENT_SUCCESS, _handlePaymentSuccess);
    _razorpay?.on(Razorpay.EVENT_PAYMENT_ERROR, _handlePaymentError);
    _razorpay?.on(Razorpay.EVENT_EXTERNAL_WALLET, _handleExternalWallet);
  }
function to handle razorpay payment
void _handlePaymentSuccess(PaymentSuccessResponse response) {
    Fluttertoast.showToast(
        msg: "SUCCESS PAYMENT: ${response.paymentId}", timeInSecForIosWeb: 4);
  }

  void _handlePaymentError(PaymentFailureResponse response) {
    Fluttertoast.showToast(
        msg: "ERROR HERE: ${response.code} - ${response.message}",
        timeInSecForIosWeb: 4);
  }

  void _handleExternalWallet(ExternalWalletResponse response) {
    Fluttertoast.showToast(
        msg: "EXTERNAL_WALLET IS : ${response.walletName}",
        timeInSecForIosWeb: 4);
  }
Here I am simply showing a toast message whenever any payment event happens.
Function that opens payment interface
To open the payment interface, create a function called openPaymentPortal() that takes several parameters like:
- API key.
- order id.
- amount.
- name.
- description.
These parameters are stored in the options variable, which is passed to the razorpay.open function.
Razorpay option request parameter
| key: | Your API key that you get for razorpay dashboard in setting option. |
| amount: | Her the amount for the transaction should by passed. The amount should be in paise in case of INR. Eg: Rs. 300 is the transaction amt, them the value to be passed in this option field should be 30000. |
| currency: | Length must be 3 char, The currency transaction should be make Eg:INR. see the supported currencies list. |
| name: | A business name shown during payment checkout. |
| prefill: | Contact: A Phone number of your customer. Email: A Email Id of your customer. |
void openPaymentPortal() async {
    var options = {
      'key': 'rzp_test_YjOu38M2dxdNJ5',
      'amount': 200,
      'name': 'jhon',
      'description': 'Payment',
      'prefill': {'contact': '9999999999', 'email': 'jhon@razorpay.com'},
      'external': {
        'wallets': ['paytm']
      }
    };

    try {
      _razorpay?.open(options);
    } catch (e) {
      debugPrint(e.toString());
    }
  }
Now Create a Button when clicked calls openPaymentPortal() and proceed to payment.
 InkWell(
            onTap: () {
              openChecF();
            },
            child: Padding(
              padding: const EdgeInsets.only(left: 18.0, right: 18),
              child: Container(
                  width: MediaQuery.of(context).size.width - 60.0,
                  height: 50.0,
                  decoration: BoxDecoration(
                      borderRadius: BorderRadius.circular(20.0),
                      color: Colors.blue.shade900),
                  child: Center(
                      child: Text('Pay',
                          style: TextStyle(
                              fontSize: 16.0,
                              fontWeight: FontWeight.w900,
                              color: Colors.blue.shade50),
              ),
          ),
       ),
   ),
)
Response to successful payment:
Payment_id: string the payment’s ID.
Order iD: If the payment was for an order, the order ID; otherwise, null.
Signature: string the signature that will be used to confirm payment. Only applicable to orders; if not.
Response to a failed
Code value : integer the error message
message value : message the message of error.
Response to a External Wallet Response:
String the chosen external wallet’s name.
Complete Source Code – Flutter RazorPay implementation
main.dart
From main page I am simple rendering payment page.
import 'package:flutter/material.dart';
import 'paymentPage.dart';

void main() {
  runApp(const MyApp());
}

class MyApp extends StatelessWidget {
  const MyApp({Key? key}) : super(key: key);

  @override
  Widget build(BuildContext context) {
    return MaterialApp(
      title: 'Flutter Razorpay implement app',
      theme: ThemeData(
        primarySwatch: Colors.blue,
      ),
      home: const PaymentPage(),
    );
  }
}
paymentPage.dart
import 'package:flutter/material.dart';
import 'package:fluttertoast/fluttertoast.dart';
import 'package:razorpay_flutter/razorpay_flutter.dart';

class PaymentPage extends StatefulWidget {
  const PaymentPage({Key? key}) : super(key: key);

  @override
  _PaymentPageState createState() => _PaymentPageState();
}

class _PaymentPageState extends State<PaymentPage> {
  Razorpay? _razorpay;

  @override
  void initState() {
    super.initState();
    _razorpay = Razorpay();
    _razorpay?.on(Razorpay.EVENT_PAYMENT_SUCCESS, _handlePaymentSuccess);
    _razorpay?.on(Razorpay.EVENT_PAYMENT_ERROR, _handlePaymentError);
    _razorpay?.on(Razorpay.EVENT_EXTERNAL_WALLET, _handleExternalWallet);
  }

  @override
  void dispose() {
    super.dispose();
    _razorpay?.clear();
  }

  void openPaymentPortal() async {
    var options = {
      'key': 'rzp_test_YjOu38M2dxdNJ5',
      'amount': 20000,
      'name': 'jhon',
      'description': 'Payment',
      'prefill': {'contact': '9999999999', 'email': 'jhon@razorpay.com'},
      'external': {
        'wallets': ['paytm']
      }
    };

    try {
      _razorpay?.open(options);
    } catch (e) {
      debugPrint(e.toString());
    }
  }

  void _handlePaymentSuccess(PaymentSuccessResponse response) {
    Fluttertoast.showToast(
        msg: "SUCCESS PAYMENT: ${response.paymentId}", timeInSecForIosWeb: 4);
  }

  void _handlePaymentError(PaymentFailureResponse response) {
    Fluttertoast.showToast(
        msg: "ERROR HERE: ${response.code} - ${response.message}",
        timeInSecForIosWeb: 4);
  }

  void _handleExternalWallet(ExternalWalletResponse response) {
    Fluttertoast.showToast(
        msg: "EXTERNAL_WALLET IS : ${response.walletName}",
        timeInSecForIosWeb: 4);
  }

  @override
  Widget build(BuildContext context) {
    return Scaffold(
      appBar: AppBar(
        elevation: 0,
        backgroundColor: Colors.white,
        centerTitle: true,
        leading: IconButton(
          icon: Icon(Icons.arrow_back, color: Colors.blue.shade900),
          onPressed: () {
            Navigator.of(context).pop();
          },
        ),
        title: const Text('Payment',
            style: TextStyle(fontSize: 22.0, color: Color(0xFF545D68))),
      ),
      body: Column(children: [
        const SizedBox(height: 16.0),
        Center(
          child: Padding(
            padding: const EdgeInsets.all(8.0),
            child: Card(
              child: Column(
                children: <Widget>[
                  Text(
                    '\$1.88',
                    style: TextStyle(
                        fontSize: 22.0,
                        fontWeight: FontWeight.bold,
                        color: Colors.blue.shade900),
                  ),
                  const SizedBox(height: 10.0),
                  const Text(' Ice Cream',
                      style: TextStyle(color: Colors.grey, fontSize: 24.0)),
                ],
              ),
            ),
          ),
        ),
        const SizedBox(height: 18.0),
        InkWell(
            onTap: () {
              openPaymentPortal();
            },
            child: Padding(
              padding: const EdgeInsets.only(left: 18.0, right: 18),
              child: Container(
                  width: MediaQuery.of(context).size.width - 60.0,
                  height: 50.0,
                  decoration: BoxDecoration(
                      borderRadius: BorderRadius.circular(20.0),
                      color: Colors.blue.shade900),
                  child: Center(
                      child: Text('Pay',
                          style: TextStyle(
                              fontSize: 16.0,
                              fontWeight: FontWeight.w900,
                              color: Colors.blue.shade50)))),
            ))
      ]),
    );
  }
}
Conclusion
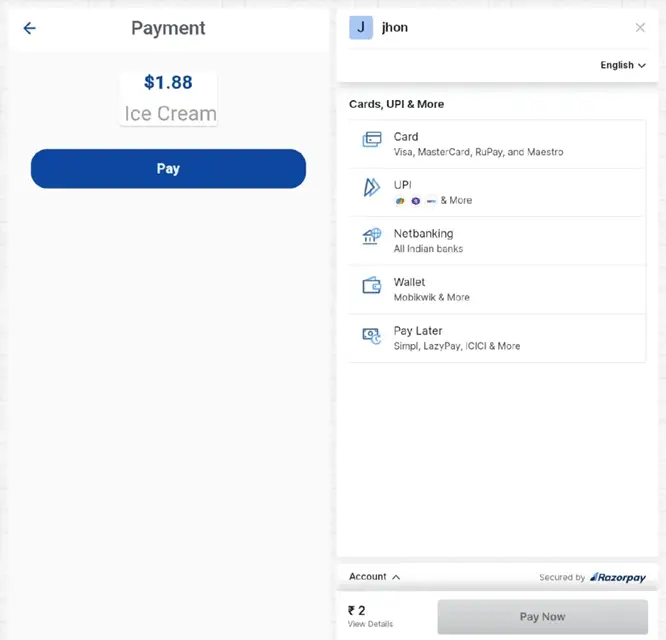
The above is a small flutter example that help you to integrate Razorpay payment. In this code, you will see how to add Razorpay to flutter app and how to acquire an order with online payment. The below image demonstrates how Razorpay Payment will function.
Thanks for spending time reading this content…..
The source code for this App , connected with Razorpay may be seen on GitHub please click here -> https://github.com/Mitali8620/razorpay_flutter.git
")


