
Hi Guys, Welcome to Proto Coders Point, In this Android Tutorial we will discuss What is Model View Controller (MVC) & Implement an Android Login Validation form using MVC Pattern.
What is MVC – Model View Controller?
An MVC Pattern – stands for MODEL VIEW CONTROLLER, It is a Software Design Pattern, usually used in developing user interfaces.
MVC Architecture pattern is a way how the information or data is been presented to the user & how the user interacts/deals with the data view.
An MVC framework is nearly utilized in all development processes like Web development and portable application like android MVC and IOS MVC.
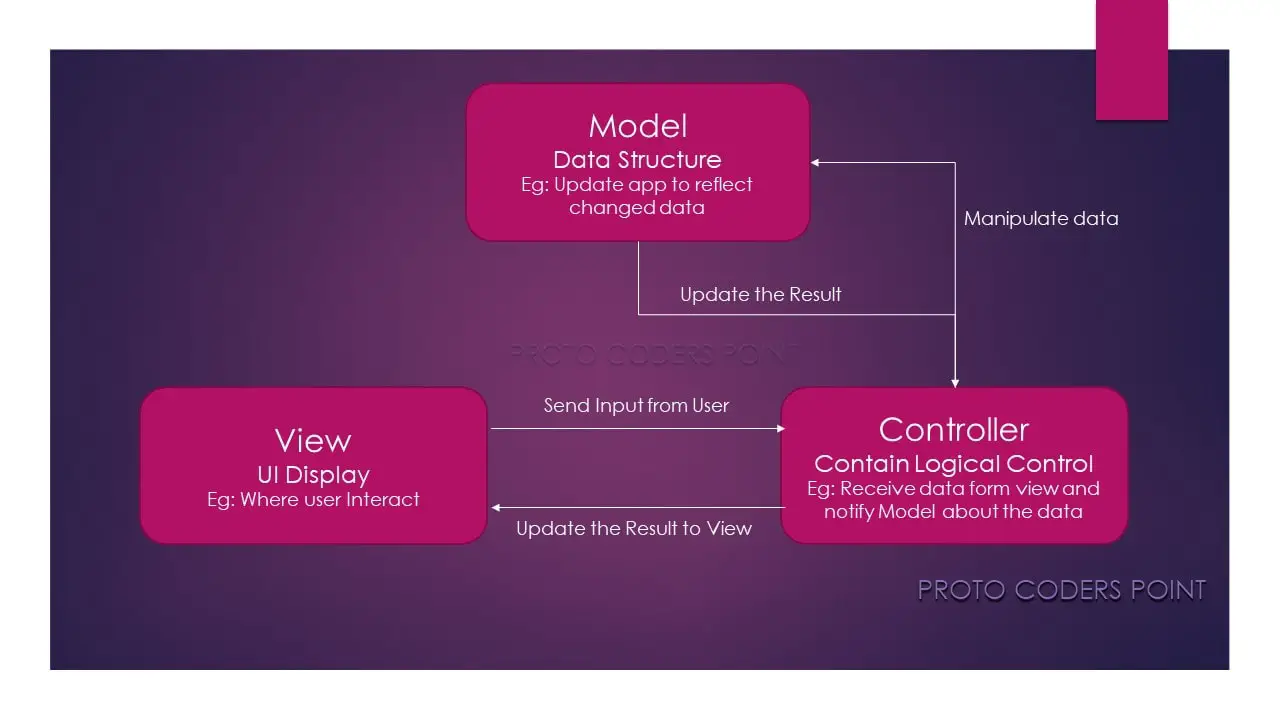
MVC Architecture Components
It has 3 Components i.e. MODEL-VIEW-CONTROLLER.
- MODEL
Here Model is nothing but a data, it directly manages the data, logic and rules of the application.
A Model is responsible for managing data of an app. - VIEW
A View in MVC is nothing but a UI design, How you can display the data to the USER screen.
A view means presentation of the data in a particular format. - CONTROLLER
A Controller is typically a piece, which control all the task/event that a user perform, Such as event handling, navigation, Communication between model & view happens in controller in MVC.
A Controller recieve the input, validate it, & pass the validated input to Model.
Video Tutorial on MVC
#MVCArchitecture
Recommended Video to Learn more about MVC
Android MVC Example Tutorial – Login Validation using MVC
So let’s build a simple Login Validation android app by making user of MVC Architecture Pattern android example.
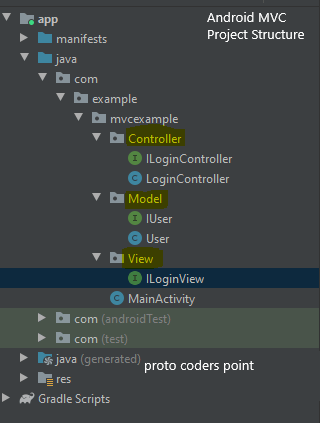
My Final Project Structure,
So then, Let’s Begin with MVC android example Code
Step 1: Create a new Android Project for MVC Example
Start your Android-Studio and create a new Project to build a simple Login Validation using MVC pattern.
File > New > New Project > Select Empty Activity > Next > Give a name to your project as MVC EXAMPLE > finish.
Step 2: Creating 3 MVC Components Package Folder in your project
So you know that we are here to work and learn about how to implement MVC in android,
We will create 3 package in our android project
- Model
- View
- Controller
Just Checkout above Project Structure we have 3 package, in each package we have 1 – 2 files ( java class or interface ).
How to Create Folder or Package in Android Studio project?
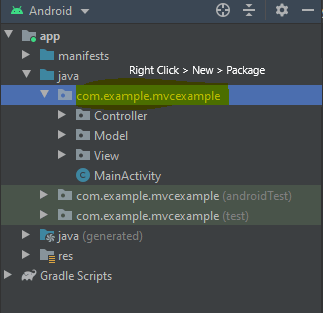
Right Click > New > Package
Here Create 3 Package by name Controller, Model, View as you can see in above image.
Step 3: Creating Interface and Classes and Coding it.
Then, you need to Create some java files in respective Package directory as follow
In Model Package create 2 files and add the code as below
IUser.java( Interface)
package com.example.mvcexample.Model;

public interface IUser {

    String getEmail();
    String getPassword();
    int isValid();
}
User.java (class)
package com.example.mvcexample.Model;

import android.text.TextUtils;
import android.util.Patterns;


public class User implements IUser{
    private  String email,password;

    public User(String email, String password) {
        this.email = email;
        this.password = password;
    }

    @Override
    public String getEmail() {
        return email;
    }

    @Override
    public String getPassword() {
        return password;
    }

    @Override
    public int isValid() {
        // 0. Check for Email Empty
        // 1. Check for Email Match pattern
        // 2. Check for Password > 6

        if(TextUtils.isEmpty(getEmail()))
            return  0;
        else if(!Patterns.EMAIL_ADDRESS.matcher(getEmail()).matches())
            return  1;
        else if(TextUtils.isEmpty(getPassword()))
            return 2;
        else if(getPassword().length()<=6)
           return 3;
        else
            return -1;

    }
}
In Controller Package Create 2 files and add the code as below
ILoginController(Interface)
package com.example.mvcexample.Controller;

public interface ILoginController {
    void OnLogin(String email,String Password);
}
LoginController(Class)
package com.example.mvcexample.Controller;

import com.example.mvcexample.Model.User;
import com.example.mvcexample.View.ILoginView;

public class LoginController implements ILoginController {

    ILoginView loginView;

    public LoginController(ILoginView loginView) {
        this.loginView = loginView;
    }

    @Override
    public void OnLogin(String email, String password) {
        User user = new User(email,password);
        int loginCode = user.isValid();
        if(loginCode == 0)
        {
            loginView.OnLoginError("Please enter Email");
        }else  if (loginCode == 1){
            loginView.OnLoginError("Please enter A valid Email");
        } else  if (loginCode == 2)
        {
            loginView.OnLoginError("Please enter Password");
        }else  if(loginCode == 3){
            loginView.OnLoginError("Please enter Password greater the 6 char");
        }
        else {
            loginView.OnLoginSuccess("login Successful");
        }
    }
}
In View Package Create 1 files and add the code as below
ILoginView (Interface)
package com.example.mvcexample.View;

public interface ILoginView {

    void OnLoginSuccess(String message);
    void OnLoginError(String message);
}
So we are done with MVC Architecture for Android, Then Now let’s Work on Simple UI Design.
MainActivity.xml
<?xml version="1.0" encoding="utf-8"?>
<LinearLayout xmlns:android="http://schemas.android.com/apk/res/android"
    xmlns:app="http://schemas.android.com/apk/res-auto"
    xmlns:tools="http://schemas.android.com/tools"
    android:layout_width="match_parent"
    android:layout_height="match_parent"
    tools:context=".MainActivity">

    <LinearLayout
        android:orientation="vertical"
        android:layout_width="match_parent"
        android:layout_height="match_parent"
        android:layout_gravity="center"
        android:gravity="center">
        <TextView
            android:layout_width="wrap_content"
            android:layout_height="wrap_content"
            android:text="Login Form"/>

        <EditText
            android:id="@+id/email"
            android:layout_width="match_parent"
            android:layout_height="wrap_content"
            android:layout_margin="20dp"
            android:hint="Email"/>

        <EditText
            android:id="@+id/password"
            android:layout_width="match_parent"
            android:layout_height="wrap_content"
            android:layout_margin="20dp"
            android:hint="Password"/>

        <Button
            android:layout_width="wrap_content"
            android:layout_height="wrap_content"
            android:text="Login"
            android:id="@+id/loginb"/>
    </LinearLayout>

</LinearLayout>
This XML design just had a 2 Edittext for Email & Password and a button for Login Event.
MainActivity.java
package com.example.mvcexample;

import androidx.appcompat.app.AppCompatActivity;

import android.os.Bundle;
import android.view.View;
import android.widget.Button;
import android.widget.EditText;
import android.widget.Toast;

import com.example.mvcexample.Controller.ILoginController;
import com.example.mvcexample.Controller.LoginController;
import com.example.mvcexample.View.ILoginView;

public class MainActivity extends AppCompatActivity  implements ILoginView {
    EditText email,password;
    Button loginb;
    ILoginController loginPresenter;

    @Override
    protected void onCreate(Bundle savedInstanceState) {
        super.onCreate(savedInstanceState);
        setContentView(R.layout.activity_main);

        email = (EditText) findViewById(R.id.email);
        password = (EditText)findViewById(R.id.password);

        loginb = (Button) findViewById(R.id.loginb);
        loginPresenter = new LoginController(this);

        loginb.setOnClickListener(new View.OnClickListener() {
            @Override
            public void onClick(View v) {
                loginPresenter.OnLogin(email.getText().toString().trim(),password.getText().toString().trim());
            }
        });
    }

    @Override
    public void OnLoginSuccess(String message) {
        Toast.makeText(this,message,Toast.LENGTH_SHORT).show();
    }

    @Override
    public void OnLoginError(String message) {
        Toast.makeText(this,message,Toast.LENGTH_SHORT).show();
    }
}
Here in above Code
We have Implemented a Interface ILoginView Which overrides 2 method OnLoginSuccess and OnLoginError, Both of this Simply show a Toast message.
Then
I have Created a Object with LoginController class that Helps us to send user inputed data on button press by using OnLogin method and then it check for Validation return the result if all the User entered field is success or error.
And depending on this result user will get a toast saying success login or some error message.
Conclusion
In this Android tutorial article we learnt what is MVC? & it’s MVC Architecture and we also implemented MVC pattern example in Android app in a form if login Validation.
Referral
Wikipedia MCV – Model View Controller
Recommended Post
Android
RecyclerView with EditText Example + Expense sum calculation
Jetpack Compose tutorial with State management Example
fetch data from database and store in CSV file format android
Flutter
Auto Create Model from JSON file | json model Dart Package
Flutter Dynamic theme change using getX | Dark & Light mode
Flutter Form Validation- Email validate, Password Confirm
Flutter BLoC Pattern Tutorial – Inc & Dec Example
")


 & Implement a Android MVC Example - Login Validation form using MVC Pattern.)